
Hollow Body Rocks
How to do Hollow Body Rocks?
The hollow body rocks is a dynamic progression of the hollow body hold, adding a gentle rocking motion to further challenge your core strength and stability. This exercise engages the entire core while improving coordination and body control. It’s commonly used in gymnastics and calisthenics training to develop strength for advanced movements like levers, handstands, and planches.
Steps to Perform a Proper Hollow Body Rocks:
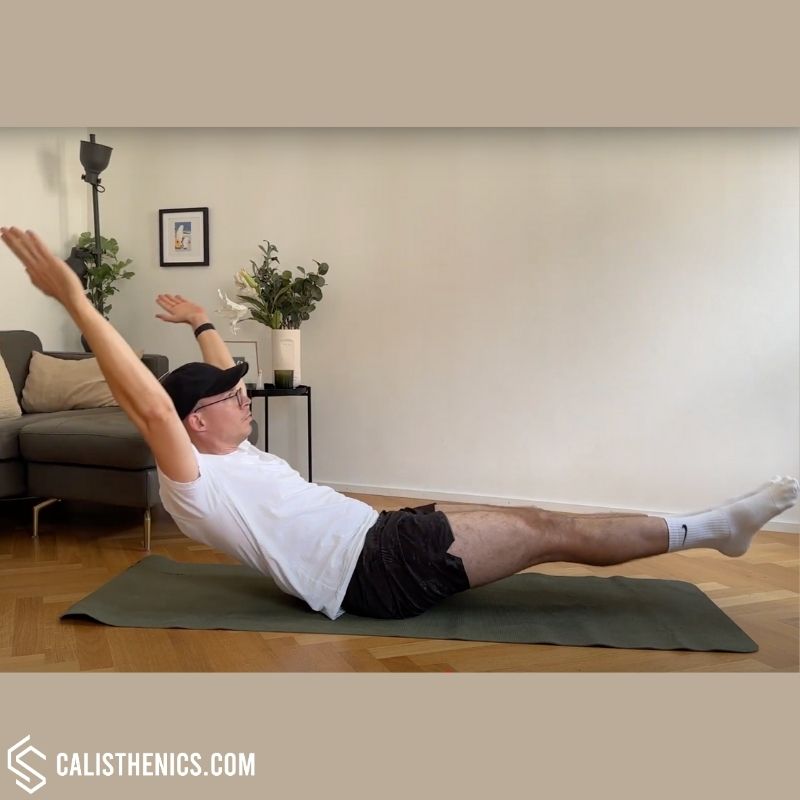
1. Start in a Hollow Body Hold Position:
• Lie on your back with your arms extended overhead and legs straight, keeping your lower back pressed firmly into the floor.
• Elevate your shoulders slightly off the ground, tighten your core, and lift your legs about 4-6 inches off the ground with toes pointed.
2. Initiate the Rocking Motion:
• Using your core, gently shift your weight toward your shoulders to lift your hips slightly off the ground.
• Reverse the motion by allowing your weight to shift toward your legs, lifting your upper back slightly off the ground.
3. Maintain a Smooth and Controlled Rhythm:
• Continue the rocking motion without breaking the hollow body position.
• Keep your core engaged and avoid jerky movements.
4. Focus on Full-Body Tension:
• Maintain tension in your core, glutes, and legs throughout the movement.
• Ensure your body remains in a “banana” shape, with no excessive arching or sagging.
5. Breathe Steadily:
• Maintain steady breathing while rocking, inhaling as you shift forward and exhaling as you rock back.
6. Repeat for the Desired Duration or Repetitions:
• Perform the exercise for a set number of rocks (e.g., 10-15) or a specified time (e.g., 20-30 seconds).
Benefits of the Hollow Body Rock
• Enhances Core Strength and Endurance: Builds strength in the rectus abdominis, transverse abdominis, and obliques, improving core stability.
• Improves Body Control and Coordination: Teaches smooth, controlled movement patterns, essential for gymnastics and calisthenics.
• Supports Progression to Advanced Movements: Develops the core strength required for skills like levers, planches, and handstands.
• Increases Core Stability: Strengthens the muscles needed to stabilize the spine, reducing the risk of injury during other exercises.
• Low Impact and Joint-Friendly: A safe and effective way to strengthen your core without high-impact stress on your joints.
• Minimal Equipment Needed: Can be performed anywhere without the need for specialized equipment.
Common Mistakes to Avoid
• Using Momentum: Avoid relying on swinging or jerking; the motion should come from controlled core engagement.
• Arching the Lower Back: Keep your lower back pressed firmly into the floor to prevent strain and ensure proper form.
• Breaking the Hollow Body Shape: Maintain a consistent “banana” shape throughout the movement to maximize effectiveness.
• Neglecting Full-Body Tension: Engage your glutes, quads, and shoulders to create a solid, unified position.
• Holding Your Breath: Breathe steadily to stay relaxed and maintain endurance during the exercise.
Tips for the proper execution of Hollow Body Rocks
Engage Your Core Fully: Ensure your abs remain tight to maintain proper form and control throughout the movement.
Avoid Using Momentum: The rocking motion should come from controlled engagement of your core, not from swinging your arms or legs.
Press Your Lower Back Into the Floor: Keep your lower back in contact with the ground to prevent strain and maximize core engagement.
Start Slow: If you’re new to the exercise, perform small, controlled rocks and gradually increase the range of motion.
Breathe Steadily: Don’t hold your breath; steady breathing helps maintain tension and focus.
Muscles worked when doing Hollow Body Rocks
Primary Muscles:
•Rectus Abdominis: The primary muscle targeted, responsible for core stability and control during the rocking motion.
•Transverse Abdominis: Engages to support the spine and maintain tension throughout the movement.
Secondary Muscles:
•Obliques: Assist in stabilizing the torso and preventing rotation.
•Hip Flexors: Help keep the legs lifted and straight.
•Lower Back (Erector Spinae): Stabilizes the spine and supports the rocking motion.
•Shoulders (Deltoids): Stabilize the arms in the extended overhead position.
•Glutes and Quads: Engage to maintain tension in the lower body and assist with movement.
Primary Muscle(s):

Abdominal
Secondary Muscle(s):
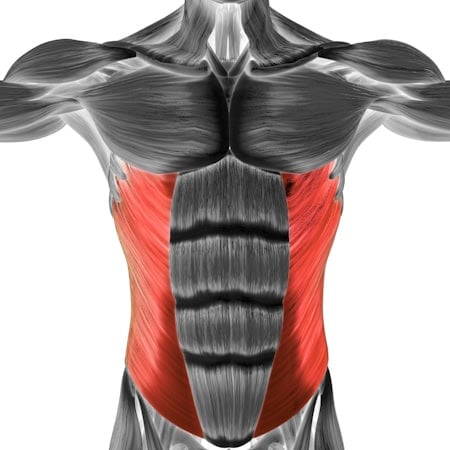
Oblique
Equipment needed for Hollow Body Rocks
No equipment needed for this exercise.
Adjust the difficulty of Hollow Body Rocks
How to make Hollow Body Rocks harder?
How to make Hollow Body Rocks easier?
How to make Hollow Body Rocks harder?
To make Hollow Body Rocks harder:
-
Increase the Rocking Range: Amplify the rocking motion by shifting your weight further toward your shoulders and legs, requiring greater core engagement.
-
Add a Weight Overhead: Hold a light dumbbell, medicine ball, or weighted plate in your hands to increase resistance.
-
Wear Ankle Weights: Use ankle weights to add resistance to your legs, making the exercise more challenging.
-
Increase Repetitions or Duration: Perform more rocks in each set or extend the duration of the exercise to build endurance.
-
Combine With Other Exercises: Transition between hollow body rocks and other core exercises, such as V-ups or tuck-ups, to create a compound movement sequence.
How to make Hollow Body Rocks easier?
To make Hollow Body Rocks easier:
-
Bend Your Knees: Keep your knees bent and your feet closer to your body to reduce the leverage and make the exercise more manageable.
-
Shorten the Rocking Range: Perform smaller rocks with a limited range of motion to focus on maintaining control.
-
Keep Arms by Your Sides: Place your arms by your sides or extend them slightly forward instead of overhead to reduce the intensity.
-
Start with the Hollow Body Hold: Master the static hold first to build the strength and stability required for rocking.
-
Use a Mat for Comfort: Perform the exercise on a padded surface to reduce discomfort on your lower back.