
Inch worm to push-up
How to do Inch worm to push-up?
The inch worm to push-up is a dynamic full-body exercise that combines flexibility, core stability, and upper-body strength. The movement begins with a standing position, transitions into a walkout to a high plank, includes a push-up, and then returns to standing. This exercise strengthens the chest, shoulders, arms, and core while improving hamstring flexibility and shoulder mobility.
Steps to Perform a Proper Inch Worm to Push-Up:
1. Start in a Standing Position:
• Stand tall with your feet hip-width apart.
• Engage your core, roll your shoulders back, and keep your arms relaxed at your sides.
2. Hinge at Your Hips to Reach the Ground:
• Bend forward at your hips, keeping your legs as straight as possible.
• Place your hands on the ground in front of your feet. Bend your knees slightly if needed to reach the floor.
3. Walk Your Hands Forward:
• Begin walking your hands forward along the floor, keeping your core engaged.
• Stop when your body forms a straight line from your head to your heels in a high plank position.
4. Perform a Push-Up:
• Lower your chest to the ground by bending your elbows, keeping them close to your sides.
• Press through your palms to return to the high plank position. Modify to knee push-ups if needed.
5. Walk Your Hands Back:
• Walk your hands back toward your feet while keeping your legs as straight as possible.
• Engage your hamstrings and core to control the movement.
6. Return to Standing:
• Slowly roll your spine upward to return to a standing position, finishing with your shoulders back and chest lifted.
7. Repeat the Movement:
• Perform the desired number of repetitions, focusing on controlled and fluid motions.
Benefits of the Inch Worm to Push-Up
• Full-Body Activation: Engages multiple muscle groups, including the chest, shoulders, core, and legs, for a complete workout.
• Improves Flexibility and Mobility: Stretches the hamstrings, calves, and lower back while improving shoulder mobility.
• Builds Core Stability: Challenges the core during the plank and transitions, enhancing overall stability.
• Enhances Upper Body Strength: Strengthens the chest, shoulders, and triceps during the push-up phase.
• Promotes Functional Movement: Combines strength, flexibility, and coordination, improving movement patterns for daily activities.
• Low Impact and Accessible: Requires no equipment, making it suitable for home workouts or any fitness level.
Common Mistakes to Avoid
• Sagging Hips in the Plank: Keep your hips in line with your shoulders and feet to avoid unnecessary strain on your lower back.
• Rushing the Movement: Perform the exercise slowly and with control to maximize effectiveness and reduce the risk of injury.
• Incomplete Push-Up Range: Lower your chest fully to the ground during the push-up to ensure proper engagement of the chest and triceps.
• Neglecting Core Engagement: Focus on engaging your core throughout to stabilize your body and prevent arching or collapsing.
• Overly Bent Knees: Keep your legs as straight as possible during the transitions to fully engage your hamstrings and improve flexibility.
Tips for the proper execution of Inch worm to push-up
Engage Your Core: Keep your core tight throughout the movement to stabilize your spine and prevent sagging in the plank or push-up.
Focus on Full Range of Motion: Lower your chest all the way to the ground during the push-up for maximum muscle engagement.
Move Slowly and Controlled: Avoid rushing through the movement; focus on smooth transitions between each phase.
Breathe Steadily: Inhale as you lower into the push-up, and exhale as you press back up and return to standing.
Modify as Needed: Use knee push-ups or bend your knees when reaching for the floor if necessary.
Muscles worked when doing Inch worm to push-up
Primary Muscles:
•Chest (Pectorals): Engaged during the push-up to press the body upward.
•Shoulders (Deltoids): Work to stabilize and assist during the push-up and plank.
•Triceps: Activate during the push-up to straighten the elbows.
Secondary Muscles:
•Core: The rectus abdominis and obliques stabilize the torso during the plank and transitions.
•Hamstrings and Calves: Engage during the walkout and return to standing.
•Lower Back (Erector Spinae): Supports spinal alignment during the plank and transitions.
Primary Muscle(s):

Abdominal
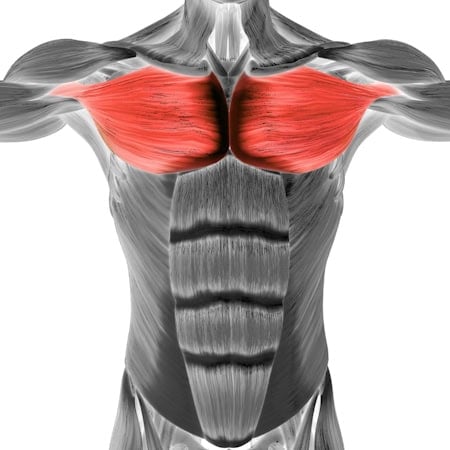
Middle chest
Secondary Muscle(s):
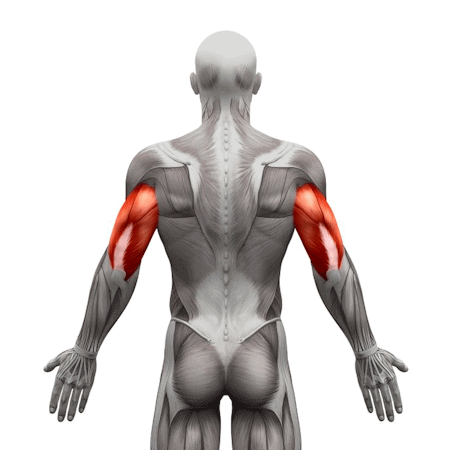
Triceps
Equipment needed for Inch worm to push-up
No equipment needed for this exercise.
Adjust the difficulty of Inch worm to push-up
How to make Inch worm to push-up harder?
How to make Inch worm to push-up easier?
How to make Inch worm to push-up harder?
To make Inch worm to push-up harder:
-
Perform Explosive Push-Ups: Add an explosive element to the push-up, such as clapping or lifting one hand off the ground at the top.
-
Add a Shoulder Tap in the Plank: After the push-up, tap each shoulder alternately while holding the plank position.
-
Walk Beyond the Plank: Extend the walkout slightly forward of the plank position to increase the demand on your core and shoulders.
How to make Inch worm to push-up easier?
To make Inch worm to push-up easier:
-
Bend Your Knees During the Walkout: Allow a slight bend in your knees when reaching for the floor to reduce strain on your hamstrings.
-
Skip the Push-Up: Focus on the walkout and plank, skipping the push-up entirely, to build strength and confidence in the movement.
-
Shorten the Walkout: Stop the hand walkout slightly before reaching the full plank to reduce the challenge on your core and shoulders.
-
Perform Knee Push-Ups: Drop your knees to the ground during the push-up to reduce the intensity on your upper body.