
Freestanding Handstand Practice
How to do Freestanding Handstand Practice?
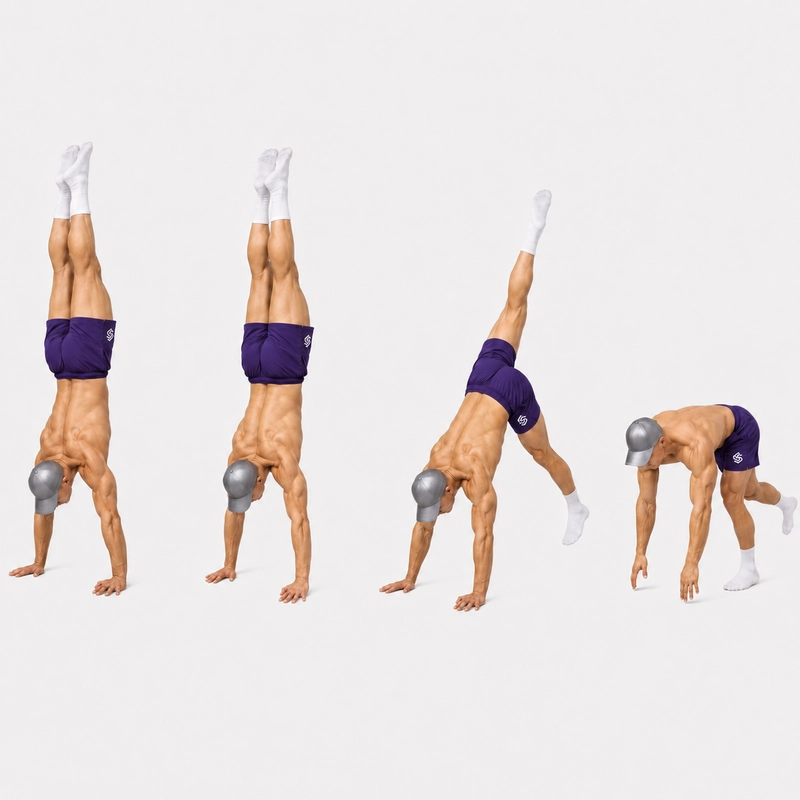
Freestanding Handstand Practice is a skill drill in which you kick up into an unsupported handstand, find your balance and return to the floor under control. The objective is not simply to stay upside down for as long as possible. Each attempt should improve the accuracy of your entry, your ability to make small balance corrections and the control of your exit.
Unlike a wall-supported handstand, the freestanding variation requires you to control your center of mass through continuous pressure changes in your palms and fingers. A successful attempt begins with a measured kick rather than a jump, reaches a stable position with straight arms and finishes with a deliberate step or cartwheel exit.
Before practicing, prepare your hands and forearms with the Wrist Warm-Up Routine. You should also be comfortable supporting your bodyweight upside down against a wall. The Wall Walk develops overhead confidence and shoulder endurance, while the Hollow Body Hold teaches the trunk position needed to limit excessive arching.
Practice in an open area with enough space to step or cartwheel out safely. Learn your bailout before trying to extend your hold time.
Tips for the proper execution of Freestanding Handstand Practice
Use only enough kick-up force to bring your hips over your shoulders.
Plant your hands shoulder-width apart and spread your fingers widely.
Lock your elbows before your feet leave the ground.
Push tall through your shoulders instead of sinking between your arms.
Look at the floor between or slightly ahead of your hands.
Press through your fingertips when your feet begin moving too far over your head.
Brace your abdominals and lightly squeeze your glutes to limit excessive back arching.
Bring your legs together only after the kick-up is under control.
Use small corrections through your hands rather than large movements from your legs.
Practice the cartwheel bailout to both sides before attempting longer holds.
Finish each attempt with a controlled step-down or cartwheel exit.
Prioritize accurate entries and controlled exits before increasing hold time.
Muscles worked when doing Freestanding Handstand Practice
The freestanding handstand is primarily a balance and straight-arm support skill. The shoulders, upper back and triceps support the body overhead, while the forearms and hand muscles make continuous pressure adjustments. The core, glutes and legs maintain the body’s position over this relatively small base of support.
Primary Muscles
- Anterior and lateral deltoids: Support the body in the overhead position and help keep the shoulders stable above the hands.
- Trapezius and serratus anterior: Maintain active shoulder elevation and keep the upper body pushed away from the floor.
- Triceps: Hold the elbows in full extension throughout the handstand.
Secondary Muscles
- Forearms and finger flexors: Adjust pressure through the palms and fingertips to prevent overbalancing or falling back toward the feet.
- Abdominals and obliques: Stabilize the trunk and help keep the ribs and pelvis aligned.
- Spinal stabilizers: Maintain the torso’s position during the entry, hold and exit.
- Glutes: Help control the pelvis and maintain a straighter body line.
- Quadriceps: Keep the knees extended once the legs come together.
- Inner thighs: Keep the legs connected and reduce unnecessary movement during the hold.
If shoulder endurance limits your practice, the Pike Push-Up can develop vertical pushing strength. If body alignment breaks down first, continue working on the Hollow Body Hold alongside your wall-supported handstand practice.
Primary Muscle(s):

Anterior delt
Secondary Muscle(s):

Triceps

Abdominal
Equipment needed for Freestanding Handstand Practice
No equipment needed for this exercise.
Adjust the difficulty of Freestanding Handstand Practice
How to make Freestanding Handstand Practice harder?
How to make Freestanding Handstand Practice easier?
How to make Freestanding Handstand Practice harder?
To make Freestanding Handstand Practice harder:
-
Longer Freestanding Handstand: Gradually extend the hold without losing locked elbows, elevated shoulders or controlled breathing.
-
Precision Kick-Ups: Aim to reach the balance point with minimal leg movement or corrective steps.
-
Leg Position Changes: Move between straight, straddle, tuck and split-leg positions without losing balance.
-
Handstand Weight Shifts: Transfer slightly more weight from one hand to the other while maintaining the vertical position.
-
Freestanding Handstand Shoulder Taps: Briefly lift one hand to touch the opposite shoulder.
-
Handstand Walk: Take controlled steps on the hands while maintaining overhead alignment.
-
Press to Handstand: Enter the handstand through controlled strength instead of using a kick-up.
-
Freestanding Handstand Push-Up: Perform a controlled vertical push-up without wall support.
How to make Freestanding Handstand Practice easier?
To make Freestanding Handstand Practice easier:
-
Partial Handstand Kick-Up: Kick only as high as you can while still returning the same leg softly to the floor.
-
Kick-Up to a Wall: Place a wall behind you and use a gentle kick so the heels touch it without crashing.
-
Back-to-Wall Handstand: Use the wall to support the heels while developing overhead endurance and alignment.
-
Chest-to-Wall Handstand: Face the wall and hold a straighter stacked position without needing to control the kick-up.
-
Wall Heel Pulls: Begin with your back to the wall, move the heels slightly away and balance briefly before returning them to the wall.
-
Split-Leg Handstand: Keep the legs separated after kicking up to make the entry and return easier to control.
-
Spotter-Assisted Handstand: Ask a competent spotter to guide the hips or legs while you find the balance point.
-
Wall Walk: Walk the feet up a wall to build confidence and straight-arm overhead support before practicing kick-ups.
