
Chest-to-Wall Handstand Weight Shifts
How to do Chest-to-Wall Handstand Weight Shifts?
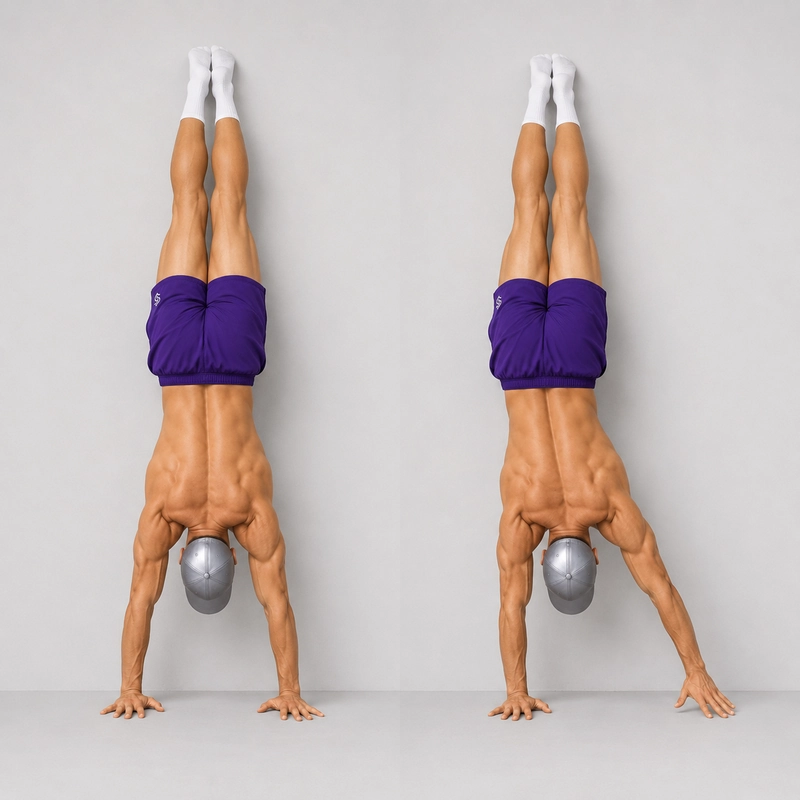
Chest-to-Wall Handstand Weight Shifts, also called Wall-Facing Handstand Weight Shifts, are a handstand balance drill performed with your chest facing a wall. From a stable wall-supported handstand, you deliberately transfer more bodyweight onto one hand and then the other while keeping both palms fully grounded.
This page covers the lateral, side-to-side version of the exercise. It is not a forward-and-back hand-pressure drill, and it is not a handstand shoulder tap: the defining standard is that neither hand intentionally leaves the floor.
Handstand Weight Shifts bridge the gap between a static Chest-to-Wall Handstand and drills that require brief single-arm support. They teach you to make one hand lighter without bending the supporting elbow, losing shoulder elevation, twisting your hips, or pushing heavily into the wall.
What Do Chest-to-Wall Handstand Weight Shifts Train?
The exercise develops lateral weight-transfer control, overhead shoulder stability, straight-arm support strength, hand-pressure awareness, and the ability to maintain body alignment while the load changes from side to side.
The fingers and wrists continue controlling your forward-and-back balance while the shoulders and trunk manage the deliberate lateral shift. A systematic review of handstand biomechanics found that handstand balance relies predominantly on a wrist strategy, with shoulder and hip adjustments also contributing when required.
The wall reduces the balance demand enough for you to practise this transfer repeatedly, making the drill useful preparation for wall-facing shoulder taps, Freestanding Handstand Practice, and eventually the Handstand Walk.
Prerequisites
Before practising weight shifts, you should be able to enter and exit a wall-facing handstand under control and hold the position for approximately 20 to 30 seconds without wrist, elbow, shoulder, or neck pain.
Build confidence with the Wall Walk and Chest-to-Wall Handstand first if you cannot yet maintain straight elbows, elevated shoulders, and steady breathing near the wall.
Setup
- Choose a clear wall and a firm, non-slip floor with enough open space to descend safely.
- Prepare your hands, wrists, elbows, and shoulders with a gradual warm-up such as the Wrist Warm-Up Routine.
- Use a controlled Wall Walk to enter a handstand with your chest facing the wall.
- Place your hands approximately shoulder-width apart and as close to the wall as your mobility and exit control safely allow.
- Spread your fingers, press the fingertips and palms into the floor, and point the fingers generally forward in a comfortable position.
- Straighten your elbows and push the floor away so your shoulders remain elevated beside your ears.
- Keep your ribs controlled, pelvis stacked, legs together, and toes in light contact with the wall.
- Look at the floor between your hands without lifting your head toward the wall.
How to Do Chest-to-Wall Handstand Weight Shifts
- Begin in the centered handstand position with pressure distributed as evenly as possible between both hands.
- Without bending your elbows, move your shoulders, ribcage, pelvis, and legs slightly toward your right hand as one connected unit.
- Press firmly through the right palm and fingertips while allowing the left palm to become progressively lighter.
- Stop the shift before the left palm peels away from the floor or your hips rotate toward the wall.
- Hold the loaded position for approximately one second while keeping the right shoulder elevated and the right elbow straight.
- Move back to the centered position and briefly restore equal pressure through both hands.
- Repeat the same controlled transfer toward your left hand.
- Continue alternating sides without bouncing, rushing, or using your feet to push away from the wall.
- Count one right shift and one left shift as one complete repetition.
- Finish the set before your alignment deteriorates, then reverse the Wall Walk to return safely to the floor.
Completion Standard
A repetition is complete when you transfer your weight toward each hand, briefly lighten the opposite palm, and return through a controlled centered position.
- Your chest remains facing the wall throughout the set.
- Both palms remain fully in contact with the floor.
- Your elbows remain straight and the loaded shoulder stays actively elevated.
- Your body shifts as a unit without excessive arching, piking, twisting, or side-bending.
- Your toes maintain light wall contact without driving forcefully into the wall.
- Your left and right shifts use a similar range, speed, and pause.
Handstand Weight Shifts vs. Shoulder Taps
During a Handstand Weight Shift, the unloaded palm becomes lighter but remains on the floor. During a handstand shoulder tap, the hand leaves the floor and the supporting arm temporarily accepts nearly the entire load.
If your hand lifts accidentally, reduce the range and regain control rather than counting the movement as a shoulder tap. Once you can perform equal weight shifts with excellent alignment, intentionally lifting the unloaded hand can become a separate progression.
Common Mistakes
- Lifting the hand: End each shift while the opposite palm is still touching the floor so the exercise remains a weight-shift drill.
- Collapsing into the shoulder: Continue pushing the floor away through the loaded arm instead of allowing the shoulder to sink toward your ear.
- Bending the supporting elbow: Reduce the range until you can accept the increased load with a straight arm.
- Side-bending at the waist: Translate your shoulders, torso, pelvis, and legs together rather than moving only your hips.
- Twisting toward the wall: Keep your ribs and hip bones facing the wall while both legs remain controlled.
- Pushing through the feet: Use the wall for light balance assistance rather than driving your toes into it to create the shift.
- Moving too far or too quickly: Make each transfer small enough to pause without losing your handstand line.
- Skipping the center position: Re-establish even hand pressure before beginning the next shift.
Breathing
Breathe continuously instead of holding your breath for the entire set. A practical rhythm is to inhale in the centered position and exhale gently during the shift and pause while maintaining abdominal tension.
Sets, Repetitions, and Programming
Perform Handstand Weight Shifts early in your workout after warming up but before your shoulders and wrists become fatigued. Begin with 3 to 4 sets of 3 to 5 complete left-right repetitions, resting for 45 to 90 seconds between sets.
Use a slow transfer and pause for approximately one second over each hand. End the set when you can no longer keep both elbows straight, both shoulders elevated, or your left and right shifts equally controlled.
A useful progression target is five controlled repetitions with light wall contact, an obvious reduction of pressure through the unloaded hand, and no visible twisting or collapsing. Increase the amount of weight transferred before adding repetitions or attempting to lift a hand.
Where It Fits in the Handstand Progression
A practical progression is Wall Walk, Chest-to-Wall Handstand, Chest-to-Wall Handstand Weight Shifts, wall-facing shoulder taps, Freestanding Handstand Practice, and then Handstand Walk practice.
You can also return to smaller weight shifts whenever your freestanding handstand develops an uneven side, a bent supporting arm, or uncontrolled lateral movement.
Safety
Use a stable wall, keep the surrounding area clear, and practise only when you can exit the chest-to-wall position confidently. The wall assists your balance but does not protect you from every possible fall.
Stop if you experience sharp wrist, elbow, shoulder, or neck pain, numbness, dizziness, visual disturbance, or loss of straight-arm support. Anyone who has been advised to avoid inversions because of an eye, cardiovascular, neurological, or other medical condition should follow guidance from an appropriate healthcare professional.
Tips for the proper execution of Chest-to-Wall Handstand Weight Shifts
Warm up your wrists and shoulders gradually before every set.
Place your hands approximately shoulder-width apart and spread your fingers across the floor.
Look between your hands without lifting your head toward the wall.
Push the floor away continuously to keep both shoulders elevated.
Keep both palms fully grounded throughout the canonical exercise.
Shift your shoulders, ribcage, pelvis, and legs as one connected unit.
Move only far enough for the opposite hand to feel noticeably lighter.
Keep your toes in gentle wall contact instead of pressing forcefully through them.
Return to an evenly loaded center position before changing sides.
Match the range, speed, and pause on your left and right sides.
Count one shift in each direction as one complete repetition.
End the set while you still have enough control to reverse the Wall Walk safely.
Muscles worked when doing Chest-to-Wall Handstand Weight Shifts
Primary muscles: The anterior deltoids support the body overhead, while the trapezius and serratus anterior help keep the shoulder blades elevated and upwardly rotated.
Secondary muscles: The triceps maintain straight elbows, the forearm and hand muscles regulate pressure against the floor, and the abdominals, obliques, spinal stabilizers, glutes, and quadriceps maintain the handstand line.
As you shift laterally, the shoulder, arm, hand, and trunk on the loaded side accept more force while the opposite palm remains in contact with the floor.
Primary Muscle(s):

Anterior delt

Trapezius
Secondary Muscle(s):

Triceps
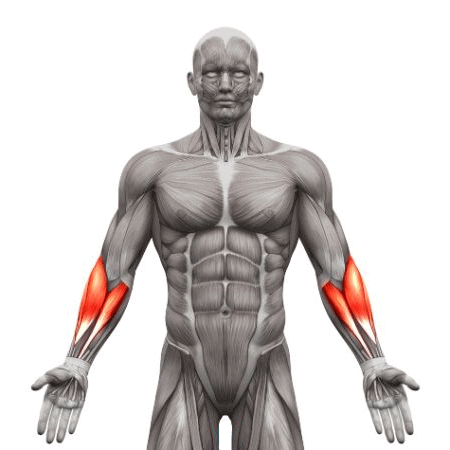
Forearm

Abdominal

Oblique
Equipment needed for Chest-to-Wall Handstand Weight Shifts
No equipment needed for this exercise.
Adjust the difficulty of Chest-to-Wall Handstand Weight Shifts
How to make Chest-to-Wall Handstand Weight Shifts harder?
How to make Chest-to-Wall Handstand Weight Shifts easier?
How to make Chest-to-Wall Handstand Weight Shifts harder?
To make Chest-to-Wall Handstand Weight Shifts harder:
-
Shift farther until the opposite palm feels almost weightless while remaining fully grounded.
-
Hold the loaded position for two to three seconds before returning to the center.
-
Reduce your toe pressure until your feet only brush the wall for balance.
-
Take three seconds to transfer your weight in each direction.
-
Lift the heel of the unloaded palm while keeping its fingertips on the floor.
-
Briefly float the unloaded hand to progress into a wall-facing handstand shoulder tap.
-
Perform the weight shifts while holding a freestanding handstand near the wall.
-
Progress from controlled shoulder taps to individual handstand steps and Handstand Walk practice.
How to make Chest-to-Wall Handstand Weight Shifts easier?
To make Chest-to-Wall Handstand Weight Shifts easier:
-
Practise a 20-to-30-second Chest-to-Wall Handstand before introducing lateral movement.
-
Perform pike weight shifts with your feet supported on a box instead of entering a full handstand.
-
Use very small shifts that only slightly change the pressure beneath your hands.
-
Maintain slightly more toe pressure against the wall while learning the movement.
-
Perform one shift in each direction before exiting and resting.
-
Remove the pause from each side until you can control the transfer smoothly.
-
Use fewer repetitions and take longer rests between sets.
-
Ask a qualified coach to spot the drill while you learn the direction of the weight transfer.
