
Back-to-Wall Handstand Heel Pulls
How to do Back-to-Wall Handstand Heel Pulls?
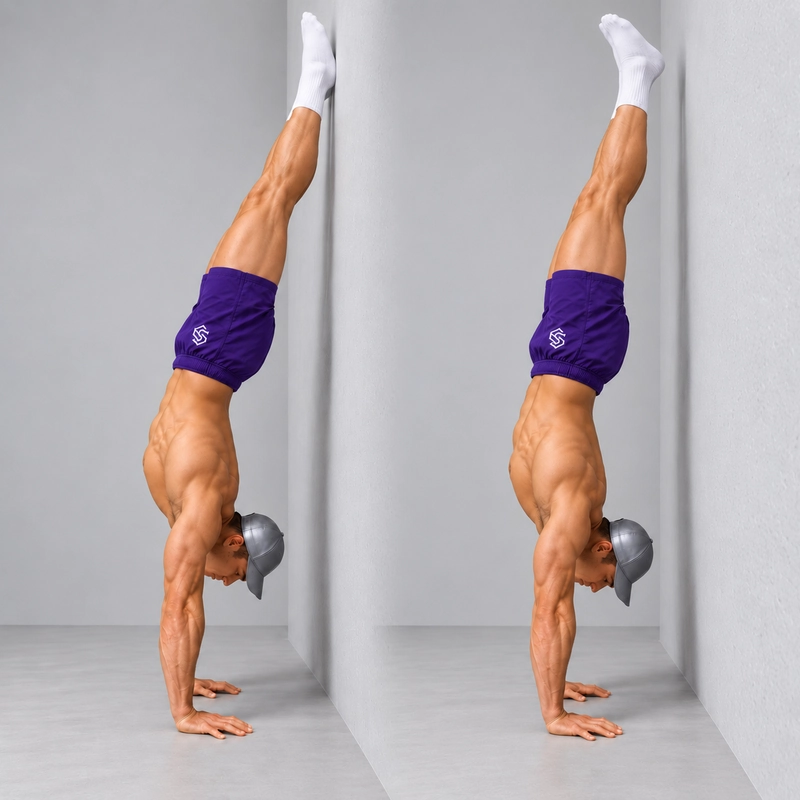
Back-to-Wall Handstand Heel Pulls are a handstand balance drill performed with your back facing a wall and your heels touching it lightly. Press through the fingers to bring the heels away, find a brief unsupported balance, then return softly. Both hands stay planted, the elbows remain straight and the legs are straight together during the free phase.
The drill builds on the back-to-wall handstand. Holding the wall position develops support, but heel pulls ask you to regulate balance after the wall contact disappears. The movement comes from a controlled hand-pressure response, not a kick off the wall or a knee bend.
Handstand Factory's The Hand that Balances explains heel-pull corrections as practice for controlling overbalance through the hands and forearms. Its progression distinguishes releases that end in a step-down from those that return to the wall. This page's main version uses a release, brief balance and gentle heel-return cycle.
Heel Pulls Versus Toe Pulls and Weight Shifts
In the usual back-to-wall setup, the fingers point generally toward the wall. Heel contact places you toward the fingertip side of your balance range. Increased finger pressure helps move the body away from that side and toward balance.
This is an overbalance correction. The fingers press against the floor to create a corrective action; they are not pulling on the wall. Maintaining a connected body shape helps that action influence the whole handstand rather than only changing the feet.
Chest-to-wall toe pulls begin from the opposite orientation, with toe contact instead of heel contact. They address the heel-of-palm side of balance and may require a small shoulder adjustment and restacking. Do not reverse the wall orientation while keeping the exact same release cue. The chest-to-wall handstand explains that starting position.
Chest-to-wall handstand weight shifts train lateral load transfer. Heel pulls work forward/back balance while retaining two-hand support. A shoulder tap or hand lift is a different task.
A freestanding handstand is the sustained unsupported hold. Heel pulls let you revisit free balance from a supported reset instead of repeating a kick-up for every attempt.
Readiness and a Practised Exit
Be comfortable in a back-to-wall handstand with straight arms, active shoulders and a deliberate feet-to-floor exit. You also need to know how to come down if the release carries you away from the wall. A long supported hold does not prove that you can control that transition.
If overhead support is the limiting factor, use a pike hold on a plyo box or other appropriate supported preparation before full inversion. The wall walk can develop wall-facing support and descent, but it does not replace learning the back-to-wall entry and exit used here.
Practise controlled step-downs and an appropriate cartwheel-style bailout progressively, with coaching or a competent spotter when needed. Handstand Factory's bailout resource describes graded exit training; its full free session requires email registration.
The wall only assists on one side. It does not catch every possible fall or prevent the arms from collapsing. Leave open space for the actual exit and end attempts before you exhaust your support.
Choose the Wall, Floor and Hand Distance
Use a solid wall without windows, shelves or projections in the contact area. Choose a firm, level, non-slip floor and keep the hands dry. Avoid a loose rug or soft hand-support surface that moves under load.
Prepare the wrists, elbows and shoulders with the joint warm-up routine, then add easy palm loading and supported overhead practice before the working set.
Set the hands approximately shoulder-width apart with fingers spread, pointing generally toward the wall or slightly outward according to comfort. Keep the palm and fingers available for support; do not balance on lifted palm heels or fingertips alone.
Choose a distance that lets you organize a near-vertical position with light heel contact and enough space for your controlled entry. There is no compulsory measurement in centimetres or inches. Too far away can encourage a large arch and heavy heel pressure; excessively close placement can make the entry awkward.
Adjust the distance between attempts, then keep the hands fixed during each set. Moving the hands as the heels release changes the drill. A floor mark can help you repeat a setup that works for your body.
Enter and Settle Before the First Pull
Use a split-leg kick-up you already control, with only enough force for the leading heel to meet the wall gently. Bring the second leg into position, then settle. The kick-up is preparation, not a heel-pull repetition.
Push tall through the shoulders and straighten the elbows. Keep the head in a comfortable position with the eyes on a consistent point between or slightly ahead of the hands. Do not look up toward the feet to manufacture a straighter line.
Organize the ribs, pelvis and legs so the body stays connected. Limit excessive lower-back arching, but do not force an exaggerated hollow shape. Only the heels should provide light wall contact; the buttocks, back and head remain clear.
If the heels are pressing heavily, reduce that dependence before attempting the release. Trying to compensate with a forceful finger squeeze can turn a poorly organized starting position into a sudden step-down.
How to Do Back-to-Wall Handstand Heel Pulls
- Establish the supported start. Settle with light heel contact, planted palms, straight elbows and elevated shoulders.
- Increase finger pressure gradually. Press the fingers into the floor while preserving the connected body shape. Keep the palms down and the arms straight.
- Let both heels leave. Use only enough correction to remove wall support. Do not push through the feet, bend the knees or pull the legs into a pike.
- Regulate pressure after release. Ease the initial corrective squeeze as you approach balance, while retaining active hand contact. Do not keep increasing pressure automatically.
- Balance briefly. Keep the legs straight and together with both feet clear. Use small, responsive corrections rather than a large shoulder or leg swing.
- Return softly. Allow a small controlled drift back toward the wall, reducing excessive finger pressure without switching the hands off. Check the motion so the heels touch gently.
- Reset fully. Restore light contact and a quiet body position before another pull. One controlled release-and-return cycle is one repetition.
- Exit deliberately. After the final attempt, use the practised step-down or other appropriate exit while the arms still support you securely.
The goal is a quiet correction, not the largest heel-to-wall gap. If the release immediately takes you down to the feet, you may have applied more pressure than the balance phase needed. Use that as feedback and make the next attempt smaller.
Keep the Fingers Responsive After the Heels Float
The pressure that initiates a release is not necessarily the pressure needed to sustain the hover. Once the body is closer to balance, continuing the same strong squeeze can send the legs farther away from the wall and toward a step-down.
If you drift toward the wall, more finger pressure can check the overbalance. If you drift away toward the heel-of-palm side, gripping harder is not a universal recovery cue. Ease excessive pressure, reorganize the position if controllable and step down when needed.
Keep the fingers touching the floor throughout. Easing pressure is not the same as lifting the fingers or losing palm support. Small shoulder or hip adjustments may contribute; the exercise does not require a perfectly motionless geometric line.
Continue breathing. Choose a brief manageable hover rather than a maximal effort that sacrifices arm support or exit control.
What Counts as a Complete Repetition?
- Begin and finish with quiet, light heel contact in the back-to-wall orientation.
- Both heels clearly leave the wall without a foot push or replacement support through the torso.
- Establish recognizable unsupported balance instead of bouncing through vertical.
- Keep both hands in place, elbows straight and shoulders actively supporting.
- Maintain straight legs together during the free phase, without a large pike, arch or leg swing.
- Return the heels gently rather than crashing against the wall.
A heel release followed by a controlled step-down remains useful practice. Record it as a release-to-step-down attempt, not a completed wall-return cycle. A planned bailout is preferable to forcing a lost position simply to finish the repetition.
Record hover duration separately. Start timing after both heels are clear and the release movement has settled; stop when support returns or the declared position is lost. Wall-supported resets and entry time are not free-balance time.
Learning Options Before Repeated Wall Returns
Begin with supported alignment and small hand-pressure changes. You should feel that the wall contact becomes lighter without moving the hands or changing the legs dramatically.
A one-heel version allows one leg to move toward the balance line while the other maintains light wall contact. Alternate the leading leg. This is assisted preparation, not a full bilateral release; avoid using the touching foot to launch the body.
If you can release but cannot yet regulate a wall return, practise a heel pull ending in a deliberate step-down. Choose that endpoint before the attempt. It can simplify the task of responding to finger pressure without demanding a sustained hover and reverse transition.
A competent spotter can help you explore the release and reset, with the assistance and exit agreed beforehand. Reduce support gradually instead of accepting hidden help as an unassisted repetition.
Practice Volume and Progression
Practise after warming up and before demanding pressing work fatigues your arms. For an athlete ready for bilateral releases, two or three sets of two to four quiet cycles is a practical starting example. Rest about one to two minutes, or longer when support has not recovered.
An initially brief hover can be enough to learn the pressure change. Add a little free-balance time only when you can still return gently and descend deliberately. These examples are coaching choices rather than validated readiness thresholds or a fixed learning schedule.
Develop consistent light starts and soft returns before adding repetitions. Change one variable at a time: hover duration, cycle count or release precision. Do not make the exercise “harder” by kicking farther, arching more or using a slippery support.
When you can regulate wall releases, add separate freestanding handstand practice to train accurate unsupported entries and exits. Heel pulls begin after an established entry; they do not automatically teach a consistent kick-up.
Include wall holds, other balance drills and hand-supported strength work when judging total wrist and shoulder exposure. Finish the set when the release, body shape or return stops being repeatable.
Common Mistakes and Corrections
- Kicking off the wall: make heel contact lighter and initiate through the hands.
- Bending the knees to lift the heels: keep the legs connected and let balance correction remove contact.
- Maintaining maximum finger pressure: regulate the squeeze once the heels leave rather than driving straight into a step-down.
- Relaxing the hands completely: reduce pressure while retaining active palm and finger contact.
- Using a large banana shape: improve the supported position and adjust hand distance between attempts.
- Crashing on the return: shorten the hover and check the drift earlier.
- Walking the hands during the cycle: establish the setup beforehand; hand stepping ends the stationary repetition.
- Staying inverted after support fades: use the planned exit before the arms buckle.
Frequently Asked Questions
How far should the heels move away?
Only far enough to remove wall support and find balance. A large gap is not a better repetition and often makes the return harder to regulate.
Why do I step down as soon as the heels leave?
The initial correction may be too strong or may continue after release. Check your starting alignment, make the squeeze smaller and learn to change pressure as the body approaches balance.
Do both heels need to leave at the same instant?
The target version releases both together. A staged release is useful while learning; label the method and bring the legs together before recording the full unsupported phase.
Does “back-to-wall” mean resting my back on it?
No. It describes your orientation. For this drill, keep the torso clear and use only light heel contact.
Can I use parallettes?
Parallettes change the wrist position and use a different gripping balance strategy. They also change support height and exit geometry. This page's standard uses flat palms on the floor; record a parallette version separately.
Stop for pain, numbness, dizziness, unusual visual symptoms, slipping hands or loss of arm support. Regress when you cannot control the entry, release or exit. If you have been advised to avoid inversions, follow that clinical guidance.
Tips for the proper execution of Back-to-Wall Handstand Heel Pulls
Learn the controlled wall entry and a deliberate step-down or appropriate bailout before attempting both-heel releases.
Choose a useful hand-to-wall distance before the set and keep both hands in the same place during each cycle.
Spread the fingers, point them generally toward the wall and keep the palms grounded.
Start with light heel contact and keep the back, buttocks and head clear of the wall.
Maintain straight elbows and active shoulder elevation through the release, hover and reset.
Use a gradual finger-pressure correction to release the heels without kicking, bending the knees or piking.
Regulate the initial squeeze after the heels float; excessive continued pressure can send you into a step-down.
Keep the legs straight and together during free balance, with a comfortable gaze and steady breathing.
Allow only a small controlled return and check the drift so the heels touch softly.
Reset quietly between cycles and exit while you still have secure support; log step-down attempts separately from wall returns.
Muscles worked when doing Back-to-Wall Handstand Heel Pulls
Back-to-Wall Handstand Heel Pulls combine predominantly isometric overhead support with small hand, wrist and body corrections. The balance task changes when heel support disappears, while the arms continue carrying bodyweight.
Primary muscles
- Deltoids: stabilize the loaded upper arms in the overhead position.
- Trapezius and serratus anterior: contribute to shoulder-blade elevation, upward rotation and active support.
Secondary muscles
- Forearm, wrist and finger muscles: regulate pressure against the floor to initiate and check balance changes.
- Triceps: maintain elbow extension rather than performing a pressing repetition.
- Abdominals, obliques and spinal stabilizers: coordinate the torso and pelvis, limiting unwanted arching and rotation.
- Rotator cuff: contributes to shoulder-joint control while loaded overhead.
- Glutes, quadriceps and inner thighs: maintain hip position, straight knees and a connected legs-together shape.
The heels are a contact point, not the main muscular target. This is a handstand skill and support-endurance drill, with an important hand-pressure component. It is not a calf-strength exercise or an isolated forearm workout.
Primary Muscle(s):

Anterior delt

Trapezius
Secondary Muscle(s):

Triceps
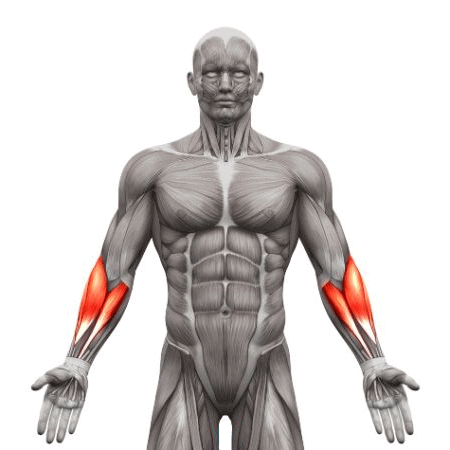
Forearm

Abdominal

Oblique
Equipment needed for Back-to-Wall Handstand Heel Pulls
No equipment needed for this exercise.
Adjust the difficulty of Back-to-Wall Handstand Heel Pulls
Begin with a supported back-to-wall position and learn to make heel contact lighter through the hands. Use one-heel preparation or a controlled release-to-step-down before repeated wall returns. Progress by refining pressure control, adding brief hover time or completing another clean cycle.
How to make Back-to-Wall Handstand Heel Pulls harder?
How to make Back-to-Wall Handstand Heel Pulls easier?
How to make Back-to-Wall Handstand Heel Pulls harder?
To make Back-to-Wall Handstand Heel Pulls harder:
-
Extend the unsupported legs-together hover slightly while keeping the hands planted and preserving a soft wall return.
-
Add a controlled release-and-return cycle at the same setup, stopping before alignment or exit control deteriorates.
-
Refine simultaneous heel release with less visible body travel, a quiet catch and a fully settled reset instead of a forceful squeeze.
-
Progress to separate Freestanding Handstand Practice with accurate entries and deliberate exits once release balance is repeatable. Keep its attempt count separate from wall-return cycles.
How to make Back-to-Wall Handstand Heel Pulls easier?
To make Back-to-Wall Handstand Heel Pulls easier:
-
Practise short Back-to-Wall Handstand holds with light heel contact, straight arms and a controlled step-down before removing both heels.
-
Move one leg toward the balance line while the other heel maintains light contact, alternating the leading leg. Label this as assisted preparation and avoid pushing through the touching foot.
-
Practise a heel release ending in a deliberate step-down when a hover and wall return are not yet manageable. Use only an exit you already control and record it separately from a complete return cycle.
