
Freestanding Handstand
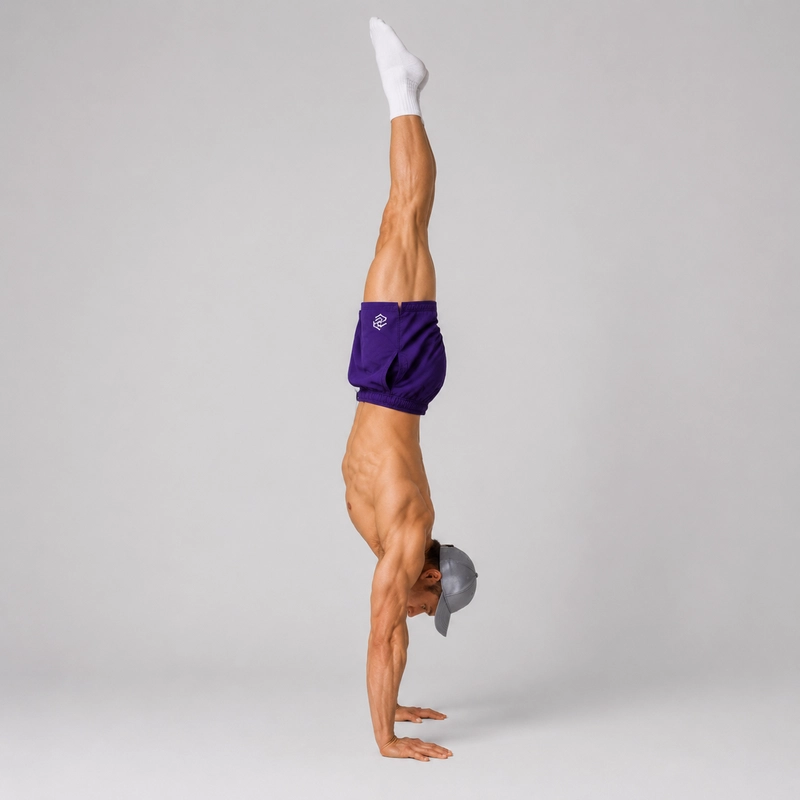
How to do Freestanding Handstand?
The freestanding handstand is a static calisthenics skill in which you support your entire body on your hands without touching a wall, spotter or other object. After entering the inversion, you establish a stable position with straight arms and maintain your balance for a measurable period of time.
This distinguishes the exercise from freestanding handstand practice. The practice drill develops the kick-up, teaches you to catch the balance point and rehearses controlled exits. The freestanding handstand described on this page begins only after the entry has been completed and a recognizable unsupported hold has been established.
A well-controlled handstand creates a connected line through the wrists, shoulders, torso, hips and legs. The shoulders remain actively elevated, the elbows stay locked and the hands make continuous pressure adjustments against the floor. The ribs and pelvis remain organized while the glutes, inner thighs and quadriceps keep the lower body quiet.
Handstand balance is not achieved by becoming completely motionless. Your center of mass constantly moves by small amounts, requiring subtle corrections through the wrists, shoulders and sometimes the hips. A systematic review of handstand biomechanics identified the wrist strategy as the principal balance mechanism, particularly among skilled performers.
The hands act as your base of support. If the feet begin travelling beyond the head, increased pressure through the fingers can bring the body back toward balance. If the body begins falling toward the entry side, changes through the shoulders and hips may be required because the fingers cannot pull against the floor.
Before training the full hold, you should already be comfortable in a chest-to-wall handstand, understand the stacked position and know how to step or cartwheel out safely. A hollow body hold can reinforce trunk control, while the wrist warm-up routine prepares the hands and forearms for weight-bearing.
The freestanding handstand develops hand balance, straight-arm shoulder endurance, full-body coordination and awareness of body position while inverted. It is also the essential balance foundation for handstand walking, press-to-handstand variations and the freestanding handstand push-up.
How to Hold a Freestanding Handstand
- Prepare your hands and shoulders. Warm up the wrists gradually and perform controlled overhead preparation before loading your full bodyweight. Use a flat, non-slip surface with enough space to exit safely.
- Enter the handstand. Use a controlled kick-up, press or another entry you can perform consistently. The entry itself is not part of the timed hold.
- Establish your hand position. Place your hands approximately shoulder-width apart. Spread your fingers and point the middle fingers forward or slightly outward according to wrist comfort.
- Distribute pressure through the hands. Keep the palms in contact with the floor while maintaining active pressure through the fingers. Avoid shifting all your weight into either the fingertips or the heels of the hands.
- Lock your elbows. Fully extend both arms and maintain the same elbow position throughout the hold. Rotate the upper arms sufficiently to create a stable overhead position without allowing the palms to lift.
- Push tall through the shoulders. Elevate the shoulder blades and imagine increasing the distance between your hands and feet. Do not allow your torso to sink between your arms.
- Position your head. Keep the neck comparatively neutral and look at a consistent point on the floor between or slightly ahead of your hands.
- Stack the torso. Bring the shoulders above the wrists and the hips above the shoulders. Draw the lower ribs toward the pelvis to limit unnecessary spinal extension.
- Control the pelvis. Lightly squeeze the glutes and maintain a small amount of posterior pelvic control without excessively rounding the lower back.
- Organize the legs. Bring the legs together, squeeze the inner thighs, extend the knees and point the toes. Keep both legs quiet rather than using them for repeated balance corrections.
- Correct an overbalance. If your feet begin travelling beyond your head, increase pressure through the fingers while keeping the shoulders elevated and the body connected.
- Correct an underbalance. If your feet begin falling back toward the entry side, reduce excessive fingertip pressure and make a small correction through the shoulders or hips. Step down if the position cannot be recovered without a large movement.
- Breathe during the hold. Maintain muscular tension while taking small, controlled breaths. Avoid holding your breath or relaxing the trunk between breaths.
- Maintain the position for the target time. Count the hold only after the legs are together, the entry movement has stopped and unsupported balance has been clearly established.
- Exit under control. Finish with a deliberate step-down or cartwheel bailout before the shoulders, elbows or wrists lose their supporting position.
Freestanding Handstand Completion Standard
- Use no wall, spotter or external support during the timed hold.
- Begin timing only after the entry has finished and unsupported balance is established.
- Keep both palms on the floor for the complete hold.
- Maintain full elbow extension.
- Keep the shoulders actively elevated.
- Bring the legs together with the knees straight.
- Maintain a recognizable controlled position rather than continuously stepping on the hands.
- Minor finger, wrist, shoulder or hip corrections are permitted.
- Stop timing when a foot touches the floor, the hands begin walking or the technical position breaks down substantially.
- Use a controlled exit after completing the hold.
Suggested Freestanding Handstand Milestones
- Five seconds: A clearly established freestanding handstand rather than a momentary pass through vertical.
- Ten seconds: Enough time to demonstrate repeatable balance corrections and controlled breathing.
- Thirty seconds: Strong handstand-specific endurance and a consistently organized body position.
- Sixty seconds: Advanced balance efficiency, concentration and overhead endurance.
These are practical training milestones rather than universal competition standards. Hold quality and repeatability matter more than achieving one unusually long attempt.
Benefits of the Freestanding Handstand
- Develops precise hand balance: The palms, fingers and wrists learn to regulate pressure beneath the body.
- Builds straight-arm shoulder endurance: The deltoids, trapezius and shoulder-blade muscles support bodyweight throughout the hold.
- Strengthens the hands and forearms: The wrist and finger muscles work continuously to maintain pressure and respond to changes in balance.
- Improves full-body coordination: The hands, shoulders, torso, pelvis and legs must respond as a connected system.
- Develops inversion-specific body awareness: You learn to recognize and correct body position while upside down.
- Reinforces overhead alignment: The exercise teaches active shoulder elevation with the torso and legs organized above the arms.
- Develops isometric core control: The abdominals, obliques and spinal stabilizers maintain the relationship between the ribs and pelvis.
- Builds concentration under load: Longer holds require calm breathing and continuous attention to small pressure changes.
- Provides a measurable calisthenics skill: Hold duration and successful-set consistency make progress relatively easy to track.
- Supports advanced handstand training: A stable static hold is required before balance can be maintained during walking, pressing or handstand push-ups.
Common Freestanding Handstand Mistakes
- Counting the kick-up as hold time: The timed hold begins only after the entry momentum has stopped and balance has been established.
- Dumping weight into the palms: Passive fingers remove an important mechanism for correcting an overbalance.
- Gripping the floor excessively: Constant maximum fingertip tension can create jerky corrections rather than responsive balance.
- Bending the elbows: Soft elbows make the supporting structure less stable and increase muscular effort.
- Sinking between the shoulders: Losing shoulder elevation shortens the body line and makes hand corrections less effective.
- Flaring the ribs: Allowing the lower ribs to move away from the pelvis frequently creates excessive lower-back extension.
- Piking at the hips: Moving the legs forward relative to the torso shifts the center of mass and interrupts the stacked position.
- Over-tucking the pelvis: Excessive posterior tilt can create a rounded position that is just as difficult to balance as an uncontrolled arch.
- Relaxing the legs: Bent knees and separated legs create additional moving segments that must be controlled.
- Looking toward the feet: Lifting the head changes the position of the neck, ribs and spine.
- Correcting everything with the legs: Large scissoring movements may save an occasional attempt but do not develop efficient hand balance.
- Moving the hands immediately: Walking can prevent a fall, but it changes the exercise and hides weaknesses in static balance.
- Holding the breath: Breath-holding creates unnecessary tension and limits longer-duration practice.
- Training only maximum holds: Repeated attempts to failure can produce poor alignment and excessive wrist or shoulder fatigue.
- Ignoring side-to-side imbalance: Uneven hand pressure or hip rotation can gradually shift the body away from the center of the base.
Frequently Asked Questions
What is the difference between a freestanding handstand and freestanding handstand practice?
Freestanding handstand practice is a learning drill focused on kick-up accuracy, catching brief periods of balance and exiting safely. The freestanding handstand is the completed static exercise: balance has already been established and is maintained for a defined duration with recognizable technical standards.
What counts as a completed freestanding handstand?
For this exercise library, a completed hold requires at least five seconds of unsupported balance after the entry has stopped. The elbows should remain straight, the shoulders active and the legs together. A brief pass through vertical during a kick-up does not count.
Does a handstand need to be perfectly straight?
No handstand is geometrically motionless or perfect. Individual shoulder mobility and body proportions affect the visible shape. The objective is a controlled and efficient position with the major body segments stacked as closely as practical, not a forced line that causes pain or loss of balance.
Is a banana handstand still a freestanding handstand?
An arched handstand can still be an unsupported handstand if it is controlled. However, excessive arching usually places the hips and legs away from a more efficient stacked position and may limit progression to presses, walking and handstand push-ups.
Where should the weight be in the hands?
Maintain contact through the palms while keeping the fingers active and responsive. The exact distribution changes continuously as you balance. You should be able to increase finger pressure without first shifting your entire body into the fingertips.
How do I stop falling over the top?
Press more firmly through the fingers as soon as you feel your feet moving beyond your head. Keep the elbows straight and shoulders elevated so the force generated by the hands transfers through the rest of the body.
How do I correct an underbalance?
Reduce excessive fingertip pressure and make a small adjustment through the shoulders or hips. Underbalance is generally harder to recover using the hands alone because the fingers cannot pull upward against the floor.
Should the elbows be completely locked?
Yes. Full elbow extension creates a more stable supporting structure and allows balance corrections to transfer effectively from the hands through the arms. A bent-arm handstand is a separate and more strength-intensive variation.
How high should the shoulders be?
Push as tall as you can while maintaining a comfortable neck position and full palm contact. The shoulder blades should remain actively elevated rather than allowing the torso to sink toward the floor.
Where should I look during the handstand?
Look at a consistent point between or slightly ahead of your hands. This provides a visual reference without requiring you to lift your head excessively.
Should I squeeze every muscle as hard as possible?
No. Use enough tension to connect the body and prevent unnecessary movement, but avoid maximum tension everywhere. Skilled handstands combine firm alignment with responsive hands, controlled breathing and the ability to make small corrections.
How long is a good freestanding handstand?
A repeatable ten-second hold demonstrates meaningful control. A consistent thirty-second hold shows strong handstand-specific balance and endurance, while sixty seconds is an advanced milestone. Repeating a shorter hold with good form is more valuable than achieving one long but uncontrolled attempt.
How should I program freestanding handstand holds?
Perform four to eight sets while your wrists, shoulders and concentration are fresh. Use holds that end before technical failure and rest long enough to reproduce the same position. For example, an athlete with a fifteen-second maximum might train controlled sets of five to ten seconds.
Should I practise maximum-duration holds every session?
No. Most sessions should use submaximal holds that allow consistent alignment and controlled exits. Test your maximum occasionally rather than turning every set into an attempt to failure.
Can I practise freestanding handstands every day?
Frequent practice can be useful because balance is a skill, but volume must match your wrist and shoulder recovery. Short technical sessions may be performed often, while longer endurance sessions generally require more recovery.
Why can I hold a wall handstand but not a freestanding handstand?
The wall removes most of the need to control your center of mass through the hands. Progress with toe pulls, heel pulls and the separate freestanding practice drill to learn the pressure adjustments that wall holds do not require.
Can the freestanding handstand be performed on parallettes?
Yes, but parallettes use a neutral wrist position and a gripping balance strategy rather than flat-palm fingertip control. A parallette handstand should therefore be treated as a variation of the floor exercise.
What should I do if my wrists become painful?
End the session if you experience sharp pain, numbness or persistent discomfort. Reduce the total volume, warm up progressively and review your hand position before returning to full-duration holds. Seek appropriate professional advice if symptoms continue.
Tips for the proper execution of Freestanding Handstand
Begin timing only after the entry momentum has stopped and unsupported balance is established.
Place your hands approximately shoulder-width apart with your fingers comfortably spread.
Maintain contact through the palms while keeping the fingers active and responsive.
Lock both elbows and maintain the same arm position throughout the hold.
Push tall through your shoulders instead of allowing the torso to sink between your arms.
Look between or slightly ahead of your hands without lifting your entire head.
Draw your lower ribs toward your pelvis to control excessive spinal extension.
Lightly squeeze your glutes to organize the pelvis above the shoulders.
Keep your legs together, knees straight and toes pointed.
Increase fingertip pressure as soon as your feet begin travelling beyond your head.
Use small shoulder or hip corrections when the body begins falling toward the entry side.
Use small shoulder or hip corrections when the body begins falling toward the entry side.
Keep the legs quiet rather than using repeated scissoring movements to save the hold.
Take small, controlled breaths without relaxing your body position.
Finish the hold before your elbows bend or your shoulders lose elevation.
Record repeatable technical holds rather than only your longest successful attempt.
Muscles worked when doing Freestanding Handstand
The freestanding handstand is primarily an isometric straight-arm support and balance exercise. The muscles surrounding the shoulders maintain the inverted overhead position, while the triceps keep the elbows extended. The hands, forearms, core and lower body create a connected structure that can respond to small changes in balance.
Anterior and Lateral Deltoids
The deltoids stabilize the upper arms in the overhead position. They remain active throughout the hold and prevent the shoulders from moving away from the supporting hands.
Trapezius
The upper trapezius contributes to shoulder-blade elevation and upward rotation. This allows you to push tall and maintain space between the shoulders and ears while supporting bodyweight.
Serratus Anterior
The serratus anterior stabilizes the shoulder blades against the ribcage and contributes to their upward rotation. It helps connect pressure from the hands with the position of the torso.
Triceps Brachii
The triceps maintain complete elbow extension. This creates the stable straight-arm structure needed for efficient balance corrections.
Forearm Flexors and Extensors
The forearm muscles stabilize the wrists in an extended position and regulate pressure through the hands. They respond continuously as the center of mass moves above the base of support.
Finger and Hand Muscles
The intrinsic hand muscles and finger flexors adjust pressure against the floor. Their role becomes particularly noticeable when correcting an overbalance through increased fingertip force.
Rotator Cuff
The rotator-cuff muscles stabilize the upper-arm bones within the shoulder joints throughout the inverted hold.
Abdominals and Obliques
The abdominals and obliques maintain the relationship between the ribs and pelvis. They resist excessive spinal extension and unwanted rotation.
Spinal Stabilizers
The spinal stabilizers work with the abdominal muscles to maintain the torso’s position rather than allowing it to collapse or arch uncontrollably.
Glutes
The glutes stabilize the pelvis and help keep the hips extended above the torso.
Hip Adductors
The inner-thigh muscles press the legs together and prevent independent leg movement from disturbing the hold.
Quadriceps
The quadriceps keep the knees extended and contribute to a rigid, connected lower-body line.
Calves and Foot Muscles
The calves and foot muscles point the toes and complete the extended body position from the hands to the feet.
Primary Muscle(s):

Anterior delt

Trapezius
Secondary Muscle(s):

Triceps

Abdominal

Oblique
Equipment needed for Freestanding Handstand
No equipment needed for this exercise.
Adjust the difficulty of Freestanding Handstand
How to make Freestanding Handstand harder?
How to make Freestanding Handstand easier?
How to make Freestanding Handstand harder?
To make Freestanding Handstand harder:
-
Increase the hold duration without changing your hand position or body alignment.
-
Perform repeated ten- to thirty-second holds with consistent rest periods.
-
Move slowly between straight, straddle, tuck and split-leg handstand positions.
-
Perform controlled handstand shrugs while keeping both elbows fully extended.
-
Shift progressively more bodyweight from one hand toward the other.
-
Perform alternating shoulder taps without rotating the hips.
-
Narrow the distance between your hands while maintaining stable overhead alignment.
-
Enter the hold through a controlled press to handstand instead of a kick-up.
-
Progress toward assisted one-arm handstand holds after developing controlled lateral weight shifts.
-
Perform a freestanding handstand push-up after establishing a stable starting position.
How to make Freestanding Handstand easier?
To make Freestanding Handstand easier:
-
Use chest-to-wall handstand holds to develop the required straight-arm position and overhead endurance.
-
Perform chest-to-wall toe pulls and balance briefly before returning the feet to the wall.
-
Use back-to-wall heel pulls to practise correcting an overbalance through the fingers.
-
Follow the freestanding handstand practice progression until your unsupported entries become consistent.
-
Hold a split-leg freestanding handstand to make the balance point and exit easier to control.
-
Use a straddle handstand if your flexibility allows you to maintain a lower and more adjustable leg position.
-
Ask a competent spotter to guide your hips without supporting your full bodyweight.
-
Accumulate several controlled two- to three-second balances before attempting a continuous five-second hold.
