
Chest-to-Wall Handstand Toe Pulls
How to do Chest-to-Wall Handstand Toe Pulls?
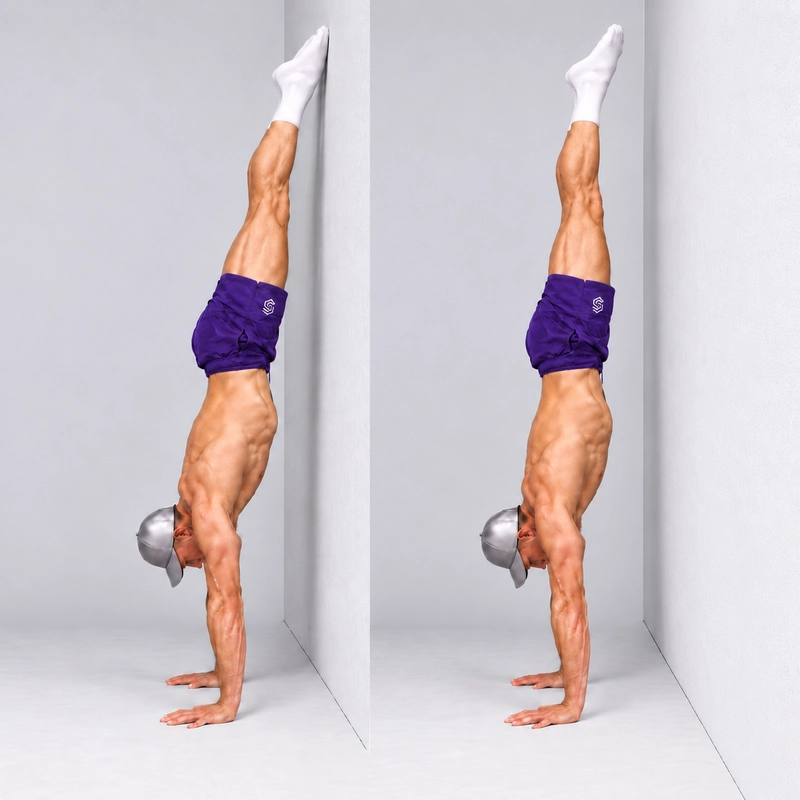
Chest-to-Wall Handstand Toe Pulls are a balance drill in which you move from light toe contact with a wall into a brief unsupported handstand, then return gently to the wall. Keep both hands planted, the elbows straight and the shoulders active. During the free balance, the legs are straight and together.
Unlike a static chest-to-wall handstand, the defining task is to remove the wall's balance assistance and regain it deliberately. You are learning to recognize when your body is supported over your hands instead of relying on the wall to keep you upright.
The name can be misleading: you do not curl the toes, bend the knees or push off the wall to make a repetition. The feet should leave because you adjust the balance of the inverted body. Momentum Training's handstand coaching guide distinguishes wall-facing toe pulls from back-to-wall heel pulls and describes a shoulder-led release followed by rebalancing.
Toe Pulls, Heel Pulls and Weight Shifts: Different Balance Tasks
Wall-facing toe pulls develop your response to underbalance: drifting toward the heel-of-palm side of your support, where the wall lies in this setup. With the fingers generally pointing away from the wall, this is different from overbalancing toward the fingertips. Simply gripping harder with the fingers is not a universal solution for both directions.
Heel pulls begin in a back-to-wall handstand. They use heel contact on the opposite side and provide a useful setting for practising finger-pressure control of overbalance. The two drills complement each other; turning the body around changes the balance problem.
Chest-to-wall handstand weight shifts move the load laterally between the hands. Toe pulls keep two-hand support and focus on leaving and returning to the wall in the forward/back direction. Do not add a hand lift or shoulder tap to this repetition.
A freestanding handstand is the sustained unsupported position. Toe pulls offer repeatable opportunities to find that position without repeating a kick-up for every balance attempt.
Readiness and Exit Control
Before releasing both feet, be comfortable supporting your body upside down with straight arms, entering a wall-facing handstand and coming down with control. You should be able to breathe and make small adjustments without sinking through the shoulders. A long wall hold alone does not establish balance or exit competence.
Use the wall walk to develop the entry and supported descent. A pike hold on a plyo box offers an earlier straight-arm support option when a full inversion is not yet manageable. It prepares the support position; it is not a toe-pull repetition.
Learn an appropriate step-down or cartwheel-style exit before practising bilateral releases. The wall can receive a gentle return on one side, but it will not catch a fall away from it. Handstand Factory's bailout resource explains graded cartwheel exits; access to its full free session requires email registration.
Practise exits progressively with a competent coach or spotter if needed. Leave enough open space for your actual exit and do not rely on inventing one after your feet leave the wall. End a set while you still have the capacity to descend.
Set Up the Wall and Floor
Choose a solid wall without shelves, windows, projections or obstacles in the working area. Use a level, firm floor with predictable grip under dry hands. Avoid loose rugs and soft hand-support surfaces that shift under pressure.
Prepare the wrists and shoulders gradually with the joint warm-up routine, then add easy palm-loading and supported overhead practice. The first full inversion should not be your first exposure to weight through the hands that session.
Place the hands approximately shoulder-width apart. Spread the fingers and orient them generally away from the wall, with a small outward turn if comfortable. Keep the fingers and palms in contact throughout the working cycle.
Choose a hand-to-wall distance that permits a near-vertical body position, light toe contact and your practised exit. There is no compulsory distance in centimetres or inches. Too far away can leave you in a steep diagonal position that needs a large correction; too close can obstruct the entry or exit.
Adjust the setup between attempts. Once the working set begins, keep the hands in the same place rather than walking them inward as the feet leave. A small strip of floor tape can help you repeat the chosen distance.
Establish Light Toe Contact
Enter through a controlled wall walk, stopping where you can manage both support and descent. Face the chest toward the wall while keeping the torso clear of it. The name describes orientation, not chest contact.
Push tall through the shoulders, straighten the elbows and organize the ribs, pelvis and legs into a connected line. Use enough trunk tension to control the shape without forcing an exaggerated hollow position or holding your breath. Keep the knees straight and the legs together.
Let the pointed toes touch lightly. Do not press the shins, thighs, abdomen or chest against the wall. Heavy contact means the wall is doing more of the balancing and makes a quiet release harder to learn.
Look at a consistent point on the floor between or slightly ahead of the hands, rather than craning the neck toward the feet. Settle before beginning: climbing into position is preparation, not the first repetition.
How to Do Chest-to-Wall Handstand Toe Pulls
- Start from a quiet supported position. Confirm light toe contact, straight elbows, active shoulders and a clear exit.
- Begin a small shoulder adjustment away from the wall. Move toward the fingertip side of the hands, keeping the arms straight. Let the connected torso and hips respond rather than throwing the feet.
- Release both toes. Make the adjustment only large enough for the wall contact to disappear. Avoid a toe push, heel flick, knee bend or large hip pike.
- Catch and restack. As the feet float free, return toward a balanced wrist–shoulder–hip relationship. Do not keep increasing the shoulder lean after the release.
- Balance briefly. Keep the legs straight and together, both palms planted and the hands responsive. An initially brief, controlled hover is useful; there is no need to force a long hold.
- Return softly. Allow a small controlled drift toward the wall, regulating it with the hands and body position until the toes touch lightly. Do not swing the legs back or strike the wall.
- Reset completely. Re-establish a quiet supported position before another pull. Count the release and controlled return as one complete cycle.
- Finish deliberately. Descend through the practised wall-walk pattern after recovering wall contact, or use your learned exit if balance carries you away from the wall.
The initial shoulder movement is a small correction, not a sustained planche lean. Keep pushing tall rather than solving the release by bending the elbows or dropping the chest.
Use Responsive Hands, Not Maximum Grip
Hand pressure changes as you balance. Once the feet are free, increased finger pressure can help check a drift toward the fingertip side. If that pressure sends you back toward the wall, ease it and reorganize the shoulders rather than gripping harder again.
Keep all parts of the hand available for support; do not deliberately lift the fingers to unload them or peel the palms from the floor. The goal is a small, timely response rather than a large correction after the body has already accelerated.
If the position escapes your control, use the planned exit. Saving every attempt is less useful than learning repeatable releases with a calm reset.
What Counts as a Complete Repetition?
- Begin and finish in a controlled wall-facing handstand with light toe contact.
- Both toes clearly leave the wall and no other body part replaces their support.
- Establish recognizable unsupported balance rather than merely bouncing through the position.
- Keep both hands in place, elbows straight, shoulders active and legs straight together during the hover.
- Return gently without a kick, knee bend or large leg swing.
A release followed by a controlled bailout is still a useful balance attempt, but it does not complete this page's wall-return cycle. A hand step can be appropriate during an exit; it ends the stationary working repetition.
Record hover duration separately from repetition count. Start timing after both toes are clear and the release motion has settled; stop at renewed support or loss of the declared position. Do not include the wall-supported reset in free-balance time.
Learn With One Foot, Then Join the Legs
If both feet leaving together is unpredictable, remove one foot while the other maintains light contact. Bring the free leg toward the balance line, make the remaining contact lighter and explore a brief release of the second foot. Alternate which leg leads between attempts.
This staged approach can help you identify the balance point. It should not become a forceful push through the supporting foot. Keep the hips facing the wall rather than twisting to drag one toe away.
A one-foot hover still uses wall assistance. Label it as preparation. A staged release that reaches unsupported legs-together balance can be recorded separately from the simultaneous bilateral version while you develop consistency.
Practice Volume and Progression
Practise after warming up and before hard pressing work fatigues your support. For an athlete already comfortable in the wall-facing position, try two or three sets of two to four controlled pulls, resting about one to two minutes or longer as needed. Use fewer repetitions if entry, balance and descent together are demanding.
An initial hover of roughly one second is enough to practise a quiet catch. Progress toward a few seconds when you can still return deliberately. These are coaching examples, not validated readiness thresholds or a required timetable.
Prioritize repeatable releases and soft returns before adding repetitions or longer hovers. Change one variable at a time and include existing wall holds, wrist loading and handstand attempts when judging total practice.
When wall-release balance becomes consistent, add separate freestanding handstand practice to train entry accuracy and controlled exits. Toe pulls teach balance after the entry; they do not automatically teach a kick-up.
Common Mistakes and Corrections
- Kicking off the wall: make the toe contact lighter first and reduce the release movement.
- Only lifting the feet: use a balance adjustment instead of bending the knees or pulling the heels toward the body.
- Continuing the shoulder lean: catch and restack once contact disappears instead of leaning until you fall away.
- Gripping maximally throughout: keep finger pressure responsive rather than forcing every correction in one direction.
- Using a large arch or pike: shorten the attempt and regain a connected torso-and-leg shape.
- Crashing back: return earlier, with less travel, and pause at the wall before restarting.
- Changing hand placement: choose the distance before the set; keep the palms anchored during the drill.
- Fatiguing the exit: end the set before support deteriorates, even if the planned repetition count is unfinished.
Frequently Asked Questions
How far should the toes move from the wall?
Only far enough to remove support and establish balance. A larger gap does not make a better repetition. Do not set a target distance that encourages a kick or excessive lean.
Do both feet have to leave at exactly the same instant?
The target version releases both together. A staged one-foot-then-the-other entry is useful preparation, but label the method and bring the legs together before measuring the unsupported phase.
Why can I hold the wall handstand but not float away?
Support endurance and balance control are different capacities. Check whether your toes are pressing heavily, your body is diagonal or your release is being attempted only by moving the feet. Use smaller attempts and coaching feedback rather than simply making the wall hold longer.
Should I move my hands closer for every progression?
No. Choose a useful distance for your body and exit, then keep it consistent while developing release quality. Moving closer is not automatically harder or better.
Can I practise on parallettes?
Parallettes change wrist position, grip, support height and exit geometry. They require their own stable setup and practised exit. This page's demonstration and comparison standard use hands on the floor.
Stop the set for pain, dizziness, slipping hands or deteriorating arm support. Regress when you cannot control the release or exit. Continue breathing throughout rather than treating each hover as a maximal strain.
Tips for the proper execution of Chest-to-Wall Handstand Toe Pulls
Practise your wall-facing entry and an appropriate step-down or cartwheel exit before releasing both feet.
Choose the hand-to-wall distance before the set and keep the hands anchored throughout each working cycle.
Point the fingers generally away from the wall, spread them and keep both palms fully supported on the floor.
Start with only light toe contact; keep the chest, abdomen, thighs and shins clear of the wall.
Maintain straight elbows and push tall through the shoulders during the release, hover and reset.
Let a small shoulder adjustment away from the wall release the toes; do not kick, bend the knees or flick the heels.
Catch and restack as soon as the feet float free instead of continuing to increase the shoulder lean.
Keep the legs straight and together during the hover, with responsive finger pressure and steady breathing.
Return the toes softly and settle at the wall before beginning another pull.
End the set while you can still descend under control; use the learned exit if balance carries you away from the wall.
Muscles worked when doing Chest-to-Wall Handstand Toe Pulls
Chest-to-Wall Handstand Toe Pulls combine straight-arm overhead support with small balance adjustments. Most of the support and body-line work is isometric, although the wrists and shoulders make subtle movements during each release and return.
Primary muscles
- Deltoids: support and stabilize the upper arms in the loaded overhead position.
- Trapezius and serratus anterior: contribute to active shoulder-blade elevation, upward rotation and control as you push tall.
Secondary muscles
- Triceps: maintain elbow extension rather than producing a push-up repetition.
- Forearm, wrist and hand muscles: stabilize the hands and regulate contact pressure during balance corrections.
- Abdominals, obliques and spinal stabilizers: coordinate the torso and pelvis while the body is inverted.
- Rotator cuff: contributes to shoulder-joint control under overhead load.
- Glutes, quadriceps and inner thighs: help maintain hip position, straight knees and a connected legs-together shape.
Removing wall contact increases the balance task; it does not mean that the shoulder muscles were unloaded while the toes touched the wall. This is a skill drill with support-endurance demands, not a targeted toe-strength exercise or a substitute for dynamic handstand push-up training.
Primary Muscle(s):

Anterior delt

Trapezius
Secondary Muscle(s):

Triceps
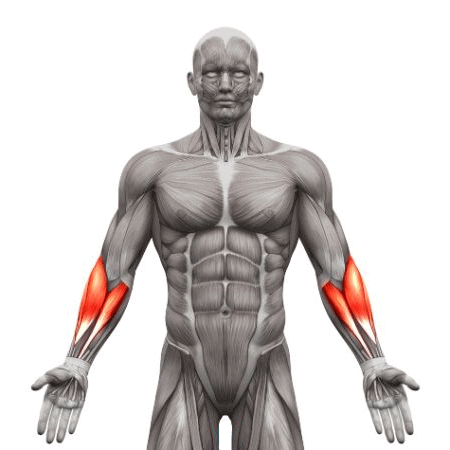
Forearm

Abdominal

Oblique
Equipment needed for Chest-to-Wall Handstand Toe Pulls
No equipment needed for this exercise.
Adjust the difficulty of Chest-to-Wall Handstand Toe Pulls
Scale the balance demand while preserving secure two-hand support and a practised exit. Begin with supported alignment or one-foot releases, then develop brief bilateral hovers and soft wall returns. Progress by improving repeatability or increasing unsupported time, rather than kicking farther from the wall.
How to make Chest-to-Wall Handstand Toe Pulls harder?
How to make Chest-to-Wall Handstand Toe Pulls easier?
How to make Chest-to-Wall Handstand Toe Pulls harder?
To make Chest-to-Wall Handstand Toe Pulls harder:
-
Gradually extend the unsupported legs-together hover while preserving planted hands and a soft, deliberate return.
-
Add a controlled release-and-return cycle at the same hand placement, stopping before support or exit quality deteriorates.
-
Refine the release until both toes leave together with minimal shoulder travel and no knee bend, hip swing or wall push.
-
Progress to separate freestanding handstand practice with controlled entries and exits once wall-release balance is repeatable. Record this as a different drill rather than another wall-return repetition.
How to make Chest-to-Wall Handstand Toe Pulls easier?
To make Chest-to-Wall Handstand Toe Pulls easier:
-
Practise short Chest-to-Wall Handstand holds with light toe contact and a controlled descent before attempting to remove both feet.
-
Remove one foot while the other maintains light wall contact, alternating the leading leg. Treat this as assisted balance preparation rather than a complete bilateral toe pull.
-
Use a competent spotter for brief releases and gentle wall resets, with an agreed exit. Reduce the number of attempts so entry and descent remain controlled; record spotter assistance.
