
Inchworm Push-Up

How to do Inchworm Push-Up?
The Inchworm Push-Up is a dynamic, full-body exercise that combines mobility, strength, and flexibility into one fluid movement. It’s an enhanced variation of the traditional inchworm, adding a push-up at the most extended plank position, thereby increasing activation in your chest, shoulders, triceps, core, and posterior chain. This exercise is an excellent warm-up choice, as it simultaneously improves upper-body strength, core stability, hamstring flexibility, and overall body coordination.
Starting from a standing position, the athlete bends forward to place hands on the ground, gradually walking the hands forward into an extended plank position. At this extended position, the athlete performs a controlled push-up before reversing the movement, walking the hands back toward the feet and returning to a standing posture. It’s beneficial for warming up muscles prior to upper-body or full-body workouts, and also serves as an excellent mobility drill.
No equipment is necessary for performing inchworm push-ups; however, a comfortable mat or soft surface is recommended for hand support and comfort.
How to Perform an Inchworm Push-Up
1. Starting Position:
• Stand upright with your feet shoulder-width apart, keeping your arms relaxed by your sides.
2. Bend and Reach Forward:
• Hinge at your hips, keeping your legs straight or slightly bent, and place your hands firmly onto the ground in front of your feet.
• Engage your core muscles to stabilize your torso as you move forward.
3. Walk Out into Extended Plank:
• Slowly “walk” your hands forward step by step, keeping your feet planted in place.
• Continue walking your hands out until your body reaches an extended plank position (hands significantly in front of your shoulders), fully engaging your core.
4. Perform a Push-Up:
• At the extended plank position, maintain strong core activation and perform a controlled push-up by bending your elbows and lowering your chest toward the ground.
• Keep your elbows at roughly a 45-degree angle to your body.
• Push yourself back up to the extended plank position with control, fully straightening your arms.
5. Walk Your Hands Back:
• Gradually walk your hands backward toward your feet, maintaining core control and straight or slightly bent legs, until your body returns to the folded-over position.
6. Return to Standing Position:
• From the folded-over position, slowly hinge upwards through your hips, returning to the standing position.
7. Repetitions & Sets:
• Perform 2–4 sets of 6–12 repetitions, adjusting based on your fitness level and the purpose (warm-up vs. main exercise).
Benefits of the Inchworm Push-Up
• Full-Body Warm-Up: Activates multiple muscle groups, ideal for preparing the entire body for exercise.
• Improves Upper-Body Strength: Strengthens your chest, shoulders, triceps, and upper back muscles.
• Core Stability and Strength: Develops significant core strength and stability through plank positioning.
• Enhances Flexibility: Provides dynamic hamstring, lower back, and shoulder stretching.
• Improves Coordination: Boosts motor control and body awareness, facilitating smoother athletic performance.
Common Mistakes to Avoid
• Dropping the Hips: Maintain a straight, engaged plank position, especially during the extended push-up phase.
• Rounding or Arching Your Back: Keep your spine neutral by engaging your core to prevent excessive rounding or arching.
• Performing Push-Ups Too Quickly: Slow, controlled movements ensure optimal muscle activation and safety.
• Limited Range of Motion: Ensure you fully extend into plank and complete each push-up through its full range.
• Neglecting Breathing Patterns: Maintain steady breathing—inhale as you lower into the push-up, exhale as you press upward.
Gym Equivalents for the Inchworm Push-Up
• Push-Ups (standard and variations)
• Plank Walkouts (extended plank holds without push-up)
• TRX or Suspension Trainer Push-Ups (upper-body and core activation)
• Swiss Ball Rollouts (for core stabilization and shoulder strength)
• Dynamic Stretching Exercises (mobility-focused)
Tips for the proper execution of Inchworm Push-Up
Keep your core actively engaged throughout to maintain stability and prevent excessive lower-back stress.
Walk your hands out progressively further as your strength and flexibility improve.
Focus on smooth transitions between each phase of the exercise to improve coordination and body control.
Use controlled breathing, matching each movement phase to inhalation and exhalation cycles.
Perform regularly as part of your warm-up routine to optimize flexibility, mobility, and upper-body strength.
Muscles worked when doing Inchworm Push-Up
The inchworm push-up primarily targets:
•Primary: Chest (pectoralis major), shoulders (deltoids), triceps, core (rectus abdominis, obliques), hamstrings.
•Secondary: Lower back (erector spinae), glutes, scapular stabilizers, forearms.
Throughout the exercise, upper-body and core muscles provide stability and power during the push-up phase, while lower-body muscles aid flexibility and stability during the inchworm motion.
Primary Muscle(s):
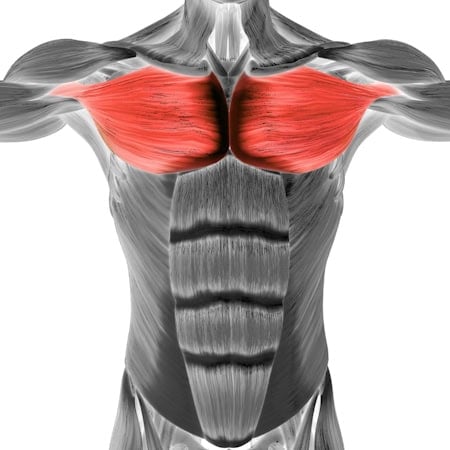
Middle chest
Secondary Muscle(s):

Triceps

Hamstring
Equipment needed for Inchworm Push-Up
No equipment needed for this exercise.
Adjust the difficulty of Inchworm Push-Up
The inchworm push-up is a versatile and effective exercise, providing both a warm-up and strength training in one movement. As athletes become stronger and more flexible, they can progressively increase the range, repetitions, and complexity of the exercise. By systematically adjusting these variables, athletes can continually enhance strength, stability, flexibility, and coordination, making it valuable for any fitness regimen.
How to make Inchworm Push-Up harder?
How to make Inchworm Push-Up easier?
How to make Inchworm Push-Up harder?
To make Inchworm Push-Up harder:
-
Extend Plank Position Further: Walk hands even further forward to intensify core and shoulder engagement.
-
Add Multiple Push-Ups per Rep: Perform 2–3 push-ups at the extended plank position.
-
Slow Down Movements: Increase the tempo, spending 3–5 seconds each in plank and push-up phases.
-
Add Resistance: Use a weighted vest or resistance bands to increase difficulty.
-
Elevate Feet: Perform with feet elevated on a small step or bench, significantly increasing upper-body and core demands.
How to make Inchworm Push-Up easier?
To make Inchworm Push-Up easier:
-
Shorten the Plank Extension: Walk your hands out less initially, gradually increasing distance as strength builds.
-
Perform Push-Ups from Knees: Drop knees gently to the ground to decrease push-up intensity initially.
-
Reduce Repetitions: Begin with fewer repetitions (4–6 per set), gradually increasing as endurance improves.
-
Bend Your Knees Slightly: Allow slight knee bends during walkouts to ease hamstring tension initially.
-
Pause at Each Position: Allow brief pauses between phases to regain composure and focus on form.