
Lying Leg Raise
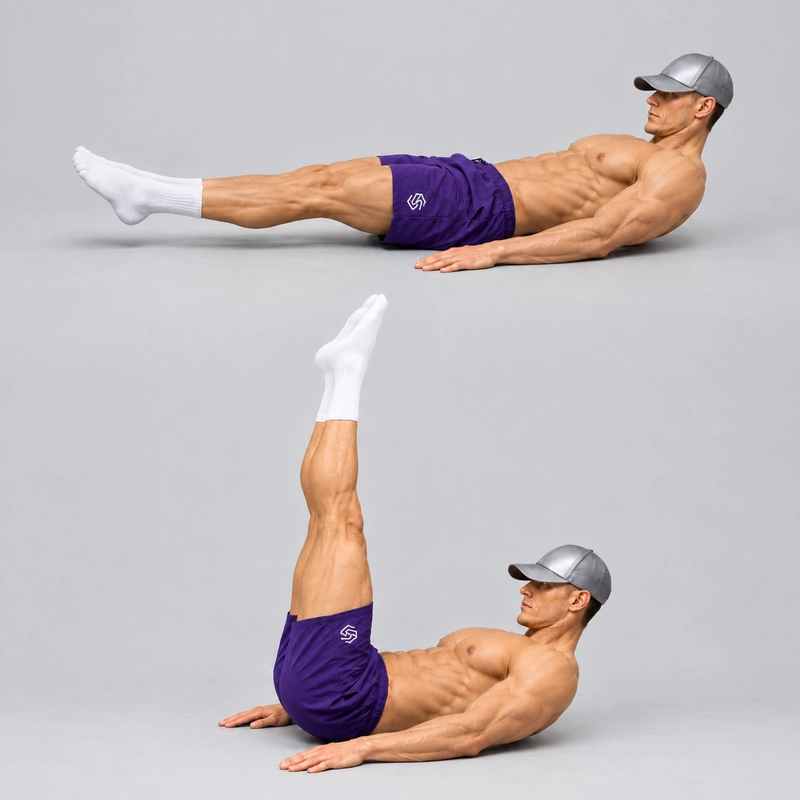
How to do Lying Leg Raise?
The Lying Leg Raise is a floor-based exercise in which you lie on your back and raise both legs together, then lower them under control. The main version uses straight knees, a supported head and shoulders, and a steady pelvis. The hip flexors move the thighs while the abdominal muscles help control the trunk and resist an increasing lower-back arch.
This is a practical way to train leg movement and abdominal control without a bar or a grip limitation. It differs from Hanging Leg Raises, which also require hanging support and control of swing. The floor version can help preparation, but does not replace those additional skills.
A bent-knee raise shortens the leg lever. A reverse crunch changes the action by deliberately curling the pelvis and lifting the hips toward the ribs, as demonstrated in ACE's reverse crunch instructions. On this page, keep the pelvis supported rather than adding a hip lift at the top of every repetition.
Hip flexion brings the thighs toward the torso. The abdominal wall helps organise the pelvis and ribs as the legs move, especially as the feet travel farther from the hips during lowering. The rectus abdominis does not cross the hip joint, so it is not the muscle directly lifting the thighs.
A small study comparing supine leg raises with sit-ups measured both abdominal and hip-flexor activity. It supports recognising both roles, rather than describing the exercise as lower-ab isolation. Short-term muscle-activity measurements do not establish a superior muscle-building exercise or an exact result for your repetitions.
Feeling effort at the front of the hips is not automatically a technique fault. The useful check is whether you can move the legs smoothly while maintaining your chosen trunk and pelvic position without pain.
Setup and your working range
Use a firm floor with an exercise mat if desired. Lie on your back with the head and shoulder blades comfortably supported. Place the arms beside the hips, palms down, and keep the neck relaxed. Do not pull the head into a crunch or push through the back of the skull.
Exhale gently, bring the ribs toward the pelvis and establish a comfortable abdominal brace. A small posterior pelvic tilt and light lower-back contact with the mat can be useful cues. Avoid forcing the spine flat through pain or squeezing so hard that you cannot breathe.
Choose a lower endpoint before the set. As the legs approach horizontal, preserving the same pelvic position usually becomes more demanding. Stop higher if the ribs lift, the lower back begins to arch more or the knees must bend to keep moving. Lowering close to the floor is a progression, not a universal starting requirement.
Some athletes place the hands under the pelvis for support or a positional cue. That changes the setup and does not substitute for controlling the trunk. Use a comfortable arrangement, record it and do not lift the hips with a strong hand push to finish the rep. The main setup described here keeps the palms beside the hips.
How to do the Lying Leg Raise
- Establish the supported position. Lie on your back, settle the head and shoulders and set the hands beside the hips. Bring the legs together and brace while breathing comfortably.
- Prepare a manageable starting shape. You may bend the knees to bring the thighs toward vertical, then straighten them to rehearse the first controlled lowering. This setup is separate from the working rep count. If straight knees pull the pelvis out of position, use a deliberately bent-knee regression.
- Set the lower endpoint. Lower the legs together only as far as you can preserve the same controlled ribs and pelvis. Keep a small clearance above the floor for continuous reps, or choose a deliberate light-touch reset and record it. Do not bounce the heels.
- Raise both legs smoothly. From that endpoint, flex at the hips to bring the legs toward vertical. Keep the knees naturally straight and the legs moving together. Exhale during the lift if that rhythm is comfortable.
- Finish the raise without a hip curl. Stop around vertical, or at a repeatable mobility-limited top position. Keep the pelvis down and avoid throwing the feet toward the head. A deliberate hip lift belongs to a reverse crunch or a separately labelled combination.
- Lower under control. Return to the same recorded lower endpoint. Keep the head and shoulders supported and the knee angle unchanged. Breathe through the movement; do not drop the legs to escape the difficult portion.
- Repeat or reset. Complete the next rep only while the same range and body position remain available. To finish, bend the knees and place the feet down comfortably rather than forcing the straight legs through a lost position.
One working repetition is a complete low-to-high-to-low cycle through your selected range. The initial setup descent is not a completed cycle. A gentle touch-and-reset version can be useful, but log it separately from continuous hovering reps when comparing sessions.
What counts as a controlled repetition?
- Both legs rise and lower together with the same naturally straight knee position.
- The top and bottom endpoints remain repeatable.
- The ribs and pelvis stay controlled, with no increasing lower-back arch or deliberate hip lift.
- The head and shoulders stay supported, and the movement does not depend on a leg swing or heel rebound.
- You can stop the descent and reverse it without suddenly changing the knee angle.
A shorter controlled range is valid training when accurately labelled. It should not be compared directly with a lower-endpoint repetition, a bent-knee version or a hip-lift combination. Record the actual exercise configuration rather than counting every leg movement as the same rep.
Common mistakes and corrections
- Lowering farther while the back arches: raise the lower endpoint or shorten the lever with a knee bend. Add range only while the original position stays controlled.
- Bending the knees only during the difficult portion: choose a consistent knee angle for the whole set and label the regression.
- Throwing the feet over the head: stop the lift earlier and keep the pelvis supported.
- Dropping or bouncing the legs: slow the descent and use a range you can reverse.
- Lifting the head to compensate: return it to comfortable support. A shoulder-lift or hollow-body combination is a different task.
- Holding the breath through a long set: use a manageable brace and shorter sets that allow steady breathing.
Stop for sharp or increasing back or hip pain, tingling or other concerning symptoms. Reduce the range or use an easier movement. Persistent or recurring symptoms warrant appropriate professional advice; this exercise is not a prescribed treatment for back pain.
How to build control and progress
If moving both straight legs changes your trunk position immediately, begin with the Dead Bug or a small bent-knee leg movement. ACE's staged supine leg-movement exercise provides another example of learning limb movement while monitoring the torso. It uses an abdominal-hollowing approach; it is a related preparation option rather than the exact bilateral bracing exercise described here.
The Tuck Hollow Body Hold offers a short-lever static comparison, while the Hollow Body Hold adds a longer-leg held shape and an elevated upper body. Neither requires you to replace the supported head position in this lying leg raise.
A practical starting example is two to three sets of six to twelve controlled repetitions, with about sixty to ninety seconds of rest. Begin with roughly two seconds up and two seconds down if that helps control. These are coaching examples, not an optimal-dose claim or a pass/fail test. Stop the set before the recorded range, knee position or pelvic control changes.
Progress one variable at a time: a slightly lower endpoint, slower lowering, a brief pause near the controlled bottom, or a small secure ankle load after bodyweight reps are repeatable. Pausing close to the floor changes demand more than simply resting the legs at vertical. Keep the head supported and avoid adding a hip curl to make the rep count look complete.
For a different anti-extension task, the Kneeling Ab-Wheel Rollout uses wheel travel and upper-body support. Treat it as a separate exercise with its own readiness and range, not an automatic next step after a particular leg-raise rep count.
Tips for the proper execution of Lying Leg Raise
Lie on a firm surface and let the head and shoulders rest comfortably. Keep the neck relaxed rather than pulling into a crunch.
Set a comfortable abdominal brace with the ribs and pelvis controlled. Use gentle lower-back contact as a cue without forcing the spine flat through pain.
Keep both legs together and the knees naturally straight throughout the working cycle. Label a consistent knee bend as a regression.
Choose your lower endpoint before the set. Stop higher when lowering farther would increase the back arch or lift the ribs.
Raise the legs smoothly through hip flexion. Do not swing from the floor or throw the feet toward the head.
Finish around vertical without deliberately lifting the pelvis. A pelvic curl changes the movement into a reverse-crunch combination.
Control the descent and reverse at the same endpoint. Continuous hover reps and deliberate touch-and-reset reps should be identified separately.
Keep the hands in a consistent position. If you use hands under the pelvis, record that support rather than comparing it directly with arms beside the hips.
Breathe throughout the set. An exhale during the raise can help organise the brace without requiring a prolonged breath hold.
End before the knee angle, range or pelvic control deteriorates. Bend the knees and place the feet down comfortably to finish.
Muscles worked when doing Lying Leg Raise
The Lying Leg Raise combines dynamic hip flexion with abdominal control of the ribs, pelvis and trunk. Moving the legs and preventing unwanted trunk movement are related but different jobs.
- Hip flexors, including iliopsoas and rectus femoris: contribute to raising the thighs and controlling their return as the legs lower.
- Rectus abdominis: contributes to controlling pelvic position and resisting an increasing lumbar arch. It does not directly flex the hip because it does not cross that joint.
- Internal and external obliques and other abdominal stabilisers: help control the ribs, pelvis and unwanted rotation as both legs move.
- Quadriceps: help keep the knees extended. Rectus femoris also has a hip-flexion role.
- Other hip muscles: help maintain the legs-together position and coordinated leg path.
The hip movement includes raising and lowering phases while much of the abdominal task is sustained stabilisation. A downward leg movement does not mean every abdominal muscle is contracting eccentrically. Deliberately lifting the pelvis adds a different trunk action, as in a reverse crunch.
Primary Muscle(s):

Abdominal
Secondary Muscle(s):

Oblique
Equipment needed for Lying Leg Raise
No equipment needed for this exercise.
Adjust the difficulty of Lying Leg Raise
Scale the leg lever and lower endpoint first. Bend the knees consistently or keep the working arc closer to vertical when a longer or lower leg position disrupts pelvic control. Progress toward straight knees and a lower endpoint gradually, then add tempo, a short low pause or small secure ankle weights. Record hand support, knee angle, range and floor contact so that different configurations are not treated as identical repetitions.
How to make Lying Leg Raise harder?
How to make Lying Leg Raise easier?
How to make Lying Leg Raise harder?
To make Lying Leg Raise harder:
-
Lower slightly closer to the floor while maintaining straight knees and the same controlled ribs and pelvis. Increase range only as far as you can reverse without an increasing back arch, heel rebound or sudden knee bend.
-
Extend the lowering phase to approximately three seconds while keeping the same endpoints. Reduce the rep count if needed rather than compensating with a shorter range or a faster finish.
-
Pause for about one to two seconds just above your recorded lower endpoint, with the legs unsupported and the pelvis controlled. Keep enough reserve to raise the legs again. Do not rest the heels or hold through back pain.
-
After repeatable bodyweight reps, add a small pair of securely fastened ankle weights. Keep the same working range and knee position, and record the load on each ankle. Avoid clamping a loose dumbbell between the feet or adding load that changes the exercise into a swing.
How to make Lying Leg Raise easier?
To make Lying Leg Raise easier:
-
Keep the working arc closer to vertical. Lower only partway before returning, stopping above the point where the ribs rise or the back begins to arch more. Record the higher lower endpoint instead of forcing floor-level range.
-
Bend both knees and keep that bend consistent through the raise and lowering. The shorter lever can make pelvic control more manageable. Gradually straighten the legs as control improves, and label bent-knee sets separately.
-
Practise a single-leg supine raise with the other knee bent and its foot supported on the floor, or use a suitable Dead Bug leg-movement regression. Keep the pelvis steady and alternate sides. This is preparation rather than a bilateral straight-leg repetition.
