Andy Toth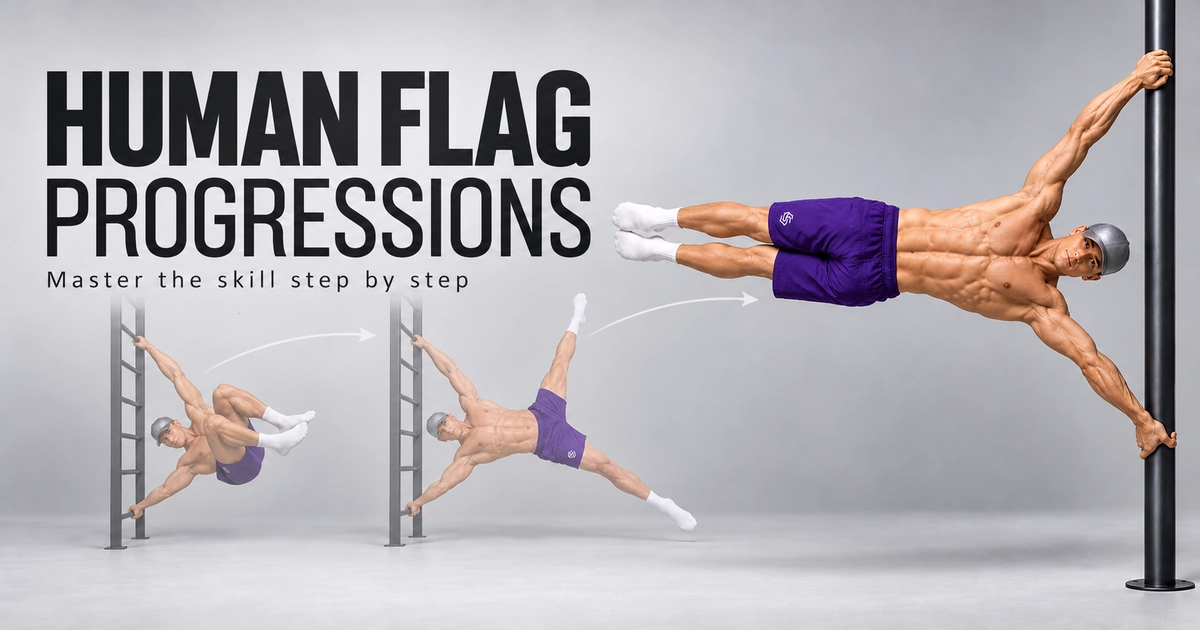
When I first started training for the human flag, I assumed the main challenge would be building enough strength. I quickly learned that strength was only part of it. For months, I could pull myself away from the pole but could not stop my hips from dropping and my body from twisting toward the ground. My top arm pulled too much, my bottom arm never felt completely locked, and every attempt seemed to fall apart before I could understand what had gone wrong. It was frustrating—especially when I felt strong in pull-ups and dips but still could not hold even a rough flag for more than a second. What finally changed my progress was stepping back, improving my shoulder position and learning how to push and pull with both arms while keeping my entire body connected. The journey was far from linear, but that first controlled hold made all the failed attempts worthwhile. This progression is the path I wish I had followed from the beginning.
The human flag is the move people stop and film at the park. It is also one of the most misunderstood skills in calisthenics. Most people treat it as a core exercise and spend months on side planks, when the real limiter is almost always the shoulders: one arm has to push the pole away while the other pulls it down, both with locked elbows, while your whole body hangs sideways in the air.
This guide is the system I use to take people from their first foot-assisted flag plank to a clean, legs-together human flag. It is built around eight progression steps, each with a clear pass standard, so you always know exactly what to train today and when you have earned the next step. Every step links to its full page in our exercise library, where you will find the detailed setup, completion standard and a demo video.
Quick answer: how do you learn the human flag? Build a base of pulling, overhead pressing and lateral core strength, then work through eight flag-specific steps: flag plank → support press (45°) → vertical flag → vertical-to-tuck negatives → tuck flag → one-leg flag → straddle flag → full flag. Train it 2–3 times a week, hold each position for short, perfect sets, and only move on when you pass the step's standard on your training side.
The Human Flag Ladder at a Glance
Bookmark this table. It is the whole guide on one screen, and it is what you will come back to every time you retest.
| Step | Exercise | What it teaches you | Pass standard to move on |
|---|---|---|---|
| 1 | Human Flag Plank | The push–pull pattern with a foot on the ground | 3 × 20 s per side with only light pressure through the foot |
| 2 | Human Flag Support Press (45°) | Lifting your whole body off the ground with straight arms | 3 × 8 s at roughly 45°, straight body |
| 3 | Vertical Human Flag | Unsupported push–pull with the shortest possible lever | 3 × 15 s, feet off the bars, elbows locked |
| 4 | Vertical-to-Tuck Negatives | Controlling the descent toward horizontal | 3 × 5-second lowerings from vertical to a horizontal tuck |
| 5 | Tuck Human Flag | Your first true horizontal hold | 3 × 8 s, hips level with shoulders |
| 6 | One-Leg Human Flag | A longer lever and resisting rotation | 3 × 8 s with each leg extended |
| 7 | Straddle Human Flag | A near-full lever with straight legs | 3 × 8 s with a controlled, active straddle |
| 8 | Full Human Flag | The skill itself | 2 s clean counts as yours; then build toward 5–10 s |
"Pass" always means clean: both elbows locked, hands aligned, no rotation, and a controlled exit. A sloppy 12-second hold does not pass. A perfect 8-second hold does.
What the Human Flag Really Is (and Why Most People Get Stuck)
In a human flag you hold your body sideways and roughly parallel to the ground while gripping a vertical structure with two straight arms. Physically, three jobs happen at once:
- The top arm pulls. Your top-side lat, helped by the teres major and the muscles around the shoulder blade, pulls the upper grip down toward your hip. (For the anatomy, see the NCBI overview of the latissimus dorsi.)
- The bottom arm pushes. Your bottom-side deltoid, serratus anterior and trapezius press the pole away and keep the shoulder from collapsing. The triceps keep the elbow locked. (See the NCBI deltoid reference.)
- The trunk and legs become one rigid lever. The obliques, abs, quadratus lumborum, glutes and quads stop your hips from sagging and your legs from folding.
Here is the idea that changes how people train: the bottom arm is the flag. When I watch a failed attempt, the story is usually the same. The bottom shoulder sinks toward the hand, the elbow softens, and the hips drop a split second later. People blame their core, but the core was never given a stable base to work from. That is why this guide puts so much weight on straight-arm pressing, and why the early steps all train the bottom arm under load.
The second idea is leverage. The further your legs are from your hands, the heavier the flag becomes, even though your bodyweight stays the same. That is the whole logic of the ladder. You start with your body vertical and compact, which is easy leverage, and then gradually lower toward horizontal and lengthen the legs.
One quick clarification, because people mix them up: the human flag has nothing to do with the dragon flag, which is a lying core exercise done on a bench.
Where to Train: Equipment, Grip and Hand Spacing
Choose the right structure
- Stall bars (Swedish wall) are the best place to learn. The rungs let you align your hands perfectly, and you can use your feet to climb into the vertical flag and step out of it safely.
- Outdoor calisthenics parks usually have vertical poles or stations built for flags. Check that the structure is anchored in concrete and does not flex or rotate. Our outdoor gym equipment section covers what to look for.
- For Step 2 you need a pull-up station with a rigid vertical upright next to the bar. A doorway bar will not work.
- Do not use street signs, lamp posts or flagpoles. They are not designed for sideways loading, many of them rotate, and you are hanging your full bodyweight off public property.
- Pole diameter matters. You should be able to wrap your hand most of the way around it. Very thick poles are dramatically harder to grip.
- Keep it dry. Chalk helps a lot. Put a mat underneath while you learn entries and exits.
Grip
On stall bars or horizontal rungs, the standard learning setup is an overhand (pronated) top hand and an underhand (supinated) bottom hand. On a round pole, wrap both hands fully and think about driving the heel of the bottom palm into the pole. Whatever the apparatus, follow the one-line rule: your top hand must sit directly above your bottom hand. If one hand drifts around the side of the pole, your body will twist in the air and no amount of strength will fix it.
Hand spacing
Start wide enough that both elbows lock comfortably. For most people that is roughly one and a half to two shoulder-widths between the hands. A wider grip gives you more mechanical advantage; a narrower grip makes the flag harder and less stable. My tip: put a strip of tape on the pole or note the rung numbers where your hands go, and write it in your training log. Consistent spacing makes your holds comparable from week to week, and later you can make the flag harder simply by bringing your hands closer together.
Choose your side with the three-attempt test
Everyone has a "good side". Do not guess which one it is; test it. After warming up, do three flag plank holds on each side (Step 1), alternating sides, and note which side lets you lean further with less foot pressure. That is your skill side, and you will progress through the ladder on it. Your other side trains one step behind as its strength side. This keeps you balanced without letting the weaker side hold back your progress.
Are You Ready? The 5-Point Flag Readiness Test
You can start Steps 1 and 2 while you work on these. Before you do unsupported flag work (Step 3 onward), pass all five. The useful part is the third column: if you fail a test, it tells you exactly where your bottleneck is.
| Test | Pass mark | If you fail, your bottleneck is… | Fix it with |
|---|---|---|---|
| Strict pull-ups | 8 clean reps | Top-arm pulling strength | Strict pull-ups, archer pull-ups, hanging side pulls |
| Chest-to-wall handstand | 30 s, arms locked, shoulders pushed tall | Bottom-arm pressing and overhead stability | Chest-to-wall handstand holds, pike push-ups |
| Straight-arm side plank | 45 s per side, hips high | Lateral core | Side plank pulses, Copenhagen plank |
| Hanging side pull | 5 controlled reps per side, no swing | One-sided lat strength and oblique control | Hanging side pulls, hanging windshield wipers |
| Shoulder check | 30 s dead hang and full overhead reach, both pain-free | Shoulder health | If either hurts, get it assessed by a physiotherapist before flag training |
The 8-Minute Flag Warm-Up
The flag loads your shoulders, elbows and wrists asymmetrically, so do not skip this.
- 2–3 minutes of the joint warm-up routine.
- 1 minute of the wrist warm-up. Your bottom wrist takes a lot of pressure.
- 8 scapular pull-ups and 8 scapula push-ups.
- 1 set of 5 hanging side pulls per side.
- 2 easy ramp-up holds of the step below your current step, one per side.
The 8-Step Human Flag Progression
For every step you get the same four things: why it matters, how to do it, the cues I use, and the standard to pass. Tap the exercise name for the full technique page and video.
Step 1: Human Flag Plank (Foot-Assisted Flag)
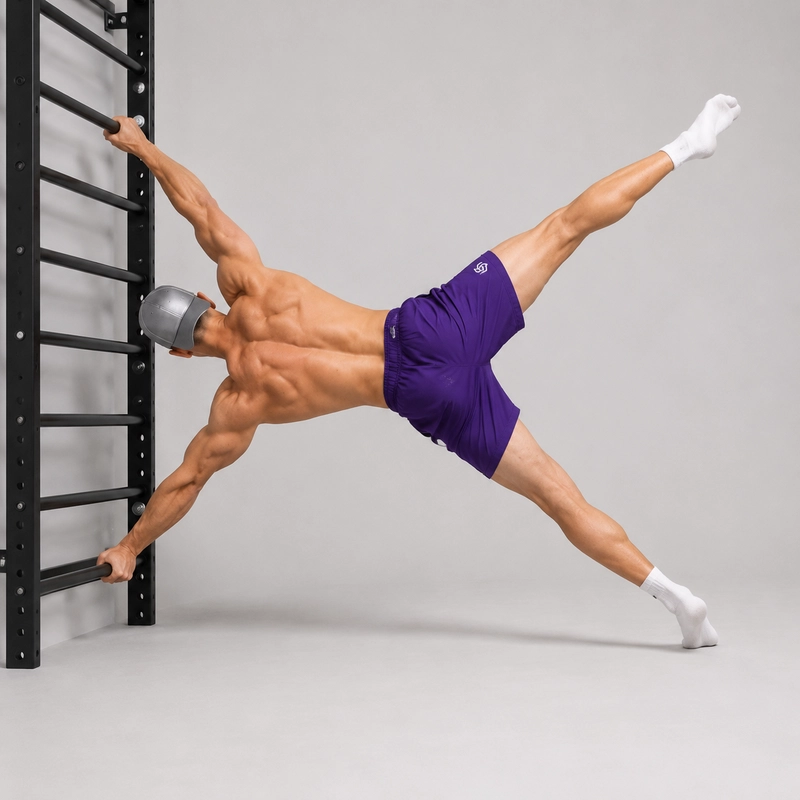
Why it matters: This is where you learn the push–pull. With one foot on the ground you can feel the top arm pulling and the bottom arm pushing without being overwhelmed by your full bodyweight. It also doubles as the side-selection test.
How to do it:
- Stand side-on to the stall bars or pole. Place your top hand overhead and your bottom hand around hip height, directly below it.
- Lock both elbows. Pull down with the top arm and push the bars away with the bottom arm.
- Step your lower foot away from the structure and lean your body sideways, keeping that foot planted.
- Lift your top leg into a wide straddle and hold.
- To progress, move the planted foot further away and put less pressure through it.
Cues: "Push the pole away like you are trying to shift it off its base." "Chest faces forward, not up to the sky."
Pass standard: 3 × 20 s per side with only light pressure through the foot. Your elbows stay locked, and the planted foot could briefly hover.
Watch out for: treating it as a passive lean. If your arms are relaxed and your leg does all the work, you are training balance, not the flag. Full breakdown on the Human Flag Plank page.
Step 2: Human Flag Support Press (45° Hang)
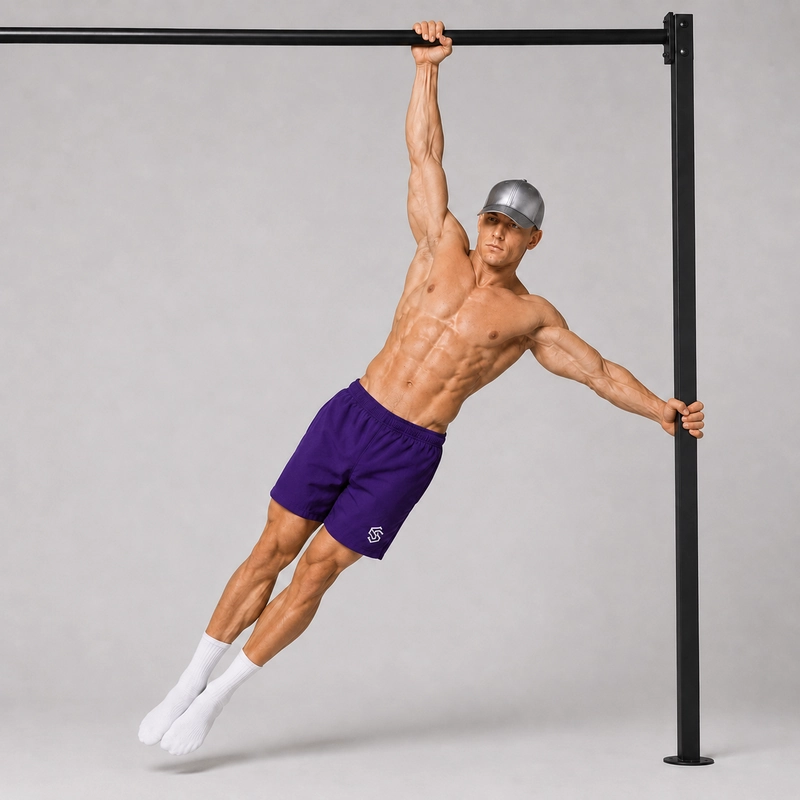
Why it matters: This is the first time your feet leave the ground. The geometry is favourable, since one hand hangs from a horizontal bar and the other presses against an upright, so you can lift your whole body with straight arms before you ever grip a pole. (You may know it as the 45-degree hang.)
How to do it:
- Hang with one hand from a pull-up bar, close to the station's vertical upright.
- Press the heel of your other, open palm against the upright at around lower-chest to hip height. Do not grip it.
- Lock both elbows, brace, and squeeze your legs together.
- Pull down with the hanging arm while pressing the upright away, and lift your straight body sideways to about 45°.
- Pause, then lower under control.
Cues: "Hips and feet rise together." "Stay long from shoulders to toes."
Pass standard: 3 × 8 s holds at roughly 45° with a straight body.
No suitable station? Spend longer on Step 1 and add hanging side pulls for the top arm. You can move to Step 3 once you pass Step 1 and the readiness test. More on the Human Flag Support Press page.
Step 3: Vertical Human Flag
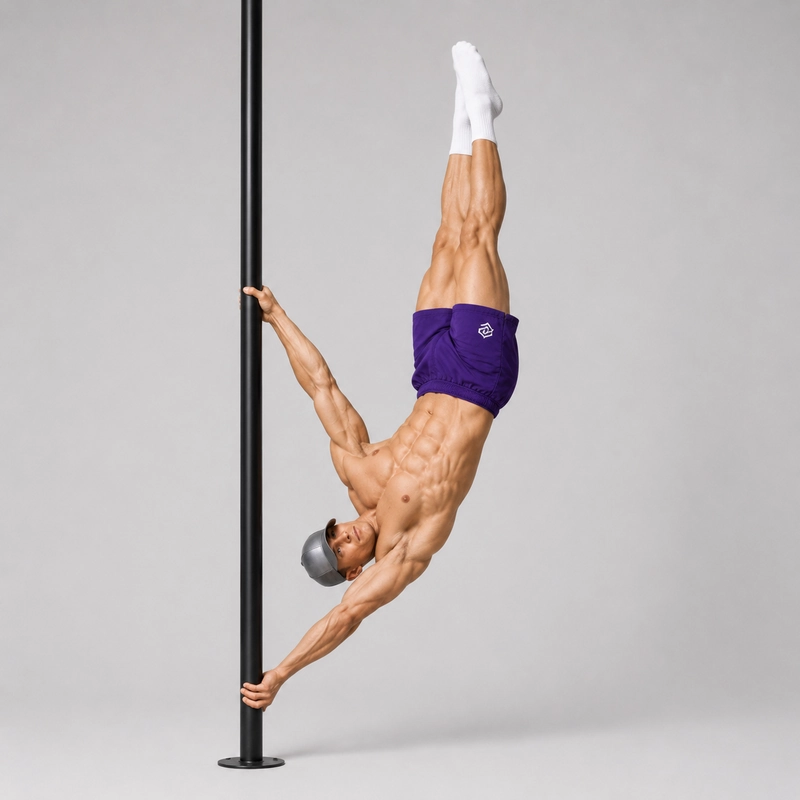
Why it matters: This is your first fully unsupported flag. With your body vertical and your feet above your head, the lever is as short as it gets, so you can practise the exact grip and arm actions of the full flag at a manageable load. It is also the starting position for Step 4, which is the most valuable drill in this guide.
How to do it:
- On stall bars, set your hands in flag position and lock both elbows.
- Climb your feet up the rungs until your hips and feet are above your shoulders. On a pole, use a small, controlled kick or a spotter.
- Bring your legs together, straighten your knees and point your feet at the ceiling.
- Gradually take the weight off your feet until the arms hold everything.
- Exit by putting your feet back on a rung before you release either hand.
Cues: "Candlestick: one straight line from hands to toes." "Keep pushing even though it feels easy."
Pass standard: 3 × 15 s, feet off the structure, elbows locked, controlled exit.
Watch out for: kicking up hard before you can climb in. An uncontrolled kick loads the shoulders suddenly and makes the exit unpredictable. See the Vertical Human Flag page. Antranik's human flag tutorial also treats the vertical flag as the base position for everything that follows.
Step 4: Vertical-to-Tuck Negatives (the "Clock" Drill)
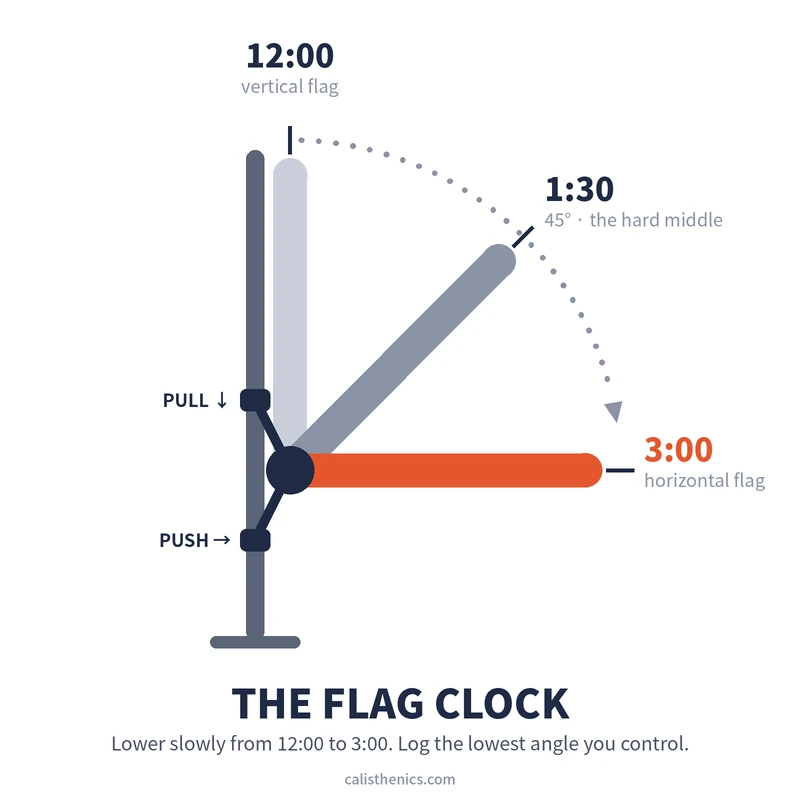
Why it matters: Holding a position teaches you one angle. Lowering through the angles teaches you all of them. Negatives take you through the exact range of the flag under control, and they are how you build strength at angles you cannot yet hold.
The clock method: Picture your body as a clock hand pivoting around your hands. 12 o'clock is the vertical flag. 1:30 is 45°. 3 o'clock is horizontal. Naming the angles this way makes them easy to film, compare and log ("tuck negative, controlled to 2:30").
How to do it:
- Get into the vertical flag (Step 3), then pull your knees into a tight tuck.
- Keep pushing and pulling hard and lower slowly toward 3 o'clock. Count the seconds out loud.
- The moment you lose control or an elbow bends, stop, tuck tighter and return your feet to the structure.
- Rest 90–120 s and repeat. Do 3–5 negatives per side.
Pass standard: 3 × 5-second lowerings from 12 o'clock to a horizontal tuck at 3 o'clock, with no speed-up at the bottom.
Coach's note: The last third of the descent is where most people "fall". If you speed up after 1:30, stop your negatives there for a week, then extend the range a little at a time.
Step 5: Tuck Human Flag
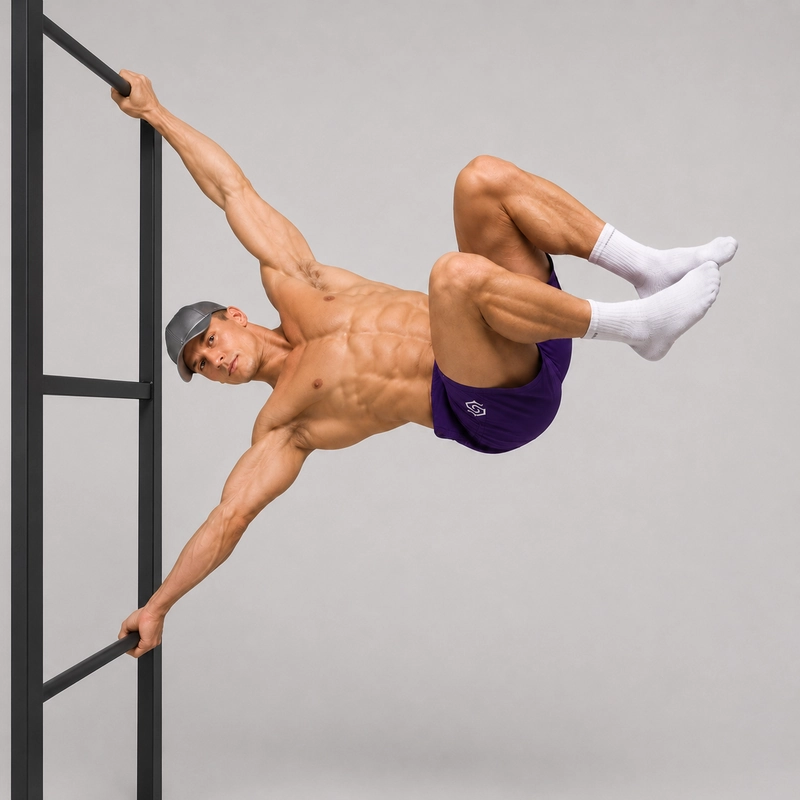
Why it matters: Your first horizontal hold. With your knees tucked to your chest, the lever is short, but your torso is now sideways, just like in the full flag.
How to do it: Enter from the vertical flag and lower into the tuck (your Step 4 skill), or enter directly from the ground with a small, controlled lift. Hold with your hips level with your shoulders and your heels close to your glutes. Exit by returning to vertical or tucking your feet back down to the ground.
Cues: "Hips up to the shoulder line." "Knees stay glued to your chest."
Pass standard: 3 × 8 s with your hips at shoulder height. Start with 3–8 s holds and 2–3 minutes of rest.
Watch out for: opening the tuck as you tire. The moment your knees drift away from your chest, the lever gets longer and the hips drop. Full details on the Tuck Human Flag page.
Step 6: One-Leg Human Flag
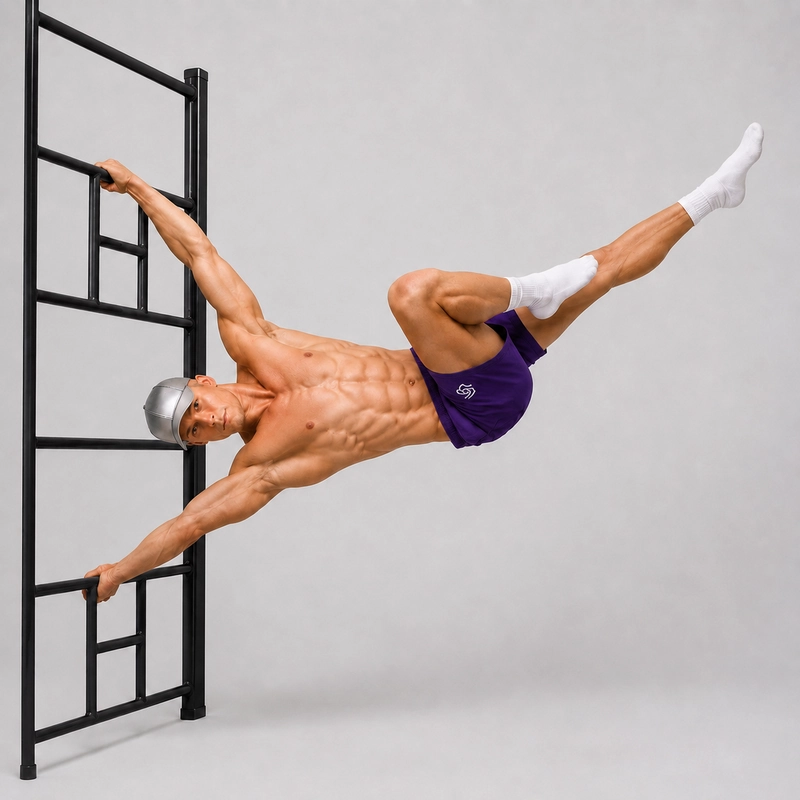
Why it matters: Extending one leg lengthens the lever and adds a new challenge: the asymmetric leg position tries to twist you. This is where your anti-rotation control is built.
How to do it: From a stable tuck flag, slowly straighten one leg until it is in line with your torso, and keep the other knee tucked. Train both configurations: top leg extended, then bottom leg extended.
Cues: "Extended leg in line with the torso: not in front, not behind." "Squeeze the quad and point the toes."
Pass standard: 3 × 8 s with each leg configuration on your skill side.
Watch out for: letting the extended leg drift forward as a counterweight. It feels easier, but it rotates your pelvis and teaches a position you will have to unlearn. See the One-Leg Human Flag page.
Step 7: Straddle Human Flag
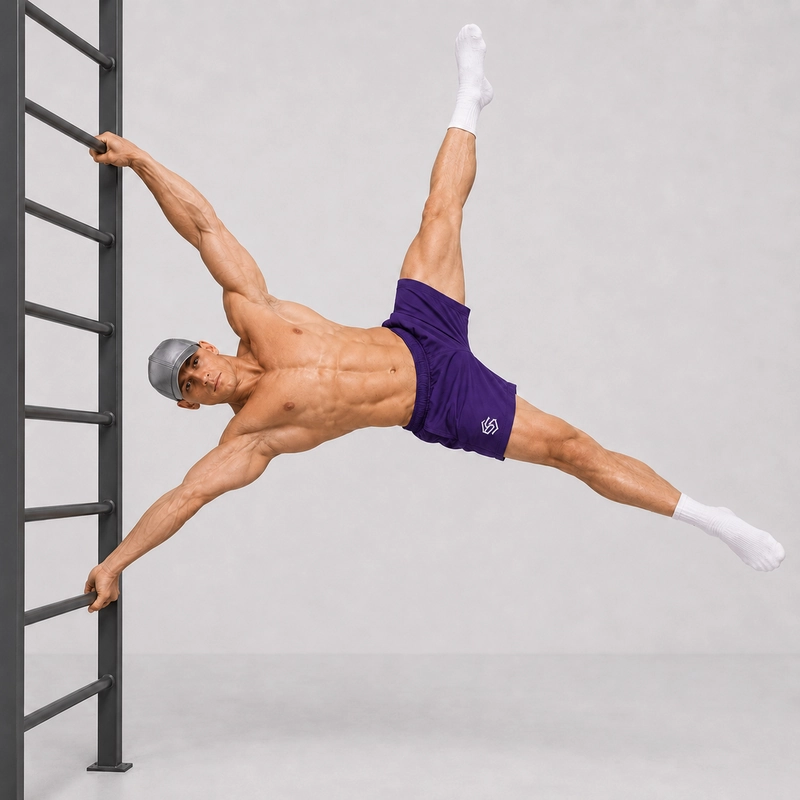
Why it matters: Straight legs spread into a wide V give you nearly the full lever, but the straddle brings your legs' centre of mass slightly closer to your hands. It is the last stop before the full flag.
How to do it: Enter via a tuck or a controlled lowering from vertical, then open into the widest straddle you can actively hold with straight knees and square hips.
Cues: "Wide legs don't excuse low hips." "Push, pull, squeeze: everything, all the time."
Pass standard: 3 × 8 s. Then start narrowing: every session, bring your feet a few centimetres closer together while keeping the same body line.
Watch out for: forcing a maximum passive split. If your pelvis rotates to get the legs wider, use a narrower straddle you can control. More on the Straddle Human Flag page.
Step 8: Full Human Flag
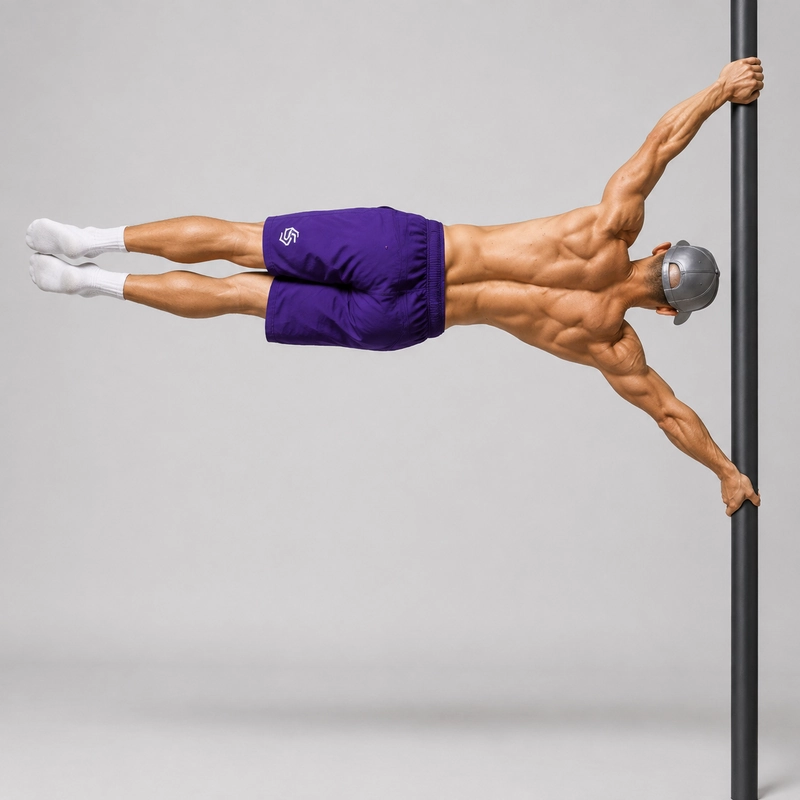
Legs together, knees locked, toes pointed, body parallel to the ground, both elbows straight. A controlled two-second hold counts. It is yours. After that, build toward 5–10 seconds and work on cleaner entries: first from a tuck, later from a lowering from vertical, and eventually from the ground with only a small kick.
Our Human Flag exercise page has the full completion standard, which is useful if you want to be sure your flag would pass a strict judge.
The Flag Matrix: Progress in Two Directions
The ladder is linear, but your strength is not. Some people can hold a tuck at 45° long before they can hold it horizontal, and a straddle at 1:30 may be easier than a one-leg flag at 3 o'clock. The Flag Matrix combines both variables, the lever (leg position) and the angle (clock position), into one grid:
| Lever ↓ / Angle → | 12 o'clock (vertical) | 1:30 (45°) | 3 o'clock (horizontal) |
|---|---|---|---|
| Tuck | Easiest | ▢ | Step 5 |
| One-leg | ▢ | ▢ | Step 6 |
| Straddle | ▢ | ▢ | Step 7 |
| Full (legs together) | Step 3 | ▢ | The goal |
How to use it:
- A cell is "owned" when you can hold it for 3 × 5 s, clean.
- Each training day, work the hardest cell you own plus one attempt at the next cell.
- Move one cell at a time, either right (lower angle) or down (longer lever). Never jump diagonally.
- Stuck on a step? The matrix gives you a sideways move instead of grinding the same failed hold. For example, if the horizontal one-leg flag won't come, own the straddle at 1:30 first.
Print the grid, fill in the cells as you own them, and share it in the comments. It is the easiest way to see how close you really are.
How to Program Your Flag Training
The rules
- 2–3 flag sessions per week, with at least one rest day in between. Straight-arm work is hard on connective tissue and needs recovery.
- Skill first. Do flag work straight after the warm-up, while you are fresh. Never at the end of a session.
- Weak side first, then your skill side. Your weak side trains one step behind.
- The two-second buffer rule: end each hold about two seconds before you think your form will break. You are practising the perfect position, not testing your limit.
- Stop at the first elbow bend. A bent-arm hold trains a different skill and loads the elbow in a way the ladder has not prepared you for.
- Rest 2–3 minutes between hard flag sets. It feels long; do it anyway.
- Retest every 3 weeks and log the result (see below).
Session template (about 45 minutes)
| Block | Day A | Day B |
|---|---|---|
| Warm-up (8 min) | The 8-minute flag warm-up above | |
| Skill (15–20 min) | Current step: 3–5 sets per side, weak side first. From Step 4 onward, add 3 negatives per side. | |
| Strength (15 min) | Bottom arm: chest-to-wall handstand 3 × 30–45 s, pike push-ups 3 × 6–10, side plank pulses 2 × 10/side | Top arm: archer pull-ups or strict pull-ups 3 × 5–8, hanging side pulls 3 × 5/side, Copenhagen plank 2 × 20 s/side |
| Shoulder care (5 min) | Rotator cuff external rotation 2 × 12–15/side | |
If you train 3 times a week, make the third session a light "technique day": 5–6 easy, perfect holds of the step below your current one, with no strength block. These easy exposures add practice without adding fatigue.
The three phases
| Phase | Steps | Main focus | You're done when… |
|---|---|---|---|
| 1. Build the base | Readiness test, Steps 1–2 | Push–pull pattern, bottom-arm pressing, top-arm pulling | You pass all five readiness tests and Step 2 (or Step 1 if you have no station) |
| 2. Get upside down | Steps 3–5 | Unsupported holds, negatives, first horizontal position | You hold a 3 × 8 s tuck flag |
| 3. Lengthen the lever | Steps 6–8 | Longer levers, anti-rotation, entries | You hold a clean 2 s full flag |
Every 6–8 weeks, take an easier week: halve your sets and drop back one step. You will usually come back stronger. If you would rather have an app schedule and track this for you, I compared the options in Best Calisthenics Apps.
Track Your Progress: The Flag Log
The athletes who get the flag fastest are rarely the strongest. They are the ones who measure. Copy this table into your notes app and fill in one row per retest:
| Date | Side | Step / Matrix cell | Best clean hold (s) | Hand spacing | Notes (what broke first?) |
|---|---|---|---|---|---|
| e.g. 1 Oct | Left (skill) | Step 5 – tuck @ 3 o'clock | 6 | Rungs 3 → 9 | Bottom elbow softened at 5 s |
The "what broke first?" column is the most useful one. If it keeps saying "bottom elbow", do more pressing. If it says "hips dropped", do more negatives and lateral core. The log tells you what to train next.
Film every retest. Place your phone at hip height a few metres in front of you, so it faces your chest, with your whole body and the pole in frame. Turn on the grid overlay. Your eyes lie mid-hold; the video doesn't. Check three things: the clock angle of your body, whether both elbows are fully straight, and whether your chest is rotating toward the sky.
Troubleshooting: Symptom → Cause → Fix
| What you see | Usual cause | Fix |
|---|---|---|
| Body twists, chest turns toward the sky | Hands not in one vertical line, or the top arm isn't pulling | Re-check hand alignment. Cue "chest faces forward". Go back to the flag plank and hold it square. |
| Hips sag below the shoulders | Bottom arm isn't pushing hard enough, or you are entering from too low | Enter from vertical and lower (Step 4). Add side plank pulses. Shorten the lever by one matrix cell. |
| Bottom elbow bends | Pressing strength, or the bottom shoulder is collapsing | Widen your grip slightly. Add chest-to-wall handstands and pike push-ups. Go back one step for two weeks. |
| Top elbow bends | Trying to "one-arm pull-up" the flag | Cue "pull the top hand toward your hip pocket" with a straight arm. Add hanging side pulls. |
| You can hold vertical but crash on the way down | No strength in the middle angles | Slower negatives. Stop them at 1:30 for a week, then extend the range. |
| Hands slip | Sweat, a thick or smooth pole | Chalk, a dry cloth between sets, a thinner structure. Add dead hangs for grip endurance. |
| Bottom wrist hurts | Grip angle or pole shape | Try stall bar rungs instead of a pole. Adjust the hand angle. Do the wrist warm-up every session. If pain persists, get it checked. |
| One side is miles behind | Completely normal | Keep the weak side one step behind your skill side. Don't try to force them level. |
Coaching Cues That Actually Work
Cues are personal: one will click for you and another won't. These are the ones that work most often for the people I coach:
- "Push the pole off its base." For the bottom arm. It makes people push through the pole instead of just leaning on it.
- "Top hand to your hip pocket." For the top arm. It turns a vague "pull" into a lat-driven straight-arm action.
- "Tall bottom shoulder." Keep space between your bottom ear and your bottom shoulder.
- "Chest to the camera." If you film from the front, your chest should face the lens the whole time.
- "One leg, not two." In the full flag, squeeze your legs together as if they were a single limb.
- "Exhale on the lift, sip air in the hold." Don't hold your breath for a whole set.
Staying Healthy: Shoulders, Elbows and Wrists
The flag is safe when you progress patiently, and punishing when you don't. The shoulder in particular takes large forces in gymnastics-style straight-arm skills (see this sports medicine review of the gymnast's shoulder), and the flag loads your two shoulders in opposite directions.
- Muscles adapt faster than tendons. That is why the pass standards are conservative, and why you should resist skipping steps even if a harder hold "sort of" works.
- Normal: muscle fatigue, a strong burn in the obliques and lats, general soreness the next day.
- Not normal: sharp pain, pain at a specific point in a joint, clicking with pain, tingling or numbness, or elbow pain that is still there the next morning. Stop flag training and get it assessed by a physiotherapist or sports medicine doctor.
- Keep the rotator cuff strong with external rotations and overhead external rotations.
- Never release a hand until your feet are down. Most flag accidents happen on the exit, not in the hold.
How Long Does It Take to Learn the Human Flag?
Honest answer: it depends, and anyone who promises "the human flag in 30 days" is selling something. As a rough guide for someone training 2–3 times a week:
- Already passing the readiness test: a clean tuck flag often comes within a few months, and a full flag within about 6–12 months.
- Starting from fewer than 5 pull-ups: expect to spend your first few months in Phase 1. That is not wasted time; it is the part that makes everything after it faster.
What speeds it up or slows it down: bodyweight and leg length (long, heavy legs make a longer lever), existing straight-arm strength (gymnasts and climbers progress fast), consistent access to good equipment, and, above all, whether you retest and log or just "have a go" at the park.
Frequently Asked Questions
Is the human flag easier than the front lever or planche?
For many people, yes, because both arms share the load and the progressions give very clear feedback. But it is not universal: athletes with long, heavy legs often find the flag's lever brutal. Treat it as its own skill rather than a stepping stone. If you want to compare, see our front lever training routine and planche progression guide.
Can I learn the human flag at home?
You can build most of the strength at home with pull-ups, handstand work and lateral core exercises. For the flag-specific steps you need stall bars, a solid vertical pole, or a pull-up station with a rigid upright. Browse our pull-up bars and stations, or find a local outdoor park.
Should I use resistance bands for the human flag?
Bands are a useful tool at any step, not a step of their own. A band looped around the hips or under the legs lets you practise a longer lever with support. Reduce the band thickness before you remove it completely. See our resistance bands.
Which side should I train?
Use the three-attempt test from the equipment section to find your skill side. Train both sides, with your weaker side one step behind.
Can I do a human flag on a lamp post or street sign?
Please don't. They are not built for sideways loads, many rotate, and a failure could hurt you or others. Use equipment designed for calisthenics.
How often should I train the human flag?
Two or three focused sessions per week, with at least a day of rest in between. More is rarely better for straight-arm skills.
Is the human flag bad for your shoulders?
Not when you progress through the steps and respect the pain signals above. Problems usually come from skipping steps, grinding bent-arm holds, or training through joint pain.
What muscles does the human flag work?
Mainly the lats (top arm), the deltoids, serratus and trapezius (bottom arm), and the obliques and deep core. The glutes, quads and adductors keep your legs locked together.
Is the human flag the same as the dragon flag?
No. The human flag is held sideways on a vertical pole. The dragon flag is a core exercise where you lie on a bench and hold your body up from your shoulders.
What to Learn After the Human Flag
- Longer holds and cleaner entries: aim for 10 seconds, entered from a slow lowering rather than a kick.
- Human flag raises: move from a lower angle back up to horizontal with straight arms.
- Human Flag Pull-Up: bend and re-extend both arms while staying horizontal. An elite follow-up.
- Other levers: the back lever and front lever use the same straight-arm strength in different planes.
Your Next Step
Do the readiness test this week, find your skill side, write down your first Flag Log entry, and start Step 1. Then come back in three weeks and retest.
Tell me in the comments which step you're on and your best clean hold, and which matrix cell is giving you trouble. I read them, and your questions shape the next update of this guide.
This article is for educational purposes and is not a substitute for individual medical advice. Read more about how we create and review content in our editorial process.