
Pull 9: Targeting the Lats, Rhomboid and Trapezius For a Full Back Workout
🎯 Workout Description:
We’re nearing the transition point. This workout blends lightly assisted vertical pulls with bodyweight rows and targeted accessory work. The goal is to get as close to an unassisted rep as possible by gradually reducing help from bands or feet.
👤 Who It’s For:
Athletes who can perform negatives with control and have experience with band- or foot-assisted pull-ups.
🧰 Equipment Needed:
Pull-up bar ▶️ check out the best Pull-Up Bars for calisthenics
- Both ▶️ Gymnastics rings and ▶️ these Dip Bars are great for bodyweight rows
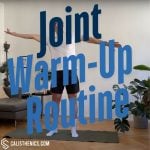
Warm-Up
Goal: Fire up the pulling chain and prep shoulders for vertical tension.
Format: Circuit – 2 rounds, no rest between exercises or rounds
-
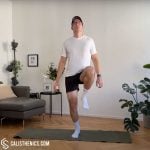
30 sec High Knees
-
10x Reverse Snow Angels
-
10x WYT Raises from each letter
This combo opens up your shoulders and activates your scapular muscles for smooth, powerful pulls.

No muscle groups found for this post.
Tips
-
Move slowly and deliberately to avoid sudden movements.
-
Keep circles smooth and controlled—avoid jerky motions.
-
Breathe steadily and deeply to maximize relaxation and blood flow.
-
Gradually increase the range of motion as your joints warm up.
-
Perform each movement for 15-20 seconds, or until joints feel loosened.
-
Customize your routine slightly based on the specific demands of your workout.


Tips
-
Keep your core tight to stabilize your spine and prevent over-rotation.
-
Pump your arms naturally—elbows bent and driving in sync with your legs.
-
Look straight ahead rather than down to keep posture aligned.
-
Use a metronome or playlist with a steady beat to maintain tempo.
-
Start slow to warm up and ramp up intensity gradually.
-
Train barefoot or in minimalist shoes (on soft flooring) to improve foot strength and awareness.

Muscle group:

Tips
-
Keep Arms Straight but Not Locked: Maintain a slight bend in the elbows to reduce unnecessary joint strain.
-
Move in a Smooth, Controlled Manner: Avoid jerky or fast motions—slow, controlled reps activate muscles more effectively.
-
Focus on Squeezing the Shoulder Blades: Imagine pinching a pencil between your scapulae at the bottom of the movement.
-
Engage Your Core Throughout: Prevent excessive lumbar arching by keeping abs and glutes activated.
-
Keep a Steady Breathing Pattern: Inhale as you extend the arms forward, and exhale as you sweep them back.
-
Try Adding Light Weights for Progression: Holding small plates or wrist weights can increase resistance for added challenge.


Tips
-
Core and Glute Engagement: Keep your core and glutes engaged throughout the exercise to support your lower back and maintain proper body alignment.
-
Focus on Shoulder Blades: The key to WTY raises is squeezing your shoulder blades together during each raise to engage the muscles of the upper back.
-
Control the Movement: Perform each raise slowly and with control, avoiding any jerky movements. Focus on quality over speed.
-
Neck Alignment: Keep your neck in a neutral position by looking down at the floor. Avoid lifting your head too high, which could strain your neck.
-
Breathing: Inhale as you prepare to lift your arms and exhale as you squeeze your shoulder blades together and raise your arms. Steady breathing helps maintain control and focus.
Strength
Goal: Build top-end pulling strength with minimal assistance and strict form.
Structure:
-
Superset A (4 rounds): A1 + A2, rest 2 minutes
-
Set B (2 sets): Performed alone, rest 45 sec
🟦 Superset A:
-
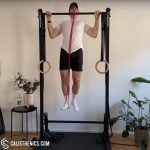
A1: Resistance Band Pull-Ups – 4–5 reps (use a lighter band than before)
-
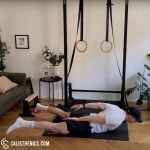
A2: Bodyweight Rows with Elevated Feet – 6–8 reps
→ Rest 2 minutes between rounds
🟩 Set B:
-
Resistance Band Shrugs – 20 reps
→ Rest 45 sec between sets
These banded pull-ups should feel tough. Focus on explosive pulling and controlled lowering—you’re simulating a real rep now.


Tips
-
Choose the right band tension – A thicker band makes the pull-up easier, while a thinner band provides less assistance.
-
Experiment with different grips – Try neutral grip (palms facing each other) or wide grip for variation.
-
Keep your body tight – Engage your core and glutes to prevent swinging.
-
Control the descent – Lowering slowly builds more strength than letting the band recoil you downward.
-
Breathe properly – Exhale as you pull up, inhale as you lower yourself.
-
Gradually decrease assistance – As you get stronger, transition to thinner bands or fewer loops.
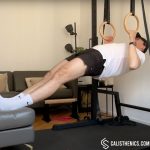


You can do it on Dip Bars or Gymnastics Rings set just below chest height.
Elevate your feet with a chair or plyo box for example.
Tips
-
Engage the Core Throughout the Movement: Keep a hollow body position to maintain stability.
-
Adjust the Ring Height to Modify Difficulty: Lower rings = harder (more horizontal position), higher rings = easier.
-
Use a Controlled Tempo: 3-4 second eccentric (lowering) phases will increase time under tension for strength gains.
-
Focus on Scapular Retraction: Squeeze your shoulder blades together at the top of each rep.
-
Keep Wrists Neutral: Avoid excessive wrist bending by maintaining a strong, aligned grip.
-
Breathe Properly: Inhale during the eccentric phase (lowering) and exhale as you pull up.

Muscle group:
Tips
-
Keep the Core Tight: Engaging your core helps stabilize your torso, ensuring the movement focuses on the traps.
-
Focus on Shoulder Elevation: Avoid pulling with your arms; instead, focus on lifting your shoulders directly upward toward your ears.
-
Avoid Rolling the Shoulders: Lift your shoulders straight up and down; rolling the shoulders can lead to improper form and shoulder strain.
-
Controlled Movement: Perform the exercise slowly, focusing on squeezing the traps at the top and controlling the descent.
-
Breathe Steadily: Exhale as you lift into the shrug and inhale as you lower back down, maintaining a consistent rhythm.
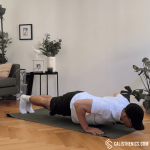
HIIT Finisher
Goal: Drive strength and endurance while maintaining clean movement under fatigue.
Format: 5 rounds – 60 sec per round
-
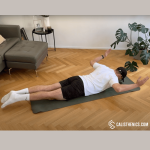
40 sec Push-Ups
-
20 sec Squat Hold
→ 5 rounds = 10 minutes
You’ll feel the push-pull balance here. Fight to keep posture tight, even when your arms are smoked from the main set.

Muscle groups:


Tips
-
Body Alignment: Keep your body in a straight line from head to heels. Engage your core and glutes to prevent your hips from dropping or rising.
-
Hand Placement: Your hands should be positioned just outside of shoulder-width for optimal stability. Moving them closer or wider will target different muscles.
-
Elbow Positioning: Keep your elbows at about a 45-degree angle from your body, not flaring out too far to avoid shoulder strain.
-
Breathing: Inhale as you lower yourself, and exhale as you push back up. Controlled breathing improves strength and endurance.
-
Controlled Movements: Lower yourself slowly to build strength, then push back up with a smooth, steady motion.
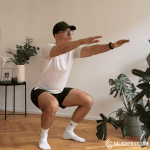


Tips
-
Maintain an Upright Posture: Keep your chest up and back straight during the entire hold. Avoid letting your lower back round, which can put strain on the spine.
-
Knee and Toe Alignment: Ensure that your knees track over your toes and do not collapse inward. Your knees should be at a 90-degree angle or slightly less.
-
Keep Your Heels Down: Ensure that your weight is distributed evenly across your feet, with your heels pressed firmly into the ground. You should be able to wiggle your toes slightly.
-
Engage Your Core: Tighten your abdominal muscles to help stabilize your lower back and maintain proper form throughout the hold.
-
Breathe Consistently: Don’t hold your breath! Breathe deeply and consistently to stay relaxed and focused.