
Negative Handstand Push-Up
How to do Negative Handstand Push-Up?
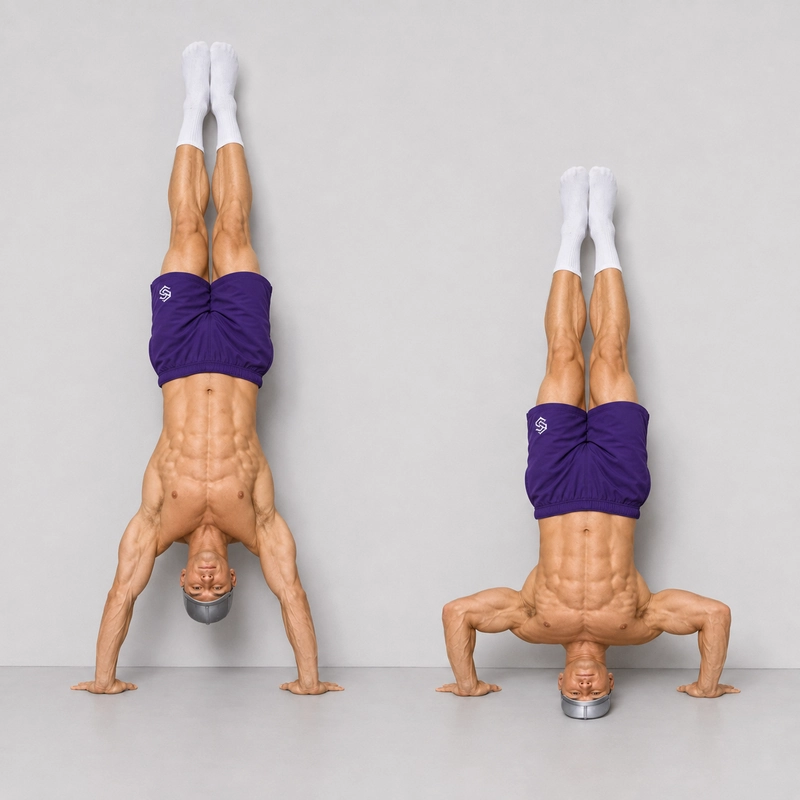
The Negative Handstand Push-Up, also called a Handstand Push-Up Negative or HSPU Negative, is the eccentric-only phase of a wall-supported handstand push-up. You begin in a locked-out handstand with your back facing the wall, slowly lower your head toward the floor, and then step down and reset instead of pressing yourself back up.
This page covers the strict back-to-wall version. The wall assists your balance, but your shoulders, triceps, and hands must still control the descent. A complete repetition lasts approximately three to five seconds and finishes with your head touching a stable target gently rather than dropping onto it.
The Negative Handstand Push-Up deserves its own canonical exercise page because its movement standard, programming, safety requirements, and reset are different from both a static Back-to-Wall Handstand and a complete Wall Handstand Push-Up. It is particularly useful for athletes who can support themselves overhead and control some of the lowering phase but cannot yet press back to straight arms.
What Does a Negative Handstand Push-Up Train?
The exercise develops eccentric vertical-pushing strength in the shoulders and triceps while also challenging scapular control, wrist stability, core tension, and body awareness in an inverted position.
During an eccentric repetition, the pressing muscles remain active while lengthening to slow your descent. This often allows athletes to control a movement they cannot yet reverse concentrically, but negatives do not completely replace upward pressing work such as Pike Push-Ups or Elevated-Feet Pike Push-Ups.
Negative repetitions are highly demanding and can cause substantial soreness when introduced too aggressively. The American College of Sports Medicine’s discussion of eccentric exercise recommends gradually increasing eccentric intensity and volume, especially when the training method is new or performed infrequently.
Readiness Requirements
You should already be comfortable entering, holding, and exiting a Back-to-Wall Handstand before attempting a negative repetition. You also need enough bent-arm strength to prevent an immediate uncontrolled fall toward the floor.
A practical but non-universal starting benchmark is a controlled 20-second wall handstand combined with several technically sound Elevated-Feet Pike Push-Ups. If you cannot slow the first part of the descent, use a pike variation or a shorter range of motion instead.
Your wrists, elbows, shoulders, and neck should be pain-free during overhead support, and you should know how you will return to the floor before beginning each repetition.
Equipment and Setup
- Choose a clear wall and a firm, non-slip floor with enough space to kick up and descend safely.
- Use a firm handstand pad or securely stacked non-slip pads as a head target when learning the exercise.
- Avoid loose pillows or unstable cushions that can compress unevenly or slide during the descent.
- Prepare your wrists and shoulders with the Wrist Warm-Up Routine and several progressively loaded pressing movements.
- Place your hands around shoulder-width apart or slightly wider, with your fingers spread and pointing generally forward.
- Begin with your hands approximately 15 to 30 centimetres, or 6 to 12 inches, from the wall and adjust the distance to suit your proportions and technique.
- Position the head target slightly farther away from the wall than your hands so the head and hands can form a stable triangle at the bottom.
How to Do a Negative Handstand Push-Up
- Kick into a Back-to-Wall Handstand and allow your heels to make light contact with the wall.
- Straighten your elbows completely and push tall through your shoulders to establish a controlled top position.
- Brace your abdomen, squeeze your glutes, straighten your knees, and keep your legs together.
- Spread your fingers and maintain active pressure through your palms and fingertips.
- Take a controlled breath and begin bending your elbows without allowing your shoulders to collapse suddenly.
- Lower your head slightly forward and down so the head and hands form a tripod rather than moving the head directly between the hands.
- Keep your elbows approximately 30 to 45 degrees from your torso and your forearms as close to vertical as your proportions allow.
- Continue lowering for approximately three to five seconds while keeping your hips controlled and your heel contact light.
- Allow the top of your head to touch the stable target gently while continuing to press through both hands.
- Keep your neck neutral and do not transfer your bodyweight onto your head or remain in a passive headstand.
- Bring your feet down from the wall under control and return to your knees or feet without attempting an uncontrolled press from the bottom.
- Reset on the floor before beginning the next repetition.
Completion Standard
One repetition begins in a stable back-to-wall handstand with fully extended elbows and ends after a controlled descent to gentle head contact followed by a safe return to the floor.
- The back faces the wall and only the heels make light wall contact.
- The elbows and shoulders reach a clearly locked-out top position before the descent begins.
- The lowering phase remains controlled for at least approximately three seconds.
- The head travels slightly forward to form a tripod with the hands.
- The elbows do not flare directly sideways and the forearms remain reasonably vertical.
- The head reaches the same stable target on every repetition without impact.
- The hands continue carrying the load when the head contacts the target.
- The repetition finishes with a controlled exit rather than an attempted bounce or kip.
A shorter-range negative is a valid regression, but it should not be recorded as a full-range repetition until the head reaches the planned floor-level target under control.
Negative Handstand Push-Up vs. Full Handstand Push-Up
A Negative Handstand Push-Up contains only the lowering phase. If you press from the bottom back to straight arms, you have completed a full Wall Handstand Push-Up rather than another negative repetition.
Controlling negatives does not guarantee that you can perform the upward phase because eccentric strength generally develops ahead of concentric pressing strength. Continue training pike push-ups, partial-range wall presses, or appropriately assisted concentric repetitions alongside the negatives.
Common Mistakes
- Dropping through the final part: Use a higher head target or shorter range if you cannot maintain a consistent lowering speed to the bottom.
- Resting on the head: Treat the target as a depth marker and continue pressing actively through both hands when contact occurs.
- Lowering directly between the hands: Move the head slightly forward so the hands and head create a stable triangular base.
- Flaring the elbows sideways: Guide the elbows diagonally backward and keep the forearms close to vertical.
- Starting without full lockout: Straighten the elbows and elevate the shoulders before beginning the repetition.
- Arching excessively: Brace the abdomen and squeeze the glutes instead of resting the hips or lower back against the wall.
- Using heavy wall pressure: Let the heels slide lightly instead of driving the legs or buttocks into the wall.
- Attempting too much depth: Raise the target until every part of the available range can be controlled.
- Using an unstable target: Replace loose cushions with firm padding that cannot shift during the repetition.
- Performing excessive volume: Keep the number of repetitions low because maximal eccentric work can create considerable fatigue and soreness.
Breathing
Inhale and brace in the top position, then exhale gradually during the descent without releasing your trunk tension. Avoid holding your breath through several consecutive attempts, and take time to breathe normally after returning to the floor.
Sets, Repetitions, and Programming
Perform Negative Handstand Push-Ups early in your pressing workout after warming up but before your shoulders and triceps become fatigued. Begin with 2 to 4 sets of 1 to 3 repetitions using a three-to-five-second descent and approximately 90 to 180 seconds of rest.
When first adding negatives, one or two weekly sessions separated by at least 48 hours will usually provide enough exposure without unnecessary repetition. Reduce the volume if soreness affects your normal shoulder movement, pressing technique, or subsequent training sessions.
End the set immediately if you cannot slow the descent, maintain your hand position, or touch the target quietly. A practical progression benchmark is three controlled full-range repetitions with a consistent five-second descent, but achieving this benchmark does not automatically mean the concentric Wall Handstand Push-Up is ready.
Continue using Pike Push-Ups or Elevated-Feet Pike Push-Ups to train the upward pressing phase. Partial-range Wall Handstand Push-Ups and negatives can also be trained in parallel rather than treated as a rigid one-way progression.
Where It Fits in the Handstand Push-Up Progression
A useful progression pathway is Pike Push-Up, Elevated-Feet Pike Push-Up, Back-to-Wall Handstand, partial-range Wall Handstand Push-Up, Negative Handstand Push-Up, and full Wall Handstand Push-Up.
The partial-range and negative stages may change order depending on whether your limiting factor is top-range pressing strength, bottom-range strength, body alignment, or confidence while inverted.
A chest-to-wall negative can later be used to demand a straighter body line, while a freestanding negative adds a much greater balance requirement. Neither variation is necessary before learning a controlled full back-to-wall repetition.
Safety
The head should touch the target gently but should never become the main support for your bodyweight. If you cannot prevent a fall onto your head, increase the target height, return to a pike variation, or practise with a qualified spotter.
Do not perform the exercise to muscular failure, on a slippery surface, or with unstable padding. Stop immediately if you experience sharp wrist, elbow, shoulder, neck, or head pain, numbness, dizziness, unusual visual symptoms, or loss of control.
If you have glaucoma or another medical condition for which you have been advised to avoid strenuous inversions, consult an appropriate healthcare professional before training; the American Academy of Ophthalmology discusses modifying or avoiding strenuous inverted positions when elevated eye pressure is a concern.
Tips for the proper execution of Negative Handstand Push-Up
Warm up your wrists, elbows, and shoulders before beginning the first negative.
Use a firm and non-slip head target that cannot move during the descent.
Place your hands around shoulder width or slightly wider and spread your fingers.
Begin every repetition with straight elbows and actively elevated shoulders.
Keep only your heels in light contact with the wall.
Brace your abdomen and squeeze your glutes to limit excessive lower-back arching.
Move your head slightly forward as you descend to create a tripod with your hands.
Keep your elbows approximately 30 to 45 degrees from your torso.
Lower for approximately three to five seconds from lockout to the target.
Maintain active pressure through your palms and fingertips throughout the repetition.
Touch the head target quietly instead of falling through the final part of the descent.
Treat the target as a depth marker rather than a place to rest your bodyweight.
Return your feet to the floor and reset after every repetition.
End the set as soon as you can no longer control the complete descent.
Muscles worked when doing Negative Handstand Push-Up
Primary muscles: The anterior deltoids control shoulder flexion while the triceps control elbow flexion as both muscle groups lengthen under load during the descent.
Secondary muscles: The lateral deltoids, upper chest, trapezius, serratus anterior, and rotator cuff stabilize the shoulders and shoulder blades throughout the eccentric repetition.
The forearm and hand muscles regulate pressure against the floor, while the abdominals, obliques, spinal stabilizers, glutes, and quadriceps maintain the inverted body position.
Light heel contact primarily assists balance, so the shoulders and arms must continue controlling most of the vertical load.
Primary Muscle(s):

Anterior delt
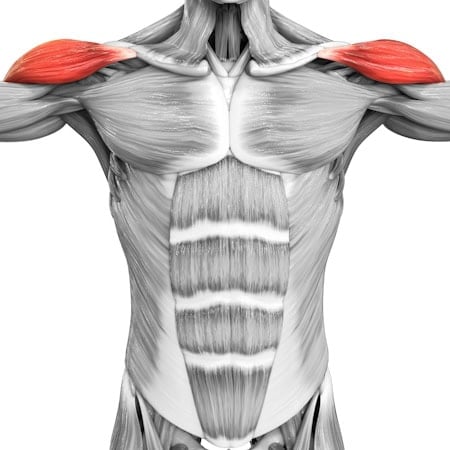
Lateral delt

Triceps
Secondary Muscle(s):

Upper chest

Trapezius
Equipment needed for Negative Handstand Push-Up
No equipment needed for this exercise.
Adjust the difficulty of Negative Handstand Push-Up
How to make Negative Handstand Push-Up harder?
How to make Negative Handstand Push-Up easier?
How to make Negative Handstand Push-Up harder?
To make Negative Handstand Push-Up harder:
-
Extend the controlled descent from five seconds toward eight seconds.
-
Pause for one second at several positions during the descent.
-
Gradually reduce the height of the head target to increase the range of motion.
-
Use progressively lighter heel contact without sacrificing the controlled lowering path.
-
Add a partial upward press before stepping down and resetting.
-
Progress to a full strict Wall Handstand Push-Up when you can control both movement directions.
-
Perform the negative chest-to-wall to demand a straighter body line and more controlled exit.
-
Use stable parallettes for a deficit negative only after mastering floor-level repetitions.
-
Perform a freestanding Negative Handstand Push-Up only after developing the required handstand balance and exit skills.
How to make Negative Handstand Push-Up easier?
To make Negative Handstand Push-Up easier:
-
Practise the Back-to-Wall Handstand until you can enter, hold, and exit it confidently.
-
Perform slow negatives from a floor-based Pike Push-Up position.
-
Use an Elevated-Feet Pike Push-Up Negative to increase the vertical load gradually.
-
Perform the negative from a box-supported pike position so some bodyweight remains through your feet.
-
Raise the head target with securely stacked firm pads to shorten the range of motion.
-
Begin with a two-to-three-second descent before progressing toward five seconds.
-
Ask a qualified spotter to support your hips or legs during the lowering phase.
-
Perform only one repetition per set and take a complete rest before repeating it.
