
Impossible Dip
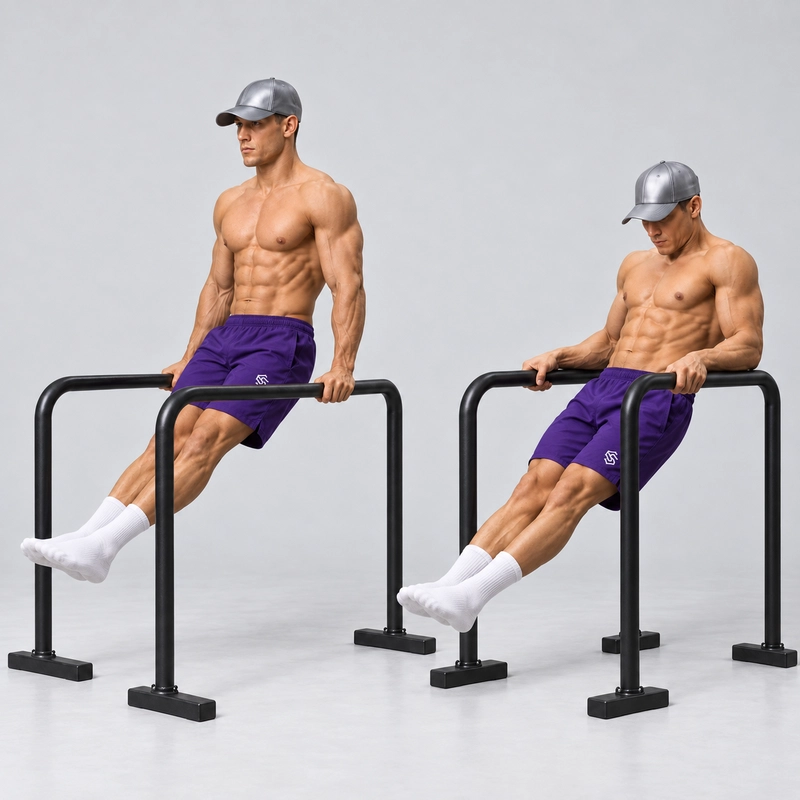
How to do Impossible Dip?
The Impossible Dip is an elite bent-arm strength skill performed on parallel bars. Starting with your forearms supported lengthwise on the bars, you press your body upward until your elbows reach full lockout without swinging, kicking or throwing your shoulders forward. Although its name includes “dip,” the movement functions more like an extremely demanding bodyweight triceps extension.
The Impossible Dip differs from a regular dip because your shoulders remain behind your elbows and your body stays leaned backward throughout the press. This position substantially increases the demand on elbow extension while reducing the contribution normally provided by a forward torso lean. It is also different from a Russian Dip, which uses a forward weight shift and often momentum to move from forearm support back onto the hands.
This exercise should be approached as a long-term specialist skill rather than a variation to attempt immediately after learning dips. Build a stable Parallel Bar Support Hold, develop controlled dip strength and condition your elbows gradually before beginning full-range attempts.
Impossible Dip quick facts
| Exercise type | Dynamic bent-arm strength skill |
|---|---|
| Primary equipment | Parallel bars or long dip bars |
| Difficulty | Elite |
| Main action | Elbow extension while maintaining a backward body lean |
| Strict starting position | Forearms supported on the bars with the shoulders behind the elbows |
| Strict finishing position | Elbows locked with the backward lean maintained |
| Defining rule | No swing, leg drive, jump or forward shoulder throw |
Benefits of the Impossible Dip
- Develops exceptional triceps strength: The triceps must extend the elbows against almost the athlete’s entire bodyweight from a mechanically disadvantaged position.
- Builds strength through deep elbow flexion: Assisted and partial variations progressively strengthen positions that ordinary dips do not fully reproduce.
- Strengthens the rear shoulders and back: The rear deltoids, lats and surrounding muscles help preserve the backward lean while the elbows extend.
- Improves parallel-bar control: The exercise requires accurate forearm placement, symmetrical pressure and a stable transition between forearm and hand support.
- Develops full-body tension: The trunk, pelvis and legs must remain controlled so that movement comes from the arms rather than a kick or body swing.
- Provides a measurable advanced skill goal: Progress can be tracked through assistance, range of motion, negative duration and the depth from which a strict press is possible.
Are you ready to train the Impossible Dip?
No single prerequisite guarantees that you can perform the skill, and weighted-dip numbers do not perfectly predict Impossible Dip strength. The following are practical coaching markers rather than compulsory standards:
- You can maintain an active Parallel Bar Support Hold for approximately 20 to 30 seconds without elbow discomfort or shoulder collapse.
- You can perform several controlled parallel-bar dips with a stable top lockout.
- You can lean backward in support without losing your grip, dropping your hips or touching your feet to the floor.
- You can lower through part of the Impossible Dip range without falling onto your forearms.
- You can perform an assisted press from forearm support without a sudden forward shoulder throw.
- Your elbows, wrists and shoulders tolerate the preparatory exercises without sharp pain or symptoms that persist after training.
A Weighted Dip can develop useful general pressing strength, but it does not replace the specific backward-leaning elbow-extension work required for this skill.
Equipment and setup
Use two fixed, stable parallel bars that are long enough to support your forearms and high enough to provide clearance beneath your body. The rails should be approximately parallel and spaced at a width that allows your forearms to track along them without forcing the elbows excessively inward or outward.
- Inspect the bars and supporting structure before every session.
- Make sure the gripping surfaces are dry and free from loose tape, moisture or debris.
- Choose a section of the bars that allows both forearms to make equal contact.
- Place an appropriate mat beneath the bars and clear the surrounding area.
- Use a stable step to mount the bars rather than wasting energy on an awkward jump.
- Arrange a qualified spotter when testing a new assistance level or deeper range.
Tall parallettes or portable dip bars can be used when they are sufficiently long, stable and high for the same movement. They do not require a separate canonical exercise. Low parallettes are better suited to feet-assisted progressions because they normally do not provide enough clearance for the full skill.
If you are choosing equipment specifically for this exercise, prioritize stability, rail length and safe forearm contact rather than portability alone; see the current guide to dip bars for suitable equipment considerations.
How to warm up for the Impossible Dip
- Complete five to ten minutes of easy general movement to raise your body temperature.
- Move the wrists, elbows and shoulders through comfortable flexion, extension and rotation.
- Use the Wrist Warm-Up Routine if your wrists need additional preparation for prolonged bar pressure.
- Perform two or three progressively longer Parallel Bar Support Holds.
- Complete several controlled bodyweight dips without approaching muscular failure.
- Practise a few shallow backward-leaning partials or heavily assisted presses.
- Finish with one or two easy repetitions of the exact progression planned for your working sets.
The warm-up should improve your position and confidence without fatiguing your triceps before the demanding work begins.
How to do the Impossible Dip
- Mount the parallel bars and establish a stable top support with your elbows at their natural lockout.
- Wrap your hands securely around the bars and distribute pressure evenly through both palms.
- Keep your shoulders active, your neck long and your upper back controlled rather than passively hanging between the bars.
- Brace your abdomen and glutes, then establish a leg position that you can maintain without kicking.
- Shift your shoulders behind the vertical line of your hands and elbows while keeping your hips approximately level with your hands.
- Bend your elbows backward and lower slowly while preserving the same backward body lean.
- Allow both forearms to meet the bars gently and at the same time without crashing or bouncing into the bottom position.
- Pause briefly until your body is stable and any movement in the legs has stopped.
- Press firmly through your palms and extend both elbows while keeping your shoulders behind them.
- Prevent your chest from being thrown forward and keep your hips from dropping beneath your hands.
- Continue pressing until both elbows reach a clear and simultaneous natural lockout.
- Stabilize the top position before beginning another controlled descent or using your planned dismount.
The concentric forearm-to-lockout press is the defining portion of the exercise. A demonstration may begin in bottom forearm support or show a complete top-to-bottom-to-top cycle, but a full strict repetition must include the unsupported press from the forearms back to locked arms.
Strict Impossible Dip form standard
The Impossible Dip does not have a universally adopted competition standard, so the following criteria provide a clear and repeatable Calisthenics.com standard:
- Your entire bodyweight is supported by the parallel bars without foot, band, partner or platform assistance.
- Both forearms reach controlled contact with the bars at the bottom.
- Your shoulders remain behind your elbows throughout the press.
- Your hips remain approximately level with your hands rather than hanging substantially beneath them.
- Your torso and pelvis remain controlled without a forceful arch, pike or hip thrust.
- Your legs remain quiet and do not generate momentum.
- Your shoulders do not shoot forward to convert the movement into a Russian Dip transition.
- Both elbows extend at approximately the same rate.
- The repetition finishes with a visible natural elbow lockout.
- Your hands remain securely positioned without slipping or changing their location on the rails.
- The press is visibly controlled rather than produced by a bounce from the forearms.
Some coaching systems use a three-second ascent as their strict benchmark. This is a useful control test, but it is not an official universal rule; the defining requirement is a momentum-free press with the target body position maintained.
Body position and elbow path
Keep the elbows tracking backward along the direction of the rails. Excessive outward flaring can make forearm placement uneven, while forcing the elbows unnaturally close may prevent you from finding a stable bottom position.
Your shoulders should remain behind the elbow line instead of travelling forward over your hands during the ascent. Maintain active pressure through the bars and keep your neck long, but do not force the shoulder blades into an exaggerated or painful position.
Keep the hips high and connect the rib cage, pelvis and legs as one controlled unit. Straight legs and pointed toes produce the cleanest presentation when bar height permits, but bent knees can still be used without changing the exercise if the leg position is established before the press and remains completely still.
Grip and wrist pressure
Use a secure grip with the thumbs wrapped around the bars whenever the equipment permits. The hands and wrists help transfer force into the rails, particularly when leaving the bottom position, but the repetition should not resemble a sudden wrist roll or forward vault.
If your wrists collapse, your hands slide or you need a violent rocking action to begin the press, increase the assistance or shorten the range. Grip technique supports the movement but does not replace the required triceps strength.
Breathing and tempo
Take a controlled breath and brace before lowering. Inhale or maintain a comfortable brace during the descent, then exhale gradually through the hardest portion of the press without relaxing your trunk.
Use a two- to four-second descent when developing control. The ascent may initially be slow because of the difficulty, but it should remain continuous rather than alternating between a long uncontrolled stall and a sudden forward throw.
Common Impossible Dip mistakes
| Mistake | How to correct it |
|---|---|
| Throwing the shoulders forward | Add assistance and keep the shoulders behind the elbows so the movement does not become a Russian Dip. |
| Letting the hips hang low | Reduce the range and brace the trunk before lowering so the hips remain approximately level with the hands. |
| Kicking or swinging the legs | Establish the leg position before pressing and end the repetition when the legs begin creating momentum. |
| Crashing onto the forearms | Use a slower negative or stop at a shallower depth until you can contact both bars quietly. |
| Bouncing out of the bottom | Pause after the forearms make contact and begin the press only after your body has stabilized. |
| Pressing one side first | Use more assistance and film from the front to identify unequal forearm placement or elbow extension. |
| Allowing the shoulders to shrug | Maintain active downward pressure through the bars and finish the set before your neck and shoulders collapse. |
| Stopping short of lockout | Use a smaller starting depth that allows you to finish each repetition with both elbows fully extended. |
| Using bars that are too short or unstable | Move to fixed rails that provide adequate forearm support and do not shift under load. |
| Repeatedly testing the deepest possible rep | Accumulate controlled assisted work and increase the range in small, measurable increments. |
| Training through elbow pain | Stop the exercise and return only after the painful position has been assessed and an appropriate regression is comfortable. |
Impossible Dip progression
- Parallel Bar Support Hold: Develop a stable straight-arm support and become comfortable carrying your full bodyweight on the bars.
- Parallel-bar dips: Build general triceps, chest and shoulder strength through controlled repetitions using the six-week dip progression if necessary.
- Weighted Dip: Increase general pressing strength while recognizing that the body position remains different from the Impossible Dip.
- Backward-leaning support: Practise moving the shoulders behind the hands while keeping the arms locked and hips high.
- Feet-assisted backward-leaning presses: Use a stable platform or low-bar setup to practise the target elbow path with only part of your bodyweight.
- Top-range partial Impossible Dip: Lower only as far as you can press back up without moving the shoulders forward.
- Partner- or counterweight-assisted Impossible Dip: Reproduce the complete range while progressively reducing external help.
- Impossible Dip negative: Lower slowly from locked-arm support until the forearms reach the bars, then dismount or reset without pressing back up.
- Bottom isometric and assisted takeoff: Pause in forearm support and practise initiating the first few centimeters without momentum.
- Full Impossible Dip: Press from controlled forearm support to full lockout with the shoulders behind the elbows and no assistance.
A Russian Dip may be used as a separate familiarization exercise for moving between forearm and hand support, but its forward transition must be removed before the repetition qualifies as an Impossible Dip. The progression does not need to be perfectly linear, and most athletes benefit from training partials, assistance and negatives concurrently.
How to program Impossible Dip training
Train the skill near the beginning of a push or skill session after warming up and before heavy dips or other fatiguing triceps work. The following is a conservative starting framework rather than a universal prescription:
- Perform three to five working sets of one direct Impossible Dip progression.
- Use one to four controlled repetitions per set for assisted, partial or full presses.
- Use three- to eight-second descents for negative repetitions.
- Use three- to eight-second holds at the deepest controllable position for isometric work.
- Rest approximately two to four minutes between demanding sets.
- Begin with one or two dedicated sessions per week and increase frequency only when the elbows recover comfortably.
- Change one variable at a time by reducing assistance, increasing depth or slowing the tempo.
- End the set when the shoulders move forward, the hips drop, the legs swing or one elbow extends before the other.
Record the assistance used and the deepest position from which you can press cleanly. A slightly shallower strict repetition is more useful than a deeper attempt completed through momentum.
Safety considerations
The Impossible Dip places very high demands on the triceps, elbows and surrounding connective tissues in deep elbow flexion. Progress gradually and avoid combining maximal attempts with excessive volumes of heavy dips, triceps extensions or other demanding elbow work in the same session.
- Use fixed bars, an appropriate mat and a planned dismount.
- Never rely on damaged resistance bands or an unstable platform for assistance.
- Do not allow the forearms or elbows to crash against the rails.
- Avoid maximal attempts when the triceps are already fatigued.
- Stop immediately if you experience sharp pain, sudden pulling, joint instability, numbness or tingling.
- Seek assessment from an appropriately qualified healthcare professional if symptoms persist or affect normal training.
Frequently asked questions
Is an Impossible Dip the same as a Russian Dip?
No. A Russian Dip normally uses a forward body transition or momentum to move from forearm support onto the hands, whereas a strict Impossible Dip keeps the shoulders behind the elbows and relies on controlled elbow extension.
What counts as a complete Impossible Dip?
A complete repetition starts with both forearms under control on the bars and finishes with both elbows locked without assistance, leg drive, swinging or a forward shoulder throw.
Do I need to take three seconds to press upward?
A slow ascent demonstrates control and some coaches use three seconds as a strict benchmark, but there is no universally recognized timing rule for the exercise.
How many regular dips should I be able to do first?
There is no reliable number that guarantees readiness because the Impossible Dip requires a much more specific backward-leaning elbow-extension position than an ordinary dip.
Will heavy Weighted Dips give me the Impossible Dip?
Weighted Dips can build useful general pressing strength, but partials, assisted presses, negatives and bottom-position work are still required for the specific movement.
Can I perform the Impossible Dip on parallettes?
Yes, provided the parallettes are stable, sufficiently long for forearm contact and high enough to give your body adequate clearance.
Can the Impossible Dip be performed on rings?
A ring interpretation exists, but moving rings and forearm or strap contact substantially change the stability and technique, so it should not be treated as an interchangeable equipment option; athletes should first develop controlled Ring Dips and extensive ring-support experience.
Can it be performed on a single straight bar?
A straight-bar interpretation forces the body to travel around one rail and changes the support mechanics, so it should be treated as a separate variation rather than demonstrated on this canonical page.
Why can I lower into the position but not press back up?
Muscles can generally control more force eccentrically than they can produce concentrically, and the first part of the press from forearm support is the exercise’s most mechanically demanding section.
How long does it take to learn the Impossible Dip?
There is no dependable timeline because progress depends on existing dip strength, body proportions, training consistency, assistance quality and how well the elbows tolerate the specific loading.
Tips for the proper execution of Impossible Dip
Use parallel bars that are long enough for full forearm contact and high enough to prevent accidental foot assistance.
Wrap your thumbs securely around the bars whenever the equipment permits.
Establish a stable top support before shifting your body backward.
Move your shoulders behind your elbows before beginning the descent.
Keep your hips approximately level with your hands throughout the repetition.
Bend your elbows backward in the same direction as the rails.
Lower slowly enough for both forearms to contact the bars quietly.
Pause briefly in forearm support to remove any bounce or residual momentum.
Press firmly through both palms as you begin extending your elbows.
Keep your shoulders behind your elbows during the entire ascent.
Prevent your chest from being thrown forward to escape the hardest position.
Keep your legs in one fixed position without kicking or swinging.
Finish with both elbows reaching their natural lockout simultaneously.
Film from the side to check shoulder position, hip height and momentum.
Increase depth or reduce assistance only after the current variation is repeatable.
Stop the set if you feel sharp elbow, wrist or shoulder pain.
Muscles worked when doing Impossible Dip
The Impossible Dip is dominated by elbow extension, making the triceps the principal force-producing muscle group. Its unusual backward lean also creates substantial work for the rear shoulders, lats and muscles that control the shoulder blades.
- Triceps brachii: Extends the elbows and produces most of the upward movement from forearm support to locked arms; the triceps’ role as an elbow extensor is described in the NCBI anatomy overview of the triceps brachii.
- Rear deltoids: Help maintain shoulder extension and preserve the backward-leaning body position.
- Latissimus dorsi and teres major: Assist with controlling the upper arms and preventing the torso from collapsing out of the target angle.
- Trapezius, rhomboids and surrounding scapular muscles: Stabilize the shoulder blades while force is transferred through the arms.
- Forearms and hand muscles: Maintain the grip and control pressure against the rails during the transition from forearm to hand support.
- Abdominals, spinal stabilizers and glutes: Keep the torso and pelvis connected while resisting swinging, piking and hip collapse.
- Chest and anterior deltoids: May assist with support and shoulder stabilization, but they are less dominant than during a conventional forward-leaning dip.
Primary Muscle(s):
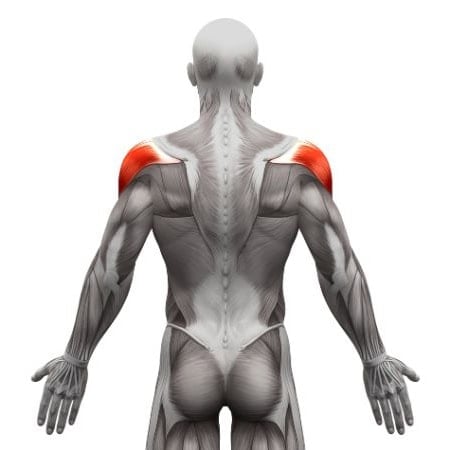
Rear delt

Triceps
Secondary Muscle(s):

Trapezius
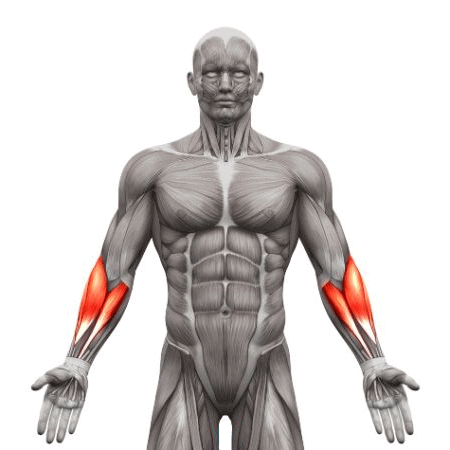
Forearm

Abdominal
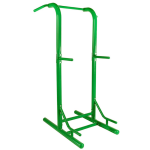
Equipment needed for Impossible Dip
Adjust the difficulty of Impossible Dip
How to make Impossible Dip harder?
How to make Impossible Dip easier?
How to make Impossible Dip harder?
To make Impossible Dip harder:
-
Reduce partner, band, foot or counterweight assistance in small and measurable increments.
-
Move your shoulders progressively farther behind your elbows while keeping your hips high.
-
Increase the range until both forearms reach complete controlled contact with the bars.
-
Begin each press from a motionless dead-stop forearm support.
-
Pause in the bottom position without relaxing your shoulders or trunk.
-
Extend the concentric phase to three to five seconds without allowing the shoulders to move forward.
-
Lower for five to eight seconds before completing the press back to lockout.
-
Keep your legs straight and toes pointed without changing the established body position.
-
Perform consecutive full repetitions without shortening the range or using momentum.
-
Progress toward a more horizontal body line only after strict full-range repetitions are repeatable.
How to make Impossible Dip easier?
To make Impossible Dip easier:
-
Practise the Parallel Bar Support Hold until you can maintain active shoulders and locked elbows comfortably.
-
Use a stable low-bar setup with your feet supported to reduce the percentage of bodyweight carried by your arms.
-
Reduce the backward lean so your shoulders sit only slightly behind your elbows.
-
Begin with a shallow top-range partial and increase the depth in small increments.
-
Use a qualified spotter to provide consistent assistance at your hips or upper back.
-
Use a securely anchored resistance band or measured counterweight to unload part of your bodyweight.
-
Perform negative-only repetitions and reset after your forearms reach the bars.
-
Hold the deepest position you can control before pressing back through a shorter range.
-
Begin the press with your elbows slightly elevated above full forearm support to shorten the hardest portion.
-
Practise assisted presses from forearm support without attempting an unassisted full repetition.
