
Kneeling Ab-Wheel Rollout
How to do Kneeling Ab-Wheel Rollout?
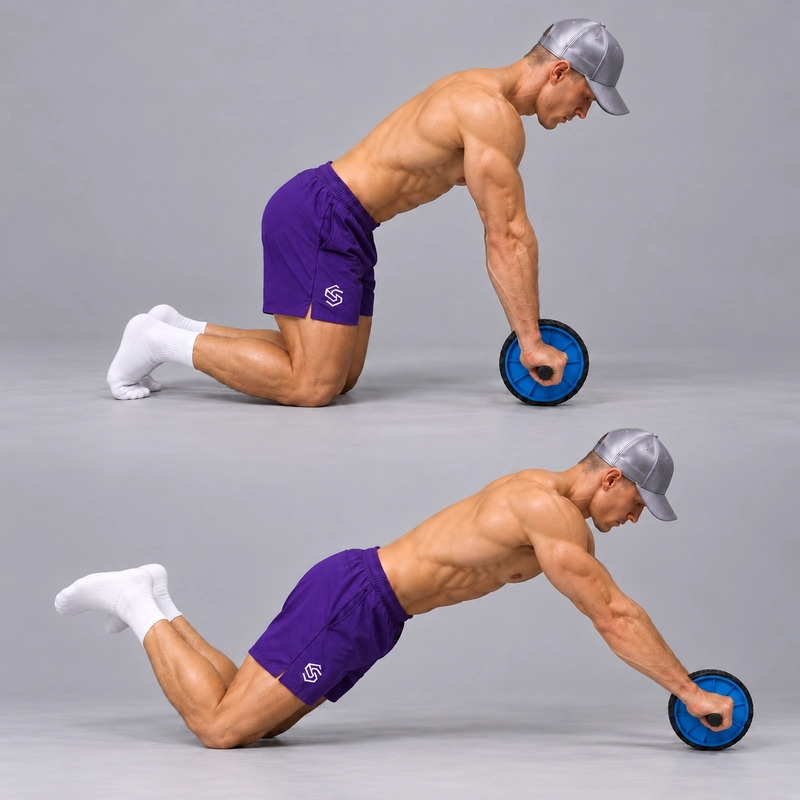
The Kneeling Ab-Wheel Rollout is a core-strength exercise performed with both knees supported and both hands gripping the handles of an ab wheel. Roll the wheel forward as your arms reach away from the body, maintain control of the ribs, pelvis and lower back, then bring the wheel back to the starting position.
The main trunk task is anti-extension: resisting the tendency for the lower back to sag as the wheel moves farther away. The shoulders also move and the upper body supports part of your weight. Unlike a crunch, the goal is not to repeatedly curl and uncurl the spine.
An isometric kneeling ab-wheel study found greater rectus abdominis activity in longer-reach positions. It tested eight trained men holding selected positions. This supports attention to rollout geometry, but does not establish a training prescription, long-term muscle growth or injury safety.
The standing ring rollout trains a related bracing task with two suspended handles and foot support. Here, the knees remain on the floor and one wheel follows a forward path. Either exercise can be made easier or harder through its setup, so compare actual range and assistance rather than assuming the standing ring version is always harder.
Learn Trunk Control Before Extending the Range
Practise keeping the ribs and pelvis organized while breathing. The dead bug offers a floor-based way to rehearse that control, while the elbow plank introduces supported bracing. A straight-arm plank adds hand-supported loading without a moving wheel.
These exercises are useful preparation, not a fixed checklist that guarantees a full rollout. Start the wheel exercise through a deliberately short range and check that you can return as well as reach forward. A long plank hold alone does not establish control of the wheel or the overhead arm position.
Use a comfortable overhead shoulder range without forcing a reach through substantial rib flare. Prepare the shoulders, elbows and wrists with the joint warm-up routine, then rehearse a few short, easy rollouts before working sets.
Choose the Wheel and Prepare the Floor
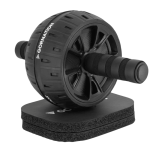
Use a conventional ab wheel with securely attached handles, a sound axle and a tyre that rolls predictably on your surface. Follow the assembly and loading instructions for your exact model. Check that neither handle loosens when you grip it and that the wheel does not jam, wobble unexpectedly or slip sideways.
A wider wheel or a dual-wheel design may make side-to-side control more manageable, but it does not eliminate the challenge of a long outward reach. A spring-assisted return mechanism changes the task; record its use rather than comparing it directly with a freely rolling wheel.
Our equipment listing contains affiliate purchase links: the ab-wheel equipment page provides options to explore. Choose for stable handles, predictable rolling and a suitable support surface rather than a promise of visible abs.
Place a firm, non-slip pad under both knees. Keep the rolling path level and clear of objects, people and pets. A separate knee pad can be useful because a very soft mat under the wheel may create irregular rolling resistance or catch the tyre at its edge.
Test the actual wheel-and-floor combination before the set. Keep the same surface and knee padding when comparing sessions; wheel diameter, return assistance and mat compression can all change the configuration.
Establish the Starting Position
Kneel with the knees about hip-width apart on the pad. Grip the two handles firmly with the thumbs wrapped around them and the wrists comfortably aligned with the forearms.
Place the wheel in front of you, with the shoulders approximately above the handles and the elbows actively straight without forcing hyperextension. Keep the hips raised clear of the heels. A small comfortable hip hinge can help establish the start; there is no requirement to make the shoulders, hips and knees form one perfectly straight line while the hands reach the floor.
Keep the lower legs and feet quiet. The knees remain the lower-body support throughout the repetition; do not lift them and turn the return into a toe-supported rollout. Choose a comfortable foot position and use it consistently.
Brace the abdominal wall and lightly engage the glutes. Organize the lower ribs over the pelvis without an exaggerated crunch or maximal spinal rounding. The hollow body hold can help rehearse rib-and-pelvis control, but its supine shape should not be copied rigidly into the kneeling setup.
How to Do a Kneeling Ab-Wheel Rollout
- Confirm the setup. Check the handles, axle, knee pad and clear rolling path. Choose a conservative endpoint before starting.
- Set the start. Keep both knees planted, shoulders approximately above the wheel, elbows straight and hips off the heels.
- Brace before rolling. Maintain the relationship between the ribs and pelvis while keeping the neck comfortable and the grip secure.
- Roll forward smoothly. Let the wheel move away as the shoulders and hips travel forward and the arms reach farther relative to the torso. Keep the elbows at the same angle and the knees on the pad.
- Stop at your controlled endpoint. Reverse before the lower back sags, the ribs flare, the shoulders become uncomfortable or you lose the ability to return. Reaching the floor is not required.
- Bring the wheel back under control. Draw the handles toward the starting position while the shoulders and hips recover together. Keep the trunk braced rather than snapping the hips toward the heels.
- Restore the same start. Return the wheel to its initial landmark, regain control and reset your breathing before the next repetition.
Allow the shoulder blades to move naturally as the arms approach overhead; do not pin them down and back. Keep the head in line with the trunk instead of reaching the chin toward the floor.
A controlled two-to-three-second outward phase and smooth return can help you learn the movement. Keep breathing while braced; a gentle exhale on the return is a useful option. Choose a manageable range instead of holding your breath throughout a long, grinding repetition.
Use a Wall to Set a Repeatable Endpoint
Face a solid wall and place the knees close enough that the wheel can touch it before you reach your current control limit. Start with a short distance. Roll slowly until the tyre lightly meets the wall, then return using the same technique.
The wall limits forward travel; it does not supply the strength needed to come back. If you cannot reverse from that point without sagging or an abrupt hip fold, move the knees closer or choose an easier exercise. Do not crash into the wall or use the contact as a rebound.
Keep the knee position and starting wheel position fixed. Move the knees a small measured distance farther from the wall only after you can repeat the selected range comfortably. A wall-limited repetition remains a kneeling rollout configuration, not a separate movement to count as standing work.
The manufacturer's GORNATION ab-wheel technique guide also recommends controlled movement and limited range while learning. It is useful first-party equipment guidance; apply your own model's instructions and do not treat its marketing claims as evidence that rollouts are universally safe or superior to other core exercises.
How Far Should You Roll?
Use the farthest distance from which you can return with the knees supported, stable elbow angle and controlled trunk. At a long-range endpoint, the hips move toward extension and the arms approach overhead while the torso remains clear of the floor. You do not need to force the abdomen or chest down to prove depth.
Short-range practice is valid when it reaches a chosen endpoint consistently. Record it as partial range rather than claiming it is the same result as a long rollout. There is no single wheel distance that fits every athlete's height, proportions and shoulder range.
For a repeatable log, mark the knee line and record the wheel axle's floor projection at the start and endpoint. Use the same reference point for both measurements. For example, an axle that starts 30 cm (11.8 in) ahead of the knee line and finishes 80 cm (31.5 in) ahead travels 50 cm (19.7 in). These are arithmetic examples, not a recommended starting distance.
For wall-limited work, also record knee-to-wall distance and the wheel model. Wall contact is at the tyre, while axle position depends on wheel radius. Do not mix tyre-contact distance with axle travel as though they were the same measurement.
What Counts as a Complete Repetition?
- Both knees remain supported on the same stationary pad.
- Both hands maintain a secure grip and the wheel follows a controlled path.
- The elbows stay actively straight, or at one deliberately recorded slight bend.
- The wheel reaches the chosen endpoint without loss of rib, pelvic or lower-back control.
- The torso does not rest on the floor at the bottom.
- The athlete returns the wheel to the same starting landmark without bouncing or an abrupt hips-first retreat.
One controlled outward-and-return cycle counts as one repetition at the recorded range. An outward phase followed by lying down or a hands-and-knees reset is eccentric-only practice, not a complete repetition. Spring assistance, band assistance and a changed elbow angle also need their own configuration notes.
Program the Exercise and Progress the Range
A practical starting option is two sets of four to six short, controlled repetitions, with around one to two minutes of rest. Use controlled singles or fewer repetitions when necessary. Two nonconsecutive sessions per week can be a manageable starting schedule alongside your other core and shoulder work. These are adjustable coaching suggestions, not a clinical or study-derived prescription.
Keep enough reserve to return from the endpoint on every repetition. Stop the set if the wheel starts drifting, the elbows bend progressively, the lower back loses position or the hips retreat before the wheel comes back.
First make one range repeatable. A coaching checkpoint might be two sets of six clean repetitions across two sessions with the same wheel, surface, endpoint and starting position. Then extend the distance slightly or move a little farther from the wall, rather than immediately chasing a near-horizontal position.
Build toward two or three sets of six to ten repetitions if that fits your program. Increase range, repetitions, pause or external load one at a time. When the range increases, reduce the repetition target as needed. You do not need to progress every session.
A standing ab-wheel rollout changes the support condition and increases the available lever; it is a substantial progression, not the automatic next session after a good kneeling set. Establish it through a separately scaled range. If you use rings instead, set ring height and foot position deliberately rather than assuming a direct difficulty match.
Common Mistakes and Corrections
- Rolling beyond the returnable range: choose a closer endpoint or wall limit before adding repetitions.
- Letting the lower back sag: shorten the reach and restore rib-and-pelvis control. Do not use back discomfort as a target sensation.
- Sitting the hips back while the wheel remains far ahead: reduce the range and recover the wheel and body together. Some hip movement is natural when returning to kneeling; an abrupt fold used to escape the hard position changes the repetition.
- Bending the elbows during the return: use a shorter range while maintaining the planned elbow angle.
- Crashing into the wall: slow the outward phase and treat the wall as an endpoint, not a brake or rebound surface.
- Changing floor or wheel resistance between comparisons: record the new setup and establish a separate baseline.
- Forcing the shoulders down during an overhead reach: let the shoulder blades move naturally and stay within a comfortable range.
Why Can I Feel My Lats, Chest or Shoulders?
The abdominal wall stabilizes the trunk, but the arms also move and support you. The chest, lats and other shoulder muscles contribute to controlling the wheel and bringing the arms back. Feeling upper-body effort does not mean the exercise has stopped being core training.
Sharp pain, increasing lower-back discomfort, numbness, tingling or a feeling of joint instability is a reason to stop and reassess the setup. If symptoms persist, seek individual guidance rather than repeatedly testing a longer rollout.
Do Kneeling Rollouts Guarantee Visible Abs?
No exercise guarantees visible abdominal definition. Rollouts can be used to train strength and control, but visible definition depends on factors beyond the exercise itself. Choose the movement for a clear training task rather than a promised appearance change.
Tips for the proper execution of Kneeling Ab-Wheel Rollout
Test the handles, axle and rolling surface before the set. A loose handle or unexpectedly catching tyre makes the setup unsuitable.
Support both knees on a firm non-slip pad and keep the rolling path clear and level.
Begin with the hips off the heels, shoulders approximately over the wheel and a repeatable comfortable hip position.
Brace before the wheel moves. Keep the ribs and pelvis organized without exaggerating a spinal crunch.
Maintain active elbow extension without forcing hyperextension. Record a deliberate fixed slight bend separately.
Allow natural shoulder-blade movement as the arms reach overhead. Avoid pinning the shoulders down and back.
Stop the outward phase at a distance you can return from without lower-back sag or an abrupt hip fold.
Use light tyre contact with a wall to limit range. The wall does not help you pull back and should not provide a rebound.
Bring the wheel and body back together. Avoid sitting the hips toward the heels while the hands remain far ahead.
Track the wheel, surface, knee pad, starting position, endpoint and assistance. A longer controlled range is meaningful only with a comparable setup.
Muscles worked when doing Kneeling Ab-Wheel Rollout
Primary trunk muscles
- Rectus abdominis: helps resist trunk extension and maintain the relationship between the ribs and pelvis during the reach.
- Internal and external obliques: contribute to trunk bracing and control unwanted rotation or side bending.
- Deeper abdominal wall: contributes to coordinated bracing; this includes the transverse abdominis, whose activity cannot be established from the cited surface measurements alone.
Upper-body movers and stabilizers
- Pectoralis major, latissimus dorsi and other shoulder extensors: help control the overhead reach and draw the arms back during the return.
- Shoulder and rotator-cuff muscles: support the upper arms through the selected range.
- Serratus anterior and trapezius: contribute to shoulder-blade movement and control.
- Triceps: help maintain the chosen elbow position.
- Forearm and hand muscles: maintain grip and handle control.
Other supporting muscles
The glutes and other hip muscles help organize the pelvis, while spinal stabilizers contribute to trunk control. The back is involved in coordinated support, but increasing lower-back pain is not a desirable sign of an effective repetition.
The exercise combines approximately isometric trunk stabilization with dynamic shoulder and hip movement. Muscle demands vary with range, geometry and assistance. Surface muscle-activity findings from short holds do not establish exact activation percentages for your repetitions or prove a long-term advantage over other exercises.
Primary Muscle(s):

Abdominal
Secondary Muscle(s):

Anterior delt

Triceps

Oblique
Equipment needed for Kneeling Ab-Wheel Rollout
Adjust the difficulty of Kneeling Ab-Wheel Rollout
Scale the kneeling rollout through controlled range first. Use a short reach or a conservative wall endpoint, then increase wheel travel while keeping the knees supported and the return coordinated. Build volume, pauses or load only after the current range is repeatable. Record wheel type, return assistance, surface and start position; standing or assisted rollouts are different configurations.
How to make Kneeling Ab-Wheel Rollout harder?
How to make Kneeling Ab-Wheel Rollout easier?
How to make Kneeling Ab-Wheel Rollout harder?
To make Kneeling Ab-Wheel Rollout harder:
-
Increase the controlled wheel travel slightly, or move a small measured distance farther from the wall, while preserving the same start and unassisted return.
-
Add a controlled repetition or another set at the same range before changing the endpoint again.
-
Use a slower outward phase or a brief one-to-two-second pause at the recorded endpoint while retaining enough reserve to return smoothly.
-
After consistent long-range bodyweight repetitions, add a small suitable external load with secure placement and unchanged range. Record the loading method and reduce volume as needed.
How to make Kneeling Ab-Wheel Rollout easier?
To make Kneeling Ab-Wheel Rollout easier:
-
Shorten the outward travel and return from a repeatable endpoint before the ribs flare, lower back sags or shoulders become uncomfortable.
-
Kneel close to a solid wall and let the tyre touch it lightly as a conservative range limit. Choose a distance you can return from without rebound or extra assistance.
-
Use shorter sets or controlled singles. If even a short rollout cannot be controlled, build bracing with dead bugs and a suitably scaled plank before trying the wheel again.
