
Crow Stand
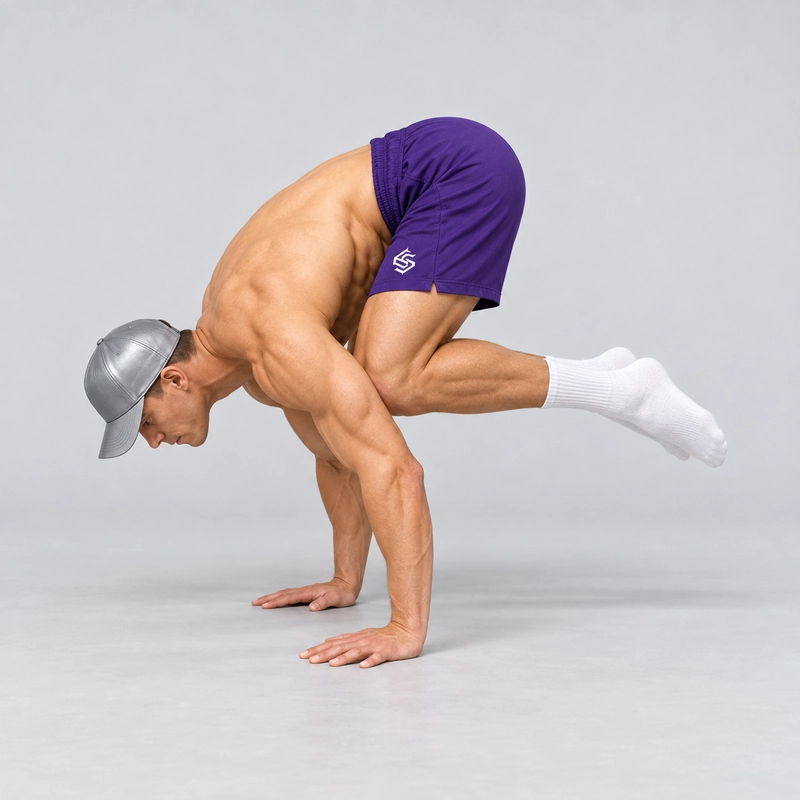
How to do Crow Stand?
The Crow Stand is a compact hand balance performed with bent elbows, both knees resting on the backs of the upper arms and both feet off the floor. From a squat, organise the knee contact and gradually move your weight forward over your hands until the feet become light. Hold with active shoulders and steady hand pressure, then return the toes to the floor under control.
The knees stay supported on the upper arms throughout the main hold. The head does not touch the floor, and straightening the elbows is not required. Crow is useful for practising the moment when foot support gives way to hand balance without needing a full handstand position.
Crow Stand vs Frog Stand: what is the difference?
The names are used differently by different coaches. In this library, the Frog Stand instructions describe knee support lower down on the forearms, between the wrists and elbows. The Crow Stand on this page places the knees on the backs of the upper arms, above the elbows. Both are bent-arm, knee-supported balances.
You may also see the upper-arm-supported version called an advanced frog stand. Elsewhere, “frog stand” and “crow pose” can describe the same hold. GMB’s Crow Pose tutorial, for example, uses the two names interchangeably. Look at the actual arm angle and knee contact rather than assuming the name alone identifies the variation.
| Feature | Frog Stand in this library | Crow Stand on this page |
|---|---|---|
| Arm position | Bent elbows | Bent elbows |
| Knee support | Forearms, between wrists and elbows | Backs of the upper arms, above the elbows |
| Leg position | Tucked, with knees supported | Tucked, with knees supported |
| Main balance task | Control weight over the hands with lower arm support | Control weight over the hands with upper-arm support |
| Complete hold | Both feet clear without head support | Both feet clear without head support |
Changing knee contact changes the shape and feel of the balance. It does not create a universal difficulty ranking: your proportions, available squat position and familiarity with the setup all matter. A clean supported entry is more useful than forcing a position because its name sounds more advanced.
How is Crow different from Crane and Tuck Planche?
Crow keeps the elbows bent. In the straight-arm variation commonly called Crane, the elbows are extended while knee contact remains on the arms. Yoga International’s Crow and Crane explanation distinguishes the two by bent versus straight elbows, while acknowledging that the names are often mixed.
A Tuck Planche is different again: the arms are straight and the knees do not rest on them. Lifting the feet in Crow does not demonstrate an unsupported tuck planche, and a longer Crow hold does not guarantee the straight-arm strength for it.
Why practise Crow Stand?
Crow gives you a focused way to practise transferring weight from the feet to the hands. The main learning task is finding a manageable balance point, making small corrections and returning to foot support deliberately.
The shoulders, arms and trunk must maintain the shape, but trying to pull the feet upward through effort alone usually misses the balance task. First organise the support and move the body forward gradually; then the feet can leave the floor without a jump.
It is a useful hand-balancing option alongside other training. It is not a required test before every handstand or planche programme. Keep dedicated overhead support and straight-arm strength work separate from this knee-supported bent-arm hold.
Equipment and setup
- Main setup: use the floor or a firm, non-slip exercise mat that gives stable hand contact. Avoid thick, compressible padding under the palms.
- Working area: leave clear space in front and behind you. A suitable cushion in front may help confidence, but it is not a head support or a substitute for controlling the lean.
- Hands: place the palms roughly shoulder-width apart with fingers spread. Start with fingers forward or slightly outward and adjust within a comfortable wrist position.
- Elbows: bend them to make a stable upper-arm support. Keep their position controlled rather than letting them suddenly splay or buckle. There is no mandatory elbow angle for every athlete.
- Knees: establish comfortable contact on the backs of the upper arms above the elbows, rather than pressing onto the bony elbow tips or resting on the forearms.
- Feet: start with toes on the floor and heels raised as needed. Keep foot support available while organising the hands and knees.
- Head: keep it clear of the floor, with the neck comfortable and eyes looking a little ahead of the hands.
Keep the knee contact comfortable and stable; forcing the knees as high toward the armpits as possible is not necessary for the bent-arm version. The hands need to stay planted while the legs fold into a compact shape.
Low, stable parallettes are an equipment option if you already control their grip, entry and exit. They change the wrist angle and balance feedback and add height; they are not automatically an easier variation. This page’s main demonstration and hold standard use palms on the floor.
Readiness and preparation
Start with manageable hand loading and toe-supported weight shifts. You should be able to place the palms, bend the arms and organise knee contact without sharp wrist, elbow, shoulder or knee pain. You do not need to reach an arbitrary push-up count before exploring the supported setup.
Use comfortable movements from the Wrist Warm-Up Routine, then a few light toe-supported Crow leans. Build pressure gradually rather than forcing wrist range or beginning with a maximum-duration attempt.
If the upper-arm contact is difficult to arrange, keep the feet down and practise the setup first. The lower-support Frog Stand is another balance option if its own position is comfortable; it is not a compulsory prerequisite.
Stop for sharp joint pain, numbness, slipping contact or loss of control. Return to a supported drill and seek appropriate advice for persistent symptoms. Do not try to correct a painful position by leaning farther or by putting the head down to carry the load.
How to do the Crow Stand
- Begin with foot support. Squat or crouch with the toes on the floor. Place both palms securely in front of you, around shoulder-width apart, with the fingers spread.
- Set the knees on the upper arms. Bend the elbows and bring each knee onto the back of the corresponding upper arm, above the elbow. Find comfortable contact while the toes still take weight.
- Make the upper body active. Press the floor away, keep the shoulder blades spread and organise a compact trunk. Maintain enough elbow bend to keep the upper-arm support stable.
- Transfer weight gradually. Move the shoulders and torso forward over the hands in a small, controlled lean. Keep the palms planted and use finger pressure to monitor the shift. Do not jump from the toes.
- Float the feet. As the toes become light, lift one foot and then the other, or allow both to leave together if you can do so smoothly. Keep both knees supported and draw the heels comfortably toward the buttocks.
- Hold the balance. Keep both feet and the head clear, the elbows bent and the knee contacts stable. Breathe normally and make small corrections through the hands rather than swinging the legs.
- Return to support. Shift back gradually until the toes meet the floor. Keep both hands planted while the feet take weight, then release the knee contact and reset.
Think “place, lean, float, return”. The feet become light because the body moves into balance over the hands. Lifting them by jumping or throwing the hips forward makes the entry harder to control.
One-foot floats are useful learning steps, but the main hold begins only when both feet are clear. Keep enough control to return to the toes before the shoulders sink, the knees slide or the face drops toward the floor.
What counts as a clean Crow Stand hold?
- Both hands remain planted and are the only body parts touching the floor.
- Both elbows remain bent and controlled.
- Both knees maintain contact on the backs of the upper arms, above the elbows.
- Both feet remain clear, with the legs compact and no repeated toe taps.
- The head remains clear and the shoulders do not collapse.
- The position is entered without jumping and exited by returning to foot support deliberately.
Start timing after both feet leave the floor and the position settles. Stop when a foot or the head touches down, knee support slips out of the defined position or the arms cease to hold the shape. Small balance corrections are normal; a fleeting pass through the position is not a settled hold.
There is no required torso-to-floor angle or compulsory foot-to-foot contact. Judge the support points and control rather than trying to make the whole body horizontal. If the elbows straighten, identify the hold as the separate straight-arm variation rather than mixing its time with bent-arm Crow.
Balance and body-position cues
Let the feet become light
Keep toe support while moving the torso forward slowly. If the toes still carry most of your weight, forcing a heel lift often just rocks you backward. Explore a small extra weight shift with support available instead of making a bigger jump.
Keep the hands active
Maintain contact through the palms and finger pads. As you begin tipping forward, a little more finger pressure can help regulate the movement. Make small corrections within the position you control; the fingers cannot compensate for a collapsing arm support.
Preserve the knee contact
Keep the legs compact and the knees gently organised toward the upper arms rather than letting them slide apart. If the contact slips, return to the feet and reset it. Avoid balancing on a painful bony pressure point.
Keep the neck comfortable
Look at the floor slightly ahead of the hands without throwing the head backward. Moving the eyes forward does not require a large neck arch. Keep the head clear throughout the hold.
Use a controlled elbow bend
The main version is a bent-arm balance. Do not force a deeper bend to make a shelf or straighten the elbows merely to make the exercise look more advanced. Use the arm position that gives stable upper-arm contact and a manageable lean.
Common mistakes and corrections
Using Frog knee placement while counting Crow
For this library’s defined Crow, place the knees on the backs of the upper arms above the elbows. Lower forearm support belongs to the Frog version described on its page. Other coaching systems may use the names differently, so check the actual support position when comparing demonstrations.
Jumping both feet off the floor
Keep the toes down while finding the balance point, then float one foot at a time if needed. The entry should remain slow enough that you can reverse it.
Letting the shoulders sink
Maintain an active push through the hands and a compact upper body. Shorten the attempt or retain toe support if the chest drops and the arm platform becomes unreliable.
Looking far ahead and lifting the chin
Keep the gaze only a little ahead of the hands and the neck comfortable. Do not use a large head movement to compensate for an unstable lean.
Resting the forehead on a cushion
A cushion in front can help confidence, but a head-supported position is not the main Crow Stand. Use toe-supported practice to reduce the task while keeping the head unloaded.
Holding longer after the knees start slipping
Return to the feet while you can still control the movement. Reset the contact and check the surface or clothing if sliding is the problem. Do not add unstable padding or continue toward a fall merely to reach a time target.
How to practise and progress
Begin with a few toe-supported leans, then short unassisted holds. As a starting example, use three to five attempts of roughly two to five seconds, resting about 45–90 seconds between attempts. Keep enough recovery to reproduce the entry and exit. These are coaching examples, not compulsory targets.
When short holds are repeatable, add a few seconds while keeping the same knee contact and elbow position. Another useful progression is a smoother lift-off and return, rather than more time spent fighting to stay up. Avoid stacking many failed attempts after the hands and shoulders tire.
Two or three brief practice sessions per week can be a starting structure, adjusted to your other hand-loading work and recovery. More frequent practice is optional, not a requirement. Stop before wrist discomfort or deteriorating control accumulates.
If your longer-term goal is a planche, train suitable Planche Leans separately for straight-arm loading. Crow’s knee support and bent arms mean it cannot replace that work.
If your goal is a handstand, the Back-to-Wall Handstand develops a different overhead support position. Learn its entry and exit independently; you do not have to press from Crow into a handstand to make useful progress.
The Elbow Lever is another bent-arm balance option, but its elbows support the abdomen and its legs extend behind the body. It is an alternative skill branch, not the same hold or a guaranteed next level.
Frequently asked questions
Are Crow Stand and Frog Stand the same exercise?
Sometimes the names are used for the same hold. This library distinguishes lower forearm-supported Frog from upper-arm-supported Crow. Both use bent elbows and tucked legs. Check the support position rather than relying only on the name.
Does Crow require straight arms?
No. This page defines bent-arm Crow. Straight-arm Crane keeps knee contact but changes the arm position. Tuck Planche requires straight arms without the knees resting on them.
Do my knees need to reach my armpits?
No. Use comfortable upper-arm contact above the elbows. A forced maximum-height placement is not part of the main completion standard. Keep enough control to float and return the feet smoothly.
Is one foot off the floor enough?
It is useful assisted practice. The main unassisted hold begins when both feet are clear and ends when a foot touches down.
Can I use parallettes?
Yes, if they are low, stable and you can control the entry and exit. Record the equipment because grip and balance feedback change. Parallettes are not a reason to train through wrist or joint pain.
How long should I hold it before moving on?
There is no universal hold-time threshold. Look for repeatable entries, a settled position, comfortable hand loading and controlled exits. Progress the next skill according to its own demands rather than assuming a long Crow hold proves readiness.
Tips for the proper execution of Crow Stand
Set both palms around shoulder width and spread the fingers on a stable, non-slip surface.
Place the knees comfortably on the backs of the upper arms above the elbows. Lower forearm support is the Frog version used in this library.
Keep a controlled bend in the elbows. Straight-arm Crane is a different variation, not a requirement for Crow.
Press the floor away and keep the upper body active instead of sinking between the shoulders.
Keep the toes down while finding the balance point, then float the feet without jumping.
Use one-foot floats as a learning step. Start timing the main hold only when both feet are clear and the position settles.
Keep the head off the floor and look a little ahead of the hands without craning the neck.
Breathe steadily and make small hand-pressure corrections. Do not swing the legs to rescue a tipping hold.
Return the toes to the floor before control deteriorates, keeping both hands planted until the feet support your weight.
Muscles worked when doing Crow Stand
The Crow Stand is primarily a static hand-balance skill. The shoulders and arms maintain the bent-arm support while the trunk and legs preserve a compact shape. Small hand-pressure adjustments help regulate balance.
- Anterior deltoids: help maintain shoulder support while the body is positioned forward over the hands.
- Triceps: contribute to maintaining the chosen elbow bend rather than letting the arms buckle.
- Serratus anterior and other scapular stabilisers: help keep the upper body active and the shoulder blades controlled.
- Forearm and hand muscles: contribute to wrist stability, finger pressure and fine balance adjustments.
- Abdominals and obliques: help organise the trunk and pelvis while maintaining the compact hold.
- Hip flexors and inner-thigh muscles: help keep the legs tucked and the knee-to-arm contacts organised.
Knee support changes the task compared with an unsupported tuck planche. Hold time reflects balance, setup and position-specific endurance as well as strength, so it should not be treated as an isolated shoulder-strength measurement.
Primary Muscle(s):

Anterior delt
Secondary Muscle(s):

Triceps
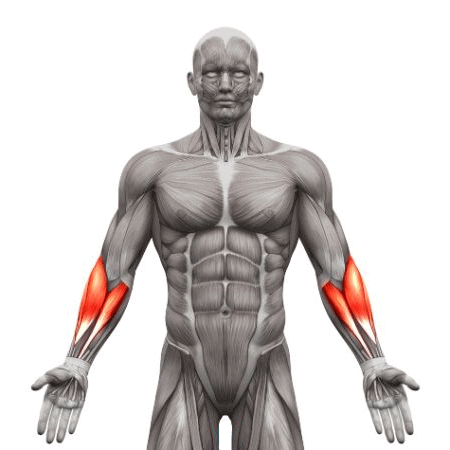
Forearm

Abdominal

Oblique
Equipment needed for Crow Stand
No equipment needed for this exercise.
Adjust the difficulty of Crow Stand
Begin with toe-supported upper-arm contact and small weight shifts. Progress to one-foot floats and then short holds with both feet clear. Keep the elbows bent, knees supported and head unloaded. Increase control and hold duration gradually; straight-arm Crane and unsupported Tuck Planche are separate skill branches with their own requirements.
How to make Crow Stand harder?
How to make Crow Stand easier?
How to make Crow Stand harder?
To make Crow Stand harder:
-
Extend a clean hold by a few seconds while preserving bent elbows, upper-arm knee contact and head clearance. For example, build from a repeatable five-second hold toward ten seconds without adding toe taps or fighting to stay up.
-
Practise several controlled entries and exits with a brief settled hold each time. Keep the hands planted during each lift-off and return. Progress repeatability rather than using a faster jump or counting time during the supported resets.
-
Once the static hold is reliable, explore very small forward-and-back weight shifts through the hands. Keep both feet clear and both knees supported, and return to the settled position. Stay within a lean you can reverse; this is balance practice, not permission to tip toward the head.
-
Develop straight-arm Crane as a separate progression when your wrist loading and shoulder control allow it. Extend the elbows gradually while keeping knee support and a controlled return available. Straight-arm Crane is not an unsupported Tuck Planche, and its hold time should be recorded separately from bent-arm Crow.
How to make Crow Stand easier?
To make Crow Stand easier:
-
Keep both toes lightly on the floor while establishing upper-arm knee contact. Shift forward only as far as you can reverse comfortably, then return. Reduce foot pressure gradually without jumping or using head support.
-
Float one foot while the other remains lightly supported. Keep both knees on the upper arms, practise each side and return the foot under control. This is assisted practice; the full hold begins only when both feet are clear.
-
Use very short unassisted holds, such as one to three settled seconds, with a full reset between attempts. Return to the toes before the shoulders sink or knees slide. Shorter attempts reduce endurance demands but still require a controlled entry and exit.
