
Chest-to-Wall Handstand Shoulder Taps
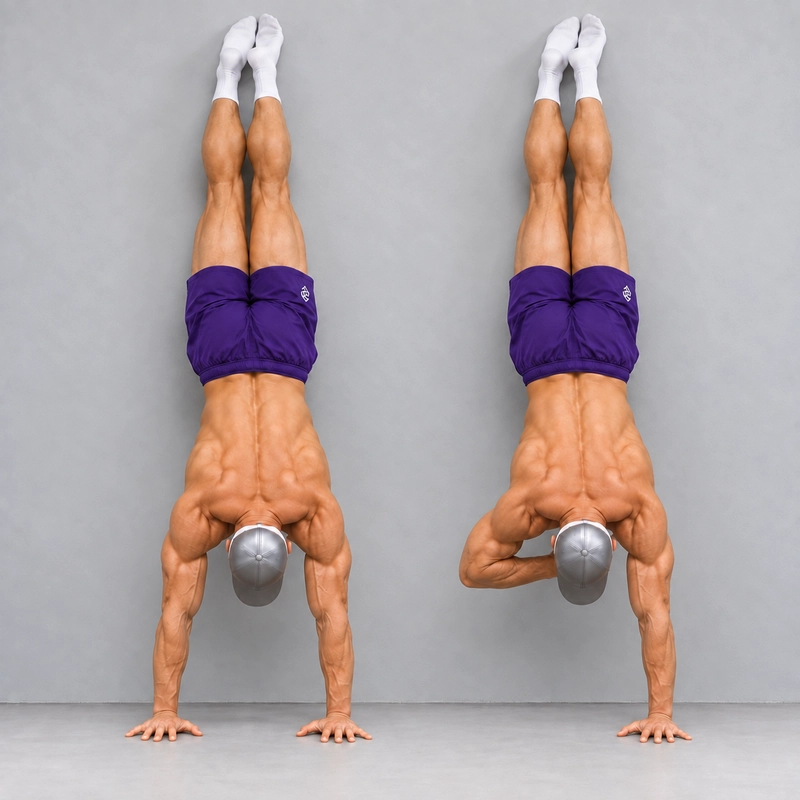
How to do Chest-to-Wall Handstand Shoulder Taps?
Chest-to-Wall Handstand Shoulder Taps are a wall-supported handstand drill in which you alternate between two-hand support and brief support on one arm. With your chest facing the wall and toes resting lightly against it, shift your weight onto one hand, lift the other hand to touch either the same-side shoulder or the opposite shoulder, then return it to the floor.
With same-side taps, the right hand touches the right shoulder and the left hand touches the left shoulder. With cross-body taps, the right hand reaches across to the left shoulder and the left hand reaches across to the right shoulder. In both methods, the hand that stays on the floor supports the transfer.
The drill practises lateral weight transfer, active overhead support and controlled hand replacement. It is a useful preparation exercise for skills that briefly unload a hand, including the Handstand Walk, while the wall continues to assist balance.
Same-side vs cross-body shoulder taps
Both methods use the same wall-facing setup, lateral weight transfer and straight supporting arm. The difference is the free hand’s destination and the reach used to get there. The International Functional Fitness Federation’s shoulder-tap standard describes same-side contact and lists a cross-body touch variation. These references confirm the terminology; this page defines its own wall-assisted training setup rather than a competition judging standard.
| Feature | Same-side taps | Cross-body taps |
|---|---|---|
| Right-hand repetition | Left arm supports; right hand touches right shoulder | Left arm supports; right hand touches left shoulder |
| Left-hand repetition | Right arm supports; left hand touches left shoulder | Right arm supports; left hand touches right shoulder |
| Free-arm pathway | Hand moves toward the shoulder on its own side | Hand reaches across the chest toward the supporting-arm side |
| Technique emphasis | Unload the hand and control the same-side reach without dropping the supporting shoulder | Control the cross-body reach without rotating the chest or pelvis to meet the hand |
| Shared training task | Brief single-arm support, lateral transfer and deliberate hand replacement | The same support task with a different free-arm position |
| Typical mistake to watch | Snatching the free hand upward before completing the transfer | Turning the torso toward the reaching hand or pressing into the wall |
| How to record | Same-side taps, total count and taps per lifting hand | Cross-body taps, total count and taps per lifting hand |
Which method should you choose? Start with whichever shoulder touch you can reach comfortably while preserving straight-arm support, light toe contact and a quiet hand return. Same-side taps are a practical first option for learning the transfer without adding a reach across the chest. Cross-body taps offer a different coordination task once you can manage that reach without twisting. This is a coaching sequence, not a universal ranking: arm proportions, shoulder movement, tempo and familiarity can change which version feels easier.
Both methods require trunk control. A cross-body reach changes the free arm’s position and can encourage rotation, but that does not prove greater core activation or a better training effect. There is no direct comparative evidence used here to claim that either method is always harder, safer or better for handstand walking.
The free hand only touches the shoulder; do not grip or lean on the supporting arm. Choose one method for a set and identify it in your log. If you practise both, use separate sets so you can compare like-for-like performance.
Shoulder taps vs handstand weight shifts
In Chest-to-Wall Handstand Weight Shifts, both palms stay on the floor. A shoulder tap goes further: you transfer enough weight to lift the unloaded hand completely, touch the shoulder and replace the palm under control.
A small hand hover is a useful step between these exercises. If lifting the hand makes the supporting elbow bend or the shoulder sink, return to weight shifts or shorter hovers before attempting the full tap.
The hands return to the same positions rather than travelling across the floor. The supporting elbow remains straight; there is no deliberate lowering and pressing phase as in a handstand push-up.
Equipment and setup
- Wall: choose a stable, clear wall without shelves, protrusions or slippery surfaces.
- Floor: use a firm, level, non-slip surface. Avoid deep, soft padding beneath the hands.
- Space: leave room to reverse the wall walk and use your practised exit. Keep furniture and equipment out of that route.
- Hands: start approximately shoulder-width apart, fingers spread and generally pointing toward the wall or slightly outward according to comfort.
- Wall distance: choose a position that allows an open shoulder angle, light toe contact and a reliable exit. Adjust between sets; do not force the closest possible hand placement.
Start from a controlled Chest-to-Wall Handstand. The name describes your orientation: your chest faces the wall, but your chest and abdomen should not lean against it.
Readiness and warm-up
Before attempting full taps, you should be able to enter and leave the wall-facing handstand deliberately, maintain straight-arm support with active shoulders and shift your weight laterally without twisting or collapsing. A steady 20–30-second hold can be a practical coaching check, but hold time alone does not establish readiness for single-arm loading.
Prepare with comfortable, gradually loaded movements from the Wrist Warm-Up Routine, then practise a short wall hold and several small weight shifts. You should have enough strength left to descend after the set.
If full inversion is premature, practise the transfer with feet or knees supported on a stable box in a pike position. The CrossFit Gymnastics Training Guide describes a box-supported progression from small palm lifts to shoulder taps in its handstand-walk section.
Stop for sharp pain, numbness, dizziness or unreliable arm support. Seek appropriate guidance if symptoms persist. If you have already been advised to avoid strenuous inversions, follow that advice before practising.
How to do Chest-to-Wall Handstand Shoulder Taps
- Choose the tap method. Decide on same-side or cross-body taps for this set. Keep the chosen shoulder target consistent on both sides.
- Enter the wall-facing position. Begin with a controlled wall walk, moving the feet upward and the hands toward the wall only as far as you can manage. Keep enough room and strength to reverse the entry.
- Establish two-hand support. Straighten the elbows within their natural range and push tall through the shoulders. Keep the head clear of the floor and look between or slightly ahead of the hands.
- Organise the body line. Keep the ribs and pelvis controlled, legs straight and toes lightly touching the wall. A small separation between the feet is acceptable if it helps you begin without twisting.
- Transfer onto the left arm. Move your body slightly toward the left hand as a connected unit. Keep the left shoulder active and the left elbow straight while the right palm becomes lighter.
- Lift and tap. Once the right hand is unloaded, lift it from the floor. For a same-side tap, touch the right shoulder; for a cross-body tap, reach across the chest to touch the left shoulder. Keep the chest and pelvis facing the wall. Do not throw the arm upward, pull on the supporting arm or shove your feet into the wall to create the lift.
- Replace the hand. Return the right palm to its original position with a quiet, controlled contact. Restore stable two-hand support before changing sides.
- Repeat to the other side. Shift onto the right arm and lift the left hand. Touch the left shoulder for a same-side tap or the right shoulder for a cross-body tap. Return the left palm and reset.
- Continue with deliberate alternation. Use only as many taps as you can complete without bending the supporting arm, leaning the torso against the wall or slapping the hands down.
- Exit before support deteriorates. Finish with both palms planted, then reverse the wall walk or use your already practised exit.
Use the cue “shift, lift, tap, replace, reset”. A small lateral movement is necessary to unload a hand. The goal is a deliberate transfer, rather than keeping the torso completely motionless or swinging the hips from side to side.
What counts as one repetition?
One repetition is one shoulder tap followed by a controlled return of that hand. A right-hand tap plus a left-hand tap equals two repetitions, whichever shoulders you touch. Count by the lifting hand, not the shoulder touched. Record the method and total alternating taps or taps per lifting hand: for example, 8 total cross-body taps equals 4 right-hand taps and 4 left-hand taps.
- The chest faces the wall and the feet retain light wall support.
- The free hand leaves the floor and touches the selected shoulder: its own shoulder for same-side taps, or the opposite shoulder for cross-body taps.
- The supporting elbow stays straight and the shoulder remains active.
- The torso stays clear of the wall without a large twist or leg swing; cross-body contact comes from the free-arm reach rather than turning the chest to meet it.
- The hand returns to its starting position and two-hand support is restored.
A hand hover without shoulder contact is a regression. An unfinished reach, uncontrolled hand drop or supporting-arm collapse does not meet the full-tap standard. Toe contact means this remains a wall-assisted drill, even when the tap itself is controlled.
Common mistakes and corrections
- Lifting before transferring: shift first until the free hand becomes light, then lift. Regress to weight shifts if you have to snatch the hand away.
- Bending the supporting elbow: shorten the set or practise small hand hovers while preserving straight-arm support.
- Sinking into the shoulder: keep pushing the floor away through the loaded arm. End the set if you cannot maintain that support.
- Twisting the hips or sweeping the legs: reduce the size and speed of the transfer. Keep the pelvis facing the wall. For cross-body taps, move the free arm across the chest without turning the whole torso; use the more manageable method or a hand hover if the reach disrupts support.
- Pressing hard into the wall: restore a manageable body line and lighter toe contact. Do not use friction against the wall as the main support.
- Rushing the hand return: land in the original position and settle before the next tap.
- Looking up at the wall: return the gaze toward the floor and keep the neck comfortable.
How to programme the drill
As a conservative starting prescription, try 2–4 sets of 4–8 total alternating taps, with roughly 60–120 seconds of rest. These are coaching starting points, not universal thresholds. Use fewer repetitions or an easier drill if you cannot preserve reliable support and a controlled exit.
Practise after warming up and before demanding pressing work. Initially, two sessions per week can be enough to assess tolerance and consistency. Increase repetitions gradually rather than turning the drill into a race or a maximum-duration test.
Progress when both lifting hands show repeatable transfers, full contact with the chosen shoulder and quiet hand replacement across your chosen sets. Log same-side and cross-body sets separately; a change in method is a change in the task, not automatically a strength gain. Change one variable at a time: add a small amount of volume, slow the movement or reduce excessive wall reliance.
Progressions toward handstand walking
A practical wall-supported sequence is static hold → lateral weight shifts → brief hand hovers → full shoulder taps. Alongside this sequence, practise unsupported balance through the Freestanding Handstand pathway.
Jim Bathurst’s handstand-walking tutorial uses chest-to-wall, same-side shoulder taps to practise weight transfer and also emphasises developing balance away from the wall. Wall taps alone do not establish readiness to walk unsupported.
With reliable freestanding balance and an appropriate exit, explore small unsupported weight shifts, brief hand lifts and controlled handstand steps. Freestanding shoulder taps add an unsupported reach and can be practised as a further challenge; they are not a compulsory test before every handstand-walking attempt.
Frequently asked questions
Do I tap the same shoulder or the opposite shoulder?
Either method is included on this page. Same-side taps mean right hand to right shoulder and left hand to left shoulder. Cross-body taps mean right hand to left shoulder and left hand to right shoulder. Choose one method for a set and record it.
Are cross-body taps harder or better?
They change the reach and the control needed to keep the torso facing the wall, but they are not universally harder or better. Use the method you can perform deliberately, then explore the other without sacrificing support. Neither variation replaces unsupported handstand-balance practice.
Do I need to balance a freestanding handstand first?
No. You can practise wall-supported taps once your wall hold, lateral transfer and exit are reliable. Unsupported handstand walking requires additional balance practice, so work on that separately rather than treating wall taps as proof of freestanding control.
Should my feet leave the wall?
No. Light toe contact is part of the main wall-assisted version. Removing the feet changes the task into an unsupported variation and requires a separate balance standard.
Why does my supporting arm bend?
You may be lifting before the weight transfer is complete, using too much reach or continuing after your support has deteriorated. Practise smaller shifts or hand hovers and shorter sets. Do not force full taps through a collapsing arm.
Tips for the proper execution of Chest-to-Wall Handstand Shoulder Taps
Face the wall with light toe contact; keep the chest and abdomen clear of it.
Use a firm, non-slip floor and a hand-to-wall distance that preserves your body line and exit.
Keep the supporting elbow naturally straight without forcing hyperextension.
Push tall through the loaded shoulder throughout the hand release.
Transfer weight before lifting; the free palm should already feel light.
Use the selected method consistently: same-side taps touch your own shoulder; cross-body taps touch the opposite shoulder without turning the torso.
Keep the ribs and pelvis controlled while allowing the small lateral shift needed to unload a hand.
Return the palm to its original position quietly and reset before alternating.
Look toward the floor, keep the neck comfortable and continue breathing.
Finish before support deteriorates and retain enough strength for a controlled descent.
Muscles worked when doing Chest-to-Wall Handstand Shoulder Taps
Chest-to-Wall Handstand Shoulder Taps primarily challenge the shoulders and upper back to maintain overhead support as weight moves between the arms. The supporting side works mainly isometrically while the free arm moves to either its own shoulder or the opposite shoulder and returns.
- Deltoids: help maintain the loaded arm’s overhead position.
- Trapezius and serratus anterior: contribute to active scapular positioning and support while you push tall.
- Triceps: maintain extension of the supporting elbow.
- Abdominals and obliques: help organise the trunk and limit unwanted arching and rotation during the transfer.
- Forearms and hand muscles: manage pressure against the floor as the support shifts.
- Glutes and quadriceps: help keep the pelvis and legs controlled.
Both tap methods use these support and trunk-control roles. A cross-body reach changes the free-arm position and requires you to avoid unwanted torso rotation; it is not presented as producing greater measured core activation than a same-side tap.
This is primarily a straight-arm support and coordination drill. The arm reach adds movement, but the exercise does not include the loaded elbow-bending range of a handstand push-up.
Primary Muscle(s):

Anterior delt

Trapezius
Secondary Muscle(s):

Triceps

Abdominal

Oblique
Equipment needed for Chest-to-Wall Handstand Shoulder Taps
No equipment needed for this exercise.
Adjust the difficulty of Chest-to-Wall Handstand Shoulder Taps
Scale the drill through static wall support, two-hand weight shifts and brief hand hovers before attempting full shoulder taps. Choose same-side or cross-body shoulder contact according to the reach you can control, and record the method. Increase difficulty through controlled repetition volume or a deliberate shoulder pause. Unsupported taps and handstand walking add a separate balance demand and should be introduced only with reliable freestanding control and an appropriate exit.
How to make Chest-to-Wall Handstand Shoulder Taps harder?
How to make Chest-to-Wall Handstand Shoulder Taps easier?
How to make Chest-to-Wall Handstand Shoulder Taps harder?
To make Chest-to-Wall Handstand Shoulder Taps harder:
-
Add a small number of total taps while retaining the same body line, light wall contact and controlled return on both sides.
-
Slow the reach and return so each hand release remains deliberate instead of relying on momentum.
-
Briefly pause at the shoulder before replacing the hand; keep the supporting shoulder active throughout.
-
Bring a previously separated pair of feet together while preserving control, without increasing pressure into the wall.
-
After establishing repeatable freestanding balance and a safe exit, practise unsupported hand hovers and then Freestanding Handstand Shoulder Taps as a separate variation.
How to make Chest-to-Wall Handstand Shoulder Taps easier?
To make Chest-to-Wall Handstand Shoulder Taps easier:
-
Build a controlled Chest-to-Wall Handstand hold with active shoulders and a reliable descent before introducing hand release.
-
Practise Chest-to-Wall Handstand Weight Shifts with both palms grounded, allowing one hand to become lighter without lifting it.
-
Lift the unloaded hand only a few centimetres, then replace it without reaching the shoulder. Record these as hand hovers.
