
Tuck Planche Push-Up
How to do Tuck Planche Push-Up?
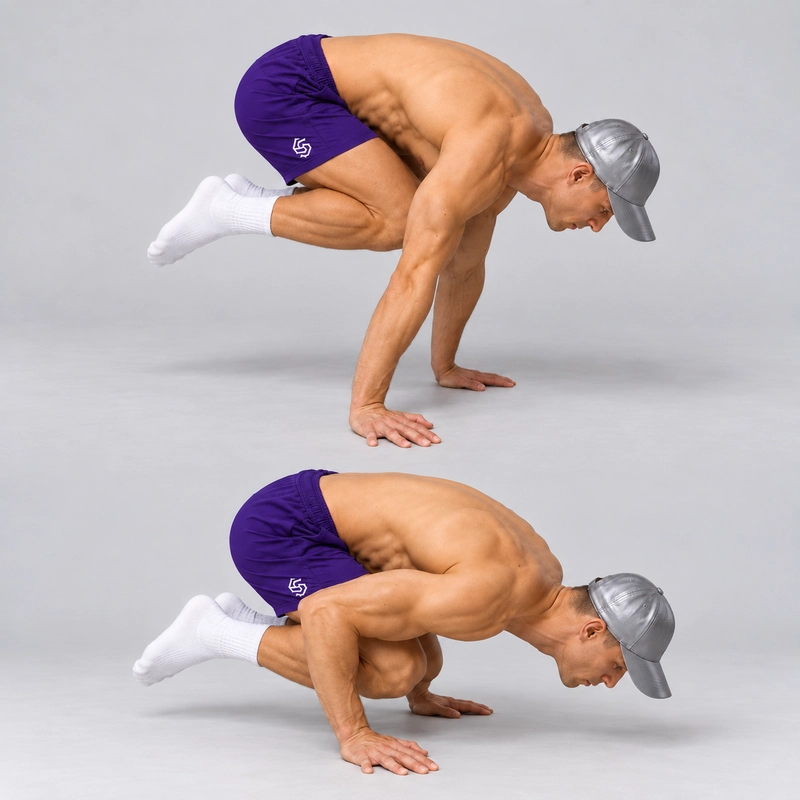
The Tuck Planche Push-Up is an advanced bodyweight pressing exercise performed with both feet off the ground and the knees tucked toward the chest. Start in an unsupported straight-arm tuck, bend the elbows to lower the body, then press back to straight arms. Your hands remain the only external support throughout each repetition, and your knees do not rest on your arms.
Unlike the static Tuck Planche, this version includes a complete lowering and pressing cycle. Unlike the Pseudo Planche Push-Up on Parallettes, it removes foot support. It also differs from a knee-supported Crow or Frog Stand: placing the knees on the upper arms changes the exercise even if the feet remain airborne.
The compact tuck keeps the leg configuration shorter than a more open tuck or straight-leg planche. It still requires substantial pressing strength and balance. The Advanced Tuck Planche moves the knees farther from the chest, while the full Planche extends the legs together. Build control in each position before adding its push-up variation.
Floor or parallettes?
Both setups can be used for this exercise. On the floor, place the palms on a firm, non-slip surface, around shoulder width apart, with fingers forward or slightly outward as comfortable. Spread the fingers and keep the whole palm in contact. On parallettes, use a secure neutral grip with thumbs wrapped around the handles. Set both bars parallel, around shoulder width apart, on a level surface.
Parallettes change the wrist position and provide more clearance for the tucked legs. They do not automatically make an unsupported repetition easier or require a deeper bottom position. Use the same shoulder-to-elbow depth reference when comparing your regular repetitions. Any deliberate extra descent beyond that reference should be recorded as added range. Check that the bars cannot slide, roll or tip under a forward lean; unstable handles or loosely stacked supports are unsuitable.
Before your first repetition
Be able to enter, briefly settle and exit an unsupported Tuck Planche on your chosen surface. A successful hold is a useful starting point, but it does not guarantee that you can reverse a full push-up. Use Planche Leans and foot-supported pseudo planche push-ups to practise forward loading and pressing while developing the unsupported movement.
Begin with gradual hand loading, shoulder movement and easier pressing. The Wrist Warm-Up Routine provides preparation ideas; it is not a guarantee against discomfort. For broader preparation and tuck-hold progressions, see GMB Fitness's planche tutorial. Its straight-arm hold drills complement this dynamic exercise rather than replace the push-up steps below.
Leave room to place the feet down deliberately. Stop if you feel sharp pain, lose your grip or cannot control the descent. Reduce the load or range instead of forcing another attempt; persistent or recurring pain warrants appropriate professional advice.
How to do the Tuck Planche Push-Up
- Set the hands and check the support. Choose the floor or stable parallettes. Keep the hand placement fixed for the repetition and leave enough room for your tucked knees and feet.
- Enter a straight-arm tuck. Begin crouched with the feet supported. Lean the shoulders forward of the hands, press firmly through the support and draw the knees toward the chest until both feet lift without a jump. Keep the knees clear of the arms. An optional knee-supported setup must end before the repetition begins.
- Settle the top position. Keep the elbows naturally straight, the legs compact and the pelvis lifted roughly toward shoulder height. The back can round in a tight tuck; you do not need the flatter, more open shape of an advanced tuck. Avoid dropping into an upright tuck support with the hips hanging below the hands.
- Lower by bending the elbows. Keep the shoulders forward and let the elbows travel back with a comfortable path rather than flaring sharply sideways. Lower the torso and pelvis together while preserving the tuck. Keep active shoulder support; do not let the chest collapse between the arms.
- Reach a controlled bottom position. For the regular repetition described here, aim for the shoulders approximately level with the elbows and the upper arms roughly parallel to the floor. Keep both feet, the knees and the head clear of the surface and equipment. If you must touch down or lose the tuck to reach that position, shorten the range and treat the attempt as a regression.
- Press back to straight arms. Push through the hands, extend the elbows and bring the torso and hips up together. Maintain the forward balance rather than rocking onto the feet or swinging the legs. Show a settled unsupported top position before starting the next repetition.
- Finish deliberately. After the last completed repetition, place the feet down under control. End the set before the next descent would require knee support, a kick or an uncontrolled drop.
Elbow bending is intentional during this push-up. The straight-arm rule applies to the start and finish, not the entire repetition. Keep the upper back actively supported, particularly at the top, while allowing the shoulder blades to move with the pressing action. Do not try to hold maximal rounding rigidly through every part of the descent.
Daniel Flefil and Daniel Hristov's planche push-up tutorial includes a tuck-planche section with a parallette setup and controlled lowering. That article focuses on explosive training. The version described here keeps the hands planted and does not require a jump or hand release.
What counts as a clean repetition?
- Begin from a settled, straight-arm Tuck Planche with both feet airborne and knees unsupported.
- Lower under control to the stated bottom reference while keeping the same compact leg shape.
- Return to natural full elbow extension and re-establish unsupported balance.
- Keep the hands fixed and use no foot contact, knee support, head contact or leg swing during the cycle.
Count one repetition after the complete straight-arm return. Entry and exit are separate from the rep count. Partial-range, spotted or band-assisted practice can be productive, but should be recorded with the actual range and assistance. Film from the side to check elbow extension, foot clearance and whether the hips drop as fatigue builds.
Common mistakes and useful corrections
- Knees resting on the arms: return to a smaller unsupported range or assisted practice. A knee-supported balance is a different task.
- Feet brushing down at the bottom: reduce the range or use suitable parallettes for clearance, keeping the same intended depth reference. Do not count a supported reversal as an unassisted rep.
- Stopping short of straight arms: practise a range you can reverse fully. Pressing only into another bent-arm hold does not complete the repetition.
- Changing the tuck to finish: keep the knee-to-chest relationship similar throughout. A large hip lift, sudden knee pull or leg swing can conceal a strength or balance limit.
- Chasing extra depth: establish repeatable regular-range reps before deliberately increasing the descent on raised supports.
- Rushing fatigued attempts: use short sets and enough recovery to repeat the same form. Stop before the feet touch down unexpectedly.
How to practise and progress
For an athlete who can already perform a clean repetition, one starting option is three sets of one to three controlled reps, with about three minutes of rest and longer recovery when needed. This is a coaching example, not a required dose or a readiness test. Perform the skill while fresh, keep some capacity in reserve and progress the number of clean reps before adding another challenge.
If no full repetition is available, choose a manageable partial range, planned assistance or the foot-supported pseudo planche push-up. Once regular reps are consistent, add a modest pause or slower lowering phase. Opening the tuck changes leverage; it should be treated as a separately named progression rather than an invisible change to your usual rep count.
Log the surface, tuck shape, depth, assistance and completed reps. Compare sessions using the same standard. Your next useful step is the smallest change you can control, rather than a forced jump to a full-planche push-up.
Tips for the proper execution of Tuck Planche Push-Up
Use a firm floor or stable parallettes. Test the supports under a forward lean before lifting both feet.
Settle a straight-arm Tuck Planche before starting the descent. Entry and exit do not count as repetitions.
Keep both feet airborne and the knees clear of the arms throughout the lowering and pressing cycle.
Maintain a compact knee-to-chest relationship. Do not swing the legs or suddenly change the tuck to finish a difficult rep.
Bend the elbows deliberately during the descent. Keep a comfortable backward elbow path and active shoulder support.
Keep the shoulders forward of the hands while balancing. Adjust the lean smoothly rather than rocking backward onto the feet.
Use a repeatable bottom reference: shoulders approximately level with the elbows and upper arms roughly parallel to the floor. Label shorter attempts partial ROM.
Raise the torso and hips together and return to naturally straight elbows. Another bent-arm hold is not a completed push-up.
Allow the shoulder blades to move with the rep while keeping active support. Avoid collapsing between the arms or forcing maximal rounding throughout.
Use short, controlled sets and a side-view form check. Put the feet down deliberately before balance, grip or pressing control deteriorates.
Muscles worked when doing Tuck Planche Push-Up
The Tuck Planche Push-Up combines dynamic upper-body pressing with sustained control of an unsupported tucked position. The shoulders and elbows move during the rep while the trunk and legs maintain the compact shape.
- Anterior deltoids: contribute to supporting the forward-leaning shoulder position and controlling the pressing movement.
- Triceps: contribute to elbow extension during the press and to maintaining the straight-arm top position.
- Pectoralis major: contributes to upper-body pressing. Its involvement should not be interpreted as a measured advantage for a specific chest region.
- Serratus anterior and other scapular muscles: help maintain active support and coordinate the shoulder blades as the body lowers and rises.
- Abdominals and obliques: help control the ribs, pelvis and trunk while maintaining the tuck.
- Hip flexors: help keep the thighs drawn toward the torso rather than letting the tuck open during the rep.
- Forearm and hand muscles: help maintain grip or palm support and regulate pressure for balance.
The movement includes lowering and pressing phases, with stabilising work throughout. It is therefore different from a purely static Tuck Planche hold. Actual muscle demands depend on the lean, leg configuration, depth and equipment; no precise loading percentage is assigned.
Primary Muscle(s):

Anterior delt

Triceps
Secondary Muscle(s):

Upper chest

Abdominal
Equipment needed for Tuck Planche Push-Up
No equipment needed for this exercise.
Adjust the difficulty of Tuck Planche Push-Up
Adjust the range or assistance before changing the leg shape. Build a controlled unsupported top position, then practise a lowering depth you can reverse without touching down. Record partial, spotted and foot-supported work separately from full unassisted reps. Once regular reps are repeatable, add a short pause or slower descent. A more open tuck is a different leverage progression; parallettes alone are not automatically an easier or harder exercise.
How to make Tuck Planche Push-Up harder?
How to make Tuck Planche Push-Up easier?
How to make Tuck Planche Push-Up harder?
To make Tuck Planche Push-Up harder:
-
Add a brief pause at the bottom, starting with about one second where you can still press back without support. Keep the feet airborne, tuck unchanged and shoulders actively supported; do not use the pause to rest on the knees or equipment.
-
Slow the descent to approximately three seconds while retaining the same bottom reference and straight-arm return. Treat tempo as added difficulty and stop if slowing the rep forces a touchdown or a large change in tuck shape.
-
Add one clean repetition to a short set when every existing rep meets the same standard. Keep sufficient reserve for a deliberate exit and avoid increasing depth or opening the tuck at the same time.
-
After establishing an Advanced Tuck Planche hold, begin controlled push-up practice with the knees farther from the chest. Start with a manageable range and keep the longer shape consistent. Record it as an Advanced-Tuck Planche Push-Up, rather than combining it with tight-tuck reps.
How to make Tuck Planche Push-Up easier?
To make Tuck Planche Push-Up easier:
-
Use a smaller lowering range from an unsupported Tuck Planche. Bend the elbows only as far as you can press back to straight arms while keeping the feet airborne and knees clear. Gradually increase depth and record these attempts as partial ROM.
-
Practise with a qualified spotter providing agreed assistance at the pelvis. Preserve the compact tuck and intended elbow action, and plan the exit before lifting the feet. Reduce help only when you can control both directions; log the reps as spotted.
-
Build the forward-leaning pressing pattern with foot-supported Pseudo Planche Push-Ups. Keep the lean manageable and return fully to straight arms. This is a preparatory exercise with a different support standard, not an unassisted Tuck Planche Push-Up.
