
Headstand
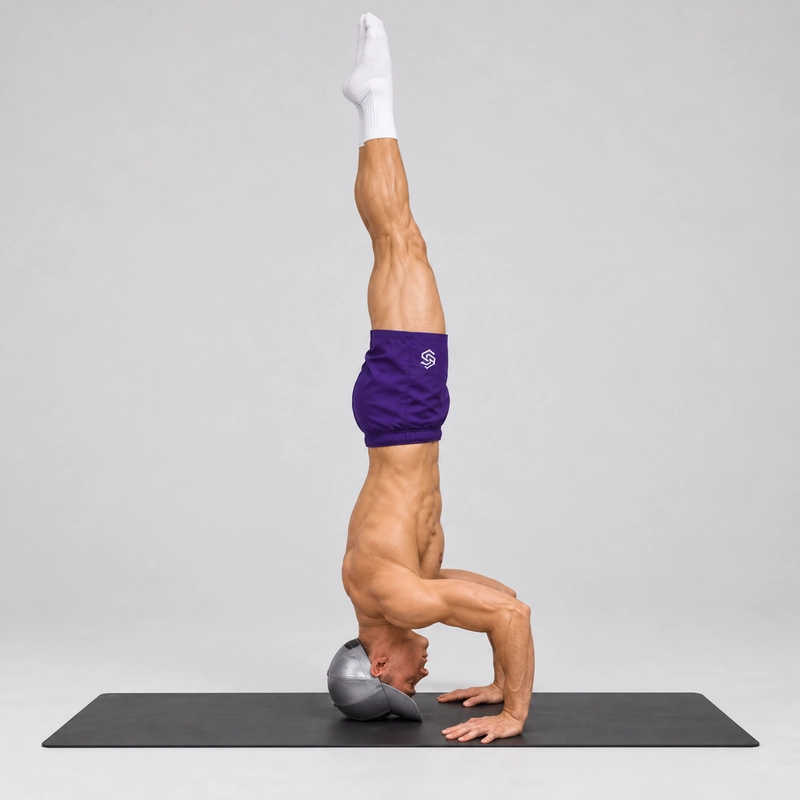
How to do Headstand?
The Headstand is an inverted balance in which the head forms part of the supporting base. This page teaches the freestanding tripod headstand: the crown of the head and both palms contact the floor, the elbows remain bent, and the legs extend together above the torso. Enter through a controlled tuck and keep the hands actively pressing into the surface throughout the hold.
Unlike a Freestanding Handstand, the tripod headstand includes head contact and uses a three-point base. A Crow or Frog Stand keeps the head off the floor and supports the knees on the arms. A headstand is also different from the Floor Pike Push-Up, which is a dynamic pressing exercise with the feet supported.
The skill offers practice in inverted body awareness and controlled leg positioning. It is an optional balance exercise, not a necessary step before learning handstands. The head and neck are loaded, so headstand practice deserves its own preparation and limits rather than being treated as an effortless substitute for hand support.
Tripod versus forearm-supported headstand
In the tripod version, both palms and the crown form a triangle. The elbows are bent and the forearms are approximately upright. In a forearm-supported version, the elbows and forearms contact the floor, usually with the hands joined behind the head. These setups change the base and arm action; do not switch between them without learning the corresponding technique.
The instructions and hold standard below apply to the tripod version. Forearm support does not remove head and neck loading, and neither setup is automatically suitable for every athlete. Use the same support configuration when comparing your practice results.
Readiness and head-and-neck loading
Learn the initial setup, balance and return with a qualified gymnastics or movement coach, especially if you have not practised head-supported inversions. You should be able to keep pressure through both palms, maintain the base and reverse a small leg lift before attempting the full vertical hold. If you cannot control the exit, keep the practice supported rather than testing an unassisted balance.
Research on headstand entry and exit found that technique influences head and neck loading in yoga practitioners. It does not provide a universally safe load percentage for this tripod exercise. Press through the hands, but do not assume that effort or a comfortable feeling proves the neck is unloaded.
A study of eye pressure during headstand measured an increase during the posture. If you have glaucoma, elevated eye pressure, a neck injury or another condition that affects tolerance of inversions or head loading, obtain appropriate medical advice before practising. A headstand is not a treatment for these conditions.
Stop immediately for neck pain, sharp pressure, numbness, tingling, dizziness, headache or visual disturbance. Return with assistance if needed, and seek appropriate care for severe or persistent symptoms. Do not continue to meet a hold-time target.
Setup and preparation
Use a level, non-slip surface with a thin, firm exercise mat if needed. The head and palms should be on the same stable surface. A deep cushion, bed or soft sofa can allow the supports to sink unevenly. Clear the surrounding area and arrange a coached spot before attempting a balance that you cannot reliably reverse.
Prepare the wrists and shoulders with gradual movement and light palm loading. The Wrist Warm-Up Routine offers preparation ideas. Avoid forceful neck stretching or trying to condition the neck by repeatedly dropping into the head contact.
For an additional visual explanation of the crown-and-palm triangle and active hand support, see Synergy Gymnastics' headstand tutorial. Use it alongside coached practice rather than treating an online tutorial as an individual readiness assessment.
How to do the Headstand
- Begin low and place the palms. Kneel or crouch on the mat. Set the palms approximately shoulder width apart, spread the fingers and choose a comfortable forward or slightly outward finger angle.
- Establish the third contact. Place the crown of the head ahead of the line between the palms so the three contacts form a triangle. Bend the elbows and keep the forearms approximately upright rather than allowing the elbows to splay outward. Adjust the spacing while your feet remain supported; do not use a fixed distance that forces your neck out of alignment.
- Load the base gradually. Press through both palms and lift the hips enough to bring the feet closer. Keep the head contact still, with no deliberate rolling onto the forehead, side or back of the skull. Maintain a comfortable neck position and avoid turning to look around.
- Find a manageable tucked balance. A preparatory entry may place one knee at a time on the upper arms. From that supported shape, raise the pelvis gradually and draw the knees toward the torso until they are clear of the arms. Keep both feet airborne and move slowly; do not kick or launch the legs.
- Extend the legs after the hips settle. Bring the pelvis over the base, then extend the hips and knees smoothly. Finish with straight legs together and a controlled vertical body line. Keep the elbows bent and both palms firmly planted.
- Hold briefly with active hand support. Maintain a comfortable breathing rhythm and control the ribs and pelvis rather than arching to counterbalance. Use small pressure adjustments through the palms and fingers, without moving a hand or twisting the head.
- Reverse the entry deliberately. Bend the knees back into a tuck and lower the feet to the original side of the base while maintaining hand support. Settle the feet before unloading the head and coming upright. End before fatigue makes this return uncertain.
The CrossFit Gymnastics Training Guide's headstand section separates knee-supported, tucked and full-leg stages and describes spotting to prevent toppling into a roll. Treat these as stages you can control, not positions to rush through.
What counts as a controlled full hold?
- The crown and both palms stay in their original positions.
- Both feet remain airborne, with the hips and knees extended and the legs together.
- The knees are clear of the arms, and no wall or spotter provides support during the timed hold.
- The elbows stay bent, the hands stay active and the neck position remains comfortable and steady.
- The entry and return are controlled, without a kick, falling collapse or roll over the head and neck.
Start timing after the full vertical shape settles. Stop timing when that shape or the assistance standard changes, even if you remain inverted. A knee-supported balance, unsupported tuck or wall-assisted hold is useful practice but should be logged with its actual shape and support.
Common mistakes and corrections
- Placing the head between the palms on one line: return to the feet and rebuild a triangular base.
- Relaxing the arms as the legs rise: reduce the leg height and restore active palm pressure. The hands are load-bearing supports.
- Rolling or turning the head to correct balance: come down with control or assistance, then reset. Do not reposition the neck while loaded.
- Throwing the feet overhead: work on a settled tuck and slower extension with a coach before repeating full attempts.
- Moving a hand during the hold: place the feet down first and change the setup before the next attempt.
- Chasing a long hold despite a poor exit: shorten the practice and retain enough control to reverse the movement.
Practise the return before extending into a full hold. Do not rely on an improvised forward roll, cartwheel or neck twist as a bailout from a loaded headstand. A qualified spotter can help prevent overbalance and guide the pelvis back; agree the assistance before starting.
Practice dose and related skills
Once you can enter and exit reliably, a modest starting example is three short holds of three to five seconds, with roughly one to two minutes of rest and a complete reset between attempts. These are coaching suggestions, not evidence-based safe exposure limits or a test to push through. Use shorter supported stages when learning, and end the session if comfortable control deteriorates.
Progress by improving the tuck-to-straight transition and controlled return rather than adding neck loading, removing a hand or extending holds indefinitely. Keep practice fresh and avoid maximal-duration challenges.
If your goal is handstands, the Chest-to-Wall Handstand offers a separate route to straight-arm overhead support without head contact, provided you can enter and exit that exercise appropriately. It is not automatically a medical substitute when inversions themselves are unsuitable.
For pressing goals, use the Floor Pike Push-Up or a suitable Reduced-ROM Back-to-Wall Handstand Push-Up after establishing the required support and exit skills. Those pressing exercises keep the arms working through the reversal; their head target should not become a resting headstand. Holding a headstand does not establish readiness to press into a handstand.
Tips for the proper execution of Headstand
Use a firm, level surface with thin, stable padding if needed. Keep the palms and head on the same surface.
Make a triangle with the crown and both palms. Adjust the contact spacing while the feet are still supported.
Keep the elbows bent and the forearms approximately upright. Do not let the elbows spread outward as the legs rise.
Maintain active pressure through both palms. Do not treat the head as the only support or assume hand effort removes all neck loading.
Settle the tucked balance before extending the legs. A knee-supported tripod is a preparatory stage, not the full hold.
Raise and extend the legs gradually rather than kicking. Keep enough control to reverse the transition at any stage.
Keep the head contact still and the neck comfortable. Never turn, roll or reposition the head while it is loaded.
Finish with hips and knees extended, legs together and a controlled body line. Avoid a large lower-back arch to counterbalance.
Breathe comfortably and keep holds short. Stop for pain, dizziness, numbness, headache or visual disturbance rather than chasing a time target.
Return through the tuck and place the feet down deliberately. Learn with a qualified coach if you cannot prevent overbalance or control the exit.
Muscles worked when doing Headstand
The tripod Headstand combines bent-arm support with trunk and lower-body control. The main vertical balance is largely static, while the entry, leg extension and return involve movement.
- Deltoids and triceps: contribute to maintaining the bent-arm support and pressure through the palms. The hold does not require repeated elbow extension like a push-up.
- Scapular and rotator-cuff muscles: help stabilise the shoulders while the hands share the support.
- Abdominals, obliques and spinal stabilisers: help maintain the relationship between the ribs and pelvis and control unwanted arching or rotation.
- Hip muscles: organise the tucked entry and the transition into an extended body line.
- Quadriceps and inner-thigh muscles: help maintain straight knees and the legs-together finish.
- Forearm and hand muscles: maintain palm support and assist small pressure adjustments.
The neck is exposed to load because the head is a support contact. This page does not recommend the exercise as neck strengthening, prescribe a safe neck-load percentage or assume that muscular effort guarantees safe loading.
Primary Muscle(s):

Anterior delt

Triceps
Secondary Muscle(s):

Trapezius

Abdominal

Oblique
Equipment needed for Headstand
No equipment needed for this exercise.
Adjust the difficulty of Headstand
Change the leg shape, assistance and transition demands before extending hold time. Begin with controlled setup practice, a knee-supported tripod or an unsupported tuck under appropriate supervision. Progress toward a brief straight-leg freestanding hold only when you can reverse the entry. Record assisted and tucked versions separately. Do not add weight, remove hand support or use head rotation to make the exercise harder.
How to make Headstand harder?
How to make Headstand easier?
How to make Headstand harder?
To make Headstand harder:
-
After a stable unsupported tuck is available, extend both legs together more slowly into the vertical line. Keep the hips controlled and stop the transition if the head moves, the elbows spread or hand support weakens.
-
Make the return from straight legs to the tuck slower and more deliberate, then place the feet down smoothly. Prioritise a controlled descent rather than adding time at the top.
-
Perform one controlled straight-to-tuck-to-straight shape change while keeping the knees clear of the arms and both palms planted. Use supervision initially, keep the total exposure brief and exit before balance deteriorates. Record the shape-change cycle separately from an ordinary static hold.
-
With a qualified coach and sufficient mobility and control, practise a straight-leg pike entry rather than using the knee-supported setup. Lift through deliberate weight transfer without hopping or kicking, and retain a reliable return. This is a more demanding entry skill, not proof of greater or safer neck loading.
How to make Headstand easier?
To make Headstand easier:
-
Practise the tripod setup with the feet still on the floor and only a gradual weight transfer. Confirm the crown-and-palm triangle and active hand pressure, then unload again. Stay within a comfortable range; do not force a full inversion.
-
Use a knee-supported tripod balance or a brief unsupported tucked headstand as separate preparatory stages. Keep the head and palms fixed and return the feet under control. Maintain knee support only when deliberately practising that stage; it does not count as the full straight-leg hold.
-
Use a qualified spotter who can guide the pelvis and prevent toppling, with the assistance and return agreed in advance. A suitable wall may be used in a coached setup, but avoid kicking into it or relying on it to catch an uncontrolled entry. Log any wall or spotter support as assisted practice.
