
Reduced-ROM Back-to-Wall Handstand Push-Up
How to do Reduced-ROM Back-to-Wall Handstand Push-Up?
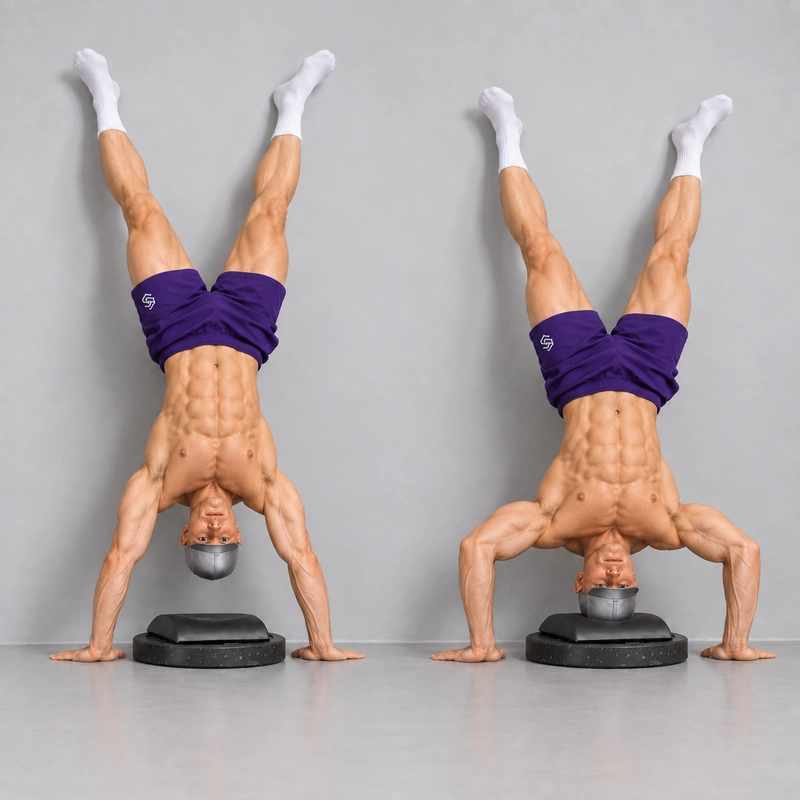
The Reduced-ROM Back-to-Wall Handstand Push-Up is a wall-assisted handstand press with a deliberately reduced range of motion. Your palms stay on the floor, your back faces the wall and your heels make light contact. Bend your elbows to lower the head toward a stable elevated target above hand level, then press back to a straight-arm handstand.
The raised target lets you practise a complete descent and return before you can manage the full floor back-to-wall handstand push-up. Raising the target shortens the movement; lowering it increases the available depth. Choose a height that allows a controlled press rather than dropping to a depth you cannot reverse.
This is an easier pressing variation, but it remains an inverted bodyweight exercise. Your arms still support your body at the top, and you still need a controlled entry and exit. A handstand push-up technique article describes the movement as combining a handstand with shoulder-press and push-up actions. Its abstract provides general exercise context rather than a tested raised-target protocol.
Who This Variation Is For
Use this version when you can establish a controlled back-to-wall handstand but cannot yet press from floor-level depth. It gives you a repeatable endpoint and an upward pressing task instead of an uncontrolled attempt at a full repetition.
If you cannot comfortably support yourself overhead, enter the wall position or step down reliably, begin with foot-supported pressing such as the floor pike push-up. A higher head target cannot solve those missing support skills.
More established athletes can also use a recorded shorter range for additional practice. Treat that work as its own configuration: a large number of raised-target repetitions does not demonstrate the ability to press from the floor.
Equipment and Raised-Target Setup
- A clear wall and a firm, non-slip floor.
- A low, broad, firm head target that stays in place, such as a suitable gym block or a purpose-built arrangement of firm exercise pads.
- If needed, a thin secured pad over the target for light contact. Its thickness is part of the target height.
- Enough open space to enter, move the head toward the target and step down without striking the target.
Keep both palms on the same floor level. Position the target beyond the line between the hands, farther from the wall, where the head will move during the descent. Viewed from above, the hand contacts and head endpoint form a triangle. This describes their positions; it is not an instruction to support your weight on the head.
The target must resist sliding, tipping and large changes in height. Avoid loose pillows, a rolling object or a narrow tower. If layered pads are used, secure the layers and check that they behave as one stable target. If a suitable plate-based target is used, secure it and cover the contact area with a thin firm pad; do not lower onto a bare hard rim or loose stack.
Check that the target leaves room for the kick-up and planned step-down. A target that fills the exit space is unsuitable even if its height seems convenient. Test the layout upright before entering the handstand.
Choose and Measure Your Starting Height
Choose an endpoint that is below your head in the straight-arm top position and allows a clear, controlled elbow bend followed by a complete return. A target so high that you cannot establish the handstand without touching it is unsuitable. There is no single starting height that fits every athlete.
Target offset = head-target top height minus palm-contact height. Measure both from the same floor reference. In this floor-palm version, the positive offset is simply the height of the target's top surface, including any contact pad.
| Palm level | Target top | Raised endpoint |
|---|---|---|
| Floor level | 20 cm (7.9 in) | 20 cm (7.9 in) above palms |
| Floor level | 15 cm (5.9 in) | 15 cm (5.9 in) above palms |
| Floor level | 10 cm (3.9 in) | 10 cm (3.9 in) above palms |
These are measurement examples, not required starting heights or universal difficulty grades. A lower target normally allows a longer descent when hand position and body line stay consistent. The offset does not state your actual head travel or the percentage of bodyweight being pressed.
A soft cushion can compress differently between repetitions. Use a firm predictable endpoint and record the complete arrangement. Changing from a thick cushion to a thin pad can increase the range even if the underlying block stays the same.
Prepare Before the First Repetition
Use the wrist warm-up routine to prepare for palm loading, followed by comfortable shoulder movement and easy pressing. Check the target, floor grip and clear exit before the working set.
First establish that you can enter, hold and leave the actual setup with straight arms. Then test one shallow repetition to a deliberately manageable target. Keep enough strength in reserve to straighten the elbows and step down; avoid repeated failed attempts while inverted.
If the press is unavailable even at a sensible high target, return to foot-supported pressing. The knee-height feet-elevated parallette pike push-up is another foot-supported branch for athletes ready for its handle and depth demands. Its apparatus and loading differ from this floor-palm handstand version.
How to Do a Reduced-ROM Back-to-Wall Handstand Push-Up
- Set the target. Secure the chosen height on the floor beyond the hand line, away from the wall. Leave the head path and step-down route clear.
- Place your hands. Set the palms roughly shoulder width apart, adjusting comfortably. Spread the fingers and choose enough wall distance for the head to travel toward the target without changing hand position.
- Enter under control. Use your familiar controlled kick-up to bring the heels lightly to the wall. Avoid striking the wall or kicking through the target's footprint.
- Establish the top. Straighten the elbows and push tall through the shoulders. Control the ribs and pelvis, keep the knees straight and bring the legs together.
- Lower through the selected range. Bend both elbows smoothly as the head travels forward and down, away from the wall. Keep the palms planted and heel contact light.
- Mark the bottom. Bring the top of the head to a gentle touch on the raised target. Keep the arms supporting the body; do not relax into a headstand or use the target to catch a falling descent.
- Reverse the movement. Press through both palms to extend the elbows. Keep the knees straight and avoid hip drive, heel pushing or rebounding from the target.
- Finish fully. Return to straight elbows and active shoulder elevation at the original top position. A shortened descent still requires a complete upward finish.
- End and exit. Stop before control deteriorates. Use your practised step-down with room for the leading foot to land beyond or beside the target, allowing the other leg to follow.
Lower at a pace that lets you stop before contacting the target. Exhale steadily through the press if comfortable and avoid prolonged breath-holding. If you cannot control the approach, stop the attempt rather than relying on the pad to absorb it.
What Counts as a Complete Repetition?
- Both palms remain on the same recorded floor surface.
- The head target is fixed, above palm level and the same height for every repetition in the set.
- Each repetition begins and ends with straight elbows and active shoulders.
- The head reaches the selected endpoint through controlled elbow bending and shoulder movement.
- Contact is light; there is no head-bearing rest or bounce.
- Only light heel contact assists balance, with no knee bend, kip or heel push.
- The target, palms and wall spacing remain in place.
If you lower but cannot press back up, record descent-only work separately. The negative handstand push-up is designed around a controlled lowering phase and reset; it is a complementary drill rather than a completed reduced-ROM press.
How to Progress Toward Floor-Level Pressing
Keep target height fixed until you can repeat the complete press without increasing heel pressure, shortening the bottom or losing the lockout. Then lower the target by a small amount and establish a new repetition baseline. An illustrative change is 1–2 cm (0.4–0.8 in) if your stable target arrangement allows it; this is a coaching option, not a compulsory increment.
A practical checkpoint might be three sets of three clean repetitions at one height on two separate sessions. Use that only as a decision aid, adjusting for your experience and recovery. The next lower target must still allow a controlled return; passing a repetition checkpoint does not guarantee the deeper press.
A systematic review of partial and full range resistance training found evidence that strength adaptations depend partly on the range trained and tested. This supports keeping depth consistent when comparing your results. It does not establish a target-height ladder for handstand push-ups or show that a shallow press automatically transfers to the untrained bottom range.
Gradually work toward the floor-level endpoint while keeping the same floor-palm setup. If a raised pad remains, record its height rather than calling the repetition full floor range. Introducing a deficit beneath raised hands is a later, separate change.
The wall-facing handstand push-up changes wall orientation and entry. It is a separate branch rather than a replacement for measuring target depth in this heels-to-wall version.
Programming the Raised-Target Version
Start with a few controlled singles to confirm that the selected depth permits a complete return. A coaching starting point is 2–3 sets of 1–4 repetitions with approximately 2–3 minutes of rest, once or twice per week alongside your other pressing work. Adjust the dose to your experience and recovery and finish each set while you can still exit under control.
Write down the target height, pad arrangement, hand width, wall distance, repetitions and any heel assistance. When you lower the target, accept fewer repetitions rather than trying to preserve the old count with a kip or shallower touch. Add range or repetitions one at a time so you can identify what improved.
Common Mistakes and Useful Corrections
- Using an unmeasured cushion: choose a firm target and record the top surface including its pad.
- Lowering the target too quickly: return to the last height that allowed a complete press and introduce a smaller change.
- Resting on the head: keep arm support throughout the touch. If you need the target to hold you up, stop and regress.
- Skipping the endpoint: a rep that turns around above the target uses less range; do not add it to the same count.
- Moving the hands or target between reps: set them once and stop the set if they shift.
- Changing the body line to reach the pad: lower through the press rather than craning the neck or increasing the back arch.
- Driving the heels or bending the knees: choose a higher target that you can reverse with strict pressing.
- Finishing with bent arms: reduce repetitions and restore the top position before increasing range.
Stop if you experience sharp pain, numbness, dizziness, unusual visual symptoms or loss of control. Persistent or recurring symptoms need appropriate professional assessment. A raised target is a strength regression, not a treatment for an injured wrist, shoulder or neck.
Questions About the Raised Head Target
How high should the target be?
High enough to allow a controlled complete press, but low enough to permit a clear descent from the straight-arm top without obstructing the handstand. Choose from your actual control and apparatus rather than a universal number.
Is a shallow repetition still useful?
It provides practice of the complete press through the range you can manage. Record the depth honestly and develop the omitted lower portion gradually if floor-level pressing is your goal.
Should I pause with my weight on the target?
No. The target marks depth. Any pause should remain supported through the arms without placing your bodyweight on the head.
Can I compare repetitions at different target heights?
Keep separate records. Reaching a lower target with fewer strict repetitions can represent meaningful progress even when the raw repetition count drops.
Tips for the proper execution of Reduced-ROM Back-to-Wall Handstand Push-Up
Keep both palms on the floor and use a secured head target whose top surface is above palm level.
Record the complete target height, including any contact pad, and use a firm surface that compresses minimally.
Place the target beyond the hand line, away from the wall, with a clear route for the head and your step-down.
Choose a starting height that permits a controlled elbow bend and complete return without obstructing the straight-arm top.
Establish a controlled wall entry, active straight-arm hold and exit before adding the pressing descent.
Lower smoothly to a light head touch while the arms continue supporting you; never drop or rest onto the target.
Keep heel contact light, knees straight and the ribs and pelvis controlled throughout the press.
Finish every repetition with straight elbows and active shoulders, even when the descent is shallow.
Stop before pressing control or your safe exit deteriorates, and record different target heights separately.
Muscles worked when doing Reduced-ROM Back-to-Wall Handstand Push-Up
The Reduced-ROM Back-to-Wall Handstand Push-Up trains vertical pressing through a selected shorter range. The shoulders and triceps control the descent and restore straight-arm support, while the trunk and shoulder-blade muscles maintain the inverted position. The target changes the endpoint; it should not carry the bodyweight.
Main Pressing Muscles
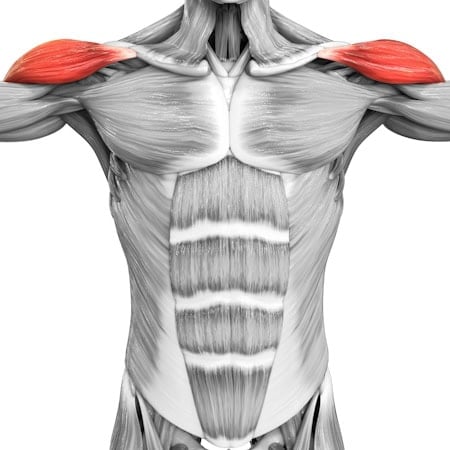
- Anterior deltoids: contribute to the loaded shoulder action during lowering and pressing.
- Triceps brachii: control elbow flexion and produce elbow extension on the return.
- Lateral deltoids: assist shoulder movement and control the upper-arm position.
Assisting and Stabilizing Muscles
- Upper pectoralis major: assists pressing according to the arm and torso position.
- Serratus anterior and trapezius: guide shoulder-blade movement and support the active overhead finish.
- Rotator-cuff muscles: stabilize the shoulders during inverted loading.
- Forearm and hand muscles: distribute palm and fingertip pressure and stabilize the wrists.
- Abdominals, obliques and spinal stabilizers: control the relationship between the ribs and pelvis.
- Glutes, quadriceps and other leg stabilizers: maintain hip extension, straight knees and a consistent body line.
A higher target normally makes the complete press more manageable by limiting depth, but the straight-arm hold still requires bodyweight support. Do not infer an exact reduction in muscle activation or joint force from the target's height, and do not use heel drive to substitute for pressing strength.
Primary Muscle(s):

Anterior delt
Secondary Muscle(s):
Lateral delt

Trapezius

Triceps
Equipment needed for Reduced-ROM Back-to-Wall Handstand Push-Up
No equipment needed for this exercise.
Adjust the difficulty of Reduced-ROM Back-to-Wall Handstand Push-Up
Scale this variation by changing the raised head target while keeping the palms on the floor. A higher stable target shortens the press; a lower target increases the range toward floor-level depth. Keep hand width, wall distance, light heel contact and lockout consistent. Use the highest practical target needed for a controlled complete return, then lower it gradually. Static holds, negatives, foot-supported pressing and deficit presses are separate tasks.
How to make Reduced-ROM Back-to-Wall Handstand Push-Up harder?
How to make Reduced-ROM Back-to-Wall Handstand Push-Up easier?
How to make Reduced-ROM Back-to-Wall Handstand Push-Up harder?
To make Reduced-ROM Back-to-Wall Handstand Push-Up harder:
-
Lower the stable target by a small measured amount without changing hand placement or increasing heel assistance.
-
Progress toward the floor-level endpoint, removing remaining target elevation gradually rather than making one large depth jump.
-
Use a controlled three-second descent through the same recorded range while preserving a complete upward press.
-
Pause briefly just above the raised target under arm support, then press without head contact, rebound or leg drive.
How to make Reduced-ROM Back-to-Wall Handstand Push-Up easier?
To make Reduced-ROM Back-to-Wall Handstand Push-Up easier:
-
Raise the secured target slightly to shorten the descent, while leaving enough clearance for a straight-arm top and a clear elbow bend.
-
Perform fewer repetitions or controlled singles at the same recorded height, with sufficient rest to preserve the return and exit.
-
Use foot-supported pike pressing if you cannot complete an inverted press, and practise wall-supported entry, hold and exit separately.
