
Lateral Handstand Walk at the Wall
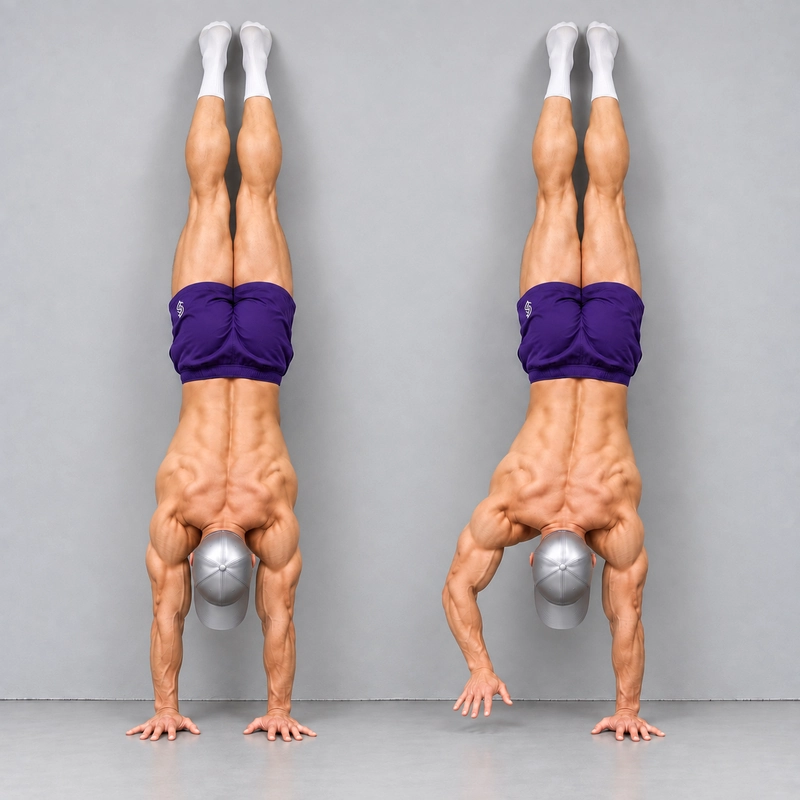
How to do Lateral Handstand Walk at the Wall?
The Lateral Handstand Walk at the Wall is a wall-supported handstand drill in which you move sideways by alternately lifting and replacing the hands. Your feet follow along the wall with light contact while your arms support the inverted body. The aim is controlled lateral travel, not simply holding a handstand or shuffling the feet to drag the body sideways.
This exercise adds a moving base of support to Chest-to-Wall Handstand Weight Shifts, where both palms stay grounded. Unlike Chest-to-Wall Handstand Shoulder Taps, the hands land in new positions and the body travels along the wall. It also differs from a Wall Walk, which moves the hands toward and away from the wall to enter and leave the inversion.
The wall supplies balance assistance, making this a useful place to practise stepping before attempting an unsupported Handstand Walk. However, sideways wall travel does not replace Freestanding Handstand practice: balancing without contact and walking forward introduce different demands.
Chest-to-wall or back-to-wall: which should you use?
Use chest-to-wall as the default for alignment-focused practice. Begin in a Chest-to-Wall Handstand, with only light toe contact. This gives you a useful reference for keeping the shoulders and hips organized instead of hanging in a pronounced lower-back arch. “Chest-to-wall” describes your orientation; your chest should not be pressed against the wall.
Back-to-wall is a useful alternative when you can enter, hold and exit it more reliably. Use gentle heel contact, keep the ribs controlled and bring the hips over the shoulders. Do not chase extra distance by letting the back arch or the heels drag heavily. Specialist Handstand Factory guidance on GMB discusses the alignment value of wall-facing work and the usefulness of a correctly organized back-to-wall position. Our preference for chest-to-wall lateral walking is a coaching recommendation, not a proven universal advantage.
| Feature | Chest-to-wall | Back-to-wall |
|---|---|---|
| Wall contact | Toes or the front of the feet touch lightly. | Heels touch lightly. |
| Typical entry | A controlled wall walk from a plank. | A controlled kick-up with a gentle landing against the wall. |
| Main coaching focus | Maintain a stacked line while the hands and feet travel sideways. | Keep the ribs and pelvis organized rather than reaching the heels back through a large arch. |
| When to choose it | Your wall walk, overhead position and exit are dependable. | Your kick-up and descent are more dependable, and you can retain light contact and good alignment. |
| Common compensation | Pressing the torso into the wall or letting the toes stick while the hands move. | Hanging on the heels with a pronounced arch or kicking into the wall too hard. |
Before you start
You should be able to enter and leave your chosen wall handstand under control, hold it with straight elbows and active shoulders, and shift enough weight onto either hand to briefly unload the other. You do not need a freestanding handstand to begin this wall-assisted drill. If you cannot yet unload a hand without bending the support arm, return to stationary weight shifts.
Prepare the wrists and shoulders progressively, using a Wrist Warm-Up Routine before full bodyweight support. Choose a firm, non-slip floor and a clear, suitable wall. Check the complete sideways route and the space needed to descend, including at the far end. Avoid obstacles, wall fittings, baseboards that obstruct your feet, and soft surfaces that make the hands unstable.
How to do a lateral handstand walk at the wall
The following steps describe the chest-to-wall version. The 12 Minute Athlete lateral wall-handstand tutorial also demonstrates the wall-facing drill. Start with a short route and enough supporting endurance left to return to the floor.
- Enter the wall-facing handstand. Start in a plank with your feet at the wall. Walk the feet upward and the hands toward the wall until you reach a controlled, nearly vertical position. Choose your hand-to-wall distance according to your overhead mobility, alignment and ability to exit; do not force a universal gap.
- Establish the starting position. Place the hands approximately shoulder-width apart, spread the fingers and use a comfortable hand angle. Keep both elbows straight and push the floor away. Organize the ribs and pelvis, extend the knees and keep the feet close together with light toe contact. Look at the floor without craning the neck.
- Choose a direction. For travel to your right, the right hand is the leading hand. Left and right refer to your own sides, not the camera view. Keep your chest facing the wall throughout the route.
- Unload the leading hand. Shift enough weight onto the planted left hand to make the right hand light. Keep the left elbow straight and the left shoulder actively elevated. Do not try to lift the right hand while your weight is still resting on it.
- Take a small leading step. Lift the right hand just clear of the floor and place it a short distance to your right, at roughly the same distance from the wall. Keep the fingers spread and settle the palm before transferring weight onto it. Avoid a large reach that leaves you unable to move the following hand.
- Bring the following hand across. Load the newly planted right hand enough to unload the left. Lift and move the left hand to your right until you restore approximately shoulder-width spacing. Do not cross the hands or bring them together beneath the body.
- Let the feet follow. Reposition the feet sideways along the wall as needed so the shoulders, hips and feet travel together. Keep contact light; do not push through the legs to propel yourself. If the feet catch on the wall or the hips twist while the hands continue, stop and reset instead of forcing the next step.
- Continue and reverse. Repeat the lead-and-follow sequence for your planned short distance. To travel left, first shift onto the right hand, move the left hand left, then bring the right hand after it. Keep both directions controlled rather than rushing the return.
- Finish while you can still descend. Settle both hands, then reverse the wall walk by moving the hands away as the feet walk down. Maintain support until the feet reach the floor. End sooner if the supporting elbow bends, the shoulder sinks, the hands slap down or you lose control of wall contact.
How to use the back-to-wall version
Enter with a controlled kick-up and establish gentle heel contact before starting. Use the same leading-hand and following-hand sequence, keeping your back oriented toward the wall throughout. Maintain a comfortable hand angle rather than rotating the palms to point sideways with each step. Let the heels follow the lateral movement without hanging on them. Finish with the controlled descent you have already practised in this orientation; do not improvise a new exit once tired.
Back-to-wall walking is still a wall-assisted stepping drill. Intentionally peeling the heels away to find unsupported balance changes the task to balance practice; it is not required to complete a lateral wall-walking step.
Step standard and how to count progress
- One hand step: one hand leaves the floor, lands in a new sideways position and accepts pressure under control.
- One lateral cycle: the leading hand steps and the following hand steps, restoring approximately shoulder-width spacing. One cycle equals two hand steps.
- Direction: record cycles to the right and left separately. Two cycles right and two cycles left equal eight total hand steps.
- Position: retain straight supporting elbows, active shoulders and an organized torso. Small corrections are normal; large twisting, piking or uncontrolled arching signal a loss of the intended technique.
- Contact: the feet continue to provide light wall assistance. The chest, back and pelvis do not rest against the wall.
- Travel: move parallel to the wall at a reasonably consistent hand-to-wall distance. The entry and descent are not counted as lateral steps.
Record the orientation, cycles in each direction and, if useful, the sideways distance. Keep the step size similar when comparing sessions. A longer reach should not masquerade as better control, and chest-to-wall and back-to-wall results should remain distinguishable in your training log.
Common mistakes
- Lifting the loaded hand: shift onto the opposite planted hand before attempting each lift.
- Taking a large leading step: shorten the reach so the following hand can move without a rushed transfer.
- Crossing the hands: preserve a lead-and-follow pattern with a usable base of support.
- Letting the feet lag: coordinate the foot repositioning with the hand steps instead of twisting the hips around stuck toes or heels.
- Using the wall as a propulsive surface: reduce leg pressure and return to a shorter route if you cannot travel without forcefully pushing through the feet.
- Turning to face the direction of travel: keep the same wall orientation. A handstand turn is a different task.
- Walking to exhaustion: reserve enough control for the exit, including the effort required to reverse a wall walk.
Sets, cycles and progression
Practise after warming up and before fatiguing upper-body work. A practical starting option is 2 to 3 sets of 1 to 3 lateral cycles in each direction, with approximately 90 to 120 seconds of rest. These are adjustable coaching suggestions, not a validated test or universal prescription. Use fewer cycles if the entry and descent already consume much of your supporting endurance.
Increase the number of controlled cycles before taking larger steps. Change one variable at a time and keep both directions comparable. When stepping becomes repeatable, add brief, deliberate hand hovers or use slightly lighter wall pressure while retaining contact. Train unsupported balance separately before progressing to freestanding walking.
Frequently asked questions
Is chest-to-wall always better?
No. It is our default for practising a straight line, but a well-controlled back-to-wall setup can also be productive. Choose the orientation in which you can maintain active support, light contact and a dependable exit.
Should my feet slide or step along the wall?
Either a small slide or a small repositioning can work, depending on the wall and footwear. Keep the movement controlled and contact light. Do not change to slippery hand or foot surfaces to chase smoother travel.
Will this teach me to walk on my hands without a wall?
It rehearses alternating hand support and sideways stepping. Unsupported balance and forward travel still need their own practice; covering a long wall route does not demonstrate freestanding walking ability.
Tips for the proper execution of Lateral Handstand Walk at the Wall
Use chest-to-wall as the default for alignment practice, provided you can enter and exit that position reliably.
Unload the hand before lifting it: to move the right hand, first transfer support onto the left hand, and vice versa.
Take a small leading-hand step, then bring the following hand across to restore approximately shoulder-width spacing.
Keep the supporting elbow straight and push tall through that shoulder throughout every hand transfer.
Keep the hands at a reasonably consistent distance from the wall rather than drifting toward or away from it.
Let the toes or heels follow the hands sideways with light contact; stop if the feet catch and the hips begin twisting.
Maintain the same wall orientation and a comfortable palm angle. Do not cross the hands or turn the body toward the route.
Use short routes in both directions and count one lead-and-follow pair as one cycle, equal to two hand steps.
Breathe steadily while keeping the ribs and pelvis organized instead of hanging against the wall in a large arch.
Finish with enough supporting endurance to perform your planned descent; the entry and exit add work even though they are not counted as lateral steps.
Muscles worked when doing Lateral Handstand Walk at the Wall
The Lateral Handstand Walk at the Wall combines sustained overhead support with repeated transfers between the arms. During each step, the planted arm accepts more of the load while the other hand moves. The wall assists balance; heavy foot pressure changes how much support the arms must provide.
Primary muscles
- Deltoids: stabilize the upper arms in the overhead weight-bearing position as support alternates between sides.
- Trapezius: contributes to scapular elevation and upward rotation while you push tall through the supporting shoulder.
- Serratus anterior: helps control the shoulder blades against the ribcage during the shifting support.
Secondary muscles
- Triceps: maintain elbow extension in the supporting arm. The exercise does not require a repeated bent-arm press.
- Forearm and hand muscles: stabilize the wrists and regulate pressure as each palm unloads, lands and accepts weight.
- Abdominals, obliques and spinal stabilizers: organize the trunk and resist excessive arching, twisting and side-bending during travel.
- Glutes, quadriceps and other leg stabilizers: keep the lower body organized while the feet follow along the wall.
Both wall orientations use these broad support and stabilization functions. Actual loading varies with technique and the amount of wall assistance; no precise muscle-activation ranking or percentage is established for this specific drill.
Primary Muscle(s):

Anterior delt

Trapezius
Secondary Muscle(s):

Triceps

Abdominal

Oblique
Equipment needed for Lateral Handstand Walk at the Wall
No equipment needed for this exercise.
Adjust the difficulty of Lateral Handstand Walk at the Wall
Adjust the amount of unsupported hand support before chasing distance. Begin with both palms grounded, then practise short lead-and-follow steps. Progress by adding controlled cycles, brief pauses or lighter foot pressure while retaining wall contact. Choose the wall orientation according to alignment and reliable entry and exit; back-to-wall is not automatically easier. Moving without wall contact is a separate freestanding progression.
How to make Lateral Handstand Walk at the Wall harder?
How to make Lateral Handstand Walk at the Wall easier?
How to make Lateral Handstand Walk at the Wall harder?
To make Lateral Handstand Walk at the Wall harder:
-
Add a small number of lateral cycles in each direction while keeping the same step size, shoulder elevation and light wall contact. Stop before the extra distance compromises your descent.
-
Pause briefly with the moving hand just clear of the floor before placing it. Start with a very short pause and keep the supporting elbow straight; do not turn the pause into a long one-arm hold.
-
Reduce pressure through the feet while keeping contact with the wall. Maintain the same short steps and organized body position instead of using repeated foot push-offs.
-
After developing reliable freestanding balance and exits, practise short unsupported lateral handstand steps in a clear area. Removing wall assistance changes the exercise to freestanding lateral handstand walking and should be logged separately.
How to make Lateral Handstand Walk at the Wall easier?
To make Lateral Handstand Walk at the Wall easier:
-
Practise stationary wall-handstand weight shifts with both palms grounded. Make one hand noticeably lighter, return to the center and repeat on the other side before introducing a deliberate lift.
-
Perform one small lead-and-follow cycle, pause with both hands planted, then reverse that cycle and descend. This reduces the lateral route and total time spent stepping while preserving the exercise's movement pattern.
-
Rehearse weight shifts and a few small sideways hand steps in a pike position with both feet supported on a sturdy, sufficiently wide box. Keep the platform stable and prevent the feet from reaching its edges. This is a separate foot-supported preparation drill, not a counted wall-handstand set.
