
Hamstring Walkouts
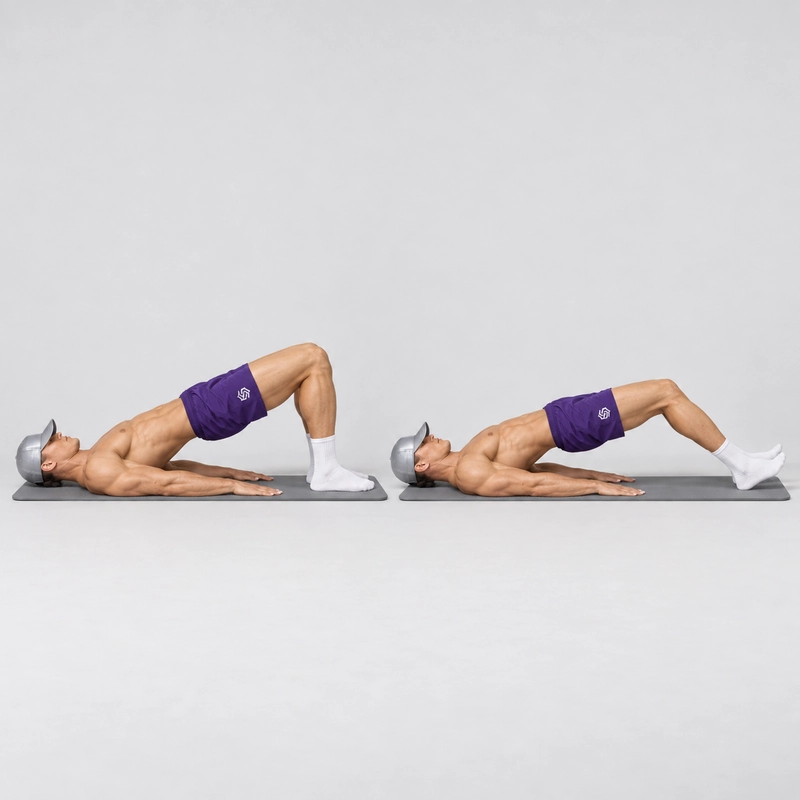
How to do Hamstring Walkouts?
Hamstring Walkouts are a bodyweight posterior-chain exercise performed from a raised bridge position. You begin with your knees bent, lift your hips and alternately take small heel steps away from your body before walking the feet back toward the starting position.
Moving the heels farther away gradually lengthens the lever acting on the hips and knees. The hamstrings control the outward steps and help pull the feet back in, while the glutes maintain hip extension and the abdominal muscles keep the ribs and pelvis aligned.
Hamstring Walkouts occupy a useful place between the Glute Bridge and the Sliding Hamstring Curl. A Glute Bridge keeps the feet stationary, Hamstring Walkouts reposition one foot at a time, and Sliding Hamstring Curls move both heels continuously across a low-friction surface.
What Are Hamstring Walkouts Good For?
Hamstring Walkouts develop hamstring strength and control without requiring a machine, resistance band, sliders or an ankle anchor. They are particularly useful for athletes who can perform a stable bridge but are not yet ready to maintain their hip position through a full Sliding Hamstring Curl.
- They train the hamstrings through progressively longer leg positions.
- They combine dynamic knee movement with an isometric hip-extension hold.
- They develop control during both the outward and returning portions of the exercise.
- They strengthen the glutes and trunk muscles that stabilize the pelvis.
- They allow the difficulty to be adjusted through range, tempo and total steps.
- They provide a no-equipment bridge between basic hip-extension exercises and more demanding hamstring curls.
Hamstring Walkouts should not be treated as an automatic injury-prevention exercise or as rehabilitation for an existing hamstring injury. Their main role is progressively loaded strength training within a balanced lower-body program.
Before You Begin
Use a clear, level surface on which your feet can be lifted and replanted without unexpectedly slipping. An exercise mat can be placed beneath your torso, but the feet should remain on a predictable surface that provides sufficient grip.
You should first be able to establish a comfortable two-leg bridge, keep your pelvis reasonably level and breathe without excessive lower-back arching. If the starting position is difficult, practise the Glute Bridge before adding heel steps; the ACE glute bridge guide provides an additional external reference for the foundational bridge setup.
How to Perform Hamstring Walkouts
1. Establish the Starting Position
Lie on your back with your knees bent, feet approximately hip-width apart and heels close enough to your glutes to create a stable bridge. Rest your arms beside your body with the palms facing down.
Keep the head, shoulders and upper back relaxed against the floor. Place your feet parallel rather than allowing the toes or knees to rotate noticeably inward or outward.
2. Brace and Lift Into a Bridge
Gently brace your abdominals, press through your heels and squeeze your glutes to lift the hips. At the top, aim for an approximately straight line from the shoulders through the hips to the knees without forcing the lower back into an exaggerated arch.
Your ribs should remain controlled rather than flaring upward. The goal is active hip extension from the glutes and hamstrings, not additional height created by extending the lumbar spine.
3. Begin Walking the Heels Away
Keep the hips elevated and take one small step away from your body with one heel. Replant that heel securely, transfer your weight under control and take a matching step with the opposite heel.
Continue alternating sides rather than moving both feet simultaneously. Each time one foot is repositioned, the other leg briefly supports more of the load, so keep the pelvis as level and quiet as possible.
4. Control the Outward Range
As the heels move farther away, the knees straighten and the hamstring demand increases. Continue only while you can keep the pelvis off the floor, maintain abdominal tension and prevent a sudden drop in hip height.
There is no required number of steps because the appropriate distance depends on leg length, step size and current strength. A controlled partial walkout is more valuable than reaching nearly straight legs by allowing the hips or lower back to collapse.
5. Reach Your Furthest Controlled Position
Stop at the longest position you can control with the knees still slightly bent. Keep pressure through the heels and pause briefly without forcefully locking the knees.
Your hips may naturally sit slightly lower than they did in the short-lever bridge, but they should remain actively elevated rather than resting on the floor. If you feel the effort shift predominantly into the lower back, shorten the range.
6. Walk the Heels Back In
Reverse the movement by taking small alternating heel steps toward your glutes. Pull each heel inward under control while continuing to squeeze the glutes and keep the pelvis level.
Avoid rushing the return or taking one large step to escape the difficult position. Finish with both feet back beneath or close to the knees and the body in a stable bridge.
7. Complete the Repetition
One complete repetition consists of walking the heels outward and then returning them to the starting bridge position. You may begin the next repetition while keeping the hips elevated, or lower the hips briefly and reset if continuous repetitions cause your form to deteriorate.
What Counts as a Complete Hamstring Walkout?
- The repetition begins with both hips elevated in a stable bridge.
- The heels move through small alternating steps rather than sliding together.
- The outward distance is controlled and repeatable.
- The pelvis remains off the floor and reasonably level.
- The lower back does not arch to compensate for lost hip extension.
- Both heels walk back toward the body under muscular control.
- The repetition finishes in the original bridge position.
Nearly straight knees are not required for a valid repetition. Your personal endpoint is the furthest position you can reach while maintaining the defining bridge position.
Common Hamstring Walkout Mistakes
Walking Too Far
The resistance rises as the heels move farther from the hips. End the outward phase before the pelvis drops, the knees lock or control changes into a hurried return.
Allowing the Hips to Sag
A small natural change in hip height is acceptable, but a clear collapse removes the intended bridge position. Reduce the distance or reset between repetitions when you can no longer keep the hips actively elevated.
Arching the Lower Back
Flaring the ribs and extending the lower back can create the appearance of higher hips without maintaining effective glute tension. Keep the front of the torso controlled and think about moving the pelvis and ribs as one unit.
Taking Steps That Are Too Large
Large steps create abrupt changes in leverage and make pelvic rotation more difficult to control. Use short steps that let you establish balance before moving the opposite heel.
Turning the Walkout Into a Slide
Hamstring Walkouts use separate heel placements, whereas Sliding Hamstring Curls use a continuous glide. If the feet are unintentionally slipping, change the surface or footwear before continuing.
Letting the Knees Drift Sideways
Keep the thighs and feet approximately hip-width apart throughout the movement. Avoid allowing the knees to collapse inward or spread wider as fatigue increases.
Pushing Forcefully With the Arms
The hands can provide light balance, but pressing hard into the floor reduces the stabilization challenge and may conceal insufficient hamstring control. Reduce the walking distance before relying heavily on the upper body.
Continuing Through a Hamstring Cramp
Hamstring cramping often appears when the chosen range or volume exceeds current capacity, but it should not be forced through. Lower the hips, allow the muscle to relax and retry with fewer steps or fewer repetitions.
How Far Should You Walk the Heels?
Walk only as far as you can maintain an active bridge and return without momentum. Beginners may take one small outward step with each foot, while stronger athletes may continue until the knees are close to straight.
Use the same approximate endpoint on every repetition so your sets are measurable. Increase the total distance gradually instead of judging progress only by the number of heel steps, because smaller steps can produce a larger count without creating a longer final position.
How to Program Hamstring Walkouts
When learning the exercise, begin with 2 to 3 sets of 3 to 6 complete out-and-back repetitions. Rest for approximately 60 to 120 seconds and end the set when the hips begin dropping, the steps become uneven or you cannot return under control.
Once your technique is consistent, build toward 3 sets of 6 to 10 complete repetitions or increase the outward distance while keeping the repetition count lower. Move each heel deliberately and use a brief pause at the furthest controlled position.
Hamstring Walkouts can be performed after a general warm-up as part of a lower-body or posterior-chain session. When using them as a preparation exercise, choose a shorter range and stop well before fatigue; when using them for strength or muscle development, use a challenging range and allow sufficient recovery between sets.
Progressing Beyond Hamstring Walkouts
Once you can perform long, controlled walkouts while keeping the hips elevated, progress to the Sliding Hamstring Curl. The sliders remove the short pauses created by individual steps and require continuous control through the complete outward and inward phases.
More advanced knee-flexion training can progress from sliding repetitions to the Band-Assisted Nordic Hamstring Curl and eventually the Nordic Hamstring Curl. These exercises use a different body position and should be treated as related progressions rather than identical versions of the walkout.
Safety and Discomfort
Expect muscular effort through the back of the thighs and glutes, particularly as the legs become straighter. Stop the set if you experience sharp pain, a sudden pulling sensation, pain behind the knee, lower-back pain or symptoms that alter your normal movement.
Hamstring Walkouts are not a self-directed rehabilitation prescription for an acute or recently injured hamstring. If you are returning from an injury or the exercise repeatedly produces pain, discuss the appropriate range and loading progression with a qualified healthcare professional.
Frequently Asked Questions
Are Hamstring Walkouts the Same as Sliding Hamstring Curls?
No. Hamstring Walkouts reposition one heel at a time through discrete steps, while Sliding Hamstring Curls move both heels continuously on sliders, towels or another low-friction surface.
Do I Need Exercise Sliders?
No. The standard exercise is performed by lifting and replanting the heels, so sliders are neither necessary nor desirable for this version.
Should My Hips Stay Elevated Throughout the Exercise?
Yes, the hips should remain actively elevated during the standard version. Lowering them between completed repetitions is an acceptable regression, but resting them during the outward walk changes the exercise.
Should I Keep My Toes Raised?
Maintain most of the pressure through your heels while allowing the toes to lift naturally or rest lightly on the floor. The important requirement is stable heel contact rather than a rigid ankle position.
Why Do My Hamstrings Cramp?
Cramping may occur when the walkout range, repetition count or bridge duration exceeds your current capacity. Stop, reset and shorten the range rather than trying to continue through the cramp.
Can Hamstring Walkouts Replace Nordic Hamstring Curls?
No. Walkouts provide a more scalable bridge-based exercise, while Nordic Curls use an anchored kneeling position and create a substantially different loading pattern.
Tips for the proper execution of Hamstring Walkouts
Use a clear, level surface on which your feet will not unexpectedly slide.
Begin with the feet hip-width apart and the heels relatively close to the glutes.
Brace the abdominals and squeeze the glutes before lifting into the bridge.
Keep most of the pressure through the heels during every step.
Take short alternating heel steps instead of moving both feet together.
Replant each heel securely before moving the opposite foot.
Keep the pelvis level as one leg briefly supports more of the load.
Stop the outward walk before the hips sag or the lower back arches.
Pause briefly at your furthest controlled position before reversing direction.
Count one outward-and-return journey as one complete repetition.
Use the arms for light balance rather than pressing forcefully into the floor.
End the set when cramping or loss of hip position prevents controlled repetitions.
Muscles worked when doing Hamstring Walkouts
Hamstring Walkouts primarily train the hamstrings while the glutes and trunk muscles maintain the elevated bridge position. The demand on the hamstrings increases as the heels move farther away and the knees become straighter.
Primary Muscles
- Biceps femoris: Controls knee extension during the outward walk and contributes to pulling the heels back toward the body.
- Semitendinosus: Helps maintain hip extension and produces knee flexion as the feet return.
- Semimembranosus: Supports the inner portion of the posterior thigh during both the lengthening and returning phases.
Secondary Muscles
- Gluteus maximus: Contracts isometrically to keep the hips elevated as the knees change position.
- Rectus abdominis and obliques: Stabilize the ribs and pelvis while helping prevent excessive lower-back extension or rotation.
- Gastrocnemius: Crosses the knee joint and assists the hamstrings during the inward steps.
- Hip adductors and abductors: Help keep the thighs aligned and the pelvis level while the feet move independently.
- Erector spinae: Stabilize the torso, although the lower back should not become the primary source of movement or effort.
The outward walk places the hamstrings under increasing tension as the knees extend, while the return requires the hamstrings to help flex the knees and shorten the lever. The glutes remain active during both phases to preserve the bridge position.
Primary Muscle(s):
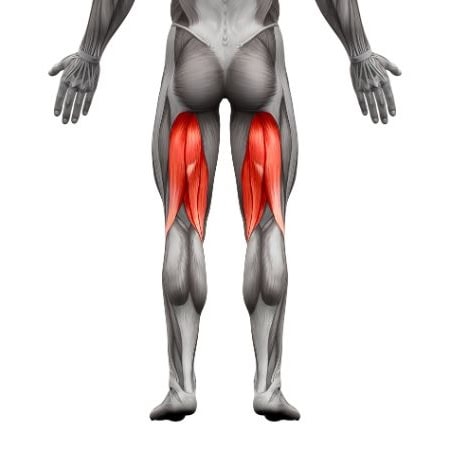
Hamstring
Secondary Muscle(s):

Abdominal

Oblique
Equipment needed for Hamstring Walkouts
No equipment needed for this exercise.
Adjust the difficulty of Hamstring Walkouts
How to make Hamstring Walkouts harder?
How to make Hamstring Walkouts easier?
How to make Hamstring Walkouts harder?
To make Hamstring Walkouts harder:
-
Walk the heels farther away while maintaining an elevated and level pelvis.
-
Take three to five seconds to complete the entire outward walk.
-
Pause for two to three seconds at your furthest controlled position.
-
Keep the hips elevated continuously between repetitions without resting on the floor.
-
Cross the arms over the chest to reduce assistance from the upper body.
-
Wear a securely fitted weighted vest after mastering the full bodyweight version.
-
Progress to Sliding Hamstring Curls for continuous knee extension and flexion without pauses between steps.
How to make Hamstring Walkouts easier?
To make Hamstring Walkouts easier:
-
Master a fixed-foot Glute Bridge before adding any heel steps.
-
Take one small step away with each heel and then return to the start.
-
Keep the knees more bent by shortening the total walkout distance.
-
Lower the hips to the floor between repetitions and rebuild the bridge before continuing.
-
Place the arms slightly wider and use light palm pressure for additional balance.
-
Reduce the set to two or three complete repetitions and rest longer between sets.
