
Hip-Height Feet-Elevated Pike Push-Up
How to do Hip-Height Feet-Elevated Pike Push-Up?
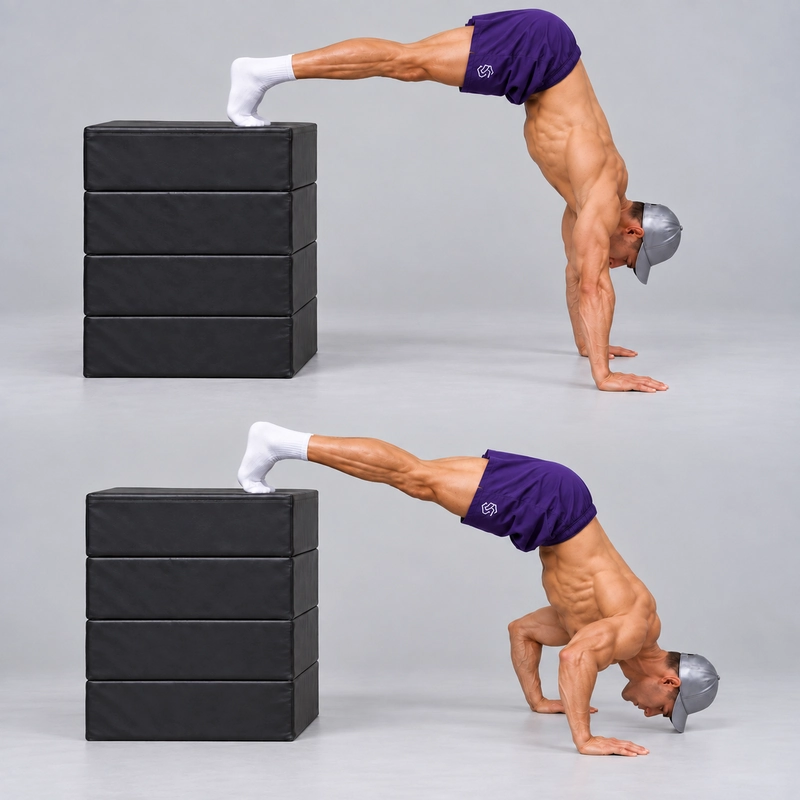
The Hip-Height Feet-Elevated Pike Push-Up is a high-support shoulder press with both hands flat on the floor and both feet on a suitable desk or purpose-built stacked plyo-box system around hip height. Fold at the hips, lower the head toward the floor ahead of the hands, then press back to straight arms while keeping the feet supported.
Use this variation after a lower-foot pike setup is controllable. Raising the feet can help you train with a more upright torso and more weight directed toward the arms, while the support removes the need to balance in a handstand. The aim is a complete, repeatable press at the new position, rather than the highest possible box.
A foot-contact surface around 80–100 cm (31.5–39.4 in), such as 90 cm (35.4 in), is a practical starting reference for equipment selection. Standing hip height varies. Measure the actual surface, and check that the resulting pike is appropriate for your proportions and current strength.
A study of forces in push-up variations measured higher peak hand-supported forces in its feet-elevated conditions than in regular push-ups. It tested conventional push-ups at lower elevations, not this high-support pike configuration. The finding provides general loading context; it does not establish an arm-load percentage or prove that every higher pike setup is harder.
What Changes From Knee Height to Hip Height?
At the higher support, the legs can sit closer to horizontal while the torso approaches a more vertical orientation. That position can be demanding even though the head still stops at the same floor level. You need enough hip fold to retain the pike, enough pressing strength to reverse the descent and enough control to get off the support.
When introducing the higher feet, keep the flat-palm grip and floor-level depth. Find a manageable hand distance at the new height and expect fewer repetitions. If the hips drop or the range becomes shallow, the higher apparatus has not produced an equivalent complete rep.
The knee-height feet-elevated floor-hand version is the closest regression. The floor pike push-up is a further step down when you need to rebuild the pressing pattern with the feet on the floor.
Use a Stack Designed for This Purpose
For stacked plyo boxes, use compatible modules specifically intended to be stacked. Follow the equipment's stacking limits and locking or securing instructions. A loose tower of unrelated boxes, stools or weights is not a suitable substitute.
Start with a level, non-slip base and check every connection. The top must remain horizontal and large enough for secure contact from both feet. Test for movement as pressure shifts toward the hands; a stack that feels solid under straight downward pressure may still shift during entry or the press.
Use a lower approved configuration when an intermediate height is needed. Measure the finished top rather than adding the labels on individual modules, and check whether a soft surface compresses noticeably beneath the feet. Keep the contact area clear of gaps and unstable edges.
Check Whether the Desk Is Suitable
Choose a desk whose structure and known load capacity are appropriate for the load through the feet. It must resist sliding, rocking and tipping, with a firm top and clear space below and in front of it. Avoid glass tops, unstable folding mechanisms, wheeled bases or loose extensions.
Measure the top. A desk may be below your hip height; if so, it provides a lower-foot configuration. Do not add improvised furniture or loose objects beneath it just to match the exercise name. Use the height that is genuinely available and controllable.
Place the feet on a secure part of the surface where the structure can support them. Keep screens, cables, drawers, shelves and sharp edges clear of the movement and exit route. A wall may help resist sliding but does not establish the desk's load capacity or prevent every form of tipping.
Separate Support Readiness From Pressing Readiness
Begin with comfortable wrist preparation from the wrist warm-up routine, followed by easy pike presses at a lower foot height. Do not use the first high-support set as your warm-up.
Practise the pike hold on a plyo box to learn elevated-foot straight-arm support, adapting the apparatus height to your ability. Then test a short hold on the actual high support and rehearse how you will step down. A hold is a positioning check, not proof that you can complete a bent-arm press.
For a first high-support attempt, try one controlled repetition with enough strength left to exit. If you cannot slow the descent or return from the intended bottom, lower the feet or use a clearly recorded reduced-range target. Do not continue dropping toward the head target because the top hold felt easy.
Set the High Pike Before Starting the Repetitions
Place the palms approximately shoulder width apart and spread the fingers. Establish enough distance from the support for a controlled entry, then adjust between practice attempts until the hips can rise toward the shoulders without forcing the neck or lower back.
The torso should become more upright while the hips remain flexed. Do not turn the entire body into a rigid sloping plank: that changes the exercise toward a decline push-up. A side-view recording can show whether the apparent height gain came from a better shoulder-pressing position or a lost hip fold.
Use straight knees for the reference version when the position is comfortable. If hamstring tension prevents the hip fold, a small fixed knee bend can make the position accessible. Record it separately and keep it fixed during the reps. Knee bending is a mobility adjustment, not guaranteed assistance for the shoulders.
Mark the hand line and foot-contact area. Small distance changes can have a large effect on a high-support pike, so make them between attempts and keep the selected contacts still during the working set.
How to Do a Hip-Height Feet-Elevated Pike Push-Up
- Confirm the apparatus. Measure the foot surface and check the desk or compatible box stack. Clear the head-target area and plan the route back to the floor.
- Mount under hand support. Plant both palms on the floor while facing away from the apparatus. Place one foot and then the other securely onto the top without jumping. If this entry cannot be controlled, use a lower support.
- Find the pike. Raise the pelvis and fold at the hips. Set a hand distance that permits straight knees, secure foot contact and a controllable torso position.
- Establish active arms. Begin with both elbows straight, pressing the floor away. Let the head sit comfortably between the upper arms rather than reaching it forward to manufacture alignment.
- Move into the descent. Bend the elbows as the shoulders and head travel forward and down. Aim to a floor point beyond the hand line, away from the foot support.
- Keep the high-support shape. Preserve the hip fold and stable feet as the elbows follow a comfortable backward-diagonal path. Avoid hip dropping, knee pumping or pushing off the surface.
- Reach the defined bottom. Make only a light touch with the top of the head at floor level. The arms continue supporting the load; the head does not become a resting point.
- Reverse under control. Press through both palms and extend the elbows together, guiding the head back between the upper arms as the torso rises.
- Finish the rep. Return to the recorded pike with straight elbows and active shoulders. Keep the original contact points before another descent.
- Dismount before fatigue removes control. At the top, open the pike enough to step one foot and then the other to the floor. If necessary, move the hands slightly away from the support during this exit, after the repetitions have ended.
Rehearse entry and exit at a lower height first. Keep both palms supporting you while the feet are being placed or removed. Stop the set with enough strength to dismount; do not finish by collapsing onto the head or trying to drop both feet at once.
Start with a smooth descent of about two seconds and a deliberate return. Breathe in as you lower and out as you press if comfortable. Keep moving through a controlled path rather than straining for a forced elbow angle or perfect vertical stack.
Maintain the Same Floor-Depth Standard
The higher feet change the body position, not the bottom target. For the reference version, the palms and head-depth marker remain at the same floor level. A thin firm mat can be used beneath both. A thick pad only beneath the head creates a raised-target partial-range version.
The palms and head target form a triangle from above; the head approaches the point beyond the hands, away from the apparatus. Keep the neck following the torso instead of reaching with the chin or forehead. Light target contact should be quiet and controlled, with no bounce.
A systematic review of range of motion in resistance training found that strength adaptation partly reflects the range trained and tested. When assessing this height increase, preserve the bottom endpoint rather than treating shorter high-box repetitions as the same task. The review did not validate a hip-height pike standard.
- Both palms stay on the floor and both feet remain on the measured support.
- The torso retains a pike with the hips flexed; it does not unfold into a decline push-up.
- The elbows begin straight, bend to the recorded endpoint and finish straight.
- The head reaches floor-level depth under arm support, without neck loading or rebound.
- The reference knee position and contact points remain fixed during the repetitions.
- No leg push, knee dip, foot hop or apparatus movement helps complete the return.
Decide Why a High-Support Attempt Fails
You Can Hold the Top but Cannot Press Out of the Bottom
Keep the apparatus stable and reduce the pressing demand. Return to the knee-height stage or introduce a secured raised head target as a recorded partial-range drill. A straight-arm hold and a deep press expose different limitations.
The Higher Feet Produce a Flatter Body
Check the hip fold and hand distance from the side. If you need to move the hands so far away that the chest leads a straight-body press, choose a lower support where the intended pike is available.
The Feet Press or Slide During the Return
Reset the contact and surface. If the feet move because you are using leg drive, reduce the repetition count or elevation. If the apparatus moves, stop and correct the support before attempting the exercise again.
Only the Last Repetitions Lose Depth
Use shorter sets with more rest at the same setup. Do not quietly add a higher head target or shift the hands to preserve the number written in the programme.
The Stack or Desk Height Makes Entry Awkward
Practise the mounting and exit sequence at a lower compatible height. The ability to support a rep does not make an uncontrolled entry acceptable. Select a support you can use from start to finish.
Build Repeatable High-Support Sets
During the first session, use a few single repetitions with a reset and full recovery between attempts. Once the configuration is reliable, try three sets of two to five complete repetitions, resting about two to three minutes or longer when needed. Leave at least one clean repetition available for control and exit.
One or two weekly exposures can be a practical starting point alongside your other shoulder pressing. These sets can replace a lower-foot pike slot rather than adding a second demanding pressing block to the same session. This is coaching guidance, not an exercise-specific research prescription.
Log foot height, apparatus, hand distance, knee position, head-target level, tempo and clean repetitions. Keep those conditions stable while building the set. If you reduce target padding, treat the restored depth as the progression for that session.
Choose Your Next Step by the Missing Ability
When you can repeat three sets of five complete reps with a reliable exit over two sessions, consider the next task. This is a practical checkpoint, not a validated qualification for handstand push-ups. You do not need to keep raising the feet indefinitely.
If the goal is more control at this position, use a slower descent or a short pause just above the floor. If the goal is a different grip or greater available depth, the knee-height feet-elevated parallette pike push-up is a separate branch. Its lower foot height and handles change more than one variable, so establish a new baseline.
If pressing is improving but fully inverted support is unfamiliar, work on a chest-to-wall handstand with its own entry and exit practice. When that position and the descent are controllable, explore the wall-facing handstand push-up with appropriate scaling.
A negative handstand push-up trains the lowering phase in a separate wall-supported configuration. It requires its own secure setup and exit; it is not an automatic substitute when a high-box pike rep fails. An eccentric-only descent is also not a completed push-up repetition.
Hip-Height Pike Push-Up Questions
Is any desk high enough?
No. Measure its top and compare it with your standing hip height. A lower desk remains useful, but label the actual configuration rather than raising it with an improvised stack.
Can I stack ordinary boxes?
Use compatible equipment designed for stacking and follow its securing and height limits. A loose pile of separate boxes is not the setup described here.
Is hip height always harder than knee height?
A more upright, well-folded high-support pike commonly increases the pressing challenge, but hand distance, body proportions and range still matter. Compare recorded setups and complete reps rather than relying on the height name alone.
Should I lower the head below my hands?
No. With palms on the floor, the bottom reference is floor level. Pressing below hand level requires elevated hand supports and belongs to a different range-of-motion branch.
Will completing this exercise guarantee a handstand push-up?
No. It develops pressing strength with the feet still supported. A handstand push-up adds a fully inverted body position and separate support, entry and exit requirements.
When to Stop
End the set when depth, straight-arm finishes, foot contact or the hip fold deteriorate. Stop for pain, dizziness, insecure palms or support movement as well. Return to a manageable configuration; persistent symptoms warrant individual assessment before repeating the load.
Tips for the proper execution of Hip-Height Feet-Elevated Pike Push-Up
Measure the foot-contact surface: 80–100 cm (31.5–39.4 in) is a practical reference, with actual hip height depending on the athlete.
Stack only compatible plyo-box modules designed for that purpose and follow their locking, securing and height limits.
Choose a desk with an appropriate known load capacity, firm top and stable base; keep the movement and exit areas clear.
Practise getting onto and off the support at a lower height, keeping both palms planted while moving one foot at a time.
Find a more upright torso through a controlled hip fold and suitable hand distance rather than chasing the highest possible foot support.
Mark the hand line and foot placement so the pressing position stays the same throughout the working set.
Direct the head to a floor-level point beyond the hands and away from the support while the arms control the descent.
Keep head contact light and return without head rebound, knee pumping or pushing off with the feet.
Finish with straight elbows and active shoulders while preserving the pike; record any bent-knee or raised-target adjustment separately.
Stop with enough strength to dismount deliberately; any hand movement needed for the exit occurs after the counted repetitions.
Muscles worked when doing Hip-Height Feet-Elevated Pike Push-Up
The Hip-Height Feet-Elevated Pike Push-Up trains shoulder-led pressing while a higher surface supports the feet. Bringing the torso toward a more upright position changes the demands of the press, while the hip fold and contact points must remain controlled.
Main Pressing Muscles
- Anterior deltoids: contribute to raising the torso from the bottom and controlling the shoulder action as you lower.
- Triceps brachii: control elbow bending and straighten the elbows during the return.
Assisting and Supporting Muscles
- Lateral deltoids: assist shoulder movement and upper-arm control according to the pressing angle.
- Upper pectoralis major: can contribute to the press, with its role affected by torso orientation.
- Serratus anterior and trapezius: coordinate shoulder-blade motion and support active upward rotation and elevation during the finish.
- Rotator-cuff muscles: stabilize the shoulders as the arms support the moving upper body.
- Abdominals, obliques and spinal stabilizers: organize the trunk and help prevent uncontrolled arching or collapse.
- Forearm and hand muscles: maintain pressure through the palms and fingers and stabilize the extended wrists.
- Hip and leg muscles: maintain the folded position, selected knee angle and secure foot contact.
Keep the hip flexion that defines the pike instead of applying a straight-body handstand cue that unfolds the movement. The feet still provide support, and no exact bodyweight loading or muscle-activation percentages are claimed for this configuration.
Primary Muscle(s):

Anterior delt
Secondary Muscle(s):
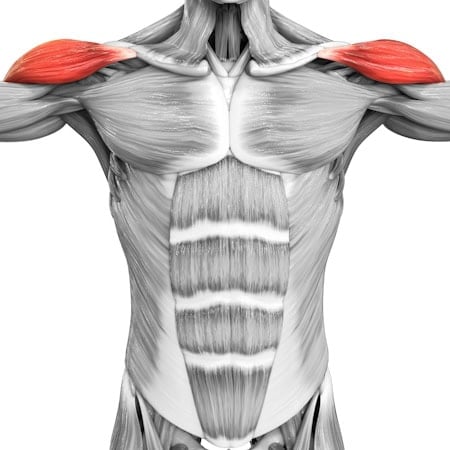
Lateral delt

Trapezius

Triceps
Equipment needed for Hip-Height Feet-Elevated Pike Push-Up
Adjust the difficulty of Hip-Height Feet-Elevated Pike Push-Up
Scale the high-support pike by changing foot height, the head target, hand distance or tempo one at a time. Retain flat palms and the intended hip fold. Lower the feet when the complete press or exit is not controllable; use a secured raised target only as a recorded partial-range adjustment. Improve depth and repeatability before choosing closer hands, pauses or slower lowering. Parallettes and wall-supported pressing introduce separate grip, range or inverted-support conditions.
How to make Hip-Height Feet-Elevated Pike Push-Up harder?
How to make Hip-Height Feet-Elevated Pike Push-Up easier?
How to make Hip-Height Feet-Elevated Pike Push-Up harder?
To make Hip-Height Feet-Elevated Pike Push-Up harder:
-
Test a slightly closer hand position between sets to make the torso more upright, maintaining secure feet, floor-level depth and a controlled exit.
-
Lower for three to four seconds at the same measured foot height, hand distance and depth.
-
Hold a brief pause just above the floor target under arm support, then press without a head bounce or leg push.
-
Progress toward an appropriately scaled wall-facing handstand push-up only after separately developing controlled inverted support, entry and exit.
How to make Hip-Height Feet-Elevated Pike Push-Up easier?
To make Hip-Height Feet-Elevated Pike Push-Up easier:
-
Return to knee-height feet elevation or another lower suitable support while retaining floor palms and the same defined head-depth standard.
-
Use a firm secured raised head target to shorten the descent, recording its height and gradually rebuilding floor-level depth without head bearing.
-
Between attempts, move the hands slightly farther from the support if that creates a more manageable pike. Keep a clear hip fold and record the new distance.
