
One-Arm Handstand
How to do One-Arm Handstand?
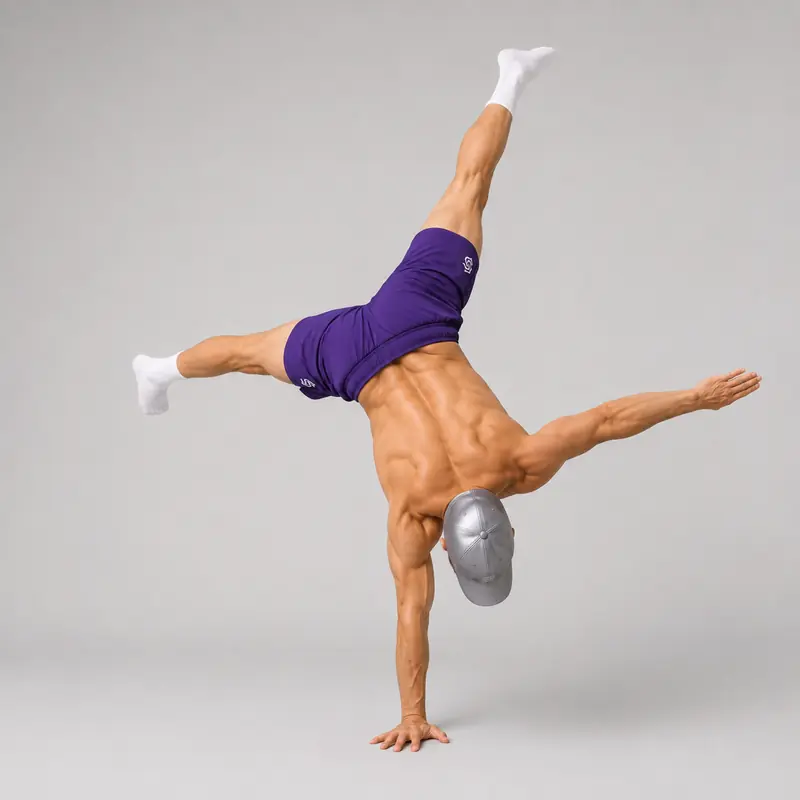
The one-arm handstand is an elite calisthenics and hand-balancing skill in which you support your entire body on one hand without assistance from the free hand, a wall or a spotter. The supporting elbow remains straight while the shoulder, torso, hips and legs organize themselves above a single palm.
This exercise is considerably more demanding than a standard freestanding handstand. Removing one hand reduces the base of support, transfers almost the entire load to one arm and removes one side of the wrist-based balance system. The athlete must therefore combine precise weight transfer with unilateral shoulder strength, fingertip control and lateral stability through the trunk and hips.
The standard one-arm handstand is normally performed with the legs in a wide straddle. The straddle provides more options for moving the center of mass and controlling side-to-side balance. A legs-together one-arm handstand is a legitimate but substantially harder progression rather than the default standard for this page.
The skill is usually entered from a stable two-arm straddle handstand. You gradually move your hips over the supporting hand, reduce pressure through the opposite palm and then remove the free hand only after it is no longer carrying meaningful weight. A brief hand lift or shoulder tap is a progression, but it is not yet a completed one-arm handstand.
Handstand research shows that balance is maintained through coordinated corrections at the wrists, shoulders and hips. A systematic review of handstand biomechanics identified wrist control as the predominant strategy during two-arm handstands. In the one-arm variation, finger and wrist control remains essential for forward and backward balance, while the hips, legs and free arm play a greater role in controlling the narrower lateral balance window.
Before attempting the full skill, you should have a consistent freestanding handstand, a controlled straddle handstand and the ability to perform slow lateral weight shifts without bending the elbows. Use the separate freestanding handstand practice drill if your kick-up or bailout is not yet reliable.
The one-arm handstand places substantial load through one wrist and shoulder. Prepare with the wrist warm-up routine, practise on both sides and progress through fingertip-assisted holds rather than repeatedly lifting the free hand before your weight has transferred.
How to Perform a One-Arm Handstand
- Prepare your practice area. Use a flat, non-slip surface with enough open space to return to two hands or cartwheel out safely. Warm up both wrists, shoulders and sides of the trunk.
- Enter a two-arm handstand. Kick or press into a freestanding handstand using an entry you can perform consistently. Establish balance before beginning the one-arm transfer.
- Move into a wide straddle. Separate your legs with the knees straight and toes pointed. Use a width that gives you room to adjust your center of mass without losing control of the pelvis.
- Push tall through both shoulders. Keep both elbows locked and elevate the shoulder blades. Maintain pressure through the palms and fingers while stabilizing the straddle position.
- Choose the supporting arm. Keep the supporting palm flat with the fingers spread. Look between the hands or slightly toward the supporting hand without rotating your head excessively.
- Shift the pelvis toward the supporting side. Move your hips and center of mass over the supporting hand while maintaining active elevation through that shoulder. Do not simply push the shoulders sideways while leaving the hips in the middle.
- Reduce pressure through the free hand. Allow the heel of the free palm to become light while its fingertips remain on the floor. Continue transferring weight until the free hand is used only for balance.
- Progressively remove the fingers. Reduce the number and pressure of the supporting fingertips until one finger can remain on the floor without carrying significant weight.
- Lift the free hand. Remove the final fingertip only when the supporting hand is carrying the load and your center of mass is positioned above it. Avoid jumping or pushing explosively from the free hand.
- Position the free arm. Extend the free arm sideways, toward the legs or alongside the torso according to your balance strategy. Keep the movement slow so the arm acts as a counterbalance rather than creating rotation.
- Maintain the supporting shoulder. Continue pushing the floor away with a straight elbow. Do not allow the supporting shoulder to collapse toward the hand or the torso to sink.
- Control front-to-back balance. Increase pressure through the fingers of the supporting hand when your feet move beyond your head. Reduce excessive finger pressure and adjust through the shoulder or hips if you begin falling toward the entry side.
- Control lateral balance. Make small adjustments through the straddled legs, pelvis and free arm. Avoid twisting the chest open or making large kicking movements.
- Hold for the target time. Maintain the position with calm breathing, a straight supporting arm and no contact from the free hand.
- Return under control. Replace the free fingertips, then the palm, and redistribute your weight between both hands before stepping down or exiting the handstand.
One-Arm Handstand Completion Standard
- Support the body using only one hand during the timed hold.
- Keep the complete supporting palm in contact with the floor.
- Maintain full extension of the supporting elbow.
- Keep the supporting shoulder actively elevated.
- Allow no contact from the free hand, including fingertip assistance.
- Allow no contact with a wall, spotter or other object.
- Do not pivot, hop or walk on the supporting hand.
- A straddle leg position is permitted, but the knees should remain straight and controlled.
- Demonstrate a recognizable static balance rather than a momentary hand lift.
- For consistent progress tracking, maintain the position for at least three seconds.
- Return to two hands or exit without collapsing onto the supporting arm.
Benefits of the One-Arm Handstand
- Develops elite unilateral balance: Supporting the body on one palm creates an exceptionally narrow base and requires precise control in several directions.
- Builds one-arm shoulder endurance: The supporting shoulder maintains the entire inverted body through a straight-arm position.
- Strengthens the hand and forearm: The supporting fingers and wrist regulate front-to-back balance while bearing substantially more load than in a two-arm handstand.
- Develops lateral trunk control: The obliques, quadratus lumborum and spinal stabilizers control the relationship between the supporting shoulder and pelvis.
- Improves advanced body awareness: The athlete must recognize very small changes in body position while inverted and supported asymmetrically.
- Develops hip and leg coordination: The straddled legs help position the center of mass without creating uncontrolled rotation.
- Identifies side-to-side differences: Training both arms reveals asymmetries in wrist control, shoulder elevation, hip positioning and confidence.
- Expands handstand skill options: A stable one-arm hold provides a foundation for arm changes, leg-position transitions and advanced hand-balancing combinations.
Common One-Arm Handstand Mistakes
- Attempting it before mastering the two-arm handstand: Inconsistent entries and basic balance problems become considerably more difficult when one hand is removed.
- Lifting the free hand too early: Removing the hand before the center of mass reaches the supporting side usually causes an immediate fall.
- Jumping from the free hand: Pushing explosively from the fingertips may create a momentary hand lift without establishing one-arm balance.
- Leaving the hips between the hands: The pelvis and center of mass must move toward the supporting side before the free hand can be unloaded.
- Moving only the shoulders: Sending the upper body sideways while the hips remain centered creates a tilted and difficult-to-control position.
- Collapsing the supporting shoulder: Losing shoulder elevation weakens the support structure and makes balance corrections less effective.
- Bending the supporting elbow: A soft arm turns the skill into a less stable bent-arm hold and increases the strength requirement.
- Twisting the chest open: Excessive rotation separates the ribcage from the pelvis and often sends the legs away from the supporting hand.
- Using a narrow straddle: Keeping the legs too close together removes some of the counterbalancing options available during the learning stage.
- Moving the free arm suddenly: Fast changes in free-arm position can rotate the torso and move the center of mass outside the supporting hand.
- Making large leg corrections: Kicking or repeatedly bending the knees creates more movement than the supporting hand can control.
- Looking toward the free hand: Turning the head can rotate the shoulders and disturb the supporting-side alignment.
- Using maximum fingertip tension constantly: The supporting hand should remain responsive rather than rigidly gripping the floor at all times.
- Training only the preferred arm: Exclusive one-sided practice can reinforce differences in technique, strength and wrist tolerance.
- Practising when fatigued: Loss of shoulder elevation or slower balance reactions can place excessive load on the supporting wrist and shoulder.
Frequently Asked Questions
What is a one-arm handstand?
A one-arm handstand is a static inverted balance performed with the entire body supported on one hand. The free hand must remain completely off the floor while the supporting elbow stays straight and the shoulder remains active.
Does a straddle one-arm handstand count?
Yes. The straddle is the standard learning and performance position for the one-arm handstand. It provides greater control over the center of mass and does not make the exercise assisted. A legs-together one-arm handstand is a harder variation.
What is the difference between a one-arm handstand and a shoulder tap?
During a shoulder tap, the free hand is lifted only briefly before returning to the floor. A one-arm handstand requires a clearly established static balance on one hand, with no free-hand contact for the specified duration.
How long should a one-arm handstand be held?
A controlled three-second hold is a useful minimum standard because it distinguishes a genuine balance from a momentary hand lift. Five to ten seconds demonstrates increasingly repeatable control, while longer holds require advanced efficiency and endurance.
What should I be able to do before training one-arm handstands?
There is no universal prerequisite test. A practical foundation includes a consistent thirty- to sixty-second freestanding handstand, a controlled straddle handstand, handstand weight shifts, shoulder taps and fingertip-assisted one-arm holds on both sides.
How do you shift onto one arm?
Begin from a stable straddle handstand and move your pelvis toward the supporting side while continuing to push tall through the supporting shoulder. Gradually reduce pressure through the opposite palm and fingers rather than lifting the hand suddenly.
Should the supporting shoulder move over the hand?
The center of mass must be organized above the supporting palm. This normally requires a lateral adjustment through the shoulder, ribcage and pelvis, but the supporting shoulder should remain elevated rather than collapsing outward or downward.
What does the free arm do?
The free arm acts as a counterbalance. It can extend sideways, toward the legs or alongside the torso, but it should move slowly and remain controlled. Different positions change the balance demand.
How do the supporting fingers control the balance?
The fingers primarily help control forward and backward movement. Increase finger pressure when the feet travel too far beyond the head. Side-to-side balance is influenced more strongly by the pelvis, legs, shoulder position and free arm.
Why is one side easier than the other?
Differences in wrist mobility, shoulder elevation, hip control, hand preference and practice history can make one side feel substantially more stable. Train both sides, although equal progress is not always immediate.
Should I learn the one-arm handstand against a wall?
Wall drills can help you learn the lateral weight shift and progressively unload the free hand. They do not completely reproduce freestanding balance, so combine them with controlled weight shifts and fingertip-assisted holds away from the wall.
How many one-arm handstand attempts should I perform?
Begin with approximately four to eight technically focused attempts per side, resting long enough to restore wrist comfort and shoulder elevation. Stop when you begin jumping from the free hand or collapsing through the supporting shoulder.
How often should I train one-arm handstands?
Two to four focused sessions per week may work well for advanced athletes, with volume adjusted according to wrist and shoulder recovery. Short assisted practice can be performed more frequently than maximum unsupported attempts.
How long does it take to learn a one-arm handstand?
The one-arm handstand commonly requires a long period of specialized practice even after the two-arm handstand is mastered. Progress depends on existing balance quality, mobility, training frequency and consistency, so there is no reliable universal timeline.
Can a one-arm handstand be performed on parallettes?
Yes, but the gripping mechanics and wrist position differ from the flat-palm floor version. A one-arm handstand on parallettes or handstand canes should be treated as an advanced variation.
Is a one-arm handstand the same as a one-arm handstand push-up?
No. The one-arm handstand is a static straight-arm balance. A one-arm handstand push-up would additionally require lowering and pressing the body through one arm and is an exceptionally specialized separate skill.
What should I do if the supporting wrist hurts?
Stop if you experience sharp pain, numbness or persistent discomfort. Reduce the one-arm loading volume, return to two-arm and assisted drills, and seek appropriate professional advice if symptoms continue.
Tips for the proper execution of One-Arm Handstand
Master a consistent freestanding straddle handstand before attempting unsupported one-arm holds.
Warm up both wrists and shoulders before transferring full bodyweight onto one arm.
Begin from a stable two-arm handstand rather than trying to land directly on one hand.
Use a wide straddle to create more options for controlling the center of mass.
Keep both elbows locked while transferring your weight toward the supporting side.
Move your pelvis over the supporting hand instead of shifting only your shoulders.
Push continuously through the supporting shoulder without allowing it to collapse.
Reduce pressure through the free palm and fingers gradually.
Lift the free hand only after it is no longer supporting meaningful weight.
Keep the supporting palm flat and the fingers active against the floor.
Move the free arm slowly so it does not rotate your torso.
Use the straddled legs for small lateral corrections rather than large kicking movements.
Keep your gaze between the hands or slightly toward the supporting hand.
Practise both arms even if one side initially feels considerably easier.
Return the free fingertips to the floor before the supporting shoulder loses elevation.
Muscles worked when doing One-Arm Handstand
The one-arm handstand is an isometric unilateral support and balance exercise. The supporting shoulder, arm, wrist and hand carry almost the entire external load, while the trunk, hips and legs position the center of mass above a single palm. The muscular demand is therefore less symmetrical than during a standard two-arm handstand. Direct research on freestanding one-arm handstands remains limited. A small exploratory study of five skilled gymnasts measured the wrist flexors, triceps and lateral deltoid during single- and double-arm handstands. Its small sample means the reported percentages should not be treated as universal, but the study supports the importance of coordinated shoulder, arm and wrist activity during the one-arm variation.
Anterior and Lateral Deltoids
The deltoids stabilize the supporting upper arm in the overhead position. The lateral deltoid contributes particularly to controlling the unilateral position as the body’s center of mass moves over one hand.
Trapezius
The upper trapezius helps elevate and upwardly rotate the supporting shoulder blade. Maintaining this active elevation prevents the torso from sinking toward the supporting hand.
Serratus Anterior
The serratus anterior stabilizes the shoulder blade against the ribcage and contributes to the tall pushing position required on the supporting side.
Triceps Brachii
The triceps maintain complete extension of the supporting elbow. A locked arm creates a more stable structure for transferring balance corrections from the hand to the body.
Forearm and Wrist Muscles
The wrist flexors and extensors stabilize the loaded wrist and control pressure changes against the floor. Their relative demand increases because only one hand is available to regulate front-to-back balance.
Finger and Hand Muscles
The intrinsic hand muscles and finger flexors maintain palm contact and create the small forces needed to correct an overbalance.
Rotator Cuff
The rotator-cuff muscles stabilize the upper-arm bone within the heavily loaded supporting shoulder joint.
Obliques and Quadratus Lumborum
The lateral trunk muscles control the relationship between the supporting shoulder and pelvis. They help resist unwanted side bending and rotation as the center of mass shifts over one arm.
Abdominals and Spinal Stabilizers
The abdominal and spinal muscles maintain trunk stiffness and prevent the ribcage and pelvis from rotating independently.
Gluteus Medius and Minimus
The lateral gluteal muscles help control the pelvis and position the straddled legs during side-to-side balance adjustments.
Hip Adductors and Abductors
The inner- and outer-thigh muscles regulate the width and position of the straddle. They also allow the legs to make controlled counterbalancing movements without bending the knees.
Quadriceps and Calves
The quadriceps maintain knee extension, while the calves and foot muscles point the toes and keep the legs organized during the hold.
Primary Muscle(s):

Anterior delt

Trapezius
Secondary Muscle(s):

Triceps
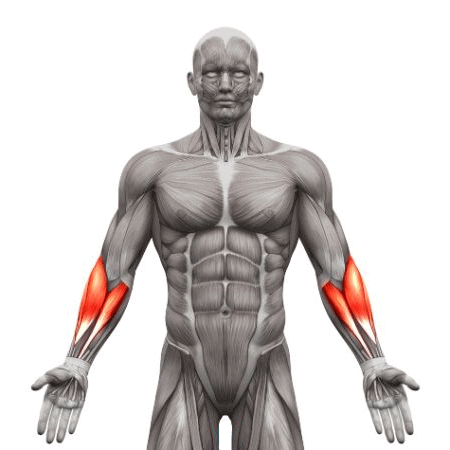
Forearm

Abdominal
Equipment needed for One-Arm Handstand
No equipment needed for this exercise.
Adjust the difficulty of One-Arm Handstand
How to make One-Arm Handstand harder?
How to make One-Arm Handstand easier?
How to make One-Arm Handstand harder?
To make One-Arm Handstand harder:
-
Increase the unsupported hold duration while maintaining the same supporting-hand position.
-
Bring the straddled legs progressively closer together until you can hold a legs-together one-arm handstand.
-
Move between straddle, tuck, stag and straight-leg positions while remaining on one hand.
-
Move the free arm from the side to a position alongside the torso without losing balance.
-
Switch from one supporting arm to the other without returning both palms fully to the floor.
-
Enter the one-arm handstand through a controlled press-to-handstand progression.
-
Perform a controlled one-arm handstand pirouette entry.
-
Perform the one-arm handstand on parallettes or handstand canes.
-
Practise controlled one-arm handstand shapes with a narrower leg position and reduced counterbalance.
How to make One-Arm Handstand easier?
To make One-Arm Handstand easier:
-
Practise lateral weight shifts in a chest-to-wall handstand while keeping both elbows straight.
-
Perform wall-supported one-arm leans with the free palm remaining lightly on the floor.
-
Use a wide freestanding straddle handstand before beginning the lateral weight transfer.
-
Perform slow freestanding handstand weight shifts without attempting to lift either hand.
-
Practise alternating handstand shoulder taps to become comfortable supporting more weight on one arm.
-
Keep the free hand supported on all five fingertips while shifting the pelvis over the opposite hand.
-
Progress from five fingertips to three, two and eventually one fingertip of assistance.
-
Place the free fingertips on a low block or handstand cane to reduce their ability to bear weight.
-
Ask an experienced spotter to guide the hips while you learn the supporting-side alignment.
