
Reverse Elbow Plank
How to do Reverse Elbow Plank?
The reverse elbow plank is a powerful and effective isometric exercise that targets the posterior chain, particularly the shoulders, upper back, core, glutes, and hamstrings. Unlike a traditional plank, this exercise is performed facing upward, supported by the elbows and forearms placed firmly on the ground behind your body. By lifting your hips and keeping your body straight and rigid, you actively engage muscles that promote strong posture and balanced muscular development.
This movement is excellent for enhancing scapular retraction, shoulder mobility, and spinal alignment, while simultaneously strengthening muscles often overlooked in standard plank variations. It’s beneficial as a complementary exercise to traditional front-facing planks and other anterior-focused core exercises, promoting overall balanced muscular development and better posture.
To perform this exercise, you’ll need a comfortable, non-slip surface or mat for elbow support. No other equipment is strictly necessary, although wearing comfortable workout clothes and using an exercise mat are recommended to reduce discomfort. A timer is useful for accurately tracking your hold durations.
How to Perform a Reverse Elbow Plank
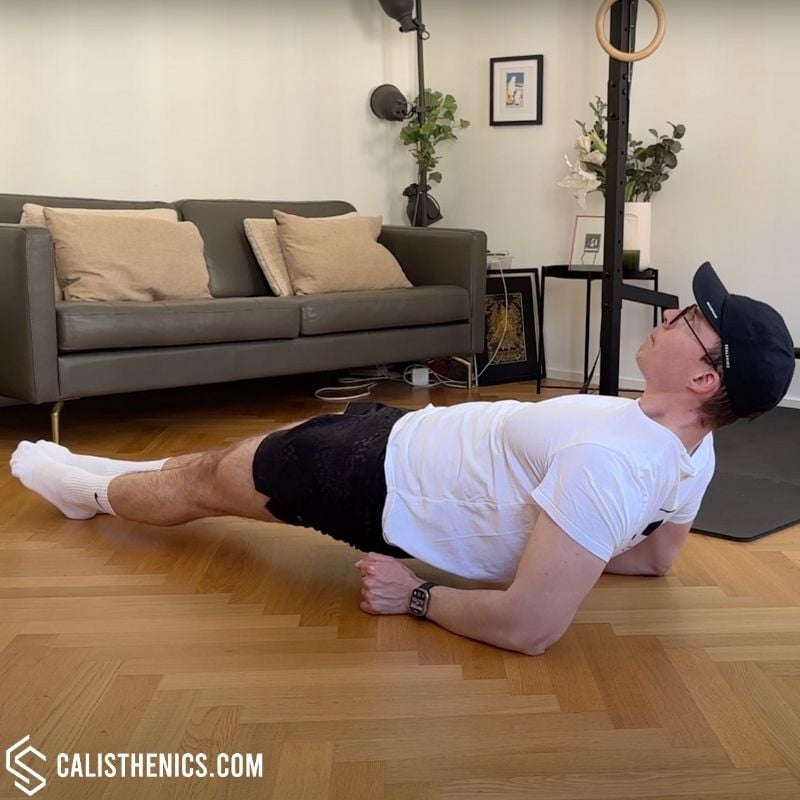
1. Set Up Position:
• Sit upright on the floor with your legs fully extended in front of you.
• Place your elbows directly under your shoulders, forearms flat on the ground with palms down or facing inward, whichever feels most comfortable.
2. Raise Your Hips:
• Press firmly through your elbows and forearms, lifting your hips upward toward the ceiling.
• Engage your core and glutes, creating a straight line from your head down to your heels.
3. Maintain the Alignment:
• Hold your body rigid and straight, ensuring your hips remain elevated and aligned with your shoulders and feet.
• Engage your core, glutes, and hamstrings continuously to sustain the plank position.
4. Keep a Neutral Neck:
• Avoid tilting your head excessively forward or backward.
• Maintain a neutral head position, gazing upward or slightly forward without straining your neck.
5. Maintain the Hold:
• Hold this position initially for 15–30 seconds, gradually extending duration as your strength and endurance improve.
• Avoid letting your hips sag; continuously engage your posterior muscles to remain stable.
6. Controlled Dismount:
• Lower your hips slowly back to the ground in a controlled manner, gently releasing tension.
7. Repetitions & Sets:
• Perform 3–5 sets holding each plank for 20–60 seconds, increasing hold durations progressively.
Benefits of the Reverse Elbow Plank
• Strengthens the Posterior Chain: Engages muscles of the upper back, shoulders, glutes, hamstrings, and core stabilizers effectively.
• Improves Posture: Helps correct forward-leaning posture, reinforcing proper alignment and spinal stability.
• Enhances Shoulder Stability and Mobility: Strengthens scapular retractors and rear deltoids, promoting healthy shoulders.
• Reduces Lower Back Pain: Balances muscular development around the spine, alleviating potential strain and discomfort.
• Complements Traditional Core Exercises: Provides balanced muscular activation alongside traditional plank and ab exercises.
Common Mistakes to Avoid
• Sagging Hips: Ensure hips remain high, maintaining a straight line from shoulders to heels.
• Incorrect Elbow Placement: Position elbows directly under your shoulders to avoid unnecessary shoulder strain.
• Overextending Neck: Maintain neutral head alignment, avoiding excessive forward or backward tilt.
• Holding Breath: Maintain steady breathing to avoid excessive tension and fatigue.
• Relaxing the Glutes and Hamstrings: Maintain continuous engagement of your posterior chain to stabilize your hips and spine.
Gym Equivalents for the Reverse Elbow Plank
• Reverse Plank (on straight arms or parallettes)
• Hip Thrusts or Glute Bridges (machine or free weights)
• Reverse Hyperextensions (machine-based)
• Superman Holds (floor exercise for posterior chain engagement)
• Back Extension Holds (hyperextension bench)
Tips for the proper execution of Reverse Elbow Plank
Ensure your elbows are positioned directly beneath your shoulders to maintain optimal stability and prevent shoulder discomfort.
Contract your glutes strongly to maintain hip elevation throughout the exercise.
Breathe steadily, inhaling deeply through your nose and exhaling slowly through your mouth to enhance endurance and relaxation.
Aim to extend hold durations gradually, rather than quickly progressing to avoid compromising form.
Use a mat or soft surface beneath your elbows for comfort and stability, reducing unnecessary discomfort.
Muscles worked when doing Reverse Elbow Plank
The reverse elbow plank primarily engages:
•Primary: Posterior deltoids, middle and lower trapezius, rhomboids, core stabilizers (erector spinae, glutes, hamstrings).
•Secondary: Forearms, scapular stabilizers (serratus anterior), lumbar muscles (lower back muscles), and quadriceps.
During the plank hold, your shoulders, upper back, and scapular stabilizers maintain the position, while your core and posterior chain muscles provide stability and strength.
Primary Muscle(s):
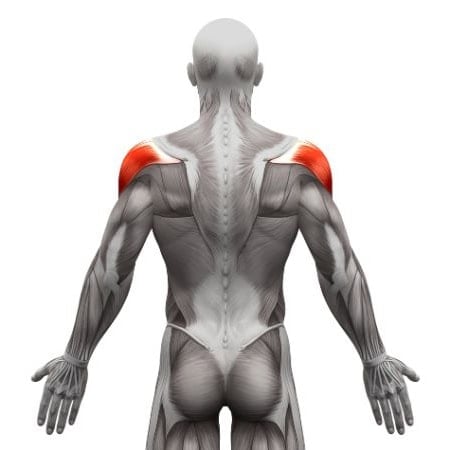
Rear delt
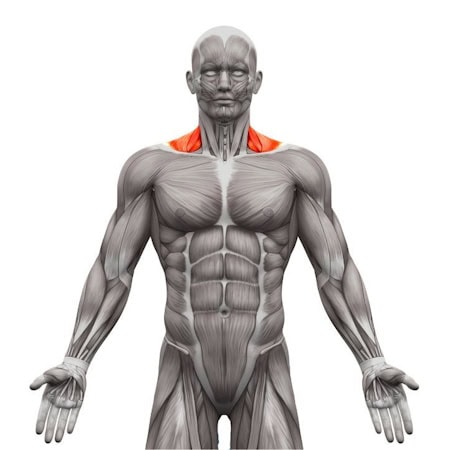
Trapezius
Secondary Muscle(s):
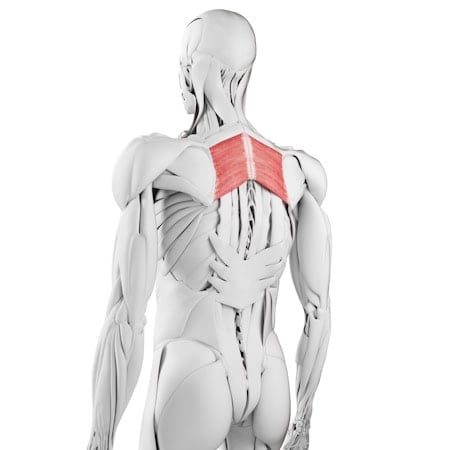
Rhomboid
Equipment needed for Reverse Elbow Plank
Adjust the difficulty of Reverse Elbow Plank
The reverse elbow plank is a versatile and highly effective isometric exercise that complements traditional core and plank variations. By systematically adjusting hold durations, limb positioning, and elevation, you can precisely tailor the difficulty to match your fitness level. Its versatility makes it suitable for beginners seeking foundational posterior-chain strength, while also providing advanced athletes with a challenging option for enhancing posterior muscular endurance, shoulder health, and balanced overall development.
How to make Reverse Elbow Plank harder?
How to make Reverse Elbow Plank easier?
How to make Reverse Elbow Plank harder?
To make Reverse Elbow Plank harder:
-
Increase Hold Duration: Gradually extend your plank holds beyond 60 seconds.
-
Add External Weight: Place weight plates or use a weighted vest to add resistance.
-
Single-Leg Reverse Elbow Plank: Elevate one leg at a time, significantly increasing unilateral engagement and difficulty.
-
Place Feet Elevated on a Box: Increases posterior-chain activation, significantly intensifying the exercise.
-
Combine with Dynamic Movements: Perform alternating leg lifts or knee tucks to enhance muscular challenge and core activation.
How to make Reverse Elbow Plank easier?
To make Reverse Elbow Plank easier:
-
Shorten the Duration: Begin by holding for shorter intervals (10–15 seconds), gradually increasing as strength improves.
-
Bend the Knees Slightly: Reducing leg extension can decrease difficulty initially, making the position easier.
-
Use an Elevated Surface: Place elbows on a bench or elevated step to reduce intensity and strain on shoulders and posterior chain.
-
Wider Foot Placement: Spread your feet wider for increased stability, reducing core and balance demands.
-
Regular Reverse Plank on Hands: First master the reverse plank with straight arms, which provides more support, before progressing to elbows.