
Push 12: Final Beginner Push Workout Routine - No Equipment
🎯 Workout Description:
This is your push-up graduation day. We’re going to reinforce everything you’ve built: full range, control, lockout strength, and tempo under fatigue. If you’re able, aim for multiple sets of 3–5 full push-ups with clean form and short rests between sets.
👤 Who It’s For:
Graduates of the program ready to perform regular push-ups—or the hardest version of their personal progression.
🧰 Equipment Needed:
None
Warm-Up: Final Activation
-
1 round: Joint warm-up routine
-
2 rounds (no rest):
-
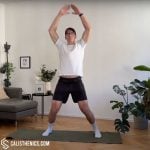
20 sec Jumping Jacks
-
12 Plank Shoulder Taps (or Kneeling Shoulder Taps)
-

No muscle groups found for this post.
Tips
-
Move slowly and deliberately to avoid sudden movements.
-
Keep circles smooth and controlled—avoid jerky motions.
-
Breathe steadily and deeply to maximize relaxation and blood flow.
-
Gradually increase the range of motion as your joints warm up.
-
Perform each movement for 15-20 seconds, or until joints feel loosened.
-
Customize your routine slightly based on the specific demands of your workout.

Muscle groups:


Tips
-
Keep your movements light and bouncy, not stiff or stompy.
-
Maintain a steady breathing rhythm, especially in longer sets.
-
Engage your core to support posture and absorb shock.
-
Land on the balls of your feet and roll through the foot gently to protect your knees.
-
Scale the speed based on your fitness goal—slower for warm-up, faster for conditioning.
-
Stay relaxed in the shoulders and arms, avoiding unnecessary tension.


Tips
-
Core Engagement: Keep your core tight throughout the entire movement. This is key to minimizing any rotation or movement in your hips and torso as you lift each hand.
-
Hip Stability: Focus on keeping your hips level and preventing them from swaying side to side. A wider stance with your feet can provide better stability as you progress.
-
Slow and Controlled: Perform the shoulder taps slowly and with control to maximize core engagement and prevent losing form.
-
Breathing: Breathe steadily throughout the exercise. Inhale as you prepare to lift your hand, and exhale as you tap your shoulder. Controlled breathing will help stabilize your core and prevent fatigue.
Strength: Controlled Volume
Structure: Superset format — A1 → 30s rest → A2 → 30s rest → A3 → 60s rest between rounds
3 total rounds
-
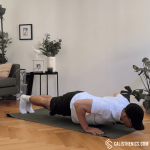
A1: Regular Push-Ups (or Incline Push-Ups) – 5–8 reps
-
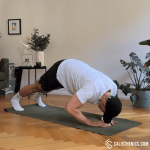
A2: Diamond Face Push-Ups – 6–8 reps
-
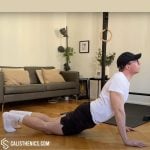
A3: Cobra Push-Ups – 8–10 reps
Use the hardest version of push-ups you can do with perfect form. If that’s still incline or negative, that’s totally fine—form is everything!

Muscle groups:


Tips
-
Body Alignment: Keep your body in a straight line from head to heels. Engage your core and glutes to prevent your hips from dropping or rising.
-
Hand Placement: Your hands should be positioned just outside of shoulder-width for optimal stability. Moving them closer or wider will target different muscles.
-
Elbow Positioning: Keep your elbows at about a 45-degree angle from your body, not flaring out too far to avoid shoulder strain.
-
Breathing: Inhale as you lower yourself, and exhale as you push back up. Controlled breathing improves strength and endurance.
-
Controlled Movements: Lower yourself slowly to build strength, then push back up with a smooth, steady motion.

Muscle groups:
Tips
-
Focus on Elbow Positioning: Keep your elbows close to your body during the movement to target the triceps more effectively and reduce strain on the shoulders.
-
Start with a Slight Angle: If you’re new to diamond face push-ups, start with a slight forward angle, gradually increasing the difficulty as you build strength.
-
Control the Descent: Perform the lowering phase slowly and with control to maximize muscle engagement in the triceps and shoulders.
-
Breathing: Inhale as you lower your face toward your hands, and exhale as you push back up. Proper breathing will help you maintain stability and power.

Muscle groups:

Tips
-
Maintain smooth, steady breathing, inhaling as you lower and exhaling as you press upward.
-
Gradually increase your range of motion over time as spinal flexibility improves.
-
Keep your palms evenly pressed into the floor to avoid uneven shoulder activation.
-
Engage your core and lightly activate your glutes to prevent excessive lower-back arching.
-
Start slowly, emphasizing quality over quantity or speed.
Finisher: Push Core Closer
Format: 30s on / 15s rest alternating for 3 rounds
-
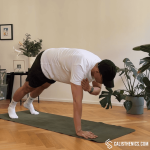
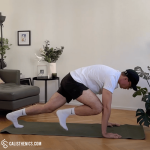
Mountain Climbers
-
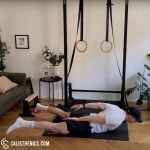
Reverse Snow Angels

Tips
-
Core Engagement: Focus on keeping your core engaged throughout the exercise to prevent your hips from rising or sagging.
-
Controlled Breathing: Breathe steadily as you alternate legs. Exhale as you drive each knee forward, and inhale as you extend each leg back.
-
Keep the Hips Level: Avoid letting your hips move up or down too much; maintain a level position to keep the focus on your core.
-
Controlled Speed: Start with a slow, controlled pace to ensure proper form, then gradually increase your speed as you feel more stable.
-
Hand and Shoulder Alignment: Keep your hands directly under your shoulders to ensure proper alignment and avoid putting excess strain on your wrists.

Muscle group:
Tips
-
Keep Arms Straight but Not Locked: Maintain a slight bend in the elbows to reduce unnecessary joint strain.
-
Move in a Smooth, Controlled Manner: Avoid jerky or fast motions—slow, controlled reps activate muscles more effectively.
-
Focus on Squeezing the Shoulder Blades: Imagine pinching a pencil between your scapulae at the bottom of the movement.
-
Engage Your Core Throughout: Prevent excessive lumbar arching by keeping abs and glutes activated.
-
Keep a Steady Breathing Pattern: Inhale as you extend the arms forward, and exhale as you sweep them back.
-
Try Adding Light Weights for Progression: Holding small plates or wrist weights can increase resistance for added challenge.