
Tuck Front Lever Raises
How to do Tuck Front Lever Raises?
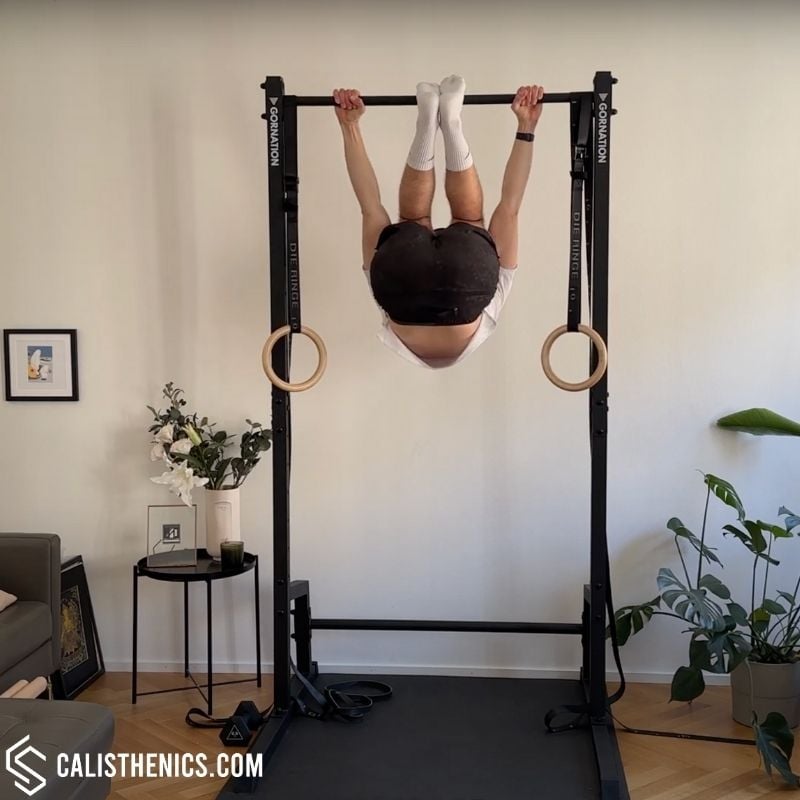
The tuck front lever raise is a regression exercise designed to build the necessary strength for a full front lever raise and front lever hold. Performed on a pull-up bar or gymnastics rings, this movement strengthens the lats, core, and posterior chain while improving scapular control and body alignment. Unlike strict pull-ups or leg raises, tuck front lever raises require isometric and dynamic core engagement, making them one of the best exercises for developing straight-arm pulling strength and body control.
Before attempting this movement, an athlete should have a solid foundation of core and pulling strength. Being able to hold a tuck front lever for at least 5 seconds and perform negative tuck front lever lowers will help ensure better control throughout the movement. Mobility in the shoulders and hips is also beneficial for maintaining proper positioning.
To perform tuck front lever raises, you’ll need either a pull-up bar or gymnastic rings set at a height that allows full extension at the bottom. Optional equipment includes chalk for grip enhancement and resistance bands for assistance. Advanced athletes can increase difficulty by using ankle weights or a weighted vest.
How to Perform the Tuck Front Lever Raise
1. Setup
• Hang from a pull-up bar or gymnastic rings with a shoulder-width overhand grip (palms facing away) or a neutral grip (palms facing each other on rings).
• Keep your arms straight and shoulders engaged (avoid passive hanging).
• Tighten your core and glutes to maintain control and avoid unnecessary swinging.
2. Initiating the Raise
• Begin by tucking your knees toward your chest, keeping them tight and compact.
• Simultaneously pull through your lats, engaging your scapulae to raise your hips upward.
• Continue lifting until your back is parallel to the ground, achieving the tuck front lever position.
3. Controlling the Lowering Phase (Eccentric Focus)
• Slowly lower yourself back to the starting position while keeping your knees tucked.
• Control the descent by resisting gravity to maximize muscle engagement.
• Fully extend your body at the bottom before repeating the next rep.
4. Breathing and Repetition Strategy
• Exhale as you raise your body into the tuck front lever position.
• Inhale as you lower yourself back to the starting position.
• Focus on strict form and controlled movement, avoiding momentum-based reps.
Benefits of the Tuck Front Lever Raise
• Develops strength for the full front lever – Builds pulling and core strength necessary for static holds.
• Enhances scapular control and shoulder stability – Essential for advanced calisthenics skills.
• Engages the entire posterior chain – Works the lats, lower back, and glutes in a full-body movement.
• Improves straight-arm pulling strength – A critical skill for advanced gymnastic and calisthenic movements.
• Can be scaled for all levels – Adjustable difficulty based on form, tempo, and assistance.
• Reinforces core strength and control – Prevents lower back arching and enhances midline stability.
Common Mistakes to Avoid
• Using momentum to swing up – Focus on controlled strength, not momentum.
• Arching the lower back – Keep your pelvis in a posterior tilt to avoid lumbar strain.
• Bending the arms – Maintain straight arms throughout the movement to improve pulling strength.
• Losing scapular engagement – Keep your shoulder blades active and retracted to prevent passive hanging.
• Dropping too quickly – Lower slowly and with control to build eccentric strength.
Gym Equivalent Exercises
• Lat Pulldown (Wide-Grip or Close-Grip) – Builds pulling strength in a vertical plane.
• Hanging Knee Raises – Strengthens the core with similar hip-flexion mechanics.
• Scapular Pull-Ups – Reinforces scapular retraction and shoulder stability.
• Negative Front Lever Lowers – Helps build control in the eccentric phase of the front lever.
Tips for the proper execution of Tuck Front Lever Raises
Engage your core and glutes to maintain full-body control.
Keep your knees tucked tightly to reduce the leverage and make the movement more manageable.
Move slowly and deliberately—momentum reduces strength-building benefits.
Use a slight pause at the top for added time under tension.
Ensure proper grip strength—chalk can help prevent slipping.
Muscles worked when doing Tuck Front Lever Raises
The tuck front lever raise is a full-body exercise, with an emphasis on the pulling muscles and core.
Primary muscles:
•Latissimus dorsi (lats) – The primary pulling muscles responsible for lifting.
• Core muscles (rectus abdominis, transverse abdominis, obliques) – Maintain body positioning and prevent arching.
•Trapezius and rhomboids – Assist in scapular retraction and stability.
Secondary muscles:
•Forearms and grip muscles – Necessary for holding onto the bar or rings.
•Glutes and lower back (erector spinae) – Help stabilize the body during the movement.
•Rear deltoids – Assist in maintaining shoulder control.
Primary Muscle(s):
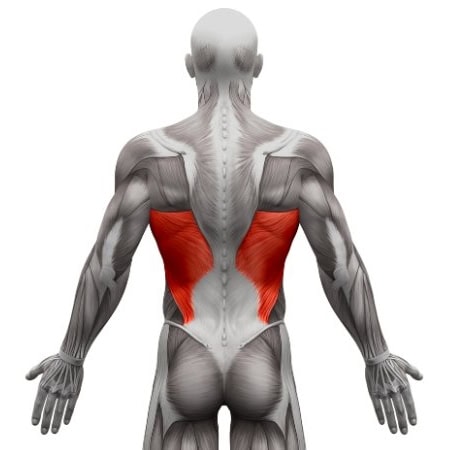
Lats
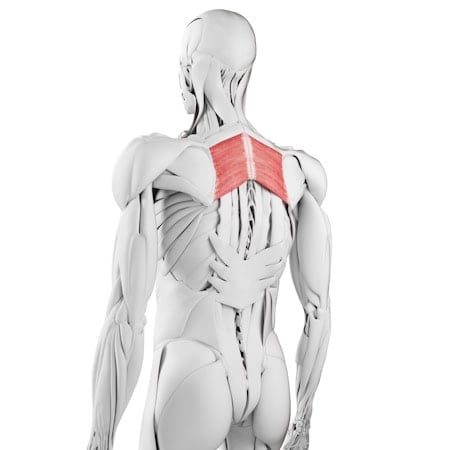
Rhomboid
Secondary Muscle(s):
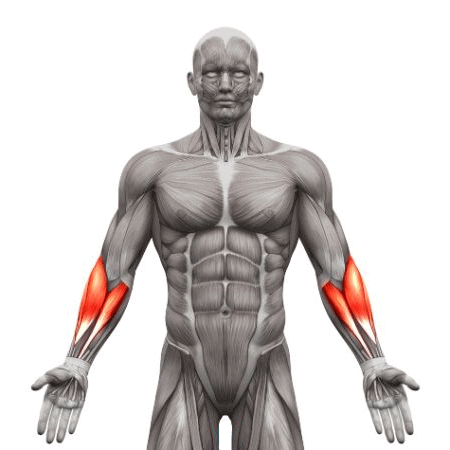
Forearm

Abdominal
Equipment needed for Tuck Front Lever Raises
Adjust the difficulty of Tuck Front Lever Raises
The tuck front lever raise is a highly scalable exercise, making it ideal for beginners and advanced athletes alike. By adjusting lever length (tucked vs. extended legs), tempo, and resistance, you can progressively overload the movement to match your strength level. Beginners can focus on negatives and assisted variations, while advanced athletes can incorporate weighted or extended variations to continually challenge their strength. Whether your goal is to achieve a full front lever hold or simply build pulling power, tuck front lever raises provide an effective, adaptable progression for calisthenics mastery.
How to make Tuck Front Lever Raises harder?
How to make Tuck Front Lever Raises easier?
How to make Tuck Front Lever Raises harder?
To make Tuck Front Lever Raises harder:
-
Perform slow negatives, extending the lowering phase to 5-10 seconds per rep.
-
Extend one leg out while keeping the other tucked (advanced tuck front lever raises).
-
Hold the tuck front lever position at the top for 2-3 seconds before lowering.
-
Transition to a straddle front lever raise, extending both legs into a wider position.
-
Wear ankle weights or a weighted vest for added resistance.
How to make Tuck Front Lever Raises easier?
To make Tuck Front Lever Raises easier:
-
Perform negative (eccentric) tuck front lever raises, focusing only on the lowering phase.
-
Start with partial range of motion before progressing to full reps.
-
Keep your hips slightly lower than parallel to the ground for an easier variation.
-
Work on tuck front lever holds to develop static strength before incorporating raises.