
Back-to-Wall Handstand Push-Up
How to do Back-to-Wall Handstand Push-Up?
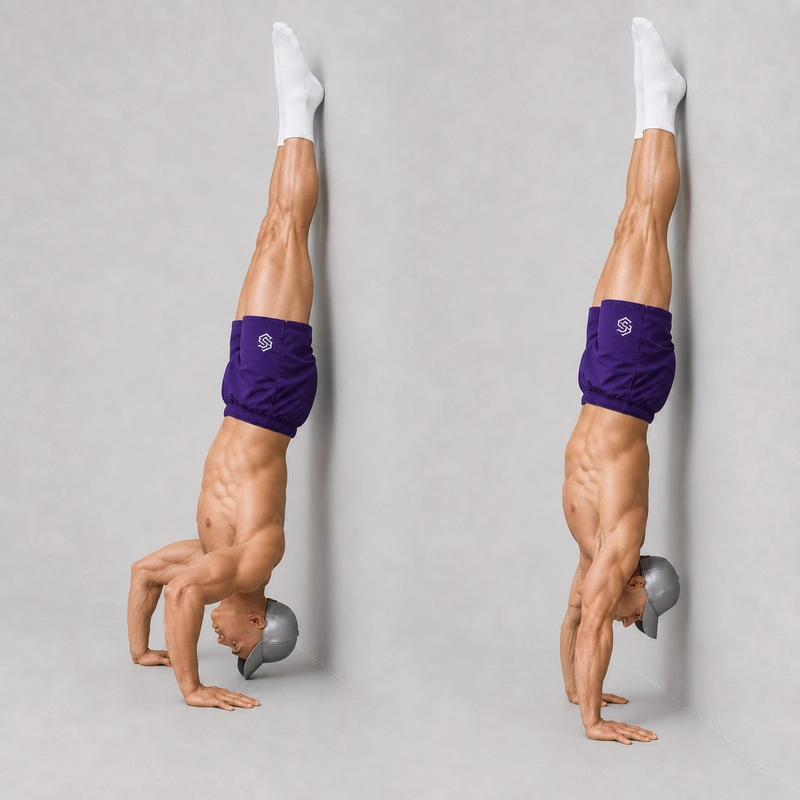
The back-to-wall handstand push-up, also called the heels-to-wall handstand push-up, is an advanced vertical pressing exercise performed with your back facing a wall. You kick into a supported handstand, lower your head toward the floor and then press back to a straight-arm lockout while the heels remain lightly supported by the wall.
The wall removes most of the balance requirement, allowing you to concentrate on shoulder and triceps strength. This makes the exercise an important progression between the elevated-feet pike push-up and unsupported handstand push-ups.
Compared with a wall-facing handstand push-up, the back-to-wall variation is generally easier to enter and exit. However, it also makes it easier to arch the lower back, push through the heels or use leg drive. For a strict repetition, only the heels should touch the wall lightly, and the shoulders and triceps must produce the pressing force.
A peer-reviewed handstand push-up technique paper describes the movement as a closed-chain, multijoint exercise combining elements of a handstand, shoulder press and push-up to develop upper-extremity strength, endurance and stability.
Before attempting full repetitions, develop overhead strength with pike push-ups and practise supporting your body weight with straight elbows in a wall-assisted handstand. Warm up the wrists, elbows and shoulders, train on a non-slip surface and leave enough clear space to lower one leg safely when exiting.
Do not train inverted presses to complete muscular failure. Stop the set while you still have enough strength to control the descent, complete the lockout and exit safely. Stop immediately if you experience sharp pain, numbness or instability in the wrists, elbows, shoulders or neck.
How to Perform a Back-to-Wall Handstand Push-Up
- Prepare the area. Use a clear wall and non-slip floor with enough open space in front of you for a controlled exit.
- Place your hands. Position your hands slightly wider than shoulder width and approximately 15–30 centimetres from the wall.
- Kick into the handstand. Place one foot forward, swing the other leg upward and bring both heels into light contact with the wall.
- Establish the top position. Fully straighten your elbows, elevate the shoulders and distribute pressure evenly through both hands.
- Create body tension. Brace your abdominals, control your ribs, squeeze your glutes and keep the knees straight.
- Begin the descent. Bend your elbows and allow your head to travel forward and downward, away from the wall.
- Create a tripod position. Lower until the top of your head lightly touches the floor or a stable target slightly in front of the line between your hands.
- Press upward. Push firmly through both palms and extend your elbows without driving your heels into the wall.
- Finish at lockout. Straighten the elbows completely and actively elevate the shoulders at the top.
- Exit safely. Remove one heel from the wall and lower that leg toward the floor, allowing the other leg to follow into a controlled lunge.
Back-to-Wall Handstand Push-Up Completion Standard
- Begin each repetition with straight elbows and active shoulder elevation.
- Keep the back facing the wall and maintain only light heel contact.
- Lower until the top of the head lightly touches the floor or predetermined target.
- Position the head slightly in front of the hands to create a stable tripod.
- Do not rest or transfer uncontrolled body weight onto the head or neck.
- Press back to full elbow extension and active shoulder elevation.
- Use no knee bend, hip drive, heel push, head bounce or kipping action.
Benefits of the Back-to-Wall Handstand Push-Up
- Builds vertical pressing strength: The shoulders and triceps press a large percentage of your body weight through an overhead movement.
- Reduces the balance requirement: The wall allows you to concentrate on strength and range of motion before progressing to freestanding repetitions.
- Strengthens the triceps: The triceps control elbow flexion during the descent and produce elbow extension during the press.
- Develops overhead endurance: The shoulders and arms must support the body throughout the entire set.
- Improves scapular control: The trapezius and serratus anterior control the shoulder blades and support the overhead lockout.
- Builds confidence while inverted: The kick-up entry and wall support help athletes become comfortable supporting their weight upside down.
- Provides measurable progression: The exercise can be scaled with target height, tempo, pauses and range of motion.
- Prepares for freestanding handstand push-ups: It develops the pressing strength required before balance becomes the main limitation.
Common Back-to-Wall Handstand Push-Up Mistakes
- Pushing through the heels: Maintain light wall contact instead of using the legs to assist the press.
- Excessively arching the lower back: Brace the abdominals and squeeze the glutes to control the relationship between the ribs and pelvis.
- Lowering directly between the hands: Allow the head to move slightly forward to create a stable tripod position.
- Flaring the elbows sideways: Keep the elbows angled generally backward rather than pointing directly out to the sides.
- Resting on the head: Touch the floor or target lightly without relaxing the shoulders or loading the neck.
- Bouncing from the bottom: Reverse the movement with muscular control instead of rebounding from the head.
- Using unintended partial repetitions: Select a consistent target height and increase the range gradually.
- Failing to lock the elbows: Finish every repetition with straight arms and active shoulders.
- Pressing unevenly: Apply equal pressure through both hands and extend both elbows together.
- Kipping unintentionally: Keep the knees straight and avoid using hip or leg drive to pass the sticking point.
- Training to failure: End the set before you lose the strength required for a controlled repetition and safe exit.
Frequently Asked Questions
Which direction should I face during a back-to-wall handstand push-up?
Your face and chest should point away from the wall while your back and heels face toward it. Only the heels should normally maintain light wall contact.
What is the difference between back-to-wall and wall-facing handstand push-ups?
The back-to-wall variation is entered by kicking up and uses the heels for balance. The wall-facing variation is entered through a wall walk with the chest and toes facing the wall. Back-to-wall repetitions are usually easier to enter and exit, while wall-facing repetitions generally encourage a straighter body line.
Is a back-to-wall handstand push-up a strict handstand push-up?
It can be classified as a strict wall-assisted handstand push-up when the athlete uses no knee bend, hip drive, head rebound or forceful push from the wall. It remains distinct from a freestanding handstand push-up because the wall provides balance assistance.
What is the difference between strict and kipping wall handstand push-ups?
The strict version keeps the legs straight and relies on the shoulders and triceps to complete the press. A kipping handstand push-up deliberately bends and extends the hips and knees to create upward momentum and should be treated as a separate exercise.
How far should my hands be from the wall?
Approximately 15–30 centimetres works for many athletes, but the correct distance depends on body proportions and mobility. You need enough space for the head to move forward without placing the body at an excessively shallow angle.
Should my entire back touch the wall?
No. The heels should provide light balance assistance while the torso remains away from the wall. Resting the back against the wall usually indicates excessive arching or an unsuitable hand position.
Should my head touch the floor?
For a full floor repetition, the top of the head should lightly contact the floor or a stable padded target. Maintain shoulder tension and never relax your body weight onto the head or neck.
How can I reduce the range of motion?
Place a stable padded target beneath your head and gradually reduce its height as your pressing strength improves. Use the same target for every repetition within a set.
How many back-to-wall handstand push-ups should I perform?
Begin with 3–5 sets of 1–5 technically consistent repetitions. End the set when the range shortens, the back arches excessively or you begin pushing through the heels.
Can I perform the exercise on parallettes?
Yes, but parallettes allow the head and shoulders to descend below the hands, creating a substantially greater range of motion. Master full floor repetitions before progressing to deep wall-assisted handstand push-ups on parallettes.
Tips for the proper execution of Back-to-Wall Handstand Push-Up
Place your hands far enough from the wall for your head to travel forward during the descent.
Spread your fingers and distribute pressure through the entire hand for a stable base.
Maintain only light contact between your heels and the wall.
Brace your abdominals and squeeze your glutes to limit excessive lower-back arching.
Allow your head to move slightly away from the wall as your elbows bend.
Keep the elbows angled generally backward rather than flaring them directly sideways.
Touch the floor or target gently without resting your body weight on your head.
Press evenly through both hands so the elbows extend at the same rate.
Finish each repetition with straight elbows and active shoulder elevation.
Stop the set while you still have enough strength to exit the handstand safely.
Muscles worked when doing Back-to-Wall Handstand Push-Up
The back-to-wall handstand push-up is a compound vertical pressing exercise. The deltoids and triceps produce most of the force required to lower and press the body, while the shoulder-blade, rotator-cuff, trunk and lower-body muscles stabilize the inverted position.
Primary Muscles
- Anterior deltoids: The front shoulders produce much of the force required to press the body toward the handstand position.
- Lateral deltoids: The side deltoids assist the vertical press and help control the upper arms.
- Triceps brachii: The triceps control elbow flexion during the descent and extend the elbows during the press.
Secondary and Stabilizing Muscles
- Upper pectoralis major: The upper chest assists the shoulders during the pressing phase.
- Upper and lower trapezius: The trapezius controls the shoulder blades and contributes to active shoulder elevation.
- Serratus anterior: The serratus supports upward rotation and helps maintain control of the shoulder blades against the rib cage.
- Rotator-cuff muscles: These muscles stabilize the upper-arm bones within the shoulder joints.
- Forearm and hand muscles: The wrists, hands and fingers distribute pressure and stabilize the body against the floor.
- Rectus abdominis, transverse abdominis and obliques: The abdominal muscles control the rib cage and pelvis while resisting excessive back extension.
- Spinal stabilizers: The back muscles co-contract with the abdominal muscles to stabilize the inverted torso.
- Glutes: The glutes maintain hip extension and help limit excessive lumbar arching.
- Quadriceps and adductors: These muscles keep the knees straight and the legs together during a strict repetition.
The wall should provide balance rather than pressing assistance. Driving the heels into the wall or using the hips and knees changes the exercise from a strict handstand push-up into an assisted or kipping variation.
Primary Muscle(s):

Anterior delt
Secondary Muscle(s):

Upper chest
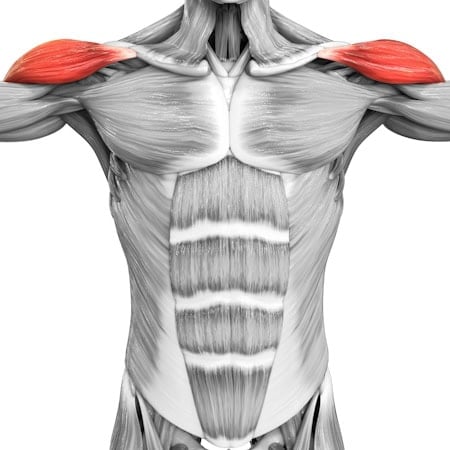
Lateral delt

Triceps
Equipment needed for Back-to-Wall Handstand Push-Up
No equipment needed for this exercise.
Adjust the difficulty of Back-to-Wall Handstand Push-Up
How to make Back-to-Wall Handstand Push-Up harder?
How to make Back-to-Wall Handstand Push-Up easier?
How to make Back-to-Wall Handstand Push-Up harder?
To make Back-to-Wall Handstand Push-Up harder:
-
Reduce the height of the head target gradually until you can complete full floor repetitions.
-
Take four to six seconds to complete every lowering phase.
-
Pause just above the floor without allowing your head to touch the target.
-
Pause at several positions during the descent while maintaining full-body tension.
-
Perform one-and-a-half repetitions by pressing halfway up, lowering again and then completing the lockout.
-
Use progressively lighter heel contact and briefly remove the heels from the wall at the top.
-
Perform the strict handstand push-up with your chest facing the wall to reduce opportunities for arching and heel drive.
-
Perform wall-assisted handstand push-ups on parallettes to increase the available range of motion.
-
Progress to freestanding handstand push-ups once strength is no longer the primary limitation.
How to make Back-to-Wall Handstand Push-Up easier?
To make Back-to-Wall Handstand Push-Up easier:
-
Practise a back-to-wall handstand hold before adding any elbow movement.
-
Perform pike push-ups to develop foundational shoulder and triceps strength.
-
Perform elevated-feet pike push-ups to increase the vertical pressing demand progressively.
-
Place a high padded target beneath your head and perform partial-range repetitions.
-
Perform slow negative repetitions and lower one leg to the floor after reaching the bottom.
-
Place your feet lower on the wall and perform the movement from a less vertical body angle.
-
Ask a qualified spotter to provide minimal assistance through the sticking point.
-
Use several low-repetition sets instead of continuing until your technique deteriorates.
