
Handstand Walk
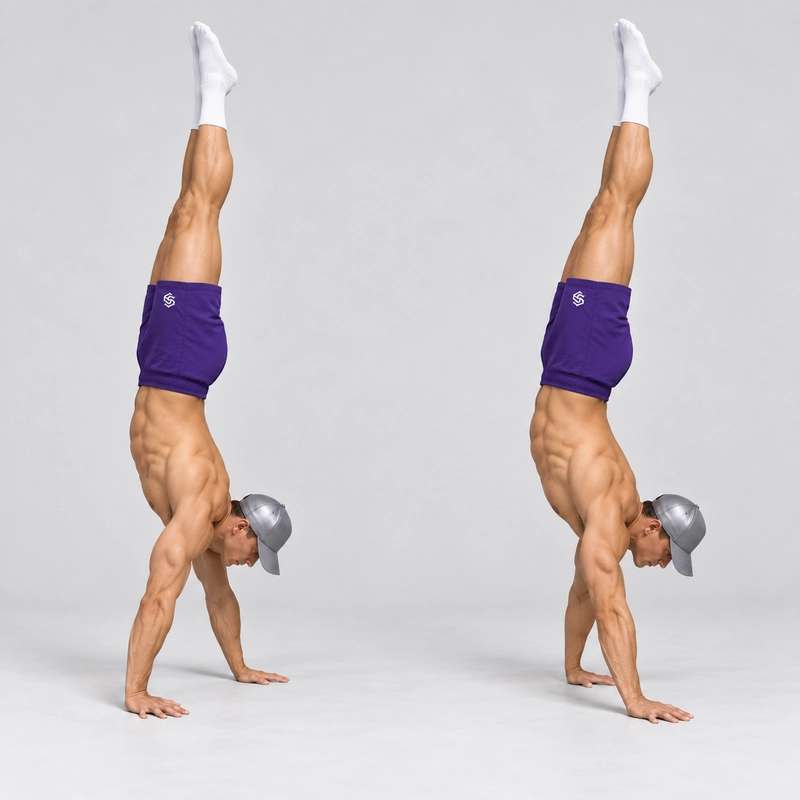
How to do Handstand Walk?
The Handstand Walk is an advanced calisthenics skill in which you travel across the floor by alternately stepping the hands while the body remains inverted. Each step requires you to shift your weight onto one arm, briefly unload the opposite hand, place it farther forward and rebuild your base of support before balance is lost.
A Handstand Walk is not simply a Freestanding Handstand with accidental corrective steps. The static handstand attempts to keep the hands in one place, whereas handstand walking deliberately moves the hands and center of mass in a chosen direction.
The exercise primarily develops dynamic balance, unilateral weight transfer, overhead endurance and coordination. It does not require equipment, but it does require sufficient wrist tolerance, straight-arm supporting strength, inversion confidence and the ability to exit safely.
How Handstand Walking Works
During a static handstand, the hands and fingers continually regulate pressure beneath the body. A 2025 systematic review of handstand biomechanics found that skilled performers predominantly use a wrist-based balance strategy, with the shoulders and hips contributing when larger corrections are required.
Handstand walking adds movement in both the forward and side-to-side directions. You must allow the body to travel slightly forward while shifting enough weight laterally to free one hand from the floor. The moving hand then creates a new base beneath the body, much like the foot does during normal walking.
A small 2026 study of ten participants who could walk at least six handstand steps found different arm positions and joint-work patterns among participants reporting shoulder pain. The study cannot establish that technique caused the pain, but it supports the practical advice not to continue walking with painful, increasingly flexed or collapsing arms. See the published handstand-walking biomechanics study.
Handstand Walk Prerequisites
You do not need a perfect 30-second handstand before beginning walking drills, and some athletes find controlled forward movement easier than remaining completely stationary. However, you should not skip the underlying support, balance and bailout skills.
Useful coaching benchmarks include:
- A controlled 20-to-30-second Chest-to-Wall Handstand with straight arms and active shoulders.
- The ability to shift most of your weight onto either hand without bending the supporting elbow.
- Several repeatable unsupported balances during Freestanding Handstand Practice.
- A controlled kick-up that does not crash into a wall or carry you immediately past the balance point.
- A step-down or cartwheel bailout that you can perform confidently to both sides.
These are practical readiness indicators rather than universal pass-or-fail standards. If overhead support is the limiting factor, build strength with Pike Push-Ups and wall-supported handstands before attempting unsupported walking.
Prepare Your Wrists, Shoulders and Training Area
Perform a progressive Wrist Warm-Up Routine and prepare the shoulders before placing your full bodyweight on the hands. Begin with gentle wrist movements and gradually introduce straight-arm weight-bearing rather than moving directly from rest into maximal attempts.
Use a level, non-slip surface with sufficient grip for the palms. A gymnastics floor or firm exercise surface can make early practice more forgiving, but an excessively soft mat may make the hands unstable.
Clear the complete path of walls, equipment, people and low overhead objects. Decide how you will exit before kicking up and avoid practising toward anything you could strike if your walking speed increases unexpectedly.
How to Perform a Handstand Walk
1. Face the Direction of Travel
Stand at the beginning of a clear walking path and face the direction in which you intend to move. Begin far enough from any wall or equipment that you can take several steps and exit safely.
2. Place Your Hands
Lunge forward and place your hands approximately shoulder-width apart. Spread the fingers, point the middle fingers forward or slightly outward according to wrist comfort and maintain contact through the palms and finger pads.
Look between or slightly ahead of the hands without lifting the head excessively. This provides a stable visual reference while allowing you to monitor the immediate path through peripheral vision.
3. Enter the Handstand
Use a controlled split-leg kick-up and bring the hips above the shoulders. Apply only enough force to reach the balance point; an aggressive kick that sends the legs far beyond the hands turns the walk into an attempt to prevent a fall.
Lock the elbows before accepting your full bodyweight and push tall through the shoulders. Bring the ribs toward the pelvis and organize the torso rather than allowing the lower back to arch uncontrollably.
4. Establish Balance Before Walking
Briefly recognize the freestanding handstand position before taking the first step. The shoulders should remain elevated, the support through both hands should feel controllable and the legs should no longer be accelerating from the kick-up.
You do not need to pause for several seconds, but beginning the walk before the hips have reached the hands commonly causes the feet to fall back toward the starting side.
5. Create a Small Forward Shift
Allow the connected body to move slightly in the intended direction while keeping the shoulders active. The shift should be large enough to create forward travel but small enough that you can still regulate the movement through your hands.
Avoid folding sharply at the hips or throwing the legs forward independently. Think about directing the shoulders, hips and feet along the same general path.
6. Shift Onto the Supporting Hand
Before lifting one hand, push firmly through the opposite hand and shift the shoulders and hips slightly over that supporting side. Maintain a straight supporting elbow and an elevated shoulder rather than dipping toward the floor.
The moving hand should feel almost unloaded before it leaves the ground. If you must pull it forcefully from beneath your body, you have not shifted far enough onto the support arm.
7. Take the First Hand Step
Lift the unloaded hand only as high as necessary and place it a short distance forward. Keep the hand within its shoulder-width lane rather than reaching far sideways or crossing in front of the other hand.
Spread the fingers as the hand lands and accept pressure through the palm progressively. Avoid slapping the floor or placing all the weight immediately into the heel of the hand.
8. Alternate the Hands
As the first hand becomes secure, shift your weight toward it and move the opposite hand forward. Continue alternating sides through a controlled shift, lift, placement and transfer sequence.
Use short steps while learning. Smaller placements reduce the time spent on one arm and make it easier to rebuild the base of support beneath your moving center of mass.
9. Maintain the Body Position
Keep pushing tall through both shoulders and resist deliberate bending of the supporting elbow. Maintain enough abdominal, glute and leg tension to prevent the lower body from moving independently of the torso.
A small split-leg position can help beginners regulate balance, but excessive kicking, knee bending or leg scissoring creates additional movement that the hands must correct. Progress toward straighter knees and quieter legs as control improves.
10. Regulate Your Speed
If the feet begin travelling too quickly beyond the hands, increase pressure through the fingers, shorten the next step and bring the new hand underneath the body sooner. Do not attempt to rescue an uncontrolled fall by taking progressively larger and faster steps.
If the legs begin falling back toward the entry side, reduce excessive fingertip pressure and make a small forward correction through the shoulders. Step down when the position cannot be recovered without bending the arms or twisting sharply.
11. Exit Under Control
Finish by separating the legs and bringing one foot toward the floor, or use the cartwheel bailout you practised beforehand. Exit while you still have enough shoulder and arm strength to control the descent.
Never wait for the elbows to collapse or allow the head to become the next point of contact. A controlled exit is part of a successful repetition rather than evidence that the attempt ended too early.
What Counts as a Handstand Walk?
- The body becomes fully unsupported by a wall, spotter or other object.
- The hands make deliberate alternating placements that produce horizontal travel.
- Both hands participate rather than one hand repeatedly hopping forward.
- The supporting elbow remains straight and the shoulder remains actively elevated.
- The head does not contact the floor.
- The athlete remains inverted between consecutive hand placements.
- The attempt finishes with a controlled step-down or cartwheel exit.
Small hand movements used only to rescue a stationary handstand do not necessarily constitute a Handstand Walk. The defining feature is intentional travel through repeated alternating hand placements.
How to Measure a Handstand Walk
A Handstand Walk is better measured by distance or successful hand placements than by conventional repetitions. One attempt begins when you establish the unsupported inverted position and ends when a foot, knee, head or another body part touches the floor.
You can track:
- The total distance travelled in metres or feet.
- The number of consecutive hand placements.
- The number of successful walks to a predetermined line.
- Your average distance across several attempts.
Use the same surface, starting procedure and measurement method when comparing sessions. Record both your longest attempt and a repeatability measure, such as how many attempts reached the target line, rather than relying only on one unusually successful effort.
Common Handstand Walk Mistakes
Walking Before Reaching Balance
Trying to move the hands while the hips are still behind the shoulders usually sends the legs back toward the floor. Allow the kick-up to bring the hips over the hands before beginning deliberate travel.
Over-Kicking Into the Walk
A large kick can create forward momentum, but it often forces the athlete to run on the hands to avoid falling. Use a measured entry and generate only a small intentional forward shift once inverted.
Lifting a Loaded Hand
If your bodyweight has not shifted onto the opposite arm, the moving hand will feel trapped against the floor. Move the shoulder and pelvis over the support hand before trying to lift the other palm.
Taking Steps That Are Too Large
Large reaches increase single-arm support time and can move the new hand beyond a useful catching position. Begin with short, repeatable placements and increase step length only after developing control.
Bending the Supporting Elbow
A bent elbow shortens the supporting side and can cause the shoulder and head to drop toward the floor. Keep pushing through the hand and maintain the longest comfortable supporting arm.
Sinking Between the Shoulders
Passive shoulders make the body harder to control and reduce the space available for moving one hand. Continue pushing the floor away as though trying to make the body taller throughout every step.
Walking With the Hands Too Wide
Placing the hands far outside shoulder width creates unnecessary side-to-side movement. Keep each hand moving along a roughly parallel lane and avoid crossing the midline.
Using the Legs to Make Every Correction
Large leg movements may save an occasional attempt but make the walking pattern inconsistent. Use hand pressure, shoulder position and accurately placed steps as the primary control mechanisms.
Looking Too Far Forward
Lifting the head to look down the complete path can change the neck, rib and shoulder position. Look between or slightly ahead of the hands and use peripheral vision to monitor the route.
Practising Only While Fatigued
Handstand Walking is a precision skill, and excessive fatigue commonly produces bent elbows, low shoulders and uncontrolled exits. Practise while fresh and end the session before technique deteriorates.
Benefits of the Handstand Walk
- Develops dynamic balance while the base of support continually changes.
- Builds unilateral straight-arm shoulder endurance during alternating support phases.
- Trains controlled weight transfer from one hand to the other.
- Strengthens the hands and forearms through continuous pressure adjustments.
- Challenges the abdominals and obliques to resist extension and rotation.
- Improves full-body coordination and awareness while inverted.
- Provides a measurable advanced skill through distance and step consistency.
- Requires no specialist equipment when a suitable training surface is available.
How to Program Handstand Walk Practice
Practise Handstand Walks after warming up but before demanding pressing exercises or conditioning. Balance and hand-placement quality usually decline once the wrists, triceps or shoulders are heavily fatigued.
Begin with 4 to 8 quality attempts, resting approximately 60 to 120 seconds between demanding efforts. Early attempts may consist of only one step with each hand, while more experienced athletes can work toward repeatable targets of 1 to 3 metres, or approximately 3 to 10 feet.
Avoid turning every set into a maximum-distance test. Most practice should use a distance you can repeat with controlled entries and exits, with occasional longer attempts used to assess progress.
Two to four short weekly sessions may be appropriate when the wrists and shoulders recover comfortably. Reduce frequency or total attempts if soreness persists, hand pressure becomes painful or performance declines across consecutive sessions.
Handstand Walk Progression
A logical progression through the current Calisthenics.com library is:
- Pike Push-Up for vertical pushing strength.
- Wall Walk for inversion confidence and overhead support.
- Chest-to-Wall Handstand for alignment and endurance.
- Wall-supported weight shifts and shoulder taps for unilateral loading.
- Freestanding Handstand Practice for entries, balance and bailouts.
- Freestanding Handstand for repeatable unsupported control.
- Handstand Walk for deliberate inverted locomotion.
The progression does not need to be perfectly linear. You can begin wall-supported walking drills while continuing to improve your static handstand, provided you can support your weight safely and control the exit.
Safety and Discomfort
Stop the session if you experience sharp wrist, elbow, shoulder or neck pain, numbness, dizziness, unusual visual symptoms or a sudden loss of supporting strength. Muscular effort is expected, but pain that changes your arm position or walking pattern should not be ignored.
If you have been advised to avoid strenuous inversions because of an eye, cardiovascular, neurological or other medical condition, obtain appropriate medical guidance before practising. A spotter can help only if they understand how to guide the hips or legs without unexpectedly pulling an arm or blocking your planned exit.
Do not practise maximum-distance attempts on concrete, beside equipment or in a crowded training area. A mat may reduce the consequence of a fall, but it does not replace learning a controlled step-down and cartwheel bailout.
Frequently Asked Questions
Do I Need to Master a Freestanding Handstand First?
You should be able to establish unsupported balance, shift your weight and exit safely, but a very long static hold is not mandatory. Some athletes can take controlled steps before they can maintain a lengthy stationary handstand.
Why Do My Feet Immediately Fall Back Down?
Your hips are probably still behind your hands when you attempt the first step. Complete the kick-up, bring the hips over the shoulders and create a small forward shift before moving a hand.
Why Can I Lift One Hand but Not the Other?
You may have a side-to-side difference in balance confidence, wrist tolerance or supporting-arm control. Practise equal wall-supported weight shifts and begin attempts from both kick-up legs.
How Large Should Each Hand Step Be?
Use short steps while learning so the moving hand can return beneath the body quickly. Increase step length only if you can maintain straight supporting arms and predictable walking speed.
Should the Legs Stay Together?
Legs together with straight knees create the cleanest and most repeatable standard. A small controlled split can help beginners manage balance, but continuous scissoring should not become the primary walking strategy.
Where Should I Look?
Look at the floor between or slightly ahead of your hands. Avoid looking toward your feet or lifting the head far enough to disturb the shoulder and rib position.
Should I Walk as Fast as Possible?
No. Fast steps can temporarily rescue an excessive forward fall, but controlled walking should allow you to regulate speed, place each hand accurately and exit deliberately.
Is the Handstand Walk Harder Than a Handstand?
It introduces unilateral support, lateral weight transfer and locomotion, making it more complex than a static hold. However, athletes who naturally overbalance may initially find taking several steps easier than remaining perfectly stationary.
Tips for the proper execution of Handstand Walk
Warm up the wrists and shoulders progressively before supporting your full bodyweight.
Use a clear, level and non-slip path with enough room for a controlled exit.
Face the intended direction of travel and decide how you will bail out before kicking up.
Place the hands approximately shoulder-width apart with the fingers comfortably spread.
Lock the elbows before the hands accept your full bodyweight.
Push tall through the shoulders throughout every support and stepping phase.
Establish the inverted balance point before attempting the first deliberate step.
Create only a small forward shift instead of turning the walk into an uncontrolled fall.
Shift the shoulders and hips over the supporting hand before lifting the opposite palm.
Lift the moving hand only as high as necessary to clear the floor.
Use short forward placements while learning the walking pattern.
Keep each hand within its shoulder-width lane rather than crossing the midline.
Use active finger pressure to regulate forward speed and prevent excessive overbalance.
Keep the torso and legs connected instead of making large corrections with the lower body.
Look between or slightly ahead of the hands without lifting the head excessively.
Exit while the supporting arms are still strong enough to control the descent.
Muscles worked when doing Handstand Walk
The Handstand Walk is a dynamic straight-arm support and locomotion exercise. The shoulders and upper back support the inverted body, while the triceps maintain elbow extension and the hands regulate balance. The trunk and lower-body muscles keep the body connected as weight alternates between the arms.
Primary Muscles
- Anterior and lateral deltoids: Stabilize the upper arms overhead and support bodyweight during both double-arm and single-arm phases.
- Upper trapezius: Elevates and upwardly rotates the shoulder blades as you push the body away from the floor.
- Serratus anterior: Holds the shoulder blades against the ribcage and helps maintain a strong connection between the arms and torso.
Secondary Muscles
- Triceps brachii: Maintain elbow extension, particularly when one arm briefly supports most of the bodyweight.
- Forearm flexors and extensors: Stabilize the extended wrists and regulate pressure as the body moves over each hand.
- Finger and hand muscles: Grip the floor and make small balance and speed corrections through changing fingertip pressure.
- Rotator cuff: Stabilizes the upper-arm bones within the shoulder joints during every weight transfer.
- Abdominals and obliques: Control the relationship between the ribs and pelvis while resisting excessive extension and rotation.
- Spinal stabilizers: Work with the abdominal muscles to preserve the torso position while the base of support changes.
- Glutes: Stabilize the pelvis and help keep the hips extended above the shoulders.
- Hip adductors: Keep the legs together and limit unwanted side-to-side movement.
- Quadriceps: Maintain straight knees and contribute to a connected lower-body position.
Unlike a static handstand, the load repeatedly shifts from two-hand support toward brief single-arm support. This increases the stabilization and coordination demands on the supporting shoulder, triceps, forearm, hand and opposite-side trunk muscles.
Primary Muscle(s):

Anterior delt

Trapezius
Secondary Muscle(s):

Triceps
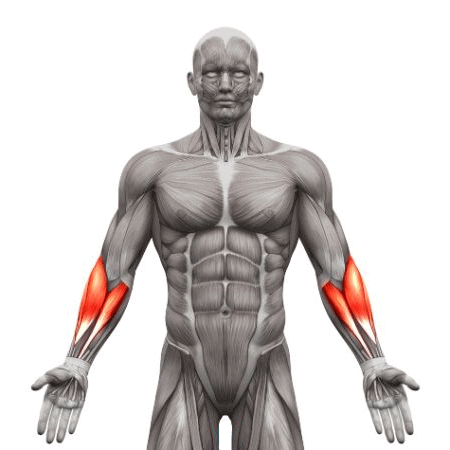
Forearm

Abdominal

Oblique
Equipment needed for Handstand Walk
No equipment needed for this exercise.
Adjust the difficulty of Handstand Walk
How to make Handstand Walk harder?
How to make Handstand Walk easier?
How to make Handstand Walk harder?
To make Handstand Walk harder:
-
Increase the walking distance while preserving the same step quality and body position.
-
Pause briefly after each hand placement to reduce reliance on forward momentum.
-
Keep the legs together with straight knees and pointed toes throughout the walk.
-
Follow a narrow marked lane without allowing either hand to cross the center line.
-
Enter through a Press to Handstand before beginning the walk.
-
Finish the walking distance in a controlled static Freestanding Handstand.
-
Perform a gradual turn while maintaining uninterrupted alternating hand steps.
-
Practise backward Handstand Walking after mastering controlled forward travel.
-
Practise lateral Handstand Walking without rotating the torso toward the direction of travel.
How to make Handstand Walk easier?
To make Handstand Walk easier:
-
Practise Wall Walks before attempting unsupported inverted locomotion.
-
Use a Chest-to-Wall Handstand to develop straight-arm shoulder endurance.
-
Perform side-to-side weight shifts while facing the wall.
-
Practise wall-supported shoulder taps without allowing the hips to rotate.
-
Use an elevated pike position with the feet on a sturdy box to rehearse hand steps.
-
Continue Freestanding Handstand Practice until your kick-ups and exits become predictable.
-
Take only one controlled step with each hand before stepping back to the floor.
-
Use a small split-leg position to make early balance corrections easier.
-
Ask a competent spotter to guide the hips while leaving your hands and exit path unobstructed.
