
Floor Pike Push-Up
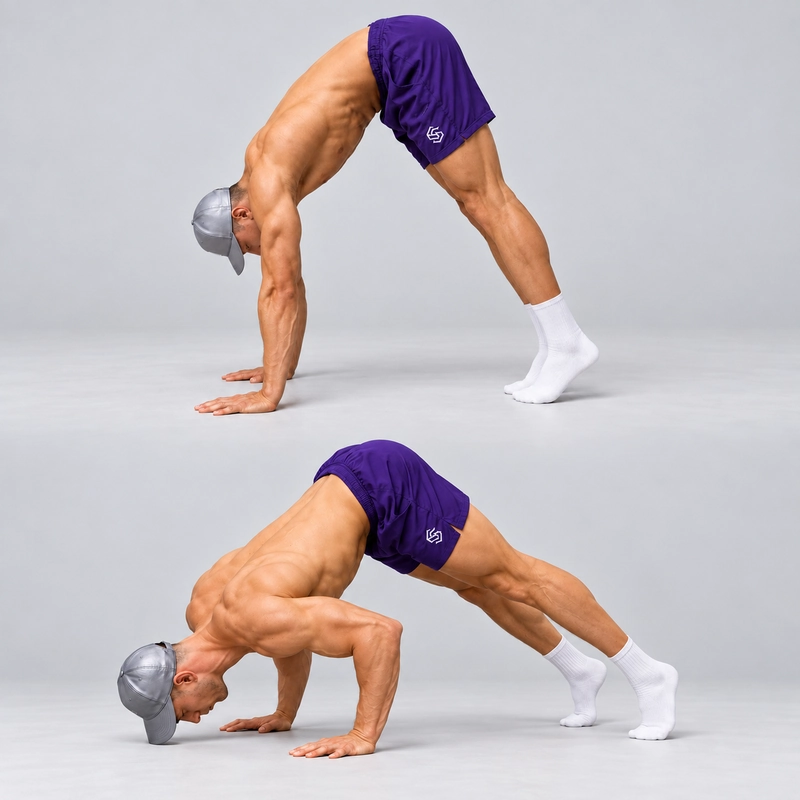
How to do Floor Pike Push-Up?
The floor pike push-up is a bodyweight pressing exercise performed with your palms and feet on the floor and your hips raised into an inverted V. Bend your elbows to lower your head toward the floor just ahead of your hands, then press back to straight arms.
This position emphasises the shoulders and triceps while the feet support part of your weight. It provides a floor-based starting point for more demanding vertical pressing variations such as feet-elevated pike push-ups. You do not need to balance in a handstand to practise it.
This page defines hands flat on the floor, straight knees and a full floor-level descent. Your heels may lift naturally; forcing them flat is not part of the exercise standard. The pike push-up on parallettes uses handles and can add range below hand level, so it is a separate setup.
Equipment and Setup
Use a firm, non-slip floor with enough space to place your hands and feet securely. A thin, firm exercise mat is optional; if used, keep the hands and head-contact point on the same surface level.
- Place your palms approximately shoulder-width apart, or slightly wider if that feels more comfortable.
- Spread your fingers and point them forward or slightly outward.
- Set your feet approximately hip-width apart and raise your hips.
- Choose a hand-to-foot distance that lets you maintain the pike without rounding the lower back or forcing a painful stretch.
- Leave a clear head-contact point just ahead of the line of your fingertips, away from your feet.
At the bottom, the head-contact point and the two hands form a triangle when viewed from above. Your head should not descend directly between the palms on the same line. Do not use a thick head cushion as though it were full floor range; a raised target is a separate partial-range regression.
How to Do a Floor Pike Push-Up
- Enter the pike. Begin on hands and feet, then lift your hips and walk your feet toward your hands until your body forms an inverted V.
- Set your starting position. Straighten your elbows and knees without forcing hyperextension. Keep your palms planted and both feet supported on the floor; your heels may be raised.
- Push through your hands. Keep the shoulders active, brace your abdomen and maintain the bend at the hips. Let your head sit naturally between your upper arms without forcing your chin toward your chest.
- Lower forward and down. Bend both elbows and move your head toward the floor just ahead of your hands. The shoulders move forward as you descend; do not simply drop the head vertically between the palms.
- Control the bottom. Keep the elbows directed diagonally back rather than flared directly sideways. Aim for roughly 30–45 degrees from your torso, adjusting comfortably. Lightly touch the top of your head to the floor without resting your weight on it.
- Press back up. Push through your palms, straighten both elbows and return along the same path to the raised-hip pike position.
- Reset at the top. Finish with straight arms and active shoulders, with your head between the upper arms. Keep the original hand and foot positions before beginning the next repetition.
Inhale as you lower and exhale as you press. Use a controlled rhythm and keep your neck aligned with your torso rather than craning it to reach the floor.
What Counts as a Full Floor Pike Push-Up?
For the strict standard on this page, a repetition begins with straight elbows in a pike, reaches a gentle floor-level head touch and finishes back in the pike with both elbows straight.
- Both palms and feet keep their original positions on the floor.
- The knees remain straight and the hips stay raised; the movement does not become a standard push-up.
- The head reaches the floor-level target just ahead of the hands, with a controlled neck position.
- The arms support the descent; the head is only a depth marker, not a place to rest.
- Both elbows straighten fully at the top without being forced beyond their normal range.
- No bounce from the head, jump from the feet or deliberate knee dip helps complete the press.
Do not count a repetition if you stop short of the depth standard, leave the elbows bent at the top, move your hands or feet, bend the knees to generate momentum, or drop the hips into a horizontal push-up. Bent-knee pike push-ups and raised-head-target repetitions are useful regressions, but record them separately.
Benefits of the Floor Pike Push-Up
- Develops shoulder pressing strength: The raised-hip position changes the press from the pattern used in a standard horizontal push-up.
- Trains the triceps: The elbows bend during the descent and extend during the press.
- Practises shoulder-blade control: The shoulders stay active as you lower and return to the pike.
- Requires little equipment: The floor supports both the hands and feet.
- Supports a vertical pressing progression: You can develop strength before adding foot elevation or a wall-supported handstand.
Pike push-ups do not teach freestanding handstand balance on their own. If your goal is a wall-facing handstand push-up, also develop the ability to enter, hold and exit the supported handstand safely.
Readiness and Mobility
Begin with a few comfortable pike holds and shallow practice repetitions. You should be able to support yourself through your palms, hold the raised-hip position and control the descent without sharp pain.
You do not need to force your heels flat or fold your chest against your thighs. Choose a hand-to-foot distance that lets you maintain the intended position. If straight knees prevent you from holding a useful pike, use a small, consistent knee bend as a separate training regression.
Common Mistakes and Corrections
Dropping the Hips
Keep the bend at the hips throughout the repetition. If the body unfolds into a plank, reduce the difficulty instead of finishing with a different pressing pattern.
Lowering the Head Directly Between the Hands
Move forward and down so the head-contact point sits ahead of the hands. Use a floor marker to learn the path rather than bending the neck to manufacture contact.
Resting or Bouncing on the Head
Control the descent through the arms and only brush the target lightly. If you cannot reach it without collapsing, shorten the range with a stable raised target and build control there.
Flaring the Elbows Directly Sideways
Let the elbows track diagonally back at a comfortable angle. Adjust hand width slightly if needed rather than forcing a position that causes discomfort.
Moving the Feet or Bending the Knees to Finish
Keep the setup fixed. A knee dip or push from the legs adds momentum and changes the task. Finish the set when you can no longer press smoothly.
Stopping With Bent Arms
Return to full elbow extension and an active pike at the top. A comfortable straight-arm finish gives every repetition the same endpoint.
Sets, Reps and Progression
As a coaching starting point, use 2–3 sets of 5–10 controlled repetitions, resting 90–120 seconds between sets. Choose a setup that leaves one or two clean repetitions in reserve. Use fewer repetitions or a regression if you cannot control the descent and press.
When you can repeat three sets of eight to ten full repetitions with consistent technique across two sessions, try a modest foot elevation on a stable support while keeping your hands on the floor. Reduce the repetitions as needed. This is a coaching guideline, not a validated readiness test.
The main loading branch progresses to feet-elevated pike push-ups and later wall-supported handstand pressing. Parallettes offer a separate range-of-motion branch: changing the handles and adding a deficit is not the same change as raising the feet. Change one variable at a time.
Keep Your Setup Consistent When Retesting
Mark your hand and foot positions and use the same hand spacing, foot spacing, footwear, knee position and head-contact point. Keep the surface level and tempo consistent. A side-view photograph can help you reproduce the pike angle.
Hand-to-foot distance and body position affect the demand, so more repetitions after changing the setup are not automatically a strength gain. A floor head touch is a practical depth reference, but does not make the exercise equally loaded between people of different proportions.
Comfort and Safety
Keep the floor clear and avoid thick, unstable padding. Stop if your palms or feet slip, you lose control of the descent, or you experience sharp wrist, shoulder, elbow or neck pain, numbness or dizziness. Persistent symptoms warrant advice from a qualified healthcare professional.
Floor Pike Push-Up FAQ
Do my heels need to touch the floor?
No. The feet stay on the floor, but the heels may be raised. Forcing them flat can restrict your pike position; heel contact is not the rep standard used here.
Should my head touch the floor?
For the full-range standard on this page, use a light floor-level touch as the depth marker without resting on the head. If you cannot control that range, use a raised target as a separate regression.
Where should my head go?
Just ahead of the hands, away from the feet, so the two hands and head-contact point form a triangle. Keep the neck controlled rather than reaching with the forehead or chin.
Can I bend my knees?
A small, consistent knee bend is a useful training adjustment when mobility limits the pike. This page defines the straight-knee version, so record the bent-knee variation separately when assessing or comparing results.
Is this the same as a pike push-up on parallettes?
The pressing pattern is related, but parallettes use a neutral grip and can allow the head to travel below hand level. This floor version uses flat palms and finishes the descent at floor level.
Tips for the proper execution of Floor Pike Push-Up
Place the palms around shoulder width, spread the fingers and use a firm, non-slip floor.
Raise the hips into an inverted V and choose a hand-to-foot distance that allows straight knees without forcing a painful stretch.
Keep both feet on the floor, but allow the heels to rise rather than forcing them flat.
Lower the head forward and down to a point just ahead of the hands, away from the feet.
Let the elbows track diagonally back at a comfortable angle rather than flaring them directly sideways.
Maintain the raised hips and consistent knee position instead of unfolding into a standard push-up.
Use only a gentle head touch for depth; keep the load through the arms and never bounce or rest on the head.
Press back to straight elbows and active shoulders, returning the head between the upper arms without forcing the neck.
Keep the hands and feet in their original positions and avoid a knee dip or leg push to finish the repetition.
Muscles worked when doing Floor Pike Push-Up
The floor pike push-up is a shoulder-focused bent-arm press. The shoulders and triceps produce the pressing action, while the shoulder-blade muscles and trunk help control the raised-hip position.
Main Pressing Muscles
- Anterior deltoids: Contribute strongly to pressing from the pike position.
- Triceps brachii: Extend the elbows during the upward phase.
- Pectoralis major: Assists the press, with its contribution influenced by the torso angle.
Supporting Muscles
- Serratus anterior and trapezius: Help control the shoulder blades as you lower and press.
- Rotator cuff: Helps stabilize the shoulder joints.
- Forearm and hand muscles: Support the wrists and distribute pressure through the palms and fingers.
- Abdominals and spinal stabilizers: Help maintain trunk control.
- Leg muscles: Maintain the chosen knee and foot position.
The pike position shifts the pressing emphasis toward the shoulders compared with a standard horizontal push-up. It still uses several muscle groups, and the feet continue to support part of your weight.
Primary Muscle(s):

Anterior delt

Triceps
Secondary Muscle(s):

Upper chest

Trapezius
Equipment needed for Floor Pike Push-Up
No equipment needed for this exercise.
Adjust the difficulty of Floor Pike Push-Up
Adjust the pike position, assistance and range to find a controlled training variation. A stable raised head target reduces the range; a consistent knee bend can help when mobility limits the position. Foot elevation generally increases the pressing demand, while parallettes can add range below hand level. Keep floor-level depth, straight knees and marked hand and foot positions consistent when recording results for this version.
How to make Floor Pike Push-Up harder?
How to make Floor Pike Push-Up easier?
How to make Floor Pike Push-Up harder?
To make Floor Pike Push-Up harder:
-
Progress to feet-elevated pike push-ups using a stable low box or bench while keeping the palms on the floor.
-
Take three seconds to lower while preserving the pike position and full elbow extension at the top.
-
Pause briefly just above the floor without placing weight on the head, then press smoothly to straight arms.
-
Use stable parallettes for a separate deficit pike push-up progression, increasing the depth below hand level gradually.
How to make Floor Pike Push-Up easier?
To make Floor Pike Push-Up easier:
-
Use a stable, firm raised head target to shorten the descent while keeping the hips raised. Record the target height and treat this as a partial-range variation.
-
Use a small, consistent knee bend if straight knees prevent a comfortable pike position. Avoid bending and straightening the knees to generate momentum.
-
Use a slightly less compressed pike that shifts less weight onto the hands, while keeping the hips raised and the same controlled pressing path.
-
Practise supported pike holds and controlled shallow presses before adding the full descent. Build depth gradually without resting on the head.
