
Seated Straddle Compression Lifts
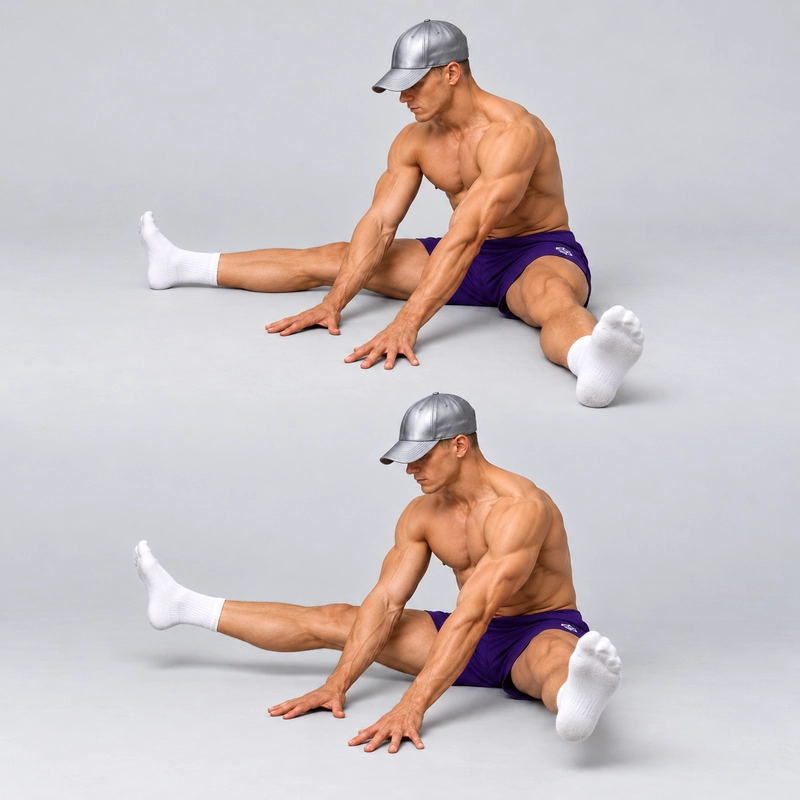
How to do Seated Straddle Compression Lifts?
Seated Straddle Compression Lifts are an active compression drill in which you sit with the legs apart and lift both straight legs from the floor. Your hands rest between the legs, your hips stay seated and the torso holds a consistent position. Raise the feet together, pause briefly and lower them quietly.
The drill practises bringing the thighs toward the torso through muscular effort in a straddle position. It is useful when you want to develop the leg-lifting part of straddle support or press preparation without also having to suspend the hips on the hands.
Straddle Lifts Versus Pike Lifts, Pancakes and Support Holds
Seated Double-Leg Pike Lifts use straight legs together. This exercise keeps the legs separated and usually places the hands centrally between them. Train the shape that matches your goal, or practise both without assuming one is always harder.
Seated Single-Leg Pike Lifts introduce one-leg compression in a legs-forward position. For a more specific regression here, keep the same straddle and lift only one leg while the other stays on the floor.
A pancake stretch brings the torso forward between grounded legs. A seated straddle lift raises the legs while maintaining the chosen torso position. A deep forward fold does not automatically mean you can actively lift both feet, and bouncing your chest toward the floor is not a compression repetition.
A supported straddle L-sit lifts the hips as well as the feet. The Middle Split Hold is another suspended straddle task with a distinct support and hip-position demand. Keep your hips on the floor for this seated drill; pushing the whole body up changes the exercise.
GMB's explanation of compression strength describes coordinated trunk and limb effort in movements such as L-sits and hip lifts. This seated drill isolates a more specific practice task: actively raising the straddled legs while the pelvis remains supported.
Choose a Comfortable Straddle
Sit on a firm, level surface with enough room for both legs. A thin, non-slip mat is optional. Avoid a soft cushion that rocks or compresses noticeably as you lift, especially when comparing your progress between sessions.
Open the legs to a width where you can straighten both knees and maintain a stable seated position. You do not need a full middle split or a fixed angle. A wider position is not automatically a better repetition.
Let the knees and toes point in a comfortable, consistent direction rather than twisting the feet outward while the thighs stay in place. Keep the knees straight without forcing them backward. Reach along the length of the legs and use a comfortable pointed-foot shape if you want a consistent gymnastics-style finish.
If widening the legs produces a strong groin pull, front-of-hip pinching or loss of control, narrow the straddle. The goal is usable active movement, not the largest possible passive range.
Hand Placement and Torso Position
Start with both hands on the floor between the thighs and just in front of the pelvis. Keep them approximately shoulder-width apart where space allows. Place the palms flat if comfortable, with the fingers pointing generally forward or slightly outward.
Choose a modest forward lean that you can maintain before, during and after the lift. A comfortable amount of upper-back rounding can occur; you do not need to force a rigid arch or flatten your chest into a pancake. Keep the neck comfortable and look toward the floor ahead rather than throwing the head back.
The hands provide positional support while the hip flexors lift the legs. Press enough to steady yourself, but keep the buttocks grounded. Do not turn hand pressure into a push that lifts the pelvis off the floor.
Position the hands where you can lift without rocking backward. Moving them farther forward can help establish a more compressed starting position, but the actual challenge depends on the torso lean you adopt. Set that position before the repetition instead of reaching forward and backward as the feet move.
If flat palms are uncomfortable, firm fingertip contact or a stable low hand support may be a practical alternative. Avoid putting excessive pressure through painful fingers. Record the change when tracking progress, and keep the seated leg-lift task rather than using the support to suspend your hips.
Readiness and Warm-Up
You should be able to sit in a comfortable straddle and deliberately tighten the thighs to straighten the knees. You do not need an L-sit, a full split or a handstand before practising this drill.
Begin with light general movement and the joint warm-up routine or similar preparation. Then use a few gentle seated hip movements, short quadriceps contractions and easy one-leg lifts before attempting both legs together.
If you cannot organize a comfortable seated position, try a slightly narrower straddle or sit on a low, firm pad. Raising the pelvis relative to the heels changes the starting geometry, so treat it as an adjusted setup rather than the same floor version.
Stop for sharp pain, pinching, tingling or a feeling of instability. A demanding muscular effort is different from forcing an uncomfortable hip or groin position. Reduce the range or change the setup; seek individual advice if symptoms persist.
How to Do Seated Straddle Compression Lifts
- Establish the seated straddle. Keep the buttocks on the floor, spread the legs comfortably and settle into a position you can repeat.
- Straighten both knees. Tighten the quadriceps and reach through the legs. Begin with the heels resting on the floor.
- Plant the hands. Set both hands between the thighs, in front of the pelvis. Choose comfortable palm contact and keep the hands in place.
- Set the torso. Take a small forward lean if useful, engage the abdomen and keep the pelvis supported. Establish this position before the feet leave the floor.
- Lift from the hips. Raise both straight legs together through a range you can control. Keep their separation consistent and avoid rotating onto one buttock.
- Show clear foot clearance. Briefly hold with both feet visibly off the floor. The knees stay straight and the hips remain seated.
- Lower deliberately. Return both legs together without dropping the heels or bouncing into another lift.
- Reset and repeat. Lightly touch the heels down, re-establish the same torso position and begin the next controlled lift.
Exhale gently as the legs rise and breathe normally between repetitions. Avoid a prolonged breath hold to force extra height. A small, deliberate lift is useful even when the feet clear the floor by only a short distance.
What Counts as a Controlled Repetition?
- Both legs start in the declared straddle with straight knees.
- Both feet rise together and become visibly clear of the floor.
- The hips stay seated and the thighs do not rest on the forearms or another support.
- The torso does not rock backward to create the lift.
- The hands remain in the chosen position and the leg separation stays consistent.
- Both legs lower under control and return to a quiet reset.
Lifting a heel by changing the ankle angle while the toes remain on the floor does not meet this standard. Lift the leg as a whole. A one-leg lift, bent-knee lift or pelvis-elevated lift can be valid preparation, but label it as that variation.
The height should come from a controlled change at the hips, not a chest bounce or a backward lean. Compare your lifts at the same starting position before chasing a larger gap under the feet.
Why a Small Lift Can Feel Difficult
You are trying to raise straight legs from an already flexed-hip position while limiting movement of the torso. The hip flexors produce the lifting action, the quadriceps maintain the long leg shape and the trunk helps organize the pelvis.
Handstand Factory's discussion of press-to-handstand preparation distinguishes passive pancake flexibility from the ability to generate active compression. More passive range can be useful, but it is not the same task as producing a controlled seated leg lift.
If your legs barely move, first check that you are not starting too far forward, using a straddle you cannot control or losing knee extension. Bring the hands closer, choose less forward lean and try one leg at a time. Increase the challenge again as that version becomes repeatable.
Reaching a deeper pancake is not the only solution. You may need more usable range, more leg-lifting strength, a better starting position or a combination. A single unsuccessful lift does not identify one specific muscle as weak or tight.
Common Mistakes and Corrections
- Rocking backward: establish the torso before lifting, reduce the hand reach or use one-leg practice.
- Bouncing the torso forward: settle between repetitions and move the legs without using a repeated chest swing.
- Bending the knees for clearance: reduce lift height and actively straighten the knees, or label a bent-knee regression deliberately.
- Only one leg rises: train each side separately, then return to a smaller synchronized bilateral lift.
- Pushing the hips off the floor: reduce the whole-body push and keep a visibly seated pelvis.
- Forcing a wider straddle: return to a width where the hips, knees and feet remain comfortable.
- Rotating onto one side: reset the seated contact and use a more manageable lift or one-leg variation.
- Changing ankle angle instead of lifting: verify that the toes as well as the heels clear the floor.
- Dropping the legs: stop the set earlier or reduce the range so the heels return quietly.
- Changing setup to maintain the rep count: record the change and compare only repetitions performed with the same declared standard.
Sets, Repetitions and Progression
A practical starting option is two or three sets of five to eight controlled lifts, with a brief pause at the top and approximately 60–90 seconds of rest. Rest longer if needed to reproduce the same quality. These are coaching suggestions, not a mandatory prescription.
If both legs do not lift cleanly, use controlled one-leg straddle lifts for each side. Keep the same hand position and compare the movement rather than assuming a difference in height is caused by one particular weakness.
Practise two or three times per week as a starting schedule, adjusted for your other compression, core and skill training. Use a few easy rehearsals to prepare; avoid exhausting the hip flexors immediately before a demanding press session.
First make a small lift repeatable. Then add a little height, extend the pause or increase the forward position while preserving straight knees and seated hips. Change one variable at a time. Moving the hands farther forward only represents a useful progression if the resulting body position actually asks for more controlled compression.
Once this shape is controlled, practise legs-together pike lifts as a complementary task if your goal includes L-sits or V-sits. Narrowing the legs changes the exercise shape and may be harder for you, but it is not a universal progression for every athlete.
How to Use It for L-Sits and Press Preparation
For support skills, pair compression practice with an appropriate hand-supported exercise such as the Tuck L-Sit on Parallettes. Seated leg lifting and suspended support can be trained as complementary branches instead of forcing them into one rigid ladder.
The V-Sit adds high leg positioning while the arms support the body. This seated drill develops a related compression quality, but it does not establish V-sit support, balance or clearance.
For the Press to Handstand, straddle lifts provide a way to practise active leg positioning. You still need straight-arm support, weight transfer, handstand control and an appropriate exit. Seated repetitions alone do not prove readiness for a full press or Stalder press.
Choose the next task based on the limitation you are trying to address. More seated compression volume is not automatically the answer if your main difficulty is holding the hips above the floor or controlling the handstand.
Frequently Asked Questions
How wide should my legs be?
Use a width where you can sit comfortably, straighten the knees and lift without twisting. There is no required middle-split angle. Keep the same width when comparing sessions.
Do I need to lift high?
No. Begin with visible clearance and a controlled pause. A small lift with a steady torso is more informative than extra height created by rocking backward.
Are the abs lifting my legs?
The hip flexors produce the principal leg-lifting action. The abdominals help stabilize the trunk and pelvis, while the quadriceps keep the knees straight. It is a compression drill with several coordinated roles.
Should the hips come off the floor?
No, not in this seated version. Lifting the hips creates a support exercise and changes the task. Keep the pelvis grounded while both legs rise.
Can I lift one leg at a time?
Yes. That is a useful regression in the same straddle setup. Record the sides separately and return to synchronized lifts when you can maintain the declared position.
Is this harder than seated pike lifts?
It depends on your setup and usable range. Straddle and pike are different compression shapes; neither deserves an automatic difficulty ranking solely because the legs are apart or together.
Tips for the proper execution of Seated Straddle Compression Lifts
Choose a comfortable straddle that lets you straighten both knees without forcing the hips or groin into the widest possible position.
Keep the buttocks seated throughout the lift. Press through the hands for steadiness without pushing the whole body off the floor.
Place both hands between the legs, in front of the pelvis, and keep them in the same position for the full set.
Establish your forward lean before lifting. Avoid rocking backward or bouncing the chest toward the floor to create extra height.
Tighten the quadriceps to keep the knees straight, reaching through the whole leg rather than kicking from a bent knee.
Raise both legs together and keep their separation consistent. Use one-leg straddle practice if a synchronized lift is not yet controllable.
Check that both toes and heels clear the floor. Changing the ankle angle while part of the foot stays grounded is not a complete leg lift.
Pause briefly at a height you can hold without twisting onto one buttock, bending the knees or shifting the hands.
Lower both legs quietly and reset before the next lift. End the set when control deteriorates instead of dropping and rebounding.
Track straddle width, hand position, torso lean, seat height and foot clearance. Compare the same setup rather than rep counts from changing positions.
Muscles worked when doing Seated Straddle Compression Lifts
Seated Straddle Compression Lifts combine active hip flexion with straight-knee control and trunk stabilization. They are often grouped with core exercises, but the abdominals are not the sole or principal movers lifting the legs.
- Hip flexors: including the iliopsoas and rectus femoris, contribute to raising the legs relative to the torso. Their roles depend on the hip position; this is a functional description rather than a measured activation ranking for the drill.
- Quadriceps: maintain knee extension so the legs retain their straight shape. Rectus femoris also contributes to hip flexion.
- Abdominals and obliques: help stabilize the trunk and pelvis while you resist backward rocking and unwanted rotation.
- Hip-position stabilizers: coordinate the straddle and limit unwanted changes in leg separation or rotation. A wide position does not by itself demonstrate strengthening of the inner thighs.
- Shoulders, arms and hands: provide positional support through floor contact. They do not carry the whole body as they would in a suspended L-sit.
The hamstrings and inner-thigh tissues can influence the range available for the seated shape, but a stretch sensation is not evidence that they are the primary muscles lifting the legs. This exercise does not diagnose whether a particular muscle is weak, tight or injured.
Primary Muscle(s):

Abdominal
Secondary Muscle(s):

Oblique
Equipment needed for Seated Straddle Compression Lifts
No equipment needed for this exercise.
Adjust the difficulty of Seated Straddle Compression Lifts
Choose a straddle, hand position and torso lean that let you lift with seated hips and straight knees. Begin with a small range or one-leg practice, then add controlled height, a longer pause or a more compressed starting position. Record setup changes; wider legs and farther-forward hands are not automatic difficulty scores.
How to make Seated Straddle Compression Lifts harder?
How to make Seated Straddle Compression Lifts easier?
How to make Seated Straddle Compression Lifts harder?
To make Seated Straddle Compression Lifts harder:
-
Increase the height of both legs slightly while keeping the same hand position, torso lean, straddle width and straight knees.
-
Extend the top pause to two or three seconds without lifting the pelvis, twisting the torso or losing knee extension.
-
Set a modestly more forward, compressed position before lifting, adjusting the hands as needed. Keep that new position fixed and reduce the range if the torso starts rocking.
-
Lower the legs more slowly or retain a small hover between lifts. Record hover repetitions separately from the usual heel-touch reset and stop before the feet drop.
How to make Seated Straddle Compression Lifts easier?
To make Seated Straddle Compression Lifts easier:
-
Lift one straight leg at a time in the same comfortable straddle, keeping the other leg grounded and the torso steady. Practise both sides before returning to bilateral lifts.
-
Bring the hands closer to the pelvis and use less forward lean while remaining seated. Aim for a small controlled lift rather than leaning backward to increase clearance.
-
Sit on a low, firm pad if floor sitting prevents a comfortable starting position. Keep the pelvis supported and record the elevation as a different setup from the floor version.
