
Copenhagen Plank
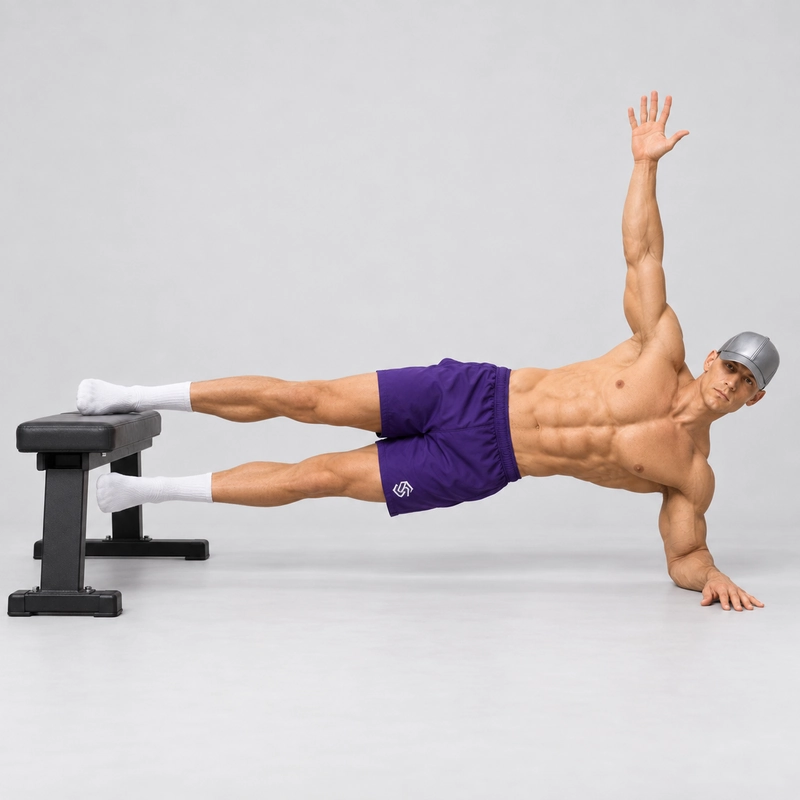
How to do Copenhagen Plank?
The Copenhagen plank is a side-plank hold in which your upper leg rests on a sturdy bench while your lower leg stays off the floor. The inner-thigh muscles of the supported leg help hold your body up; your obliques and supporting shoulder keep your trunk steady. Unlike an elbow side plank, your feet do not share the load on the floor.
This page teaches the static, long-lever version, with the upper leg supported near the ankle. It is demanding even if you can hold a regular side plank: moving the support nearer the upper knee makes the exercise easier. If forearm support itself is difficult, build that position first with an knee side plank.
Copenhagen adduction exercises have been studied as part of progressive adductor-strengthening programmes. For example, a trial in male football players found fewer self-reported groin problems in the group assigned a progressive programme. That result applies to the studied programme and population; it does not mean a single static hold prevents injury or treats groin pain.
Equipment and setup
Use a stable bench with enough room beneath or beside it for your lower leg to move freely. Check that it will not slide or tip, and place an exercise mat beneath your supporting forearm if the floor is uncomfortable. A little padding on the bench can make contact with your inner lower leg more comfortable; avoid pressing a hard edge directly into the bony inside of your ankle or knee.
Lie on your side, perpendicular to the bench, with your supporting forearm on the floor and your elbow approximately beneath your shoulder. Place the inner side of your upper lower leg, just above the ankle, on top of the bench. Keep that upper knee mostly straight. Let your lower leg start beneath the bench, and place your free hand on your hip or on the floor briefly while you find your balance.
Step-by-step Copenhagen plank technique
- Set your shoulder: Press your forearm into the floor and keep your supporting shoulder comfortably away from your ear.
- Press through the upper leg: Push the supported inner lower leg down into the bench as you lift your hips off the floor.
- Float the lower leg: Lift your lower leg clear of the floor and hold it beneath the supported leg without needing to touch the bench.
- Find a straight body line: Align your head, trunk, hips, and upper leg rather than folding at the waist or pushing your hips excessively high.
- Hold and breathe: Keep your hips stacked, your lower leg off the floor, and your breathing steady for the planned hold.
- Finish under control: Lower your hips and lower leg to the floor, reset, and repeat on the other side.
What counts as a complete hold?
Count only the time you can keep the upper leg supported near the ankle, the lower leg off the floor, and your trunk controlled without rotating toward the ceiling or floor. Your body will form a straight diagonal from shoulder toward the raised upper foot; it does not need to be horizontal. Stop the hold when your hips sag, your lower foot begins taking weight on the floor, or you cannot maintain the position comfortably.
Breathing and training
Take a breath before lifting, then continue breathing during the hold instead of straining to maintain it. As a starting practice option, try 1–2 sets of short, controlled holds of about 5–10 seconds per side, with enough rest to reproduce the same position. Increase the hold gradually or use knee support if the full lever is too demanding. This is an example for learning the exercise, not a rehabilitation prescription.
The inner thighs can become sore when this loading is new. Introduce the exercise gradually rather than beginning with your longest possible hold or a large number of sets. A progressive approach has also been studied for managing training load and postexercise soreness in footballers; your appropriate starting level still depends on your current capacity.
Common mistakes and fixes
- Using a bench that moves: Test the bench before lifting and choose a stable support rather than a rolling chair or lightweight stool.
- Resting the lower foot on the floor: Shorten the hold or use upper-knee support if you cannot keep the lower leg floating.
- Letting the hips drop: Press the upper leg into the bench and end the hold when you can no longer keep a straight body line.
- Rolling the torso open or closed: Keep your shoulders and hips approximately stacked instead of turning your chest toward the ceiling or floor.
- Placing a hard edge against the inner knee or ankle bone: Adjust the contact point and add modest padding where the leg meets the bench.
- Holding your breath or forcing a painful position: Breathe normally and stop if you feel sharp groin, knee, hip, or shoulder pain.
Frequently asked questions
Which leg is working?
Both legs have a role. The supported upper leg presses into the bench to hold your body up, while the lower leg works to stay raised; your obliques and shoulder stabilize the plank. Switch sides so each leg takes a turn as the supported upper leg.
Should I start with my knee or ankle on the bench?
Start with support on the inner thigh just above the upper knee if ankle-supported holds are too difficult. Once you can keep your hips and lower leg controlled, move the support progressively farther down the upper leg toward the ankle.
Is this the same as Copenhagen adduction?
The setup is similar, but this page's main exercise is an isometric hold. In moving Copenhagen adduction, you repeatedly lower and lift the hips or move the lower leg; treat those as harder variations rather than assuming their training effects are identical to a static hold.
Should I do it if I already have groin pain?
Do not push through sharp or worsening pain. Groin pain has several possible causes, and someone returning from an injury may need an individually adjusted exercise and loading plan from a qualified clinician.
Tips for the proper execution of Copenhagen Plank
Check that the bench cannot slide or tip before placing your upper leg on it.
Position your supporting elbow approximately beneath your shoulder before lifting your hips.
Press the inner side of your upper leg into the bench instead of trying to hold yourself up with your arm alone.
Keep your shoulders and hips stacked so your torso does not roll toward the ceiling or floor.
Lift your lower leg clear of the floor without swinging it upward.
Breathe throughout the hold and lower yourself when you can no longer maintain the same body line.
Train both sides using a hold length you can control on each side.
Muscles worked when doing Copenhagen Plank
Primary muscles: The hip adductors of the inner thighs—especially on the bench-supported side—work to hold the pelvis up, while the obliques resist side bending and rotation.
Secondary muscles: The adductors of the lower leg help keep it raised; the abdominal muscles, glutes, and supporting shoulder help maintain the body position.
Primary Muscle(s):
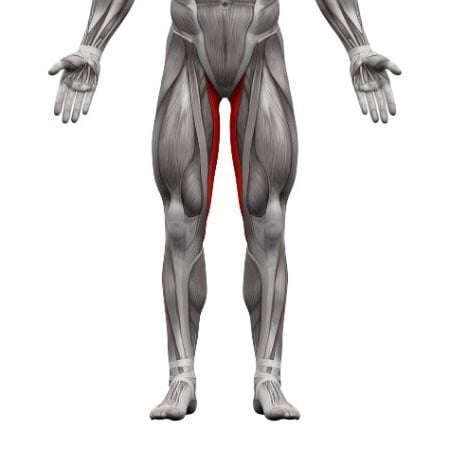
Inner thigh

Oblique
Secondary Muscle(s):
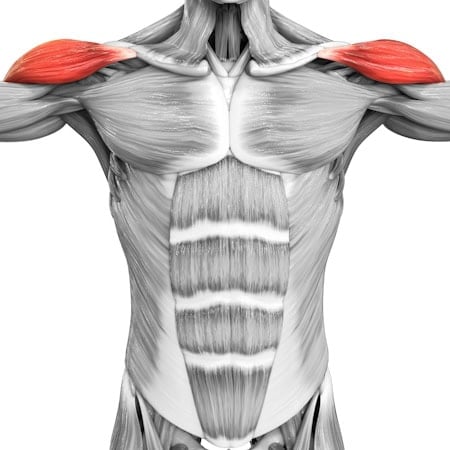
Lateral delt

Abdominal
Equipment needed for Copenhagen Plank
No equipment found.
Adjust the difficulty of Copenhagen Plank
How to make Copenhagen Plank harder?
How to make Copenhagen Plank easier?
How to make Copenhagen Plank harder?
To make Copenhagen Plank harder:
-
Gradually extend the long-lever hold while keeping your lower leg off the floor and your hips stacked.
-
Perform small, controlled lifts of the lower leg toward the bench without allowing your hips to drop.
-
Slowly lower and raise your hips while the upper leg stays supported, turning the static hold into a moving Copenhagen adduction variation.
-
Reach your free arm overhead while maintaining the same trunk and hip position.
How to make Copenhagen Plank easier?
To make Copenhagen Plank easier:
-
Practice a knee side plank to build forearm support and side-plank control before adding bench-supported leg loading.
-
Place the inner thigh just above your upper knee on the bench and bend that knee to shorten the lever.
-
Let your lower foot provide light assistance on the floor while learning to lift your hips.
-
Use holds of only a few controlled seconds before gradually extending the time.
