
Deficit Back-to-Wall Handstand Push-Up
How to do Deficit Back-to-Wall Handstand Push-Up?
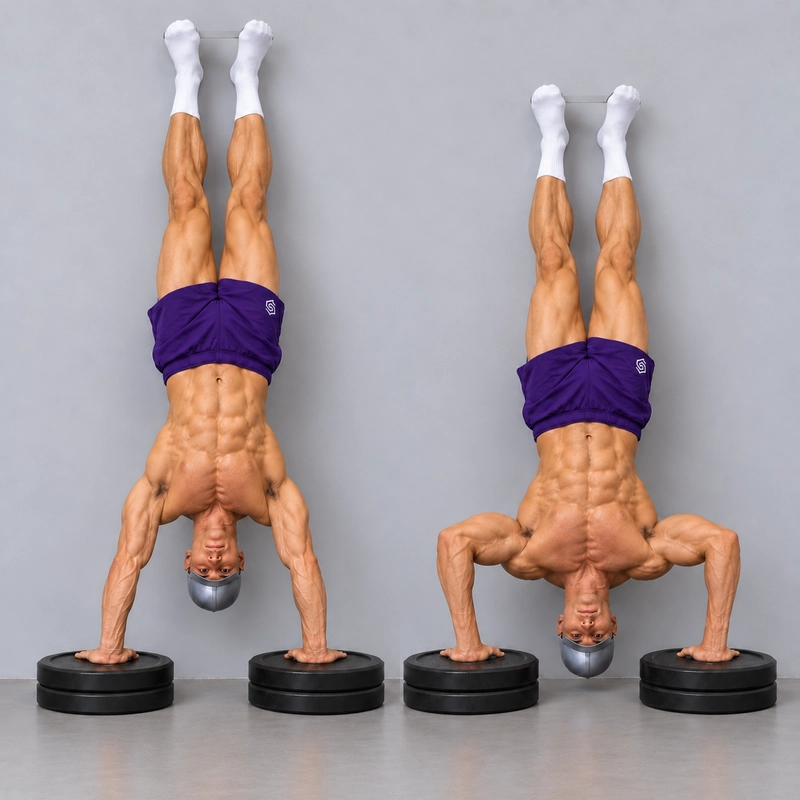
The Deficit Back-to-Wall Handstand Push-Up is a strict wall-assisted handstand press performed with each hand on a stable low support. Keep your back facing the wall and your heels in light contact, lower the head to a target below hand level, then press back to straight elbows with active shoulders.
Use it to add a small amount of depth after the floor back-to-wall handstand push-up is controllable. Suitable low push-up bars, matched weight-plate supports or purpose-built low blocks can provide the elevation. The goal is a repeatable deeper press, not the tallest possible support.
This version adds range while the wall continues to assist balance. A peer-reviewed handstand push-up technique article describes the exercise as combining handstand support with shoulder-press and push-up actions. That is useful context for treating support control and pressing strength as separate requirements; its abstract does not establish a specific low-deficit setup or readiness threshold.
Measure the Depth You Are Actually Adding
Hand elevation only provides the opportunity for extra depth. You must descend to a target below the hands to use that opportunity.
Effective deficit = hand-contact height minus head-target height. Measure both from the same floor surface. For handles, measure the actual gripping level; for plates or blocks, measure the top under the palms.
| Hand level | Head target | Added below-hand depth |
|---|---|---|
| 5 cm (2.0 in) | Floor level | 5 cm (2.0 in) |
| 5 cm (2.0 in) | 2 cm (0.8 in) above the floor | 3 cm (1.2 in) |
| 5 cm (2.0 in) | 5 cm (2.0 in) above the floor | No below-hand deficit |
These are geometry examples, not compulsory equipment dimensions. A small initial deficit around 2–5 cm (0.8–2.0 in) may be appropriate, but use less if that is the complete range you can control. A cushion can reduce or remove the deficit, so record the target as well as the hand height.
The existing handstand push-up on parallettes page principally describes a freestanding deep press on handles. This low-support wall version isolates an earlier depth progression without adding that independent balance task.
Choose Stable Supports Before Choosing More Depth
Matched Weight-Plate Supports
Use a low, matched arrangement under each hand with a broad, flat contact surface. A single suitable plate per side can be simpler than a stack. Check that the palms and fingers have secure room and that neither a central hole, raised rim nor curved surface undermines contact.
If multiple plates are used, every layer must stay flat and resist sliding against the floor and adjacent plates. Check equal top heights and stable loading through both hands, including the forward shift used in the descent. Plate thickness and shape vary, so count and measure the actual arrangement rather than assuming equal stacks from their weight labels.
Do not use a loose tower, a narrow surface or a plate that rocks under the palm. If stable full-hand contact cannot be established, choose purpose-built low blocks or suitable handles. Soft cushions beneath the hands do not fix unstable plates.
Plate-supported palms retain wrist extension, broadly like flat palms on the floor. Keep the contact surface and hand orientation consistent while introducing the extra depth.
Low Push-Up Bars
Use bars with a suitable load capacity and a base that remains planted under inverted loading and forward pressure. Lock any adjustment and reject equipment that swivels, rocks, slides or tips. Being marketed for ordinary push-ups does not by itself establish suitability for this handstand setup.
Set a matched pair at the same height. With handles running front to back, take a secure neutral grip with the thumbs wrapped around them. Test hand support before entering the handstand, then test the controlled entry and top hold before adding a descent.
Handles change the wrist position as well as the hand level. Treat the first handle session as a new configuration instead of assuming that a plate-supported repetition count transfers unchanged. Record the measured deficit even when the bars are taller than your initial depth target.
Leave a Clear Path Between the Supports
Use a clear wall and firm non-slip floor. Set the supports roughly shoulder width apart, adjusting comfortably, with enough room for the head to travel forward and down without striking a plate edge, handle or base.
The head target sits farther from the wall than the line between the hands. From above, the two hands and target form a triangle. Leave enough hand-to-wall distance for this path and a controlled body line; support dimensions and body proportions affect the spacing.
Keep the target firm, secured and predictable. If a pad compresses substantially, its unloaded thickness does not define the exact bottom height. Choose a repeatable endpoint rather than measuring an unstable cushion as though it were rigid.
Check the Floor Press and the New Support Separately
You should already be able to enter, hold and exit a back-to-wall handstand and complete strict floor-level presses without a head bounce, kip or heel push. A fixed repetition number cannot guarantee readiness for the new bottom position.
Prepare with comfortable movements from the wrist warm-up routine and a few easier presses. Establish a brief straight-arm hold on the actual low supports before the first deficit rep. This checks contact and entry control; it does not prove that the deeper press is available.
Try one complete repetition at the smallest useful deficit, keeping enough strength to exit. If the descent cannot be slowed or reversed, reduce the deficit. The floor pike push-up offers foot-supported pressing when you need a lower-load pattern instead of another inverted attempt.
How to Do a Deficit Back-to-Wall Handstand Push-Up
- Set and measure the apparatus. Match the hand supports, secure the head target and record the hand height, target height and resulting positive deficit.
- Establish hand contact first. Place the palms securely on the plate or block tops, or take a wrapped grip on the low handles. Keep the supports fixed.
- Enter under control. Use your practised kick-up to bring the heels lightly to the wall. Avoid a forceful entry that slides the supports or throws the back against the wall.
- Own the top position. Straighten both elbows, elevate the shoulders and control the ribs and pelvis. Keep the legs together and the knees straight.
- Lower forward and down. Bend the elbows along a comfortable backward-diagonal path while the head and shoulders move away from the wall toward the target.
- Use the added range. Continue to the recorded endpoint below hand level without suddenly dropping through the final portion. Keep heel contact light and the trunk controlled.
- Touch without resting. Brush the target gently with the top of the head while the arms continue supporting the body. Do not load the neck or rebound from the target.
- Press out of the new bottom. Push through both hands and extend the elbows without a knee bend, hip swing or deliberate drive through the heels.
- Complete the finish. Return to straight elbows and active shoulders with the same hand contacts and light heel assistance.
- Exit with control remaining. From the top, lower one leg and then the other to the floor using your practised exit. Keep the hands on the supports until stable.
Begin with a smooth descent of roughly two to three seconds and a controlled return. Breathe in on the descent and out during the press if comfortable. Do not force an elbow-angle number or crane the neck to make contact.
What Counts as a Complete Deficit Rep?
A complete repetition starts and finishes in controlled straight-arm support and reaches the recorded target below hand level. The achieved deficit matters: a shallow press on raised hands is not automatically a deficit repetition.
- The back faces the wall and only the heels provide light balance contact.
- Both supports stay stationary and the hand-contact heights match.
- The head reaches the defined positive-deficit target without resting or bouncing.
- The knees stay straight, with no kip, heel drive or abrupt hip swing.
- The return reaches full elbow extension and active shoulders.
- Hand width, grip, wall distance and head target stay consistent through the set.
If the target is above floor level but below hand level, label the actual smaller deficit. Reaching the floor uses the full available deficit of that support arrangement. A target at or above hand level is a reduced-range support configuration, not added below-hand depth.
A systematic review of range of motion in resistance training found that strength adaptations partly reflect the range trained and tested. Keep the endpoint consistent when tracking this transition. The review did not validate a deficit handstand-push-up protocol or show that a particular support height is superior.
Fix the New Bottom Before Adding Repetitions
- The floor version is clean but the deficit press stalls. Use less below-hand depth while keeping the same grip. Restore the return before lowering the target again.
- The heels drive hard into the wall. Reduce depth or end the set. Do not count leg-assisted returns as strict deficit reps.
- The head target is reached by neck movement. Recheck the target path and choose a range you can reach through a controlled arm descent.
- One hand feels higher or less secure. Re-measure and correct the supports before another inversion.
- The bars or plates shift as the head moves forward. Stop and change the setup. Do not try to compensate by gripping harder or shortening the last rep.
- You can lower but cannot press back up. That attempt is not a completed deficit push-up. Return to a manageable full-press configuration.
The negative handstand push-up is a separately planned eccentric drill with an exit and reset. Do not turn a failed deeper press into a surprise maximal negative or remain resting on the head.
Introduce a Few Controlled Reps
After easier pressing and a short support hold, begin with a few single reps at a small deficit, stepping down and resting between attempts. Once the setup is reliable, try two or three sets of one to four completed repetitions with two to three minutes of rest or more when needed.
Keep at least one clean rep available rather than testing failure in the added range. Use one or two weekly exposures initially within your existing pressing workload, adjusting to recovery and technique. These are coaching starting points, not a research-prescribed dose for this exact variation.
Log hand height, target height, effective deficit, grip, wall distance, clean reps and tempo. An occasional side-view recording should show the endpoint, quiet head contact, light heel assistance and complete finish.
Progress by One Depth Change at a Time
Build repeatable complete reps at one recorded deficit before adding depth. As a practical checkpoint, three sets of three clean reps across two sessions may justify testing a small next increment; it is not a compulsory qualification or a promise of transfer to another skill.
At fixed hand height, lowering the head target slightly adds depth without changing the grip or support. Once the target is at floor level, a small increase in matched hand elevation is another option if the new supports remain suitable. An increment of 1–2 cm (0.4–0.8 in) can be sufficient; do not add several layers just to keep a session progressing.
Switching wall orientation is a different task. The wall-facing handstand push-up changes alignment and entry/exit requirements. Removing the wall adds balance demands. Establish those configurations separately rather than changing depth, grip and wall assistance together.
Deficit Back-to-Wall Handstand Push-Up Questions
How much elevation should I use?
Use the smallest stable arrangement that gives a complete controlled press. A measured 2–5 cm (0.8–2.0 in) deficit is a practical example, not a mandatory starting range.
Can I use weight plates?
Yes, when both hand supports are flat, matched, broad enough and resistant to sliding or rocking. A low suitable arrangement is preferable to an unstable stack.
Can I use low push-up bars?
Yes, if their load capacity, base and construction suit the inverted setup. Handles change the grip, so test them separately from flat palms on plates.
Does a head cushion remove the deficit?
It reduces it. Subtract the target height from hand height: a 5 cm (2.0 in) hand elevation and 2 cm (0.8 in) target leave a 3 cm (1.2 in) deficit. If the target reaches hand level, no below-hand deficit remains.
Do my shoulders need to go below the hands?
No. This small-deficit version requires the head endpoint below hand level. Forcing the shoulders below the hands adds a much deeper requirement that is not the standard on this page.
End the Set Before Control Is Lost
Stop for support movement, missed depth, heel drive, a lost straight-arm finish or an uncontrolled descent. Also stop for pain, numbness, dizziness or unusual visual symptoms. Keep enough strength to exit and choose a manageable configuration before continuing; persistent symptoms warrant individual assessment.
Tips for the proper execution of Deficit Back-to-Wall Handstand Push-Up
Measure the hand-contact and head-target heights from the same floor reference; their difference is the effective deficit.
Use matched low supports that remain planted under both downward loading and the forward shift of the descent.
For plates, ensure broad flat palm contact without a hole, curved rim or unstable layer compromising the hand position.
For low bars, use a suitable load capacity, stationary bases and a secure wrapped grip; reject swivelling or tipping equipment.
Leave a clear head path between the supports to a target beyond the hand line and away from the wall.
Practise a controlled entry and straight-arm hold on the actual supports before adding the deeper press.
Practise a controlled entry and straight-arm hold on the actual supports before adding the deeper press.
Keep only light heel contact and control the ribs, hips and straight knees without a kip or heel push.
Reach the recorded below-hand target through elbow bending and shoulder movement, with only light head contact.
Complete the return to straight elbows and active shoulders; a controlled descent without the press is a separate negative.
Add depth in small measured increments while keeping grip, wall spacing and assistance consistent, and stop with enough strength to exit.
Muscles worked when doing Deficit Back-to-Wall Handstand Push-Up
The Deficit Back-to-Wall Handstand Push-Up uses the shoulders and triceps to control a deeper wall-assisted press. The wall helps balance, while the hand supports create space for the head to move below hand level. Extra depth does not automatically mean a measured increase in muscle activation or better results for every athlete.
Main Pressing Muscles
- Anterior deltoids: contribute strongly to the shoulder action during the descent and upward press.
- Triceps brachii: control elbow flexion and extend the elbows to restore straight-arm support.
- Lateral deltoids: assist shoulder movement and control of the upper arms.
Assisting and Stabilizing Muscles
- Upper pectoralis major: can assist the press, with its contribution affected by arm and torso position.
- Serratus anterior and trapezius: guide shoulder-blade motion and support active upward rotation and elevation.
- Rotator-cuff muscles: stabilize the shoulders through the loaded movement.
- Abdominals, obliques and spinal stabilizers: control the ribs and pelvis and resist an exaggerated back arch.
- Glutes, quadriceps and other leg stabilizers: maintain hip extension, straight knees and a controlled inverted body line.
- Forearm and hand muscles: stabilize extended wrists on flat supports or maintain the wrapped handle grip.
Heel drive adds assistance rather than demonstrating stronger strict pressing. Keep it distinct from light wall contact used for balance. Record flat-palm and handle configurations separately because the wrist position and contact mechanics differ.
Primary Muscle(s):

Anterior delt
Secondary Muscle(s):
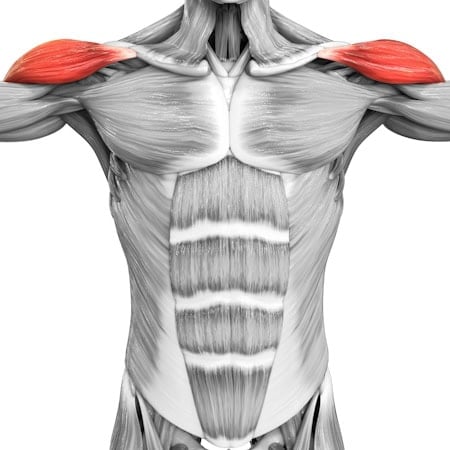
Lateral delt

Trapezius

Triceps
Equipment needed for Deficit Back-to-Wall Handstand Push-Up
No equipment found.
Adjust the difficulty of Deficit Back-to-Wall Handstand Push-Up
Scale the effective deficit by changing hand elevation or head-target height one at a time. Start with the smallest positive deficit that allows a complete controlled press. Lower the target gradually at fixed hand height, then consider a small increase in stable matched supports. Keep grip, wall spacing and heel assistance consistent. Removing the deficit returns to the baseline range; negatives and different wall orientations are separate configurations.
How to make Deficit Back-to-Wall Handstand Push-Up harder?
How to make Deficit Back-to-Wall Handstand Push-Up easier?
How to make Deficit Back-to-Wall Handstand Push-Up harder?
To make Deficit Back-to-Wall Handstand Push-Up harder:
-
At fixed hand height and grip, lower the head target by a small measured amount while preserving a controlled descent and complete return.
-
Once the target is at floor level, add a small amount of matched stable hand elevation and establish a new repetition baseline.
-
Use a three- to four-second descent through the same recorded deficit without increasing heel pressure.
-
Pause briefly just above the bottom target under arm support, then press without head bearing, rebound or leg drive.
How to make Deficit Back-to-Wall Handstand Push-Up easier?
To make Deficit Back-to-Wall Handstand Push-Up easier:
-
Raise the firm secured head target slightly to reduce the effective deficit. Record whether the endpoint remains below hand level.
-
Reduce the matched hand elevation or return to a strict floor back-to-wall handstand push-up, restoring a complete press before adding depth again.
-
At fixed hand height and grip, lower the head target by a small measured amount while preserving a controlled descent and complete return.
