
Handstand Push-Up on Parallettes
How to do Handstand Push-Up on Parallettes?
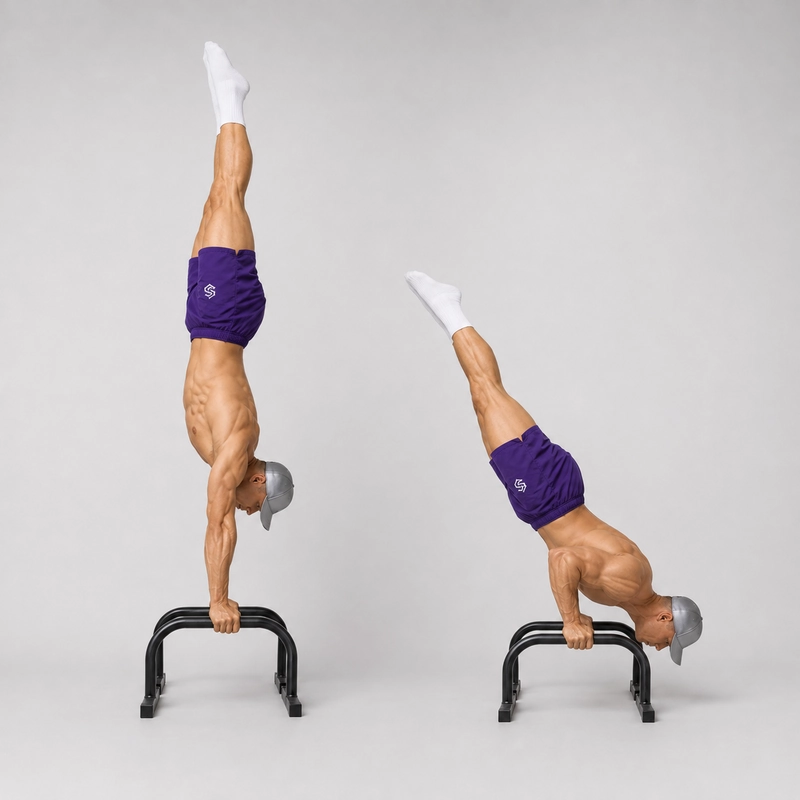
The handstand push-up on parallettes is an elite bodyweight exercise that combines a freestanding handstand with a deep vertical press. Starting in an inverted position with straight arms, you bend your elbows and lower your head and shoulders between the bars before pressing back into a stable handstand.
Parallettes create two important differences compared with a floor handstand push-up. First, they place the wrists in a comparatively neutral position instead of requiring substantial wrist extension. Second, they allow the head and shoulders to descend below the level of the hands, creating a greater potential range of motion.
The additional depth is not automatic: a shallow repetition on parallettes does not become a deep handstand push-up merely because bars are being used. For a clearly differentiated repetition, the head should travel below the hands and the shoulders should descend toward or below the height of the handles while the athlete remains in control.
The exercise primarily develops the deltoids and triceps, while the upper chest, trapezius, serratus anterior, rotator cuff and core help stabilize the inverted press. Unlike a wall-supported handstand push-up, the freestanding version also requires continuous balance adjustments throughout the lowering and pressing phases.
A peer-reviewed exercise-technique paper describes the handstand push-up as a combination of a handstand, shoulder press and push-up that challenges upper-extremity strength, endurance and stability. See the published handstand push-up technique paper.
Before attempting this variation, you should be able to balance consistently on parallettes, exit a failed handstand safely and perform controlled vertical pressing regressions such as elevated-feet pike push-ups and wall-assisted handstand push-ups. Practise in an open area on a non-slip surface, and stop if you experience sharp pain, instability, numbness or persistent discomfort in the shoulders, elbows, wrists or neck.
- Prepare the equipment: Place two sturdy parallettes parallel to one another on a flat, non-slip surface.
- Choose the spacing: Position the bars approximately shoulder-width apart or use the width at which you can maintain comfortable overhead alignment.
- Check your surroundings: Leave enough open space to step or cartwheel out of the handstand without striking a wall, person or object.
- Establish your grip: Wrap your hands firmly around the middle of the handles with your wrists aligned with your forearms.
- Enter the handstand: Kick, press or jump into a freestanding handstand according to your established entry technique.
- Set the top position: Fully extend your elbows, elevate your shoulders, bring your ribs toward your pelvis and keep your legs together or in your controlled balance position.
- Stabilize before descending: Pause until your weight is centered over the parallettes and you are no longer relying on entry momentum.
- Begin the descent: Bend your elbows and allow your shoulders to move slightly forward as your head travels between and slightly in front of the bars.
- Maintain control: Keep your forearms comparatively vertical and avoid allowing your elbows to flare abruptly outward.
- Reach your available depth: Lower until your head passes below the handles and your shoulders approach the height of the bars, or stop earlier if you cannot maintain balance and shoulder control.
- Reverse the movement: Press forcefully through the parallettes and extend your elbows while guiding your body back over the base of support.
- Finish the repetition: Return to straight arms with active shoulder elevation and regain a stable freestanding handstand.
- Exit safely: Step or cartwheel out using a technique you have already practised instead of remaining inverted after losing control.
Common Mistakes to Avoid
- Using unstable parallettes: Test that both bars are level, evenly spaced and unable to slide or tip before entering the handstand.
- Descending before finding balance: Stabilize the top position instead of turning the momentum from your entry directly into the repetition.
- Dropping into the bottom: Control the descent so the shoulders and elbows are not suddenly loaded at maximum depth.
- Lowering directly onto the head: The head should travel through the space between the bars without supporting body weight on the floor.
- Flaring the elbows excessively: Keep the elbows moving in a consistent path instead of allowing them to spread abruptly to the sides.
- Allowing the elbows to collapse inward: Maintain forearm and wrist alignment rather than losing support toward the inside of the bars.
- Using a very narrow bar position: Choose spacing that permits the shoulders to move comfortably through the deep press.
- Arching excessively: Maintain abdominal and glute tension instead of using a large lumbar arch to keep the legs above the hands.
- Separating or throwing the legs: Avoid using uncontrolled leg movement to generate pressing momentum during a strict repetition.
- Failing to elevate the shoulders at the top: Finish with active straight-arm support rather than stopping with the shoulders collapsed toward the ears.
- Forcing maximum depth prematurely: Increase the range only when you can control both the descent and the press from the current depth.
- Holding the breath through several attempts: Use controlled breathing and take adequate rest between high-effort repetitions.
- Training without a safe exit: Practise stepping and cartwheeling out of a parallette handstand before attempting freestanding push-ups.
Benefits of Handstand Push-Ups on Parallettes
- Develops advanced vertical-pressing strength: The shoulders and triceps move a large proportion of your body weight through an inverted press.
- Allows a deeper range of motion: The elevated handles permit the head and shoulders to descend below the level of the hands.
- Uses a neutral wrist position: Gripping the handles reduces the wrist-extension requirement compared with placing the palms flat on the floor.
- Combines strength and balance: The athlete must continuously control the center of mass while lowering and pressing.
- Strengthens the overhead lockout: Each repetition finishes with straight elbows and active shoulder elevation.
- Develops scapular control: The trapezius and serratus anterior coordinate the shoulder blades as the body moves through the press.
- Builds full-body tension: The abdominals, glutes and legs help maintain an efficient inverted position.
- Provides a measurable advanced standard: Depth, control, body alignment and completion of the lockout can be assessed consistently.
Frequently Asked Questions
Is a parallette handstand push-up harder than a floor handstand push-up?
It depends on the range being compared. Parallettes may feel more comfortable at the wrists, but using them for a deep repetition increases the pressing range and makes the bottom substantially more demanding. A shallow parallette repetition may not be harder than a full floor repetition.
How deep should I descend?
For a deep parallette handstand push-up, the head should pass below the level of the handles and the shoulders should approach or pass the height of the hands. Use only the depth from which you can press without dropping, kipping or losing shoulder control.
Should my head touch the floor?
No. One purpose of using parallettes is to create open space for the head and shoulders to move between the bars. The head should not support your body weight or strike the floor.
Where should my head travel?
The head normally travels between and slightly in front of the parallettes as the elbows bend. This creates a small triangular relationship between the head and hands rather than placing all three points in one straight line.
How wide should the parallettes be?
Begin approximately at shoulder width and adjust slightly according to your shoulder structure and the dimensions of the equipment. Both bars should remain parallel and symmetrically positioned.
Should the elbows remain completely tucked?
No. The elbows can travel at a moderate angle according to your shoulder structure and bar width. Avoid both extreme flaring and forcing the elbows tightly against the torso.
Do parallettes make the exercise safe for painful wrists?
The neutral grip reduces wrist extension, which some athletes find more comfortable. However, the wrists and forearms still support and balance the entire body. Stop if gripping or loading the parallettes produces pain, numbness or instability.
Should I learn the wall-assisted version first?
Most athletes should develop pressing strength with wall-assisted repetitions and balance with separate freestanding handstands before combining both qualities. The chest-to-wall handstand develops overhead alignment, while elevated-feet pike push-ups develop vertical pressing strength.
Does a wall-assisted repetition count as the same exercise?
It uses a similar pressing action but removes much of the balance requirement. It should be recorded as a wall-assisted parallette handstand push-up rather than a freestanding repetition.
Can I use a kip?
A kip uses rapid hip and leg movement to help complete the press. This page defines the strict variation, so the legs and torso should remain controlled. Kipping handstand push-ups should be treated as a separate exercise with different technique and completion standards.
How many repetitions should I perform?
Use low-repetition sets that preserve depth and balance, often one to five repetitions. Stop when you can no longer control the descent, reach the intended depth or finish in a stable handstand.
What should I do if I cannot press from the bottom?
Reduce the range, perform controlled wall-assisted negatives or return to elevated-feet pike push-ups. Increase the depth gradually instead of repeatedly failing at the deepest position.
Which parallettes are suitable?
Use bars that provide enough clearance for your intended depth, a handle diameter you can grip securely and a base that cannot rock or slide. The parallettes equipment archive explains the available equipment categories.
What should I do if my shoulder hurts?
Stop the exercise and return to a pain-free pressing range or easier progression. Seek guidance from a qualified healthcare professional if pain persists, recurs or affects normal overhead movement.
Tips for the proper execution of Handstand Push-Up on Parallettes
Place both parallettes parallel to one another on a flat, non-slip surface.
Use a grip width that allows comfortable overhead alignment and a controlled deep press.
Practise a reliable step-down or cartwheel exit before attempting freestanding repetitions.
Stabilize the handstand before beginning the lowering phase.
Maintain a firm grip with your wrists aligned with your forearms.
Keep your abdominals and glutes engaged to limit excessive lower-back arching.
Allow your head to travel between and slightly in front of the parallettes.
Keep your forearms comparatively vertical as your elbows bend.
Lower only as deeply as you can maintain balance and shoulder control.
Never rest your body weight on your head at the bottom of the repetition.
Press strongly through both bars and extend the elbows at the same rate.
Finish with straight arms and active shoulder elevation.
Stop the set when depth, balance or body alignment noticeably deteriorates.
Muscles worked when doing Handstand Push-Up on Parallettes
The handstand push-up on parallettes is a compound vertical-pressing exercise. The deltoids and triceps produce most of the pressing force, while the shoulder-blade, rotator-cuff, trunk and grip muscles stabilize the inverted body.
Primary Muscles
- Anterior deltoids: The front shoulders produce much of the force required to press the body from the deep bottom position toward the overhead lockout.
- Lateral deltoids: The side deltoids assist the press and help control the upper arms throughout the movement.
- Triceps brachii: The triceps control elbow flexion during the descent and extend the elbows during the press to straight arms.
A published handstand push-up technique review describes the exercise as a demanding combination of an inverted balance, shoulder press and push-up. Its primary purpose is to develop upper-extremity strength, endurance and stabilization. See the peer-reviewed exercise-technique article.
Secondary and Stabilizing Muscles
- Upper pectoralis major: The clavicular fibers of the chest assist the shoulders during the pressing phase, particularly from greater depth.
- Upper and lower trapezius: The trapezius contributes to shoulder-blade positioning and active elevation in the handstand.
- Serratus anterior: The serratus helps control the shoulder blades against the rib cage and supports the overhead lockout.
- Rotator-cuff muscles: The supraspinatus, infraspinatus, teres minor and subscapularis stabilize the upper-arm bones within the shoulder joints.
- Forearms and hand muscles: These muscles maintain the grip and produce small pressure adjustments needed to balance on the parallettes.
- Rectus abdominis, transverse abdominis and obliques: The abdominal muscles control the relationship between the rib cage and pelvis.
- Spinal stabilizers: The back muscles co-contract with the abdominals to maintain a controlled inverted trunk.
- Glutes: The glutes help control the pelvis and reduce excessive lumbar extension.
- Quadriceps and adductors: The thigh muscles keep the knees straight and the legs together during a strict repetition.
The pike push-up and elevated-feet pike push-up train a similar vertical-pressing pattern with partial support from the feet. The chest-to-wall handstand develops the straight-arm alignment and shoulder elevation needed at the top of each repetition.
Primary Muscle(s):

Anterior delt
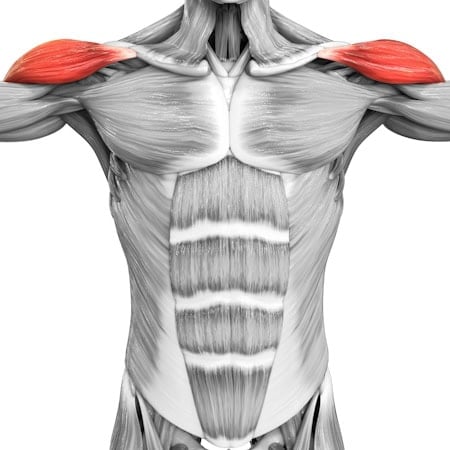
Lateral delt

Triceps
Secondary Muscle(s):

Upper chest

Abdominal
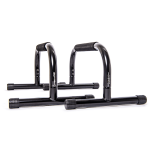
Equipment needed for Handstand Push-Up on Parallettes
Adjust the difficulty of Handstand Push-Up on Parallettes
How to make Handstand Push-Up on Parallettes harder?
How to make Handstand Push-Up on Parallettes easier?
How to make Handstand Push-Up on Parallettes harder?
To make Handstand Push-Up on Parallettes harder:
-
Increase the depth until your shoulders descend below the height of the parallette handles.
-
Take four to six seconds to complete each lowering phase.
-
Pause at several positions during the descent without losing the body line.
-
Perform a dead-stop repetition after pausing in the deepest controlled position.
-
Perform one-and-a-half repetitions by pressing halfway from the bottom, lowering again and then returning to the handstand.
-
Keep the legs completely together and toes pointed throughout every repetition.
-
Perform consecutive freestanding repetitions without stepping down or using entry momentum.
-
Enter through a controlled press to handstand before performing the push-up.
-
Progress toward a 90-degree handstand push-up only as a separate advanced skill after mastering strict deep repetitions.
How to make Handstand Push-Up on Parallettes easier?
To make Handstand Push-Up on Parallettes easier:
-
Develop overhead pressing strength with pike push-ups on parallettes.
-
Elevate your feet during pike push-ups to move progressively closer to a vertical pressing position.
-
Practise chest-to-wall handstand holds to develop straight-arm overhead alignment.
-
Perform wall-assisted handstand push-ups on parallettes to remove most of the balance requirement.
-
Place a stable padded depth target between the parallettes and reduce its height gradually.
-
Perform partial-range freestanding repetitions and increase the depth only when you can regain balance at the top.
-
Perform slow wall-assisted negatives, exit at the bottom and reset for each repetition.
-
Use a qualified spotter to assist your balance and provide only the minimum help needed during the press.
-
Use a controlled straddle position if keeping the legs together makes freestanding balance too difficult.
