
Knee-Height Incline Push-up
How to do Knee-Height Incline Push-up?
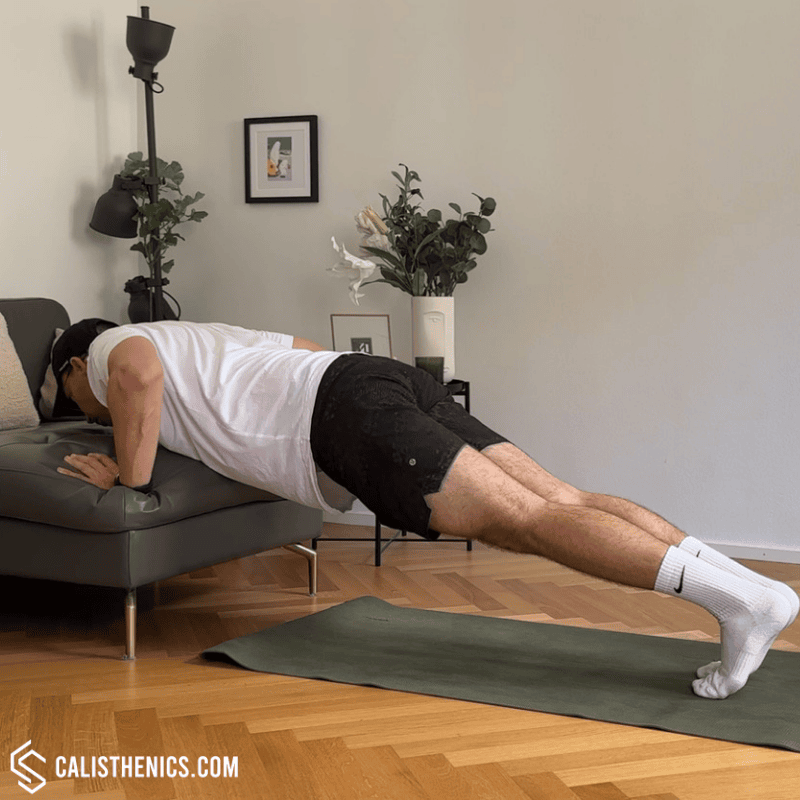
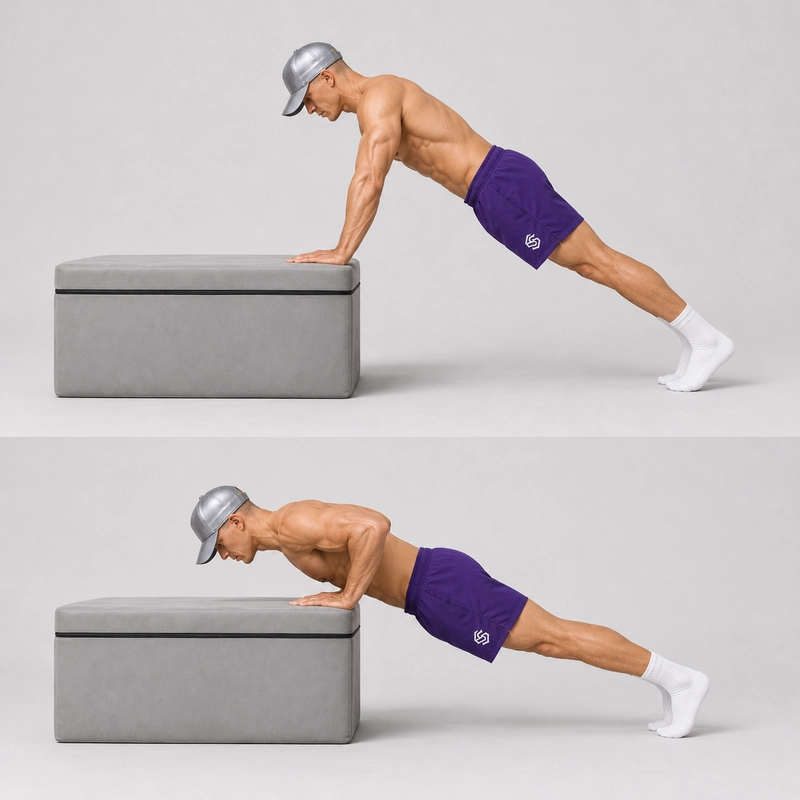
The knee-height incline push-up is a push-up performed with your hands on a stable surface at approximately knee height and your toes on the floor. Keep your legs straight and your body aligned as you lower your chest toward the support, then press back to straight arms. The name describes the height of your hands: your knees remain off the floor throughout the exercise.
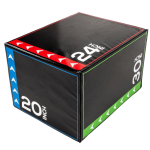
A workout bench or sturdy box around 40–50 cm (16–20 inches) high is a practical setup for many people, although knee height varies with body size. Elevating your hands reduces the load compared with a regular floor push-up, while preserving the straight-body position and basic pressing pattern. This makes the exercise a useful bridge between higher incline push-ups and full push-ups on the floor.
The chest, triceps and front of the shoulders produce the pressing movement. The serratus anterior helps control the shoulder blades, while your abdominals, glutes and legs help keep your torso and pelvis steady. You practise moving your body as one unit rather than lifting your chest and hips separately.
A force-platform study comparing push-up variations found lower hand-supported forces in hands-elevated push-ups than in regular push-ups. The study tested specific support heights, not a universal knee-height setup, so there is no single percentage of bodyweight that applies to everyone performing this variation.
Compared with knee push-ups, this version keeps support at the toes and maintains a longer body position. Neither variation is automatically easier for every person: incline height, body proportions and technique affect the challenge. Choose the version that lets you complete controlled repetitions through a consistent range. Our beginner push-up workout plan provides a structured way to build toward full floor push-ups.
How to Do a Knee-Height Incline Push-Up
Equipment and Setup
- Choose a stable knee-height support. Use a workout bench, fixed platform or sturdy box that can support your weight without sliding, tipping or folding. Avoid furniture on wheels, loose cushions and unsecured stacks of objects.
- Check the hand-contact surface. It should provide enough space for both palms and a reliable grip. Choose a smooth or padded edge that will be comfortable when your chest reaches the bottom position.
- Keep your feet on firm ground. Use a non-slip floor with enough room to step backward into position. Your toes should remain in place throughout the set.
- Record the actual height. Measure from the floor to the surface supporting your hands. A bench around 45 cm (18 inches) is a useful reference, but keeping the same measured setup matters more than matching that number exactly.
Readiness and Warm-Up
You should be able to hold the starting position briefly with straight arms, a steady trunk and comfortable wrists and shoulders. If you immediately sag, shake uncontrollably or cannot lower smoothly, begin with a higher support, such as a secure hip-height platform.
Prepare with the joint warm-up routine, followed by a few easy push-ups against a higher surface. Gradually bring the movement closer to your working height without tiring your arms before the main sets.
Stop if you experience sharp pain, tingling or numbness. A higher incline may make the exercise more manageable, but it is not a guaranteed solution for joint pain or an injury-rehabilitation prescription. Seek assessment from a qualified healthcare professional if symptoms persist.
Step-by-Step Technique
- Place your hands. Set your palms on the support approximately shoulder-width apart or slightly wider. Spread your fingers and use a position that feels secure. Keep both hands at the same height and avoid a very wide placement that forces your elbows directly out to the sides.
- Step back into an inclined plank. Walk your feet backward until your legs are straight and your shoulders, hips and ankles form one line. Start with your feet around hip-width apart for stability. Position yourself so your chest can travel toward the support between your hands without your face striking it.
- Brace before lowering. Gently tighten your abdomen, glutes and thighs. Keep your ribs and pelvis aligned rather than letting your lower back arch. Your knees remain off the floor and your body should feel like one stable unit.
- Lower your whole body together. Bend your elbows and bring your chest toward the support. Let your elbows travel diagonally backward, roughly 30–45 degrees from your torso as a starting cue. Adjust slightly for comfort; there is no single ideal elbow angle for every person.
- Reach a consistent bottom position. Lower until your chest lightly reaches the smooth or padded support edge between your hands. Keep your hips aligned and avoid leading with your chin. Touch gently without resting your weight, bouncing or striking your chest against a hard edge.
- Press away from the support. Push through your palms and straighten your elbows while lifting your shoulders and hips together. Keep your feet still and avoid thrusting your hips upward to finish the repetition.
- Finish with straight arms. Return to the inclined plank with your elbows fully extended without forcing them beyond their comfortable range. Let your shoulder blades move naturally around your rib cage as you press away; do not hold them rigidly squeezed together.
- Reset and repeat. Re-establish your body line before the next repetition. Inhale as you lower and exhale as you press if that rhythm feels comfortable. End the set when you can no longer maintain the same depth, body position and controlled finish.
Useful tempo: Take about two seconds to lower, briefly control the bottom position, then press up smoothly. This is a practice cue rather than a compulsory counting standard. An extremely slow repetition is not necessary for learning good technique.
What Counts as a Clean Repetition?
For a repeatable training standard, each repetition should meet these criteria:
- Both hands remain on the same knee-height support and both feet remain on the floor.
- The knees stay off the floor and the body maintains a straight shoulder-to-ankle line.
- The repetition begins and ends with straight elbows.
- The chest lightly reaches the same smooth or padded support edge at the bottom.
- The shoulders and hips lower and rise together.
- There is no bounce, chest rest or deliberate hip movement to assist the press.
If your equipment prevents comfortable chest contact, choose a consistent alternative target and record it. A shallower repetition can be useful during practice, but it should not be counted as equivalent to the full-depth standard. Use the same support height, hand placement, foot position and depth when comparing sessions.
Common Mistakes and How to Correct Them
- Letting the hips sag: Brace your abdomen and glutes before moving. If you cannot maintain the body line, use a higher support or end the set sooner.
- Raising the hips first: Press your chest and pelvis away together. A repetition that finishes by folding at the hips indicates that the current difficulty or set length needs adjusting.
- Reaching with the head: Keep your neck aligned with your torso and bring your chest toward the target. Your chin touching the bench does not establish sufficient depth.
- Flaring the elbows directly sideways: Start with a moderate hand width and guide the elbows diagonally backward. Avoid forcing either a very wide or tightly tucked position.
- Moving only the shoulders: Let the whole body travel toward the support. Do not leave your hips behind while dipping your head and upper chest.
- Bouncing off the bench: Touch lightly and reverse the movement under control. Raise the support if you cannot press from the bottom without a bounce.
- Shortening later repetitions: End the set when full depth is lost. Fewer consistent repetitions provide a clearer training result than a larger count with changing range.
- Changing the setup mid-set: Keep your feet and hands in place. Reset between sets if needed rather than shifting your body position to make the remaining repetitions easier.
If This Height Is Too Difficult
Raise the hand support to hip height, chest height or use a wall. Keep the same basic body alignment and practise a controlled range. The aim is to choose a manageable version, then gradually reduce the assistance provided by the incline.
If you can hold the starting position but cannot press back up from the bottom, use a higher surface for full repetitions. You can also practise a small number of controlled lowering-only repetitions, then step forward to reset. Do not repeatedly collapse into the bottom or force failed presses.
If no suitable elevated surface is available, knee push-ups offer another way to reduce the challenge. Their leverage differs, so record them separately rather than treating their repetition count as interchangeable with knee-height incline push-ups.
Sets, Repetitions and Training Frequency
For an otherwise healthy beginner, a practical starting point is two or three sets of six to ten controlled repetitions, twice per week, with a rest day between sessions. Rest around 90–180 seconds between sets, or longer if needed to repeat the same technique. These are coaching starting points, not a prescription that fits every trainee.
- If six repetitions are too difficult: Raise the support until you can complete a manageable set through the intended range.
- If later sets lose depth or alignment: Reduce the repetitions, rest longer or use a higher incline.
- If all sets are comfortable: Add repetitions gradually, then consider a slightly lower support.
Finish most working sets while you could still perform roughly one or two more clean repetitions. The ACSM resistance-training guidance emphasizes consistent, individualized training and recognizes bodyweight exercise as a useful training method. It does not prescribe this exact incline push-up routine, and every set does not need to reach muscular failure.
When to Progress Toward Floor Push-Ups
A practical progression checkpoint is completing three sets of ten to twelve full-depth repetitions with steady alignment and some effort still in reserve across more than one session. This is a coaching guideline, not a validated test or a guarantee that floor push-ups will be possible.
- Make your current depth and technique consistent.
- Increase repetitions within your planned range.
- Lower the hand support by a small amount, such as 5–10 cm (2–4 inches), when a stable option is available.
- Reduce the repetition target as needed and rebuild at the new height.
- Practise clean floor push-ups when you can maintain the same body control at a low incline.
Gradually lowering the incline is also included in ACE's push-up progression guidance. If you can lower a floor push-up under control but cannot yet press back up, negative push-ups offer another progression option. Keep full repetitions at a manageable incline in your training while you work on the harder variation.
Check Your Technique and Track Progress
Film a set from the side with your hands, chest, hips and feet visible. Check that the chest reaches the same target on every repetition, the hips remain aligned, and the arms straighten at the top. Review the last repetition as carefully as the first.
Record the support height in centimetres or inches, repetitions per set, rest periods and any change in depth. Mark your hand and foot positions if helpful. Ten repetitions on a higher bench are not the same result as ten on a lower platform. More repetitions at the same setup, or comparable repetitions at a lower incline, give you useful evidence of progress.
Knee-Height Incline Push-Up Questions
Is this the same as a knee push-up?
No. In a knee-height incline push-up, the hands are elevated and the toes support the lower body. In a knee push-up, the knees rest on the floor. The name refers to hand-support height, not knee contact.
How high should the bench be?
Approximately knee height when standing, often around 40–50 cm (16–20 inches). This is a practical guide rather than a universal measurement. Record the actual height, and use a higher surface if this setup is not yet manageable.
Will this help me learn a full push-up?
It lets you practise the straight-body pressing pattern with reduced load. Progress depends on consistent training, suitable difficulty and recovery. Gradually lower the support while preserving depth and control rather than rushing to the floor.
Does it isolate the lower chest?
No. It trains the chest alongside the triceps, shoulders and stabilizing muscles. Treat the incline primarily as a way to adjust the exercise load rather than as a method for isolating one small part of the chest.
Is a knee-height incline always easier than a floor push-up?
With otherwise comparable positioning and range, elevating the hands generally reduces the pressing load. However, a deep, controlled incline repetition may feel more demanding than a shallow floor repetition. Compare exercises using consistent technique.
Tips for the proper execution of Knee-Height Incline Push-up
Core Engagement: Keep your core tight to prevent your hips from sagging or rising too high. This ensures proper body alignment and protects your lower back.
Hand Placement: Your hands should be placed directly under your shoulders. Adjust the width based on comfort, but ensure that your elbows don’t flare out too much.
Body Positioning: Ensure that your body forms a straight line from your head to your heels throughout the exercise. Engage your glutes and quads to maintain this alignment.
Controlled Movement: Lower yourself slowly to engage your muscles fully and avoid rushing through the reps.
Breathing: Inhale as you lower yourself and exhale as you push back up. Proper breathing helps maintain strength and stability.
Muscles worked when doing Knee-Height Incline Push-up
Primary Muscles:
•Chest: Pectoralis major and minor (emphasis on the lower portion of the chest)
•Shoulders: Anterior deltoids
•Triceps: Triceps brachii (back of the arms)
Secondary Muscles:
•Core: Abdominals and obliques (for stabilization)
•Lower Back: Erector spinae (helps maintain proper posture)
•Glutes and Quads: Engaged to maintain body stability and alignment
•Forearms and Wrists: Stabilized to control the push-up motion
Primary Muscle(s):

Lower chest

Triceps
Secondary Muscle(s):

Anterior delt

Abdominal

Oblique
Equipment needed for Knee-Height Incline Push-up
Adjust the difficulty of Knee-Height Incline Push-up
How to make Knee-Height Incline Push-up harder?
How to make Knee-Height Incline Push-up easier?
How to make Knee-Height Incline Push-up harder?
To make Knee-Height Incline Push-up harder:
-
Lower the Surface: Decrease the height of the surface to increase the intensity. As you get stronger, move to lower surfaces like a step or chair to approach a traditional push-up.
-
Add Resistance: Wear a weighted vest or place a small weight plate on your upper back to add resistance and make the exercise more challenging.
-
Increase Repetitions or Sets: Perform more repetitions or sets to increase the intensity and build endurance.
-
Plyometric Incline Push-ups: Incorporate an explosive element by pushing off the surface forcefully and letting your hands leave the surface before returning to the starting position.
How to make Knee-Height Incline Push-up easier?
To make Knee-Height Incline Push-up easier:
-
Increase the Height of the Surface: Use a higher elevated surface, such as a countertop or tall bench, to reduce the intensity of the exercise.
-
Start with Fewer Reps: Begin with a smaller number of repetitions (5-8) and gradually increase as your strength improves.
-
Shorten the Range of Motion: Lower your body only halfway down instead of all the way, and gradually increase your range of motion as you gain strength.
