Resistance Band Calf Raises
How to do Resistance Band Calf Raises?
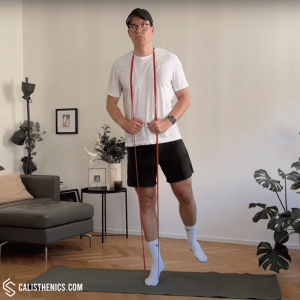
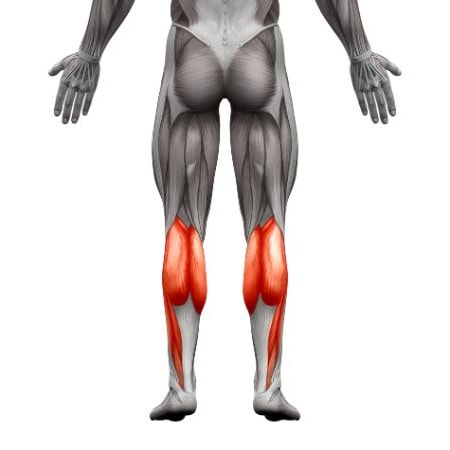
Resistance band calf raises are a lower-body exercise that targets the calves, specifically the gastrocnemius and soleus muscles. By adding a resistance band anchored under the foot and looped behind the neck, you increase the intensity of the movement, particularly at the top of the calf raise. This exercise helps build calf strength, improve ankle stability, and enhance lower-leg endurance, making it a great addition to any workout routine.
Steps to Perform a Proper Resistance Band Calf Raise:
1. Anchor the Resistance Band Under Your Foot:
• Place one end of the resistance band securely under the sole of your foot, ensuring it is fixed and won’t slip during the exercise.
• Loop the other end of the band over your shoulders and behind your neck, similar to a barbell position, holding it lightly for support. Make sure there is no slack in the band.
2. Set Up in a Standing Position:
• Stand tall with your feet hip-width apart, core engaged, and shoulders relaxed.
• The band should be under slight tension in this starting position, creating resistance as you lift.
3. Raise Onto the Balls of Your Feet:
• Exhale as you lift your heels off the ground, rising onto the balls of your feet. Keep your knees straight but not locked.
• Focus on pushing through your toes and contracting your calves at the top of the movement. The band will increase tension as you reach the top.
4. Hold the Contraction at the Top:
• Hold the raised position for 1-2 seconds, squeezing your calf muscles to maximize engagement.
5. Lower Back to the Starting Position:
• Inhale as you slowly lower your heels back to the ground, keeping control of the movement to maintain tension in the calves.
• Stop just before your heels fully touch the ground to keep constant tension on the muscles.
6. Repeat the Movement:
• Perform the desired number of repetitions, focusing on smooth, controlled movement and maximizing the band’s resistance at the top of each calf raise.
Benefits of Resistance Band Calf Raises
• Builds Calf Strength and Definition: This exercise effectively targets the calf muscles, helping build strength, endurance, and definition.
• Improves Ankle Stability and Balance: By lifting onto the balls of your feet, you strengthen the ankle joint, improving stability and balance.
• Enhances Lower Leg Endurance: Resistance band calf raises build muscular endurance in the calves, which is beneficial for walking, running, and other athletic activities.
• Portable and Convenient: With only a resistance band needed, this exercise is ideal for home workouts or travel, providing a practical way to train the calves.
• Joint-Friendly Resistance: The band’s smooth resistance is gentle on the joints, making this exercise accessible for people with ankle or knee sensitivities.
• Supports Functional Movement: Strong calves are essential for various daily movements, including walking, climbing stairs, and standing, making this a functional exercise.
• Accessible for All Fitness Levels: With different resistance bands available, this exercise can be adjusted to suit beginners and advanced athletes alike.
Common Mistakes to Avoid
• Incorrect Band Placement: Ensure the band is securely anchored under the sole of your foot and positioned comfortably behind your neck, preventing discomfort or slipping.
• Leaning Forward or Backward: Keep your torso upright, engaging your core to avoid any forward or backward lean, which can reduce calf engagement.
• Relying on Momentum: Avoid bouncing at the top or bottom; focus on lifting and lowering slowly to fully activate the calf muscles.
• Not Reaching Full Extension: Lift as high as possible onto the balls of your feet to maximize calf activation and avoid cutting the range of motion short.
• Letting the Band Snap Back: Control the band’s resistance throughout the movement, especially during the descent, to keep tension on the calves and prevent injury.
Tips for the proper execution of Resistance Band Calf Raises
Secure Band Placement: Ensure the band is securely anchored under the sole of your foot to prevent slipping, and loop it comfortably behind your neck.
Engage the Core: Keep your core tight to stabilize your torso, avoiding any forward or backward leaning.
Focus on the Lift: Concentrate on lifting through the balls of your feet, fully engaging the calf muscles as you raise.
Controlled Movement: Perform the exercise slowly, especially when lowering your heels, to fully engage the calves and prevent using momentum.
Breathe Steadily: Exhale as you lift, and inhale as you lower, maintaining a steady rhythm and control.
Muscles worked when doing Resistance Band Calf Raises
Primary Muscles:
•Gastrocnemius: The larger calf muscle, primarily engaged when you lift onto the balls of your feet.
•Soleus: The deeper calf muscle, which is also activated during the calf raise, especially when knees are slightly bent.
Secondary Muscles:
•Anterior Tibialis: Assists in stabilizing the lower leg, particularly during the descent.
•Core: Engages to stabilize the torso and maintain balance.
•Glutes and Hamstrings: Provide additional stability to the legs, especially if standing on one leg or holding the band behind the neck.
Primary Muscle(s):
Secondary Muscle(s):
Adjust the difficulty of Resistance Band Calf Raises
How to make Resistance Band Calf Raises harder?
How to make Resistance Band Calf Raises easier?
How to make Resistance Band Calf Raises harder?
To make Resistance Band Calf Raises harder:
-
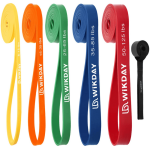
Use a Heavier Resistance Band: Increase the challenge by using a band with more resistance, requiring greater calf muscle engagement.
-
Add a Pause at the Top: Hold the top position for 2-3 seconds to increase time under tension, maximizing muscle engagement.
-
Slow Down the Eccentric Phase: Take extra time lowering back to the starting position, focusing on control and muscle activation during the eccentric (lengthening) phase.
How to make Resistance Band Calf Raises easier?
To make Resistance Band Calf Raises easier:
-
Use a Lighter Resistance Band: Start with a band that provides less resistance, allowing you to perform the movement with better control.
-
Perform with One Hand Holding the Band: Instead of looping it behind the neck, hold the band with one hand at shoulder level for less resistance.
-
Limit Range of Motion: Perform a smaller raise, lifting only halfway, to reduce intensity and build strength gradually.


