
Ring Muscle-Up Transition
How to do Ring Muscle-Up Transition?
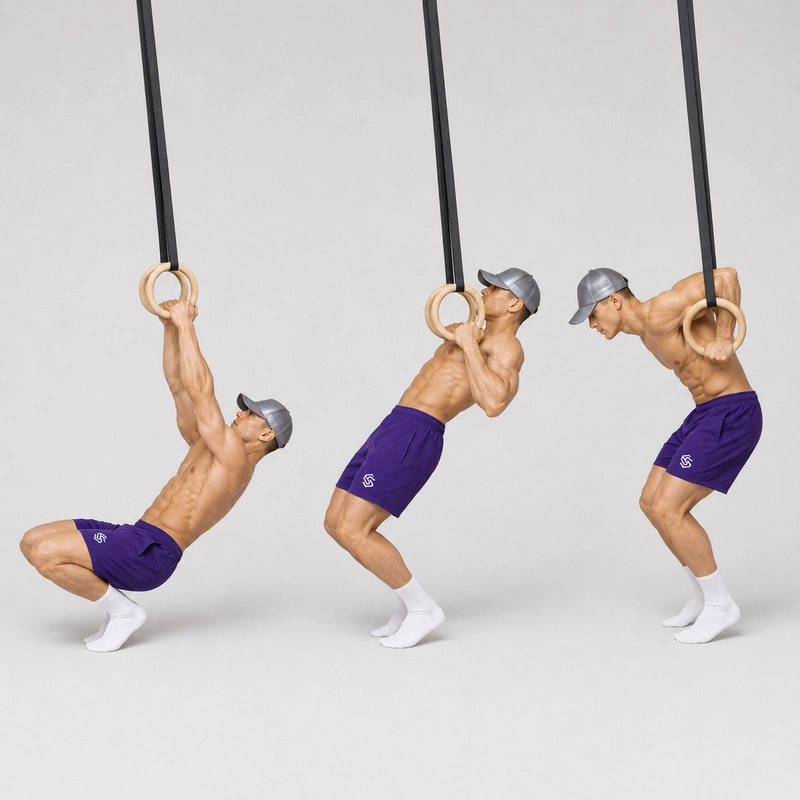
The ring muscle-up transition is a skill drill used to practise the most technical part of the ring muscle-up: moving from the top of the pull into the bottom of the dip. The rings are set low enough for your feet to remain on the floor, allowing your legs to reduce the load while you learn the correct path of the hands, elbows and shoulders.
A complete ring muscle-up consists of three connected phases: a high pull, the transition and a deep ring dip. The transition begins when the rings reach the lower chest and finishes when the shoulders have moved over the hands into the bottom of the dip. This breakdown is also used in the CrossFit ring muscle-up progression, which separates the skill into its pull, transition and dip components.
The low-ring drill lets you repeat this short but difficult phase without having to perform a full body-weight pull-up first. Your feet provide as much assistance as necessary, but your upper body should still control the movement. As your technique improves, you can gradually reduce the pressure through your feet.
A secure false grip is normally used for the strict ring muscle-up. The heel of each hand and the wrist rest above the ring, allowing the hands to change from pulling to supporting without slipping underneath the equipment. Practising a false grip pull-up alongside this transition drill develops the grip and pulling strength needed to connect the phases.
This drill is different from a complete feet-assisted ring muscle-up. It focuses specifically on the turnover from the high-pull position to the bottom of the dip. You do not need to begin from straight arms or finish in a locked-out support unless you deliberately extend the drill into a full assisted repetition.
How to Do the Ring Muscle-Up Transition
Equipment and setup
- Attach both ring straps to a stable overhead structure.
- Set the rings to exactly the same height and approximately shoulder-width apart.
- Lower the rings until you can hold them near your lower chest while sitting, squatting or kneeling with your feet supported.
- Leave enough space between and behind the rings for your shoulders and elbows to move through the transition.
- Position your feet where they can provide controlled assistance without forcing you to jump.
Gymnastics rings are particularly suitable for assisted progressions because their height can be adjusted and the position of the feet can change the difficulty. See the Calisthenics.com guide to choosing and setting up gymnastics rings if you need help selecting or installing them.
Starting position
- Sit, squat or kneel below and slightly behind the rings with both feet securely touching the floor.
- Establish a false grip by placing the inside edge of each ring across the heel of your palm and wrist crease.
- Close your hands firmly around the rings and keep your wrists above them.
- Hold the rings close together in front of your lower chest or sternum.
- Keep your elbows bent, pointing down and held close to your torso.
- Lean back slightly so that you resemble the top position of a high false-grip ring pull-up.
Step-by-step instructions
- Begin in the high-pull position. Hold the rings against or close to your lower chest with your elbows tucked and your shoulders slightly behind your hands.
- Brace your upper body. Keep your chest controlled, engage your abdominal muscles and avoid allowing the rings to move away from you.
- Press through your feet lightly. Use only enough leg assistance to make the transition smooth and controlled.
- Keep the rings close. Guide the rings along the sides of your chest instead of allowing them to separate toward your shoulders.
- Move your shoulders forward. Lean your chest through the space between the rings and bring your shoulders from behind the hands to a position above and slightly in front of them.
- Send both elbows back together. As the shoulders move forward, rotate both elbows from underneath the rings to behind your torso.
- Allow the wrists to change position. Maintain pressure through the heel of each palm as the wrists move from the flexed false-grip position into a supporting position above the rings.
- Finish in the bottom of the dip. The rings should be close to your lower chest or armpits, your elbows should point behind you and your shoulders should be positioned over your hands.
- Pause and confirm control. Hold the bottom position briefly without letting the rings drift outward or the shoulders collapse.
- Reverse the transition. Move your shoulders back behind the rings, bring both elbows forward and down, and return the rings to the lower-chest pulling position.
The movement should feel like your torso travels around the hands while the rings remain close to the body. Do not try to throw the rings over your shoulders or push them far out to the sides.
This low-ring muscle-up progression similarly uses ring support and feet-assisted work before moving to the skill on high rings.
Completion standard
A controlled repetition should meet the following standards:
- Both feet remain in contact with the floor.
- The false grip remains secure as the hands change from pulling to supporting.
- The rings stay close to the lower chest and sides of the body.
- Both shoulders move forward over the hands.
- Both elbows pass through the transition at the same time.
- The athlete finishes in a stable bottom-of-dip position.
- The reverse transition is performed without dropping or losing the grip.
The amount of assistance from the feet does not have to be zero. The purpose of the drill is to learn a symmetrical and repeatable transition. Reduce leg assistance only when doing so does not change the movement pattern.
Understanding the Ring Muscle-Up Transition
The pulling position
Immediately before the transition, the rings should be much lower on the torso than during a normal ring pull-up. Ideally, the hands and rings approach the lower chest while the elbows remain close to the sides.
The turnover
The turnover is not simply an additional pull. The shoulders must move forward and over the hands while the elbows rotate behind the torso. The body changes from hanging or pulling below the rings to supporting weight above them.
The bottom of the dip
The finishing position resembles the bottom of a deep ring dip. The rings are close to the ribs or armpits, the elbows point backward and the shoulders remain controlled rather than collapsing below the hands.
The role of the false grip
The false grip keeps the wrists high enough to move directly into support. If the rings slide into the fingers during the transition, the hands end up underneath the rings and must be repositioned before the dip can begin.
Common Mistakes
Starting with the rings too high on the chest
Beginning with the rings near the shoulders or neck encourages the elbows to flare and makes it difficult to move the shoulders over the hands. Start with the rings close together around the lower chest or sternum.
Allowing the rings to move away from the body
The transition becomes substantially harder when the rings travel forward or outward. Keep them close enough to brush along the chest and sides of the torso.
Losing the false grip
If the wrists roll underneath the rings before the shoulders move forward, the athlete cannot arrive in a useful dip position. Reduce the load through your feet and reset the grip before continuing.
Moving one elbow over at a time
Turning one side over before the other creates a twisting movement and teaches an asymmetrical transition. Use more assistance and move both elbows back together.
Trying to pull vertically throughout the drill
The transition requires a forward shift of the shoulders. Continuing to pull straight upward leaves the body underneath the rings instead of moving it into support.
Throwing the chest forward
The shoulders must move over the hands, but the shift should remain controlled. Avoid diving forward and dropping suddenly into the bottom of the dip.
Using too much leg drive
Jumping through the transition may place you above the rings without teaching the turnover. Use steady pressure through the feet rather than an explosive jump.
Using too little assistance
If insufficient assistance causes the rings to separate, the false grip to slip or one elbow to move first, make the drill easier until the pattern is controlled.
Finishing with the shoulders behind the hands
The transition is incomplete if the elbows move back but the shoulders remain behind the rings. Finish with your weight clearly organized over your hands.
Letting the shoulders collapse deeply
Do not drop passively into the bottom of the dip. Maintain active tension and use your feet to limit the depth to a position you can control comfortably.
Benefits of the Ring Muscle-Up Transition Drill
- Isolates the most technical phase: You can practise the turnover repeatedly without first completing a full body-weight pull-up.
- Teaches the correct weight shift: The drill develops awareness of moving the shoulders from behind the rings to above the hands.
- Improves false-grip coordination: You practise maintaining hand contact while changing from a pulling grip to a supporting position.
- Develops symmetrical technique: Slow assisted repetitions make it easier to identify and correct a one-arm-at-a-time transition.
- Connects pulling and pressing: The drill teaches you to link a high pull directly to the bottom of a ring dip.
- Provides adjustable assistance: Ring height, foot position, knee angle and leg pressure can all be modified.
- Builds confidence on the rings: The feet remain available for support while you learn an unfamiliar body position.
- Prepares the strict ring muscle-up: The movement pattern can later be combined with an unassisted false-grip pull and ring dip.
Prerequisites and Readiness
You do not need to be capable of a complete ring muscle-up before practising this drill. However, you should be comfortable holding the rings, supporting part of your body weight through your arms and moving through a foot-assisted deep-dip position.
Useful preparatory exercises include the feet-assisted ring pull-up, false-grip holds, the false grip pull-up, controlled ring dips and the ring support hold.
The false grip may create pressure across the heel of the hand and forearm, but it should not cause sharp pain, tingling or numbness. The bottom of the transition should also be pain-free in the shoulders, elbows and sternum. Stop and seek appropriate professional guidance if symptoms persist outside training or worsen with reduced assistance.
Progression Toward the Ring Muscle-Up
- Feet-assisted false-grip hold on low rings
- Feet-assisted false-grip ring row
- Static high-pull position with the rings against the lower chest
- Partial transition with a small forward shoulder shift
- Full low-ring transition with substantial foot assistance
- Full low-ring transition with progressively less foot assistance
- Low-ring transition followed by a feet-assisted ring dip
- Complete feet-assisted ring muscle-up on low rings
- Band-assisted ring muscle-up
- Negative ring muscle-up
- Strict ring muscle-up
Advance when you can keep the rings close, maintain the false grip and move both elbows simultaneously. Do not progress based only on how little assistance you used if the movement becomes asymmetrical.
Programming the Ring Muscle-Up Transition
Practise the drill near the beginning of a ring-training session while your hands, wrists and shoulders are fresh.
- Technique practice: Perform 3–5 sets of 3–6 controlled transitions.
- Tempo practice: Use approximately two seconds to move into the dip, pause for one second and take two seconds to reverse the movement.
- Rest: Rest for 60–120 seconds between sets or longer if grip quality decreases.
- Frequency: Practise one to three times per week depending on your other ring training and recovery.
- Progression: Gradually straighten your legs, place your feet farther forward or raise the rings slightly.
Keep the volume low enough that every repetition remains deliberate. The CrossFit muscle-up development guide similarly programs low-ring transitions with the feet on the floor alongside false-grip pull-ups and ring-dip training.
Safety Considerations
- Attach the rings to a stable structure and check both buckles before training.
- Set both rings to the same height.
- Keep the floor around your feet clear and use a non-slip surface.
- Begin with more leg assistance than you think you need.
- Do not drop suddenly into a deep shoulder position.
- Stop the set if the false grip slips or one elbow repeatedly moves before the other.
- Regress the movement if you experience sharp wrist, elbow, shoulder or chest discomfort.
Frequently Asked Questions
What is the transition in a ring muscle-up?
The transition is the phase in which the athlete moves from the top of the ring pull-up into the bottom of the ring dip. The shoulders travel forward over the hands while the elbows rotate behind the torso.
Why are the rings set low?
Low rings allow the feet to remain on the floor. This reduces the amount of body weight supported by the upper body and lets the athlete repeat the transition slowly.
Should my feet remain on the ground?
Yes. Foot contact is intentional in this drill. As your technique improves, use less pressure through the feet rather than removing them prematurely.
Do I need to use a false grip?
A false grip is strongly recommended when training the transition for a strict ring muscle-up because it keeps the wrists above the rings as you move into support.
Where should the rings touch my body?
Begin with the rings around the lower chest or sternum. During the turnover, keep them close as they move toward the sides of the chest and armpits.
Should the elbows move outside or inside the rings?
Keep the elbows close to your torso and move them back together as the shoulders pass over the hands. Avoid flaring them widely to the sides.
Why do I always transition one arm at a time?
You may be using insufficient assistance, losing one false grip or allowing one ring to drift away. Increase foot support and practise slower symmetrical repetitions.
How can I make the drill harder?
Use less pressure through your feet, straighten your legs, move your feet farther forward, raise the rings slightly or connect the transition to a complete assisted dip.
Is this the same as a feet-assisted ring muscle-up?
No. This drill isolates the turnover from the high-pull position to the bottom of the dip. A feet-assisted ring muscle-up includes the complete pull, transition and press to support.
When should I attempt a full ring muscle-up?
Begin full attempts only after you can maintain the false grip, pull the rings high, perform a symmetrical transition and control a deep ring dip. Strength and readiness vary, so there is no universal repetition threshold.
Tips for the proper execution of Ring Muscle-Up Transition
Set both rings to exactly the same height before beginning the drill.
Establish the false grip while your feet are firmly supported on the floor.
Begin with the rings close together around your lower chest or sternum.
Keep the elbows tucked against your sides during the high-pull position.
Use steady pressure through your feet instead of jumping through the transition.
Keep the rings close enough to brush along the sides of your chest.
Move your shoulders forward over your hands as both elbows travel backward.
Transition both elbows at the same time to avoid developing an asymmetrical movement pattern.
Maintain pressure through the heel of each palm as the wrists move into support.
Finish in a controlled bottom-of-dip position with the rings close to your ribs.
Pause briefly in the bottom position to confirm that your shoulders remain active.
Reverse the transition slowly to improve control in both directions.
Use more assistance whenever the rings separate or the false grip begins to slip.
Practise the drill while fresh rather than after your grip and pulling muscles are exhausted.
Muscles worked when doing Ring Muscle-Up Transition
The ring muscle-up transition combines pulling, pressing and stabilization. Because the feet remain on the floor, the muscular load depends on how much assistance the legs provide. The upper body should nevertheless control the path of the rings and the movement of the shoulders.
Latissimus dorsi
The lats help hold the rings close to the lower chest and maintain the high pulling position as the transition begins.
Biceps, brachialis and brachioradialis
The elbow flexors maintain the bent-arm pulling position and help control the rings while the shoulders begin moving forward.
Forearms and wrist flexors
The forearms and wrist flexors maintain the false grip and prevent the rings from slipping into the fingers during the turnover.
Pectoralis major
The chest becomes increasingly involved as the shoulders move over the hands and the body enters the bottom of the dip.
Anterior deltoids
The front deltoids assist the forward movement of the shoulders and stabilize the deep transition position.
Triceps brachii
The triceps help stabilize the bent elbows at the bottom of the transition and become increasingly active if the drill continues into a ring dip.
Trapezius and rhomboids
The trapezius and rhomboids control the shoulder blades while the body changes from pulling below the rings to supporting above them.
Serratus anterior and rotator cuff
These muscles stabilize the shoulder blades and upper-arm bones while the rings move independently around the torso.
Abdominals and obliques
The abdominal muscles stabilize the trunk so the shoulders can move over the hands without uncontrolled arching or twisting.
Leg muscles
The quadriceps, glutes and calves provide adjustable assistance through the feet. Their contribution should gradually decrease as transition strength and coordination improve.
Primary Muscle(s):

Lats

Lower chest
Secondary Muscle(s):

Anterior delt

Biceps

Triceps
Equipment needed for Ring Muscle-Up Transition
Adjust the difficulty of Ring Muscle-Up Transition
How to make Ring Muscle-Up Transition harder?
How to make Ring Muscle-Up Transition easier?
How to make Ring Muscle-Up Transition harder?
To make Ring Muscle-Up Transition harder:
-
Gradually reduce the pressure applied through your feet.
-
Move your feet farther in front of the rings while keeping your heels on the floor.
-
Straighten your knees to reduce the amount of assistance available from your legs.
-
Raise the rings slightly while preserving the same transition technique.
-
Pause for two to three seconds at the midpoint of the turnover.
-
Use a three-to-five-second transition in both directions.
-
Begin with a feet-assisted high false-grip pull before performing the transition.
-
Press from the transition into a complete feet-assisted ring dip.
-
Perform a complete feet-assisted ring muscle-up on low rings.
-
Progress to band-assisted and then strict ring muscle-ups once the entire movement is controlled.
How to make Ring Muscle-Up Transition easier?
To make Ring Muscle-Up Transition easier:
-
Keep your knees deeply bent and place your feet close enough to provide substantial leg assistance.
-
Perform the drill from a seated or kneeling position with the rings set very low.
-
Practise only the first part of the shoulder shift before returning to the high-pull position.
-
Hold the false-grip high-pull position without attempting the transition.
-
Practise moving one or two centimetres into and out of the weakest part of the transition.
-
Use a partner to guide the rings and help keep them close to your torso.
-
Perform feet-assisted false-grip ring rows before returning to the turnover drill.
-
Limit the depth of the bottom dip to a position your shoulders can control comfortably.
