
Rotator Cuff Internal Rotation
How to do Rotator Cuff Internal Rotation?
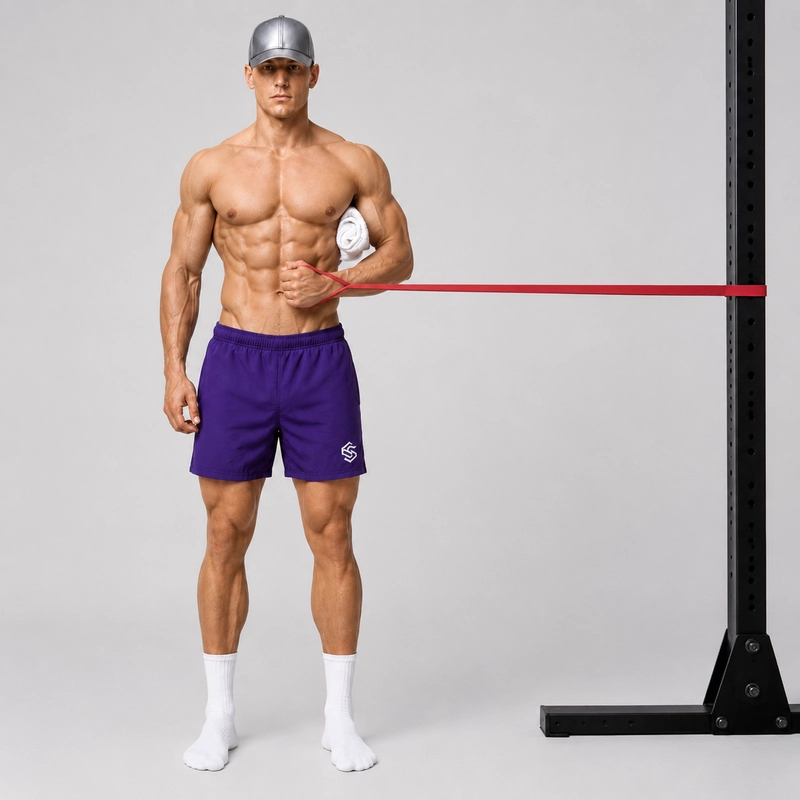
The rotator cuff internal rotation is a single-arm shoulder exercise performed with a resistance band anchored beside your body. With your elbow bent and held close to your side, you rotate your forearm inward toward your abdomen while keeping the upper arm comparatively still.
Although the name refers to the rotator cuff, the exercise does not train all four rotator-cuff muscles in the same way. Its primary rotator-cuff target is the subscapularis, which produces internal rotation of the upper arm and contributes to shoulder-joint stability. The pectoralis major, latissimus dorsi, teres major and anterior deltoid can also assist the movement.
The exercise is the inward-rotation counterpart to the rotator cuff external rotation, which primarily trains the infraspinatus and teres minor. Both movements can be included in shoulder-strengthening or warm-up work, but they train different muscles and do not necessarily require identical resistance or training volume.
The American Academy of Orthopaedic Surgeons shoulder-conditioning program includes banded internal rotation and identifies the subscapularis and pectoral muscles as its main targets. Electromyography research has also found that resisted internal-rotation exercises recruit the subscapularis, although muscle activation does not by itself prove that the exercise will prevent or rehabilitate an injury.
Use a light band that allows smooth rotation without twisting your torso, pulling the elbow backward or forcing the shoulder into an uncomfortable range. This general exercise guide should not replace an individualized rehabilitation program. Stop if you experience sharp pain, instability, numbness or a catching sensation, and consult a qualified healthcare professional if symptoms persist.
- Secure the resistance band: Attach the band to a stable anchor at approximately elbow height and test that it cannot slip or detach.
- Position your body: Stand sideways with the shoulder you intend to train closest to the anchor point.
- Hold the band: Grasp the band with the hand nearest the anchor and step far enough away to create light tension.
- Set your elbow: Bend your elbow to approximately 90 degrees and keep the upper arm close to your side. You may place a small rolled towel between your elbow and ribs.
- Establish the starting position: Allow your forearm to point toward the anchor while keeping your wrist straight, shoulders relaxed and torso facing forward.
- Brace your body: Stand tall and lightly engage your abdominals so that your trunk does not rotate with the arm.
- Rotate inward: Keeping the elbow beside your body, rotate your upper arm so your hand travels inward toward your abdomen.
- Reach the finish: Stop when your forearm reaches your torso or before the shoulder rolls forward, the elbow moves or the wrist bends.
- Return under control: Slowly allow the forearm to rotate back toward the anchor while continuing to resist the band.
- Complete both sides: Perform controlled repetitions before turning around and repeating the exercise with the opposite arm.
Common Mistakes to Avoid
- Using excessive resistance: Choose a lighter band if you cannot rotate the arm without twisting your torso or moving the elbow.
- Turning the movement into a row: Keep the elbow beside your ribs instead of pulling it backward behind your body.
- Rotating the entire torso: Keep your chest and pelvis facing forward while the upper arm rotates inside the shoulder joint.
- Allowing the elbow to drift outward: Use a rolled towel as a position reference and maintain gentle contact between the upper arm and your side.
- Rolling the shoulder forward: Finish the repetition before the shoulder blade tips forward or the shoulder moves toward the chest.
- Bending the wrist: Keep the hand aligned with the forearm rather than using wrist flexion to move the band farther.
- Changing the elbow angle: Maintain approximately 90 degrees of elbow flexion instead of straightening or curling the arm.
- Letting the band pull the arm back: Control the returning phase and never allow the band to snap your forearm toward the anchor.
- Forcing the available range: Stop within a comfortable range rather than trying to pull the hand as far across the body as possible.
- Using an insecure anchor: Check the band and attachment point before every set, particularly when using a door anchor.
Benefits of Rotator Cuff Internal Rotation
- Strengthens the subscapularis: The exercise directly trains the rotator-cuff muscle primarily responsible for internal rotation.
- Develops controlled shoulder rotation: The upper arm must rotate while the elbow, shoulder blade and torso remain comparatively stable.
- Trains a shoulder stabilizer: The subscapularis contributes to controlling the head of the upper-arm bone within the shoulder joint.
- Provides adjustable resistance: Band thickness and distance from the anchor can be changed to suit the intended training intensity.
- Complements external-rotation training: Internal and external rotations target different parts of the shoulder musculature and can be programmed as related exercises.
- Requires minimal equipment: The movement can be performed with a resistance band and a secure anchor at home or in the gym.
- Fits different training roles: Light repetitions can be used during shoulder preparation, while more challenging sets can develop isolated internal-rotation strength.
Frequently Asked Questions
Which rotator-cuff muscle does internal rotation train?
The primary rotator-cuff muscle is the subscapularis. The infraspinatus and teres minor perform the opposite action of external rotation, while the supraspinatus is better known for assisting shoulder abduction and stabilization.
What is the difference between internal and external rotation?
Internal rotation moves the forearm toward your abdomen when your elbow is held at your side. External rotation moves the forearm away from the body. Internal rotation emphasizes the subscapularis, pectoralis major and other internal rotators, whereas external rotation emphasizes the infraspinatus and teres minor.
Which arm should hold the band?
Use the arm closest to the anchor. The band should pull that forearm outward so you must rotate inward toward your abdomen against the resistance.
Where should I feel the exercise?
You may feel muscular effort around the front of the shoulder and upper chest. The subscapularis lies on the front surface of the shoulder blade and may not produce an easily identifiable surface sensation. Sharp pain, catching or a feeling of instability is not a normal training sensation.
Should I squeeze my shoulder blade back?
Keep the shoulder blade comfortably controlled without aggressively pinching it toward the spine. The goal is to rotate the upper arm while avoiding excessive shoulder-blade movement, shrugging or forward rolling.
Why place a towel beneath the elbow?
A small rolled towel provides a position reference and helps prevent the upper arm from drifting away from your side. Hold it gently rather than forcefully squeezing it against your ribs.
How many repetitions should I perform?
A practical starting point is two or three sets of 8–15 controlled repetitions per side. The AAOS conditioning program uses three sets of eight and progresses toward three sets of 12, but the appropriate prescription depends on whether the exercise is being used for preparation, general strength or an individualized rehabilitation plan.
Should I use a heavy resistance band?
Usually not. Select enough resistance to challenge the target movement without causing your elbow, wrist, shoulder blade or torso to compensate. A heavier band is useful only when the full range remains smooth and pain-free.
Is this a shoulder mobility exercise?
It is primarily a strengthening and motor-control exercise. Moving through a comfortable range may help you practise active control, but it should not be treated as a guaranteed method for increasing passive shoulder mobility.
Can this exercise rehabilitate a shoulder injury?
Internal rotation is used in some shoulder-conditioning and rehabilitation programs, but its suitability depends on the injury, healing stage and individual symptoms. Follow the guidance of a qualified healthcare professional if you are recovering from shoulder pain, surgery, dislocation or a rotator-cuff injury.
Tips for the proper execution of Rotator Cuff Internal Rotation
Attach the resistance band to a secure anchor at approximately the same height as your elbow.
Stand with the working shoulder closest to the band’s anchor point.
Keep your elbow bent to approximately 90 degrees throughout the exercise.
Place a small rolled towel between your elbow and ribs if it helps you maintain the upper-arm position.
Keep your wrist straight and allow your hand and forearm to move as one unit.
Rotate the upper arm inside the shoulder joint without pulling the elbow backward.
Keep your chest and pelvis facing forward instead of rotating your torso toward the working arm.
Stop the inward movement before your shoulder rolls forward or your elbow leaves your side.
Control the return and never allow the resistance band to pull your arm back suddenly.
Use a light enough band to perform every repetition smoothly and without pain.
Muscles worked when doing Rotator Cuff Internal Rotation
Resistance-band internal rotation primarily trains the subscapularis. Several larger chest, back and shoulder muscles can assist with internal rotation, while the remaining rotator-cuff and shoulder-blade muscles help stabilize the joint.
Primary Muscle
- Subscapularis: The subscapularis is the largest rotator-cuff muscle and the cuff’s primary internal rotator. It rotates the upper arm inward and contributes to controlling the position of the humeral head within the shoulder joint.
Electromyography studies have recorded subscapularis activity during resisted shoulder-internal-rotation exercises. One study found that common internal-rotation exercises activated the subscapularis to moderate levels, supporting their use as strengthening exercises without proving a specific clinical outcome. See the published subscapularis study.
Secondary and Stabilizing Muscles
- Pectoralis major: The chest assists with internal rotation and can contribute noticeably as the forearm moves across the body.
- Latissimus dorsi: The lats can assist internal rotation while helping connect the upper arm to the torso.
- Teres major: Teres major assists the subscapularis, pectoralis major and latissimus dorsi in rotating the upper arm inward.
- Anterior deltoid: The front of the shoulder can assist internal rotation and helps control the upper arm.
- Infraspinatus, teres minor and supraspinatus: The other rotator-cuff muscles can contribute to joint stabilization even though they are not the primary producers of internal rotation.
- Trapezius, serratus anterior and rhomboids: These muscles help control the shoulder blade while the upper arm rotates.
- Biceps, triceps and forearm muscles: The arm and grip muscles maintain the elbow angle, wrist position and connection to the band.
- Abdominals and spinal stabilizers: The trunk muscles resist rotation and help keep the torso facing forward.
The rotator cuff external rotation trains the opposing rotational action, while resistance band pull-aparts and resistance band face pulls place greater emphasis on the posterior shoulders and upper back. These are related exercises rather than interchangeable versions of the same movement.
Primary Muscle(s):
Secondary Muscle(s):
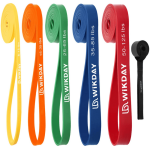
Equipment needed for Rotator Cuff Internal Rotation
Adjust the difficulty of Rotator Cuff Internal Rotation
How to make Rotator Cuff Internal Rotation harder?
How to make Rotator Cuff Internal Rotation easier?
How to make Rotator Cuff Internal Rotation harder?
To make Rotator Cuff Internal Rotation harder:
-
Step slightly farther away from the anchor to increase the resistance without changing the exercise technique.
-
Progress to a heavier resistance band only when your elbow, wrist, shoulder blade and torso remain controlled.
-
Take three to five seconds to complete the returning phase of each repetition.
-
Pause for two or three seconds at the internally rotated position without allowing your shoulder to roll forward.
-
Perform one-and-a-half repetitions by rotating inward, returning halfway, rotating inward again and then completing the return.
-
Increase the number of technically consistent repetitions or sets before making a large increase in band resistance.
-
Perform internal rotation with the upper arm supported at approximately shoulder height only after mastering the arm-at-side version and confirming that the new shoulder position is comfortable.
How to make Rotator Cuff Internal Rotation easier?
To make Rotator Cuff Internal Rotation easier:
-
Use a thinner resistance band that creates less tension throughout the movement.
-
Stand closer to the anchor point to reduce the band’s starting tension.
-
Rotate through a shorter pain-free range and increase the movement only as your control improves.
-
Perform the exercise while seated to reduce torso movement and make your body position easier to maintain.
-
Place a rolled towel between your upper arm and ribs to help keep the elbow beside your body.
-
Practise a gentle isometric hold by resisting a very light band without allowing your forearm to move.
-
Use your free hand to provide light position feedback at the working elbow without pushing the arm through the movement.
