
Tuck Front Lever Row
How to do Tuck Front Lever Row?
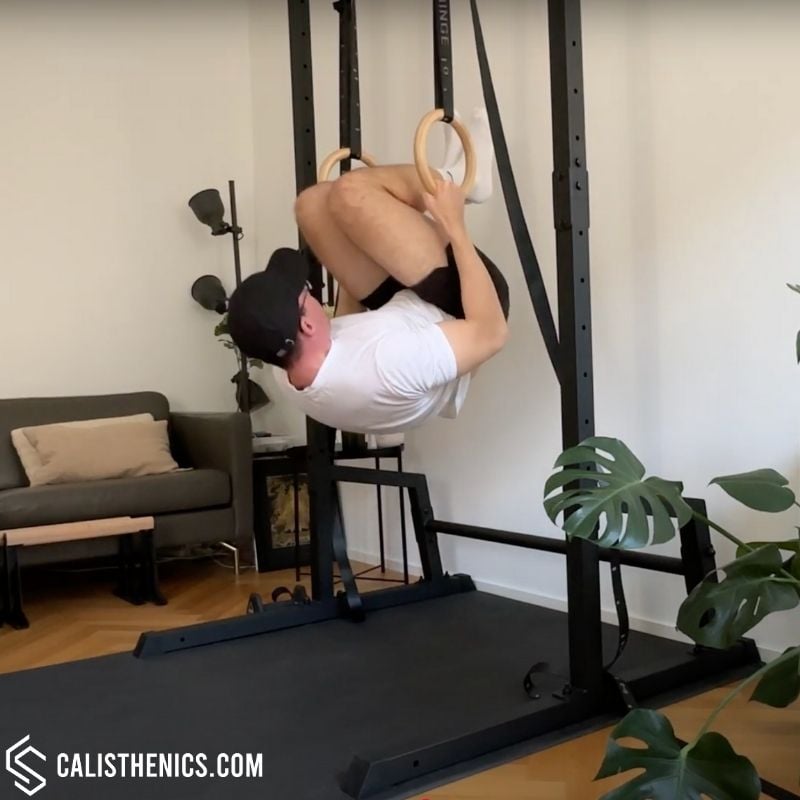
The tuck front lever row is a highly effective calisthenics pulling exercise that strengthens the back, arms, and core while improving body control and scapular stability. This movement combines the tuck front lever hold with a rowing motion, making it a crucial exercise for developing the strength necessary for full front lever progressions. Unlike standard ring rows, the tuck front lever row requires anti-extension core engagement, forcing the body to remain in a stable tucked position while pulling.
Before attempting this exercise, an athlete should have basic pulling strength and core control. Being able to perform 10+ strict pull-ups, ring rows, and a 10-second tuck front lever hold will provide the necessary foundation. Mobility in the shoulders, wrists, and hips is also beneficial for maintaining proper positioning throughout the movement.
To perform tuck front lever rows, you’ll need a pair of gymnastic rings or a sturdy pull-up bar. The rings should be anchored at a height that allows full-body clearance when rowing. Chalk may help with grip, while resistance bands can assist beginners by reducing load. Advanced athletes can add a weighted vest or ankle weights for increased intensity.
How to Perform the Tuck Front Lever Row
1. Setup
• Adjust the rings or use a bar at a height where you can hang with your arms fully extended.
• Grip the rings or bar with a pronated grip (palms facing away) or a neutral grip (palms facing each other, for rings).
• Start in a dead hang position, engaging your shoulders by slightly depressing your scapulae.
2. Entering the Tuck Front Lever Position
• Pull your knees toward your chest, tucking your legs while maintaining a posterior pelvic tilt to keep your lower back from arching.
• Engage your core and glutes to maintain a solid tucked position.
• Keep your shoulders retracted to avoid collapsing forward.
3. The Rowing Phase
• Initiate the movement by pulling your chest towards the rings or bar, keeping your elbows close to your body.
• Focus on scapular retraction, squeezing your shoulder blades together at the top of the movement.
• The goal is to pull until your hands reach your lower chest or ribcage.
4. Lowering Phase
• Slowly extend your arms while maintaining your tucked front lever position.
• Control the movement and avoid dropping too fast—eccentric control is crucial for building strength.
• Fully extend your arms at the bottom before initiating the next repetition.
5. Maintaining Position Throughout the Set
• Keep your hips level with your shoulders to prevent excessive swinging.
• Maintain full-body tension by keeping your abs, glutes, and back engaged.
• Breathe in as you lower and exhale as you pull up.
Benefits of the Tuck Front Lever Row
• Strengthens the entire posterior chain – Engages the lats, traps, rhomboids, and lower back for powerful pulling strength.
• Develops core stability – Requires anti-extension control, improving abdominal and oblique endurance.
• Enhances scapular control – Reinforces healthy shoulder mechanics by promoting strong retraction and depression.
• Prepares for full front lever progressions – Builds foundational strength for more advanced static holds and dynamic movements.
• Increases grip strength – Holding onto the rings or bar under load enhances forearm endurance and finger strength.
• Transfers well to pull-ups and muscle-ups – Improves pulling mechanics, making other bodyweight exercises easier.
Common Mistakes to Avoid
• Letting the hips drop – Keep your body in a stable tuck position by engaging your core.
• Flaring the elbows – Maintain a close elbow position to avoid unnecessary shoulder strain.
• Using momentum – Perform controlled reps, avoiding kipping or swinging.
• Losing scapular engagement – Always retract the shoulder blades to maximize back activation.
• Arching the lower back – Maintain a posterior pelvic tilt to prevent lumbar stress.
• Shortening the range of motion – Pull until your hands reach your ribcage and extend fully on the way down.
Gym Equivalent Exercises
• Seated Cable Row (Close-Grip or Wide-Grip) – Mimics the rowing movement with resistance control.
• Chest-Supported Row – Provides strict pulling mechanics without requiring core engagement.
• Lat Pulldown (Close-Grip or Neutral Grip) – Strengthens similar muscles in a vertical pulling plane.
• Dumbbell Renegade Row – Engages core and pulling muscles dynamically.
Tips for the proper execution of Tuck Front Lever Row
Keep your knees tucked tightly to reduce unnecessary movement.
Squeeze your glutes and core to maintain a rigid body line.
Use a controlled tempo to maximize strength gains—especially on the eccentric phase.
Adjust the angle of your body (pushing your knees further away from your chest into an advanced tuck front lever) to find an appropriate difficulty level.
Breathe steadily and avoid holding your breath, as it can cause unnecessary tension.
If grip is an issue, try wrapping your thumbs around the bar or rings for extra security.
Muscles worked when doing Tuck Front Lever Row
The tuck front lever row engages multiple muscle groups throughout the pulling motion:
Primary muscles:
•Latissimus dorsi (lats) – The primary mover, responsible for pulling strength.
•Rhomboids and middle trapezius – Assist with scapular retraction.
•Biceps brachii – Play a key role in elbow flexion during the row.
• Core muscles (rectus abdominis, transverse abdominis, obliques) – Maintain body positioning and anti-extension.
Secondary muscles:
•Lower back (erector spinae) – Helps stabilize the tucked body position.
•Rear deltoids – Assist with pulling mechanics.
•Forearms and grip muscles – Necessary for sustaining the hold on the rings or bar.
Primary Muscle(s):
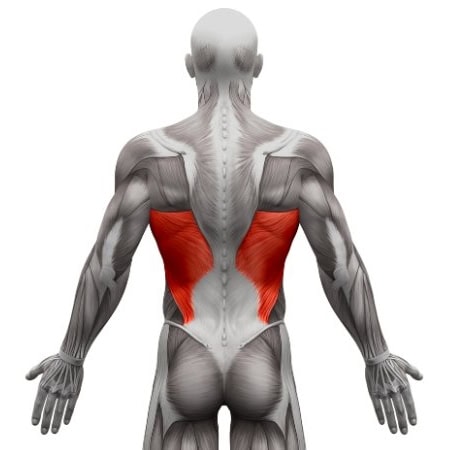
Lats
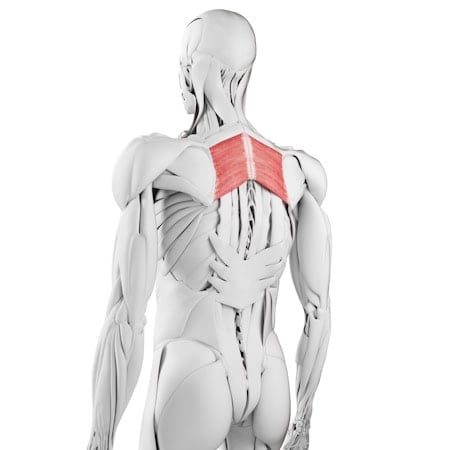
Rhomboid
Secondary Muscle(s):
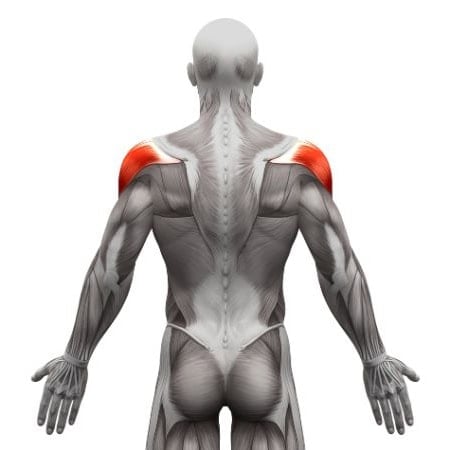
Rear delt
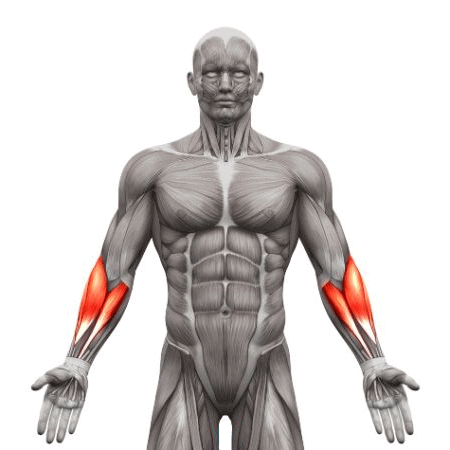
Forearm
Equipment needed for Tuck Front Lever Row

Adjust the difficulty of Tuck Front Lever Row
The tuck front lever row is highly scalable, allowing athletes to adjust difficulty based on their strength level. Beginners can keep the movement easier by reducing the leverage (higher ring height, partial range of motion, or assistance from a resistance band). Intermediate athletes can focus on perfecting form, slowing down the movement, and working on higher volume. Advanced athletes can challenge themselves with weighted variations, extended lever progressions, or isometric holds at the top of the row. This versatility makes the tuck front lever row an excellent tool for progressive strength development in bodyweight training.
How to make Tuck Front Lever Row harder?
How to make Tuck Front Lever Row easier?
How to make Tuck Front Lever Row harder?
To make Tuck Front Lever Row harder:
-
Lower the rings or use a more horizontal body position to increase resistance.
-
Extend one leg out while keeping the other tucked (half-front lever row).
-
Perform slow negatives with a 3-5 second lowering phase for increased muscle engagement.
-
Add a weighted vest or ankle weights to increase difficulty.
-
Attempt a straddle front lever row, extending your legs wider for an intermediate challenge.
-
Increase repetition volume or incorporate pause reps at the top for extra time under tension.
How to make Tuck Front Lever Row easier?
To make Tuck Front Lever Row easier:
-
Perform ring rows with feet elevated
-
Use a resistance band to assist the movement by supporting your hips.
-
Keep your hips slightly higher than your shoulders to reduce leverage.
-
Start with eccentric reps (lowering slowly) to build strength gradually.
-
Perform the exercise with a shorter range of motion before progressing to full reps.