
Weighted Push-Up
How to do Weighted Push-Up?
The weighted push-up is a horizontal pressing exercise that adds external resistance to the standard push-up. The additional load makes each repetition more demanding without requiring you to replace the familiar push-up movement with a completely different exercise.
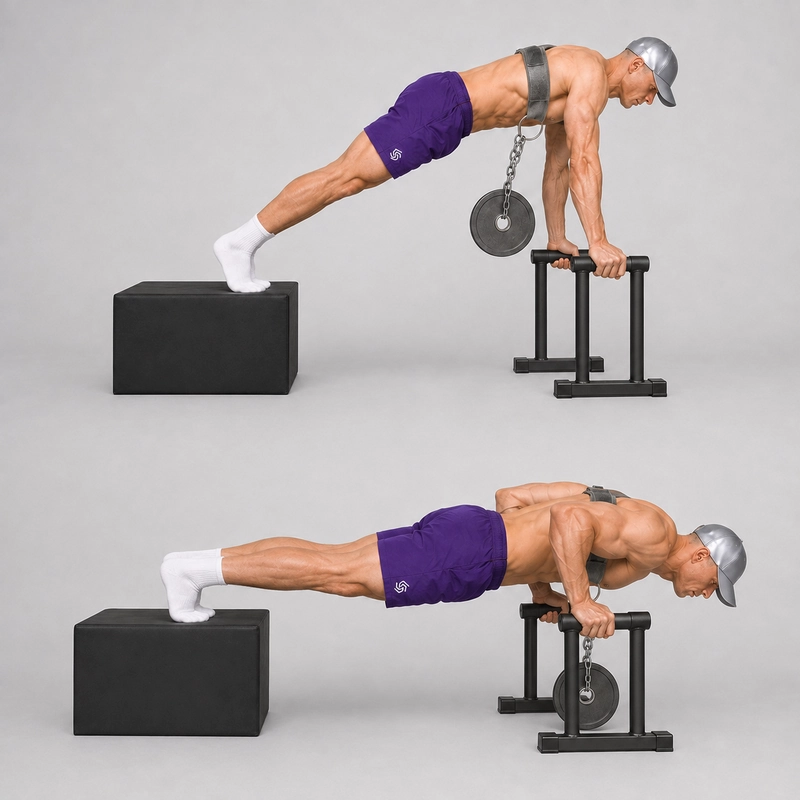
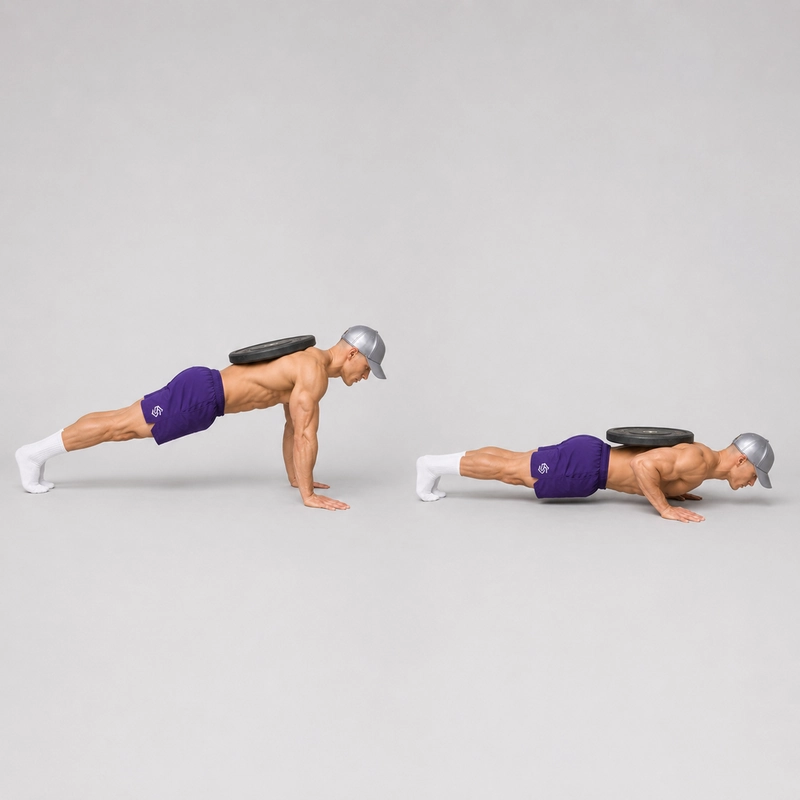
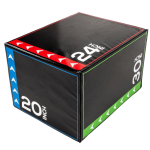
Weighted push-ups can be performed in three main ways: by placing a weight plate across the upper-to-middle back, wearing a securely fitted weighted vest or using an elevated setup with the feet on a plyo box, the hands on dip bars and a dip belt supporting a hanging kettlebell or weight plate beneath the body.
A weighted vest is generally the most practical option for independent training because it distributes the load across the torso and does not require a partner to position the weight. See our guide to the best weighted vests for calisthenics for suitable equipment and loading considerations.
A weight plate requires less specialized equipment, but a training partner should place, monitor and remove the plate. The elevated dip-belt weighted push-up requires more setup, but it allows a kettlebell or plate to hang below the body without balancing the load on the back. Our weight vest versus dip belt guide explains the practical differences between the two loading tools.
The standard push-up is a closed-chain horizontal press in which the shoulder blades can move around the rib cage. Adding weight preserves that basic characteristic when the exercise remains controlled. Research comparing loaded push-ups and bench pressing suggests that push-ups can provide a meaningful strength and hypertrophy stimulus when the resistance is appropriately matched and progressed, although the exercises are not identical. See this eight-week push-up and bench press study for context.
Equipment and General Setup
Choose one loading method before beginning the set. The three versions use different equipment and should be recorded separately in your training log because the same numerical load may not feel equivalent across setups. Before adding resistance, you should be able to perform controlled Regular Push-Ups through a consistent range of motion while keeping your trunk and pelvis aligned. Complete a general warm-up followed by several progressively more demanding bodyweight push-ups.
Loading Method 1: Weight Plate on the Back
- Select a single flat plate that you can control without changing your push-up technique.
- Assume the top push-up position with your hands slightly wider than shoulder width.
- Ask a training partner to place the plate flat and centrally across your upper-to-middle back.
- Keep the plate away from your neck and lower-back region.
- Have your partner monitor the plate without pressing down or adding assistance.
- After completing the set, remain in a stable top position while your partner removes the plate.
- Lower your knees or leave the position only after the plate has been removed.
Do not attempt to balance multiple unsecured plates or reach behind yourself to reposition a slipping plate during a repetition.
Loading Method 2: Weighted Vest
- Put on the weighted vest before moving into the push-up position.
- Distribute the removable weights evenly between the left and right sides.
- Tighten the vest so it remains close to your torso without restricting breathing or shoulder movement.
- Check that no loose strap can become trapped beneath your hands or body.
- Perform the push-up while keeping the vest stable and your body aligned.
- If the front of the vest touches the floor before you reach your normal depth, use secure push-up handles or reduce the bulk of the vest.
Loading Method 3: Elevated Dip-Belt Weighted Push-Up
- Use a stable pair of dip bars and a non-slip plyo box that can safely support the combined load.
- For a predominantly horizontal push-up, position the hand and foot supports at approximately similar heights.
- Place the dip bars far enough apart for your normal push-up hand position and secure them against tipping or sliding.
- Wear a commercial dip belt securely around your hips with the padded section positioned across your lower back.
- Place your hands on the dip bars and your feet on the plyo box to establish a straight elevated plank.
- Ask a training partner to attach a kettlebell or weight plate to the belt using the intended chain, strap and closed carabiner.
- Confirm that the load hangs freely beneath your hips and cannot strike the floor, box or bars at the bottom of the repetition.
- Keep the hanging weight motionless before beginning the set.
- After your final repetition, hold the top position while your partner removes the hanging weight.
- Step down only after the external load has been detached.
Use heavy, interconnected or rack-mounted dip bars whenever possible. Lightweight independent stands may be unsuitable if they can tip, spread or move under horizontal force. See our guide to the best dip bars when selecting a sufficiently stable setup. If the plyo box is significantly higher than the handles, the exercise becomes a loaded Decline Push-Up and shifts more of the effective resistance toward the upper body.
Step-by-Step Weighted Push-Up Technique
- Place your hands slightly wider than shoulder width with your fingers facing generally forward.
- Extend your legs and create a straight line from your head through your hips to your heels.
- Brace your abdominals and squeeze your glutes before accepting the external load.
- Begin with your elbows extended and your shoulders actively supported.
- Inhale and lower your chest by bending your elbows.
- Allow your elbows to travel approximately 30 to 45 degrees away from your torso instead of flaring directly sideways.
- Keep your head neutral and lower your shoulders, chest, hips and external load together.
- Reach the deepest position you can control without losing trunk alignment or shoulder stability.
- Press through both hands and extend your elbows to return to the top.
- Allow the shoulder blades to move naturally around the rib cage as you complete the repetition.
- Exhale through the pressing phase without losing abdominal tension.
- Finish with full elbow extension before beginning the next repetition.
Weighted Push-Up Completion Standard
- The external load remains secure and controlled throughout the set.
- The body remains in a straight line from the head through the hips to the heels.
- The shoulders, chest and hips lower together.
- The elbows remain at a controlled angle rather than flaring directly sideways.
- The athlete reaches a consistent bottom position on every repetition.
- The hips do not sag or rise before the chest.
- Both arms contribute evenly to the press.
- The elbows reach full extension at the top.
- The repetition is completed without bouncing, twisting or shifting the load.
- The external weight is removed safely before the athlete exits the setup.
Common Mistakes
- Adding weight before mastering push-ups: Build a repeatable bodyweight push-up with consistent depth and trunk alignment first.
- Using too much weight: Reduce the load if your range shortens, your hips sag or your pressing path changes.
- Placing a plate on the lower back: Position the plate across the upper-to-middle back instead of loading the lumbar region.
- Positioning the plate near the neck: Move it lower and make sure a partner monitors its position.
- Training with an unsecured plate: Stop immediately if the plate begins to slide rather than attempting to save the repetition.
- Entering the plate variation alone: Use a partner to place and remove the weight instead of twisting beneath it.
- Wearing a loose weighted vest: Tighten it sufficiently to prevent the load from bouncing or shifting.
- Allowing the vest to limit depth: Use handles, a less bulky vest or a lighter setup if it reaches the floor prematurely.
- Using unstable dip bars: Test the bars against horizontal and vertical force before attaching a hanging load.
- Using mismatched hand and foot heights unintentionally: Match the supports if you want to preserve a predominantly horizontal pressing angle.
- Allowing the hanging weight to swing: Brace your trunk, move smoothly and pause until the load becomes still.
- Letting the hanging weight touch the floor: Adjust the support height or chain length before beginning the set.
- Sagging through the hips: Brace your abdominals and glutes or reduce the external load.
- Lifting the hips first: Press your chest and hips upward as one unit.
- Flaring the elbows: Keep the upper arms at a controlled angle relative to the torso.
- Shortening every repetition: Use a load that permits a consistent and appropriate range of motion.
- Dropping rapidly into the bottom: Control the lowering phase instead of relying on a bounce.
- Recording only the added weight: Note the loading method, support heights and equipment because they affect the effective resistance.
Benefits of Weighted Push-Ups
- Provides progressive overload after standard push-ups become manageable.
- Develops horizontal pressing strength in the chest, shoulders and triceps.
- Allows strength and hypertrophy training without requiring a barbell bench press.
- Preserves natural scapular movement when performed with suitable technique and equipment.
- Strengthens the serratus anterior and other scapular stabilizers.
- Challenges the abdominals, lower back and glutes to maintain a rigid plank.
- Can be loaded in small increments with plates or an adjustable vest.
- Offers practical options for home, outdoor and gym training.
- Allows heavier belt loading when sufficient elevation and stable equipment are available.
- Makes it easier to progress resistance without relying only on increasingly long sets.
Readiness and Safety
Use a load that allows you to preserve the same essential technique demonstrated in the Regular Push-Up. There is no universal bodyweight repetition threshold that every athlete must reach before adding resistance. The relevant standard is whether you can maintain full control, repeatable depth and body alignment. Start with the smallest practical increase and progress only after you can repeat technically consistent sets. A heavier load is not useful if it reduces the exercise to partial repetitions or causes the hips to sag. Use a training partner for the plate-loaded version and preferably for the elevated dip-belt setup. Agree on how the load will be attached, monitored and removed before starting the set. Stop if you experience sharp wrist, elbow, shoulder, chest or back pain, instability, numbness or tingling. Persistent symptoms should be assessed by an appropriately qualified healthcare professional.
Frequently Asked Questions
What is the best way to add weight to push-ups?
A weighted vest is normally the most convenient option for independent training. A plate on the back is accessible but requires a partner, while the elevated dip-belt setup provides greater loading flexibility but requires stable bars, a plyo box, sufficient clearance and careful assistance.
Where should a weight plate be placed?
Place the plate flat and centrally across the upper-to-middle back. Do not position it on the neck or lumbar region. A training partner should monitor the plate and remove it if it begins to shift.
Can I perform plate-weighted push-ups alone?
It is safer to use a partner. Attempting to place, reposition or remove a plate yourself can twist your torso and cause the weight to slide. A weighted vest is the better option when training alone.
How does the elevated dip-belt push-up work?
Your hands rest on stable dip bars and your feet rest on a plyo box, creating space beneath the body. A dip belt sits around the hips while a kettlebell or weight plate hangs below your torso from the belt’s chain or strap.
Should the dip bars and plyo box be the same height?
Approximately matching the hand and foot heights helps preserve a horizontal body position. If the feet are substantially higher, the movement becomes a weighted decline push-up and generally places a greater proportion of the effective load on the upper body.
Can the hanging weight swing?
The load should remain nearly motionless. If it swings, reduce the speed, brace more firmly and allow it to settle before continuing. The kettlebell or plate must not contact the floor, bars or box.
Can a weighted vest reduce the range of motion?
Yes. A bulky front panel may contact the floor before your chest reaches its usual bottom position. Secure push-up handles, parallettes or dip bars can restore clearance, provided the equipment remains stable.
How much weight should I start with?
Start with the smallest load that creates a noticeable challenge without changing your technique. Increase the resistance only when you can maintain consistent depth, body alignment and full elbow extension across every planned repetition.
How many sets and repetitions should I perform?
Three to five sets of approximately four to twelve controlled repetitions is a practical starting range for strength and muscle development. Stop each set before your trunk alignment, range of motion or load position deteriorates.
Are weighted push-ups as effective as the bench press?
Both exercises can train the chest, shoulders and triceps through a horizontal pressing pattern, but they are not identical. Push-ups are closed-chain and allow the shoulder blades to move, whereas the bench supports the torso. Studies have reported similar muscle activation or training adaptations when resistance is appropriately matched, but the result depends on the setup and program. See this push-up and bench press comparison study.
How should I track weighted push-up progress?
Record the loading method, added weight, repetitions, range of motion and support heights. Do not assume that a 20-kilogram vest, back plate and hanging belt load create exactly the same effective resistance.
Do the three loading methods need separate exercise pages?
No. They share the same fundamental weighted push-up movement and search intent. Keeping them on one canonical page prevents unnecessary duplication while allowing each setup to be explained clearly.
Tips for the proper execution of Weighted Push-Up
Master controlled bodyweight push-ups before adding external resistance.
Use the same loading method consistently when comparing your training performance.
Start with the smallest practical increase in resistance.
Keep your body aligned from your head through your hips to your heels.
Brace your abdominals and squeeze your glutes before beginning each repetition.
Lower your chest and hips together instead of allowing the pelvis to sag.
Keep your elbows approximately 30 to 45 degrees away from your torso.
Use a consistent and controlled range of motion on every repetition.
Allow your shoulder blades to move naturally around your rib cage.
Press evenly through both hands to avoid shifting toward one side.
Use a training partner to position and remove a weight plate.
Place a back-loaded plate across the upper-to-middle back rather than the neck or lower back.
Secure a weighted vest firmly enough to prevent bouncing or shifting.
Confirm that dip bars and the plyo box cannot move before attaching a hanging load.
Keep a dip-belt weight centered and motionless beneath your hips.
Make sure a hanging kettlebell or plate has sufficient clearance at the bottom.
Return to full elbow extension without losing trunk tension.
Stop the set when your range, alignment or load position deteriorates.
Muscles worked when doing Weighted Push-Up
The weighted push-up is a compound horizontal pressing exercise. Adding resistance increases the force that the pressing muscles and trunk stabilizers must control, but the fundamental muscle actions remain similar to those of a standard push-up.
Primary Muscles
- Pectoralis major: The chest produces much of the force required to move the torso away from the floor or handles.
- Triceps brachii: The triceps extend the elbows during the pressing phase.
- Anterior deltoids: The front shoulders assist the chest and stabilize the shoulder joints throughout the movement.
Secondary Muscles
- Serratus anterior: Helps control the shoulder blades as they move around the rib cage.
- Rectus abdominis and transverse abdominis: Brace the torso and resist excessive lower-back extension.
- Obliques: Resist rotation, particularly if the external load begins to shift.
- Erector spinae: Help maintain the rigid trunk position.
- Gluteus maximus: Supports pelvic alignment and prevents the hips from sagging.
- Quadriceps: Keep the knees extended and the lower body rigid.
- Forearms and hand muscles: Stabilize the wrists and maintain pressure through the floor or handles.
The exact distribution of the load changes with the setup. Raising the feet above the hands creates a decline push-up angle, while placing the hands and feet at similar heights preserves a more horizontal pressing position. A systematic review of push-up kinetics found that changes in body position and exercise variation alter the forces involved, supporting the importance of recording the precise setup. See the systematic review of push-up kinetics.
Primary Muscle(s):

Middle chest

Triceps
Secondary Muscle(s):

Anterior delt

Abdominal
Equipment needed for Weighted Push-Up
Adjust the difficulty of Weighted Push-Up
How to make Weighted Push-Up harder?
How to make Weighted Push-Up easier?
How to make Weighted Push-Up harder?
To make Weighted Push-Up harder:
-
Increase the external resistance in small increments.
-
Use a three-to-five-second lowering phase.
-
Pause just above the bottom position before pressing upward.
-
Increase the range of motion using stable push-up handles or dip bars.
-
Perform weighted decline push-ups with the feet higher than the hands.
-
Use the elevated dip-belt setup to load the exercise progressively.
-
Perform weighted close-grip push-ups to increase the triceps demand.
-
Perform weighted deficit push-ups while maintaining shoulder control.
-
Add a controlled one-and-a-half-repetition tempo.
-
Progress to heavier sets only after repeatable full-range repetitions are established.
-
Progress to advanced leverage variations such as the pseudo planche push-up.
How to make Weighted Push-Up easier?
To make Weighted Push-Up easier:
-
Return to strict bodyweight push-ups until you can maintain consistent technique.
-
Use a lighter plate, vest or hanging weight.
-
Remove some of the adjustable weight from the vest.
-
Perform incline push-ups while wearing a light weighted vest.
-
Use push-up handles to create clearance for a bulky vest.
-
Reduce the number of weighted repetitions in each set.
-
Perform controlled weighted negatives before adding full repetitions.
-
Use the plate variation only with a partner who can remove the load immediately.
-
Replace the dip-belt setup with a light weighted vest while learning loaded push-up technique.
