
Push 21: Chest Strength Workout With Slow Motion Exercises
🎯 Workout Description:
This session is designed to test your current dip strength with slower eccentrics, deeper bottom positions, and longer pauses. Push-up and vertical push variations are both more advanced now, and your dip progression should feel challenging—but doable.
👤 Who It’s For:
Athletes who can do controlled negative dips and feet-assisted dips with minimal support.
🧰 Equipment Needed:
- Gymnastics Rings or dip bars
- Resistance band (light)
- Parallettes (optional)
- Plyo box/bench
Warm-Up
Goal: Prime the body for slower pushing tempo and scapular retraction.
Format:
-
Wrist warm-up routine – 1 round
-
2 rounds (superset format):
-
10 Scapula Push-Ups
-
6 Inchworms with Push-Up
-


Muscle group:

Tips
-
Perform this routine before every handstand or push workout.
-
Use a soft mat or towel if your wrists are sensitive to hard surfaces.
-
Pair with scapular and shoulder prep for a complete upper-body warm-up.
-
Spread your fingers during each drill to distribute load.
-
Gradually increase range and pressure over weeks, not in one session.


Tips
-
Focus on Shoulder Blade Movement: The goal of this exercise is to isolate the movement of the scapula. Ensure your elbows remain locked and focus on squeezing and spreading your shoulder blades.
-
Core Engagement: Keep your core and glutes engaged to maintain proper body alignment and avoid unwanted movement in the hips or lower back.
-
Controlled Movements: Perform the exercise slowly and with control to fully engage the muscles of the shoulder girdle and prevent injury.
-
Breathing: Inhale as you retract your scapula (lowering your chest) and exhale as you protract your scapula (pushing through your hands and rounding your back).

Muscle group:

Tips
-
Keep your core actively engaged throughout to maintain stability and prevent excessive lower-back stress.
-
Walk your hands out progressively further as your strength and flexibility improve.
-
Focus on smooth transitions between each phase of the exercise to improve coordination and body control.
-
Use controlled breathing, matching each movement phase to inhalation and exhalation cycles.
-
Perform regularly as part of your warm-up routine to optimize flexibility, mobility, and upper-body strength.
Strength
Goal: Build high-quality pushing strength and refine control in the bottom range of the dip.
Structure:
-
Superset A (3 rounds): A1 + A2, rest 90 sec
-
Set B (2 rounds): Dip progression
→ Rest 60–90 sec between all rounds
🟦 Superset A:
-
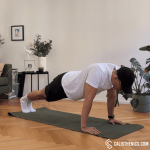
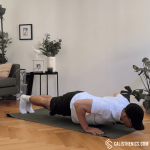
A1: Slow Motion Push-Ups – 5–6 reps (5 sec down, 2 sec pause, explode up)
-
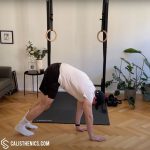
A2: Pike Push-Ups with Elevated Feet – 6 reps
🟩 Set B:
-
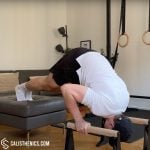
Negative Dips – 2 sets of 3–4 reps (5–6 sec lower, aim to go deeper)
Control every inch of the descent. Finish every push-up and dip with a full elbow lockout.


Tips
-
Body Alignment: Keep your body in a straight line from head to heels. Engage your core and glutes to prevent your hips from dropping or rising.
-
Hand Placement: Your hands should be positioned just outside of shoulder-width for optimal stability. Moving them closer or wider will target different muscles.
-
Elbow Positioning: Keep your elbows at about a 45-degree angle from your body, not flaring out too far to avoid shoulder strain.
-
Breathing: Inhale as you lower yourself, and exhale as you push back up. Controlled breathing improves strength and endurance.
-
Controlled Movements: Lower yourself slowly to build strength, then push back up with a smooth, steady motion.

Muscle groups:


Tips
-
Keep your hips high and stacked over your shoulders to maximize vertical pressing mechanics.
-
Slow down the eccentric (lowering) phase, aiming for at least 3-5 seconds per repetition.
-
Maintain external rotation at the shoulders, actively pressing into the parallettes for better stability.
-
Engage your core throughout the entire movement to avoid unnecessary swinging or instability.
-
Gradually increase the elevation height of your feet as strength improves.
-
Pause at the bottom for 1-2 seconds to enhance strength development and improve control.
-
Aim to fully press your head through your arms at the top position, achieving proper overhead alignment.
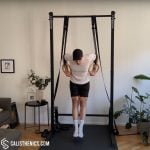

Muscle group:
Tips
-
Aim for a 3-5 second descent per repetition for maximum strength gains.
-
Maintain external rotation of the rings (slight outward turn) to protect the shoulders.
-
Focus on quality over quantity—4-6 well-controlled reps are better than 10 rushed ones.
-
Keep the core tight and legs slightly in front to prevent excessive swinging.
-
If full range of motion is difficult, use foot assistance or perform partial negatives before progressing.
-
Gradually work toward slower descents as you gain strength.
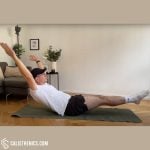
HIIT Core Finisher – TABATA
Format: 10-minute TABATA (20s on / 10s off – 8 rounds alternating)
-
Hollow Body Rocks
-
Mountain Climbers
→ Keep the core tight through the fatigue!

Muscle group:

Tips
-
Engage Your Core Fully: Ensure your abs remain tight to maintain proper form and control throughout the movement.
-
Avoid Using Momentum: The rocking motion should come from controlled engagement of your core, not from swinging your arms or legs.
-
Press Your Lower Back Into the Floor: Keep your lower back in contact with the ground to prevent strain and maximize core engagement.
-
Start Slow: If you’re new to the exercise, perform small, controlled rocks and gradually increase the range of motion.
-
Breathe Steadily: Don’t hold your breath; steady breathing helps maintain tension and focus.


Tips
-
Core Engagement: Focus on keeping your core engaged throughout the exercise to prevent your hips from rising or sagging.
-
Controlled Breathing: Breathe steadily as you alternate legs. Exhale as you drive each knee forward, and inhale as you extend each leg back.
-
Keep the Hips Level: Avoid letting your hips move up or down too much; maintain a level position to keep the focus on your core.
-
Controlled Speed: Start with a slow, controlled pace to ensure proper form, then gradually increase your speed as you feel more stable.
-
Hand and Shoulder Alignment: Keep your hands directly under your shoulders to ensure proper alignment and avoid putting excess strain on your wrists.