
Archer Push-Up
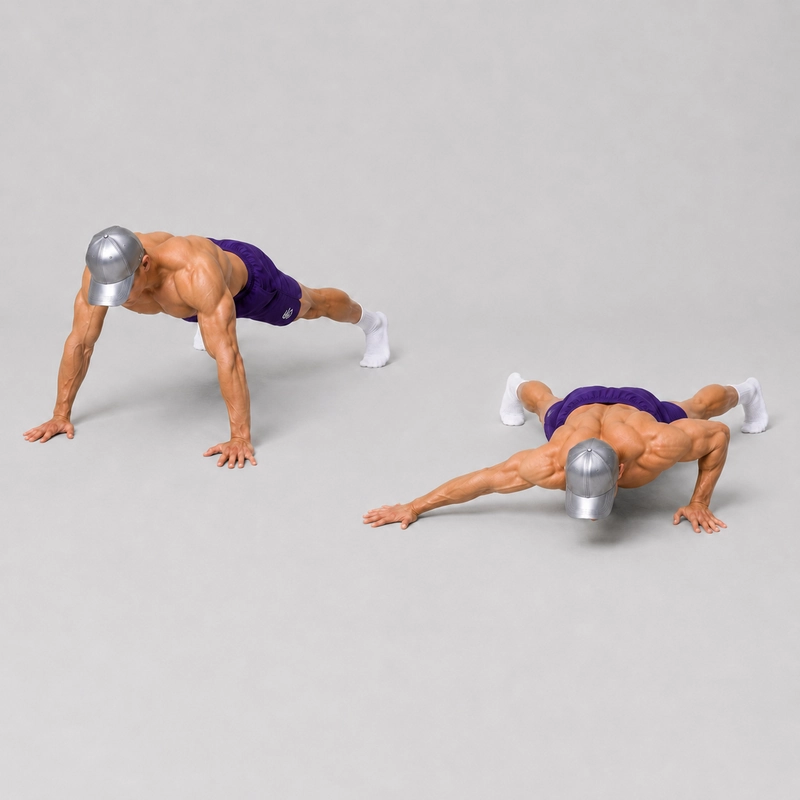
How to do Archer Push-Up?
The Archer Push-Up is an asymmetrical horizontal pushing exercise in which you lower your chest toward one hand while the opposite arm extends out to the side. The bent arm performs most of the pressing work, while the straighter arm remains on the floor to provide assistance and balance.
This makes the exercise substantially harder than Regular Push-Ups, but more accessible than a full One Arm Push-Up. It is especially useful for learning how to shift the chest over one hand, control asymmetrical loading and resist unwanted torso rotation without removing the assisting hand completely.
Unlike Uneven Push-Ups, both hands remain at the same height during an Archer Push-Up. It also differs from Staggered Push-Ups, where one hand is placed farther forward and the other farther back. In the Archer Push-Up, the hands are placed wide and the body travels laterally toward the working arm.
Before attempting the full floor variation, you should be able to perform controlled regular push-ups through a consistent range of motion. Athletes who cannot yet keep their body aligned while shifting to one side should begin with incline Archer Push-Ups or a smaller lateral weight shift.
1. Establish a Wide Push-Up Position
Place both hands on the floor significantly wider than shoulder-width apart. Spread your fingers and choose a hand angle that feels comfortable for your wrists. Extend your legs behind you and begin with your feet approximately hip-width apart or slightly wider for stability. Your body should form a straight line from your head through your shoulders, hips and heels. Brace your abdominals, squeeze your glutes and press the floor away so that your shoulder blades remain controlled.
2. Shift Toward the Working Arm
Move your chest and shoulders toward one hand before and during the descent. Your working-side elbow should begin bending as the opposite arm gradually straightens. Move your torso as one connected unit. Do not leave your hips in the center while reaching only with your head or shoulders.
3. Lower Under Control
Continue lowering your chest toward the working hand. Let the working elbow travel diagonally backward instead of flaring directly out at 90 degrees. The assisting arm should become nearly straight while remaining active against the floor. Do not force the elbow into an uncomfortable locked position. Keep both hands planted and avoid rotating your chest or pelvis away from the floor.
4. Reach the Bottom Position
Lower until your chest approaches the working hand or until you reach the deepest position you can control without shoulder discomfort, hip rotation or lower-back sagging. At the bottom, most of your upper-body weight should be supported by the bent arm. The opposite arm should be extended laterally, creating the bow-and-arrow shape that gives the exercise its name.
5. Press Back to the Center
Push firmly through the working hand while continuing to use the extended arm for controlled assistance. Extend the working elbow and move your chest back toward the central starting position. Finish with both elbows straight, your shoulders level and your body aligned from head to heels.
6. Repeat on the Opposite Side
Shift toward the other hand and repeat the same movement. Alternate sides or complete all repetitions on one side before switching, but perform the same number of controlled repetitions in each direction.
What Counts as a Complete Archer Push-Up?
- The hands remain planted in a wide position throughout the repetition.
- The chest and shoulders visibly travel toward the working hand.
- The working elbow bends through a consistent range of motion.
- The opposite arm becomes nearly straight while remaining active.
- The shoulders, hips and legs move together without uncontrolled twisting.
- The repetition finishes in a stable high plank with both elbows extended.
- Both sides are performed with comparable depth and control.
Common Archer Push-Up Mistakes
Placing the Hands Too Close Together
A narrow hand position prevents the assisting arm from extending and turns the movement into an uneven regular push-up. Widen your hands gradually until you have enough room to shift your torso toward each side.
Moving the Head Instead of the Chest
Reaching your head toward the working hand does not create meaningful unilateral loading. Shift your shoulders, rib cage and hips together so that your center of mass moves toward the bent arm.
Leaving the Hips in the Center
If the upper body moves sideways while the hips remain behind, the body twists and loses its rigid plank position. Brace your core and allow the pelvis to travel laterally with the shoulders.
Rotating the Chest Away From the Floor
Opening the torso can reduce the pressing demand and make the repetition difficult to standardize. Keep the chest generally facing the floor and resist excessive rotation with your abdominals and obliques.
Making the Assisting Arm Completely Passive
The straighter arm still contributes to the exercise. Keep its hand pressed into the floor and use as much assistance as necessary to maintain a smooth, controlled repetition.
Flaring the Working Elbow
Allowing the working elbow to travel directly sideways can create an uncomfortable shoulder position. Let it move diagonally backward while keeping the forearm controlled over the hand.
Cutting the Range of Motion
Do not increase the lateral shift or hand width at the expense of depth. Use a smaller shift or perform the exercise on an incline until you can reach a consistent bottom position.
Sagging Through the Lower Back
Maintain abdominal and glute tension so the pelvis does not drop as the arms bend. End the set when you can no longer keep your trunk aligned.
Rushing Between Sides
Use a controlled transition through the center instead of bouncing from one arm to the other. Each side should resemble a deliberate unilateral repetition.
Benefits of the Archer Push-Up
- Develops unilateral pressing strength: One arm accepts more of the load while the second arm provides scalable assistance.
- Builds toward the One Arm Push-Up: The exercise teaches you to position your chest over the working hand before removing the assisting arm.
- Challenges core stability: The abdominals and obliques resist rotation as the load shifts from side to side.
- Reveals side-to-side differences: Training each direction makes differences in strength, depth and control easier to identify.
- Requires no equipment: The standard version can be performed anywhere with sufficient floor space.
- Offers several progression options: Hand width, foot position, assistance, elevation, range of motion and tempo can all be adjusted.
Readiness and Safety
Build a foundation of repeatable Regular Push-Ups before adding the large lateral weight shift. You should be able to keep your trunk stable, reach a consistent depth and extend both elbows without pain. Warm up your wrists, elbows and shoulders before training. Increase the hand width and lateral shift gradually, and stop if you experience sharp or persistent joint pain. An incline variation is preferable to forcing a shallow or twisted floor repetition. Research examining push-up variations shows that changing body position can meaningfully alter how much bodyweight the upper body supports. Placing the hands on a stable elevated surface is therefore a practical way to reduce the load while learning the Archer Push-Up pattern. See the push-up kinetic analysis indexed by PubMed for additional context.
How to Program Archer Push-Ups
For strength development, begin with 3 to 5 sets of 3 to 8 controlled repetitions per side. Rest for approximately two to three minutes between demanding sets and let your weaker side determine the repetition target. Stop each set before your depth shortens, the hips begin twisting or the assisting arm can no longer remain controlled. Increase the range of motion or reduce assistance before adding large numbers of repetitions.
Frequently Asked Questions
Are Archer Push-Ups the same as One Arm Push-Ups?
No. Both hands remain on the floor during an Archer Push-Up, and the straighter arm continues to provide assistance. In a true One Arm Push-Up, the free hand does not contact the floor.
Which arm works during an Archer Push-Up?
The bent arm performs most of the pressing work. The extended arm remains active and provides assistance, with its contribution depending on your hand width and how far you shift toward the working side.
Should the assisting arm be completely straight?
The arm should become nearly straight at the bottom, but you should not force the elbow into a painful locked position. A small bend is acceptable while you develop strength, mobility and control.
How wide should the hands be?
Use a position wide enough for your chest to travel toward one hand while the opposite arm extends. Start moderately wide and increase the distance gradually rather than immediately using your maximum reach.
Should the feet be together or apart?
A wider foot position provides more stability and is appropriate when first learning the exercise. Moving the feet closer together increases the balance and anti-rotation demands.
Why do my hips rotate during Archer Push-Ups?
Rotation usually occurs when the lateral shift exceeds your current pressing or core strength. Reduce the range, widen your feet or perform the exercise on an incline until you can keep the shoulders and hips controlled.
Are Archer Push-Ups a good One Arm Push-Up progression?
Yes. They teach unilateral weight transfer while allowing the assisting hand to remain on the floor. Follow them with progressively lighter assistance, incline One Arm Push-Ups or self-assisted One Arm Push-Ups.
What is the difference between Archer and Uneven Push-Ups?
During Uneven Push-Ups, one hand is elevated above the other. During Archer Push-Ups, both hands stay at the same height while the body shifts laterally toward one arm.
Can Archer Push-Ups be performed on parallettes?
Yes. Stable parallettes can provide a neutral wrist position and allow a deeper range of motion. Begin with the standard floor version or limit the deficit until your shoulders are prepared for the additional depth.
How many Archer Push-Ups should I perform?
Start with 3 to 5 sets of 3 to 8 repetitions per side. Movement quality, equal depth and controlled weight transfer are more important than reaching a predetermined repetition total.
Tips for the proper execution of Archer Push-Up
Place your hands wide enough for the opposite arm to become nearly straight as your chest approaches the working hand.
Spread your fingers and grip the floor to create a stable base for the lateral weight shift.
Brace your abdominals and glutes before beginning each repetition.
Move your shoulders, chest and hips toward the working hand as one connected unit.
Keep your chest generally facing the floor instead of rotating away from the working arm.
Let the working elbow travel diagonally backward rather than flaring directly sideways.
Keep the extended arm active and use only as much assistance as necessary.
Lower until your chest approaches the working hand without losing your plank position.
Press through the working hand and return to a stable central position before changing sides.
Use a wider foot position while learning and narrow it gradually as your control improves.
Match the range of motion and number of repetitions on both sides.
End the set when your hips twist, your lower back sags or your depth becomes inconsistent.
Muscles worked when doing Archer Push-Up
The Archer Push-Up is an asymmetrically loaded horizontal pushing exercise. The arm you move toward performs most of the dynamic pressing work, while the opposite arm provides assistance and helps control the lateral movement.
Primary Muscles
- Pectoralis major: The chest produces horizontal pressing force, with the working side accepting a greater share of the load as the body shifts laterally.
- Triceps brachii: The triceps extend the working elbow as you press away from the floor and return to the central position.
Secondary Muscles
- Anterior deltoid: The front shoulder assists the chest and stabilizes the upper arm during the descent and press.
- Rectus abdominis: The abdominal muscles help maintain a rigid trunk and prevent the lower back from sagging.
- Obliques: The obliques resist unwanted rotation as bodyweight shifts toward one arm.
- Serratus anterior and scapular stabilizers: These muscles control the shoulder blades and help maintain stable contact with the floor.
- Glutes and quadriceps: The lower body remains tense so the shoulders, hips and legs move as a connected unit.
- Forearm and hand muscles: These muscles stabilize the wrists and help maintain pressure through both hands.
The assisting arm should not be treated as passive. Its chest, shoulder and triceps continue to contribute, although the amount of assistance decreases as the hand position widens and the body moves farther toward the working side. For a complete overview of the final unilateral progression, see the One Arm Push-Up Guide.
Primary Muscle(s):

Middle chest

Triceps
Secondary Muscle(s):

Anterior delt

Abdominal
Equipment needed for Archer Push-Up
No equipment needed for this exercise.
Adjust the difficulty of Archer Push-Up
How to make Archer Push-Up harder?
How to make Archer Push-Up easier?
How to make Archer Push-Up harder?
To make Archer Push-Up harder:
-
Place your hands farther apart so the assisting arm contributes less at the bottom.
-
Move your feet progressively closer together to increase the balance and anti-rotation demands.
-
Pause for two to three seconds with your chest close to the working hand.
-
Lower over four to six seconds before pressing back to the starting position.
-
Use a weighted vest to increase resistance without placing an unsecured load on your back.
-
Perform the exercise on stable parallettes and lower your chest below hand level for a greater range of motion.
-
Reduce assistance by keeping only the fingertips of the extended hand in contact with the floor.
-
Progress to a self-assisted One Arm Push-Up and eventually a full One Arm Push-Up.
How to make Archer Push-Up easier?
To make Archer Push-Up easier:
-
Perform Incline Archer Push-Ups with both hands on a stable box, bench or bar to reduce the percentage of bodyweight being pressed.
-
Use a smaller lateral shift so the assisting arm remains more bent throughout the repetition.
-
Bring your hands slightly closer together to reduce the distance your body must travel.
-
Spread your feet farther apart to create a wider and more stable base.
-
Perform Archer Push-Ups from the knees while keeping a straight line from the knees through the hips and shoulders.
-
Practise controlled Archer Push-Up negatives and return to the top using a regular two-arm push-up.
-
Use Uneven Push-Ups to develop asymmetrical pressing strength before attempting the full lateral movement.
-
Limit the depth temporarily and increase it only when you can keep your torso and hips controlled.
