
Feet-Elevated One-Arm Push-Up
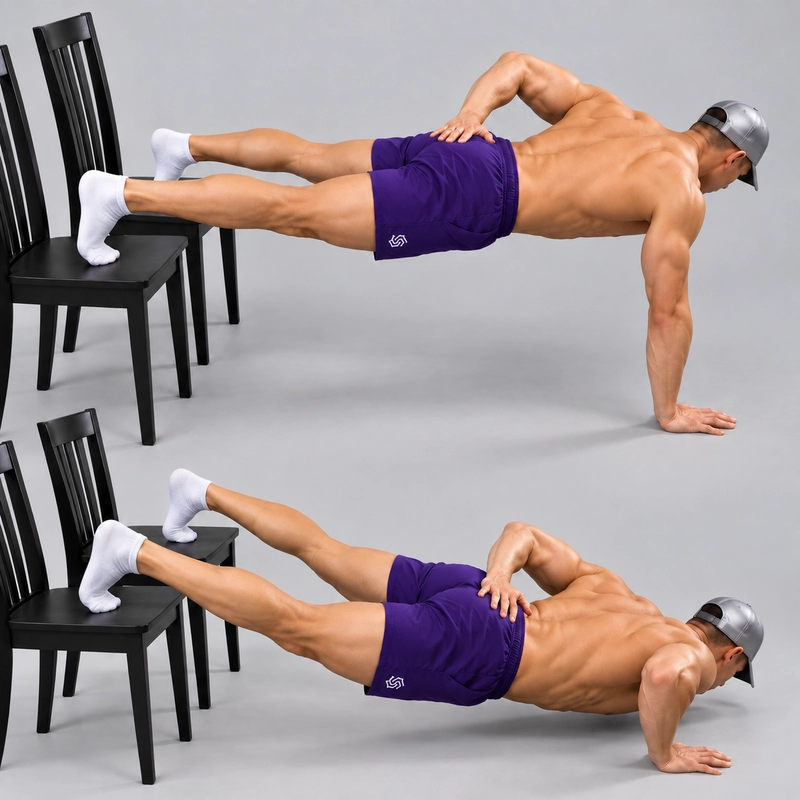
How to do Feet-Elevated One-Arm Push-Up?
The feet-elevated one-arm push-up is an advanced pressing exercise performed with one hand on the floor and both feet on a stable workout bench or suitable chair around knee height. Keep the free hand off the floor, lower the chest under control and press back to a straight working arm while maintaining straight legs and a connected body line.
This is a progression of the floor-footed one-arm push-up. Raising the feet above the working hand creates a decline setup and generally increases the pressing demand when stance and range are otherwise comparable. The chest, triceps and front shoulder work with the trunk to produce the press and control the asymmetrical support.
A force-platform study of push-up variations measured higher peak hand-supported forces in its feet-elevated conditions than in regular push-ups. Those tests used two-arm push-ups, so they support the general loading principle without establishing an exact load percentage for this one-arm version.
Before adding this challenge, develop consistent one-arm repetitions with the feet on the floor and learn the elevated-foot setup using two-arm decline push-ups. A bench or chair must be stable and wide enough for the stance you can control; its height alone does not make it suitable.
Equipment and Setup
Use a rigid workout bench or suitable chair with a flat, secure foot-contact surface around knee height. Approximately 40–50 cm (15.7–19.7 in) is a practical guide for common supports, but measure your actual setup. Choose a non-slip floor for the working hand.
- Support stability: the bench or chair must stay stationary under downward and sideways force. Test it before loading your feet.
- Chair suitability: use a rigid chair with secure legs and a firm seat. Avoid wheels, swivel mechanisms, folding designs, loose parts and soft or unstable cushions.
- Foot contact: place both toes/forefeet securely on the top surface. Keep the feet away from an edge where they could slip off.
- Support width: leave enough room for your chosen stance. If a chair is too narrow, use a wider bench rather than forcing a feet-together attempt.
- Working hand: palm flat on the floor with the fingers spread, positioned to support the working shoulder and chest comfortably.
- Clearance: allow enough room for the chest to reach the floor without the head, furniture or other objects obstructing the movement.
A wall may help prevent a suitable chair from sliding, but it does not make a tipping or structurally unsuitable chair safe. Check the whole support and keep any backrest out of the foot and body path.
Measure from the floor to the surface under the feet. Keep that height, the hand-to-support distance and the foot spacing consistent throughout the set.
Readiness and Warm-Up
Attempt this version after you can repeat the floor-footed one-arm movement with consistent depth and a controlled finish. Also check that you can hold a stable two-hand decline plank and perform controlled two-arm decline repetitions on the selected support. These are practical readiness checks, not a validated pass test or a fixed repetition requirement.
Prepare the wrist with the wrist warm-up routine, then use easy two-arm presses and a few floor-footed one-arm repetitions. Keep the warm-up comfortable and leave enough strength for the working sets.
If you are still learning asymmetrical pressing, uneven push-ups and staggered push-ups offer preparation with both hands involved. They are training options, not equivalent tests of an unassisted one-arm repetition.
How to Do a Feet-Elevated One-Arm Push-Up
- Check the support. Confirm that the bench or chair stays stable and the foot surface provides secure contact at approximately knee height.
- Enter with both hands down. Place both palms on the floor, bring the feet onto the support one at a time and extend the legs into a stable decline plank.
- Choose the stance. Separate the feet enough to control the single-arm support, while keeping both feet fully supported. Use a wider bench if the chair cannot accommodate that stance.
- Transfer toward the working hand. Adjust the palm beneath the working-side shoulder or slightly inward as needed, then shift the chest toward that hand without letting the hips sag.
- Remove the free hand. Hold it behind the back or alongside the torso, clear of the floor and furniture. Establish a steady straight-arm position before beginning the descent.
- Lower the chest. Bend the working elbow and guide it diagonally backward. Lower the shoulders and hips together, keeping the neck aligned and both knees straight.
- Reach the chosen depth. For the full-range version described here, bring the chest gently to the floor without resting or bouncing. Keep the support contacts and body shape controlled.
- Press with the working arm. Push through the palm and raise the chest and pelvis together. Keep the free hand off the floor and avoid twisting or folding the body to finish.
- Finish and reset. Return to straight-elbow support without forcing hyperextension. At the end of the set, put the free hand down before stepping the feet off the support.
Inhale during the descent and exhale as you press if that rhythm feels comfortable. Use a smooth descent of around two seconds while learning to control the position.
A small, coordinated weight shift or torso rotation can occur during a one-arm press. Keep it repeatable and avoid using a large hip roll or sudden opening of the chest to escape the bottom. Do not force a rigidly square position that prevents comfortable movement.
Depth and What Counts as a Complete Repetition
For this page's full-range standard, start with a straight working elbow, touch the chest gently to the floor and return to straight-elbow support. Both feet remain on the same knee-height surface and the free hand stays off the floor throughout the repetition.
- The working palm and both foot contact points remain in their original positions.
- The legs stay straight and the trunk does not sag, pike or fold at the waist.
- The chest reaches the floor under control; a chin, forehead or shoulder touch alone does not establish chest depth.
- The body rises as a connected unit, without a hip thrust, bounce or sudden twisting finish.
- The free hand does not assist against the floor, furniture or thigh.
- The working elbow returns to the same controlled straight-arm top.
- The bench or chair remains stationary.
If full chest-to-floor depth is not controllable, lower the feet or return to the floor-footed version. A shallower practice repetition can help you learn the movement, but record it separately rather than counting it as the same full-range repetition.
A review of range of motion in resistance training found that strength adaptations depend partly on the range trained and tested. This is a reason to keep the depth consistent when judging progress; the review did not validate this particular one-arm assessment standard.
Common Mistakes and Corrections
Starting With Feet That Are Too High
Learn the floor-footed one-arm movement first, then introduce a lower elevation before building toward knee height. Use the height you can control rather than the tallest available chair.
Using a Chair That Cannot Fit the Stance
Choose a wider stable bench. Narrowing the feet to fit a small seat changes the balance task and may make the exercise too demanding.
Rolling the Hips to Complete the Press
Reduce the elevation or use fewer repetitions. Keep the chest and pelvis coordinated rather than rotating the torso sharply as the arm begins to tire.
Letting the Hips Sag or Rise First
Brace the abdomen and glutes before lowering. The shoulders and hips should descend and rise together; a separate hip lift does not complete the same pressing task.
Reaching With the Head
Keep the neck in line with the torso and judge chest depth. Do not turn a head touch into a substitute for lowering the chest.
Cutting the Bottom Range or Top Finish
Use a version that permits the same chest-depth target and straight-elbow finish on every repetition. A higher foot support does not compensate for a shorter range.
Using the Free Hand for Hidden Assistance
Keep it clear of supporting surfaces. If assistance is needed, deliberately use an assisted variation and record it as such.
Forcing the Working Elbow Directly Sideways
Adjust the hand position and guide the elbow diagonally backward through a comfortable path. Do not force an exact elbow angle that makes the shoulder or wrist uncomfortable.
Training Only the Stronger Side
Train both arms with comparable height, stance and depth. Begin with the weaker side and let its controlled performance guide the repetition target.
How to Make It Easier
Lower the foot support in manageable steps, then return to one-arm push-ups with the feet on the floor if needed. Reducing the elevation preserves the unilateral task while changing the decline angle.
Use two-arm decline push-ups to practise the same bench or chair setup with both hands supporting the press. For an asymmetrical option that retains assistance, archer push-ups help you practise shifting toward one arm while the other hand remains active.
An incline one-arm push-up with the working hand elevated and feet on the floor is another regression. It changes which contact is raised, so log it as a separate exercise setup. Wider foot spacing can help the support task when the platform allows it, but do not confuse a stance change with a reduction in foot height.
How to Make It Harder
Build repeatable full-range repetitions at the chosen knee-height elevation before adding a brief bottom pause or slower descent. A narrower stance is another progression if both feet remain secure and the body stays controlled.
For experienced athletes, a securely fitted weighted vest can add resistance while retaining the same foot height. First establish safe two-hand entry and exit with the vest and confirm that the support is suitable for the combined load. Change one variable at a time.
A taller foot support creates a different decline setup and should be tracked separately. There is no need to keep increasing the height if it changes the movement into a hip-folded pike press or prevents a consistent chest-to-floor repetition.
Sets, Reps and Frequency
As a coaching starting point, perform 3–4 sets of 1–5 controlled repetitions per arm, with two to three minutes of rest before repeating a demanding effort on the same arm. Leave roughly one clean repetition in reserve when possible.
If even one full-range repetition requires twisting, bouncing or free-hand assistance, use a lower elevation rather than repeating failed attempts. Practise one or two times per week initially and adjust around your other heavy pressing work and recovery.
Start with the weaker arm and use matching setup criteria on both sides. If one side needs a lower support, log that difference instead of comparing unlike repetitions. Add repetitions or a small training progression after the existing sets are repeatable across more than one session.
These are coaching suggestions, not validated readiness thresholds. The one-arm push-up guide provides broader progression and strict floor-version context. The elevated-foot setup here has its own criteria and is not automatically equivalent to a record-category repetition.
Keep Retests Consistent
Record the foot-contact height, stance width, hand position, hand-to-support distance, footwear, chest-depth target, tempo and any external load. Keep the free-arm position and torso movement comparable. A side-view recording helps check depth, while a front-oblique view helps reveal excessive rotation.
Count each arm separately. The same repetition count on a lower support, wider stance or shallower range is a different result. Around knee height describes the setup; it does not establish a fixed load percentage or a universal score milestone.
Comfort and When to Stop
Stop for sharp wrist, elbow or shoulder pain, pinching, numbness, instability, slipping feet or a moving support. Place the free hand down and exit with control. Persistent or recurring symptoms warrant advice from a qualified healthcare professional.
This is an advanced training progression. Elevation and one-arm loading are not a rehabilitation prescription, and a warm-up does not guarantee that the setup is suitable for you.
Feet-Elevated One-Arm Push-Up FAQ
How high should the feet be?
About knee height. A common bench or chair seat may be around 40–50 cm (15.7–19.7 in), but measure the actual foot surface and use a height you can control.
Can I use a chair instead of a workout bench?
Yes, if it is rigid, stable, non-slip and wide enough for secure foot placement. A wider workout bench is usually more practical when you need a broad stance.
Should the feet be together?
Not necessarily. Begin with a supported stance that permits control. Bring the feet closer only as a deliberate progression, keeping the same height and depth.
Where should the free hand go?
Behind the back or alongside the torso, clear of the floor and furniture. It must not assist during a counted unassisted repetition.
Is any body rotation allowed?
A small coordinated shift can occur. Keep it controlled and comparable from rep to rep; a large hip roll or sudden chest turn used to finish the press changes the movement.
How does this differ from an incline one-arm push-up?
Here the feet are higher than the floor-based working hand. An incline one-arm version raises the working hand above the feet and is generally used to reduce the pressing challenge.
What if I cannot reach the floor?
Use a lower foot support or return to the floor-footed one-arm version. You may practise a shorter range, but record it separately from full chest-to-floor repetitions.
Tips for the proper execution of Feet-Elevated One-Arm Push-Up
Use a stable bench or rigid chair around knee height, approximately 40–50 cm (15.7–19.7 in) as a practical guide, and record the actual foot-contact height.
Keep both toes/forefeet securely on the top surface and use a support wide enough for the stance you can control.
Enter with both hands on the floor, establish the elevated-foot plank, then remove the free hand after transferring toward the working side.
Spread the working-hand fingers and choose a palm position that lets the shoulder and chest move comfortably over the support.
Keep the free hand off the floor and furniture throughout each counted repetition; do not use it to assist against the thigh.
Brace the abdomen and glutes, keep both knees straight and lower the shoulders and hips together.
Guide the working elbow diagonally backward and lower the chest without leading with the head or forcing an uncomfortable elbow angle.
For the full-range version, touch the chest gently to the floor and press back to straight-elbow support without bouncing or resting.
Keep torso movement controlled and repeatable; avoid a large hip roll, sudden chest turn or separate hip lift to finish the press.
Train both arms with comparable setup criteria, and put the free hand down before dismounting or if support control deteriorates.
Muscles worked when doing Feet-Elevated One-Arm Push-Up
The feet-elevated one-arm push-up combines a unilateral press with trunk and lower-body stabilization. The working arm supports the upper-body press while the feet remain on the elevated surface.
Main Pressing Muscles
- Pectoralis major: Moves the working upper arm during the press and controls the descent.
- Triceps brachii: Extends the working elbow to return to the top position.
- Anterior deltoid: Assists the working-side shoulder movement.
Supporting Muscles
- Obliques and other abdominal muscles: Help manage trunk position and unwanted rotation under asymmetrical support.
- Serratus anterior and other shoulder-blade stabilizers: Coordinate the working shoulder blade with the pressing arm.
- Spinal stabilizers, glutes and quadriceps: Help maintain the connected torso and straight-leg position.
- Forearm and hand muscles: Maintain secure palm contact and control at the working wrist.
- Foot and lower-leg muscles: Help maintain contact with the elevated surface.
Foot elevation changes the pressing task, but it does not isolate one part of the chest or establish a precise activation advantage. Support height, stance, depth and torso movement all affect the exercise.
Primary Muscle(s):

Middle chest

Triceps
Secondary Muscle(s):

Anterior delt

Abdominal
Equipment needed for Feet-Elevated One-Arm Push-Up
No equipment needed for this exercise.
Adjust the difficulty of Feet-Elevated One-Arm Push-Up
Lower the foot support or return to floor-footed one-arm push-ups to reduce the decline challenge. Use two-arm decline or assisted asymmetrical presses if needed. Progress at the same knee-height elevation by adding repeatable full-range repetitions, a bottom pause, a slower descent, a narrower supported stance or securely fitted resistance. Change one variable at a time and record the setup.
How to make Feet-Elevated One-Arm Push-Up harder?
How to make Feet-Elevated One-Arm Push-Up easier?
How to make Feet-Elevated One-Arm Push-Up harder?
To make Feet-Elevated One-Arm Push-Up harder:
-
Bring the feet gradually closer together while keeping them securely supported and preserving the same height, chest depth and controlled torso movement.
-
Pause for one to two seconds at the bottom without resting bodyweight on the floor or using the free hand to assist.
-
Lower for approximately three seconds before pressing smoothly to a straight working elbow, retaining the same setup and range.
-
Add a securely fitted weighted vest after mastering the unweighted version and confirming stable equipment and safe two-hand entry and exit.
How to make Feet-Elevated One-Arm Push-Up easier?
To make Feet-Elevated One-Arm Push-Up easier:
-
Use a lower stable foot support, then return to the floor-footed one-arm push-up if needed while retaining consistent chest depth.
-
Perform two-arm decline push-ups on the same bench or chair to practise secure foot placement and the elevated-foot body position.
-
Use archer push-ups, self-assisted one-arm presses or an incline one-arm setup as separate regressions when unassisted repetitions are not controlled.
