
Deep-Deficit Freestanding Handstand Push-Up
How to do Deep-Deficit Freestanding Handstand Push-Up?
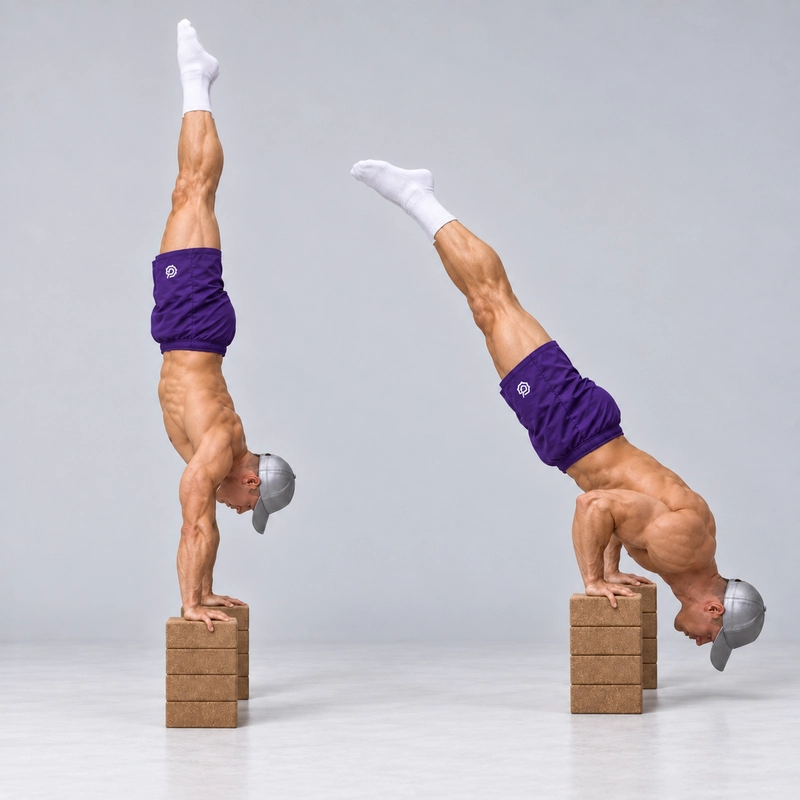
The Deep-Deficit Freestanding Handstand Push-Up is an elite inverted press performed with flat palms on two tall, stable blocks or suitable plyo-box platforms. Starting in an unsupported handstand, lower the head and shoulders clearly below the level of the hands, then press back to a balanced straight-arm handstand.
It combines a deeper pressing range with continuous freestanding balance. Compared with the floor freestanding handstand push-up, the open space below the palms allows a lower endpoint. Compared with the handstand push-up on parallettes, this page uses broad flat hand surfaces rather than a wrapped handle grip.
A peer-reviewed handstand push-up technique article describes the exercise as combining inverted support with shoulder-press and push-up actions. Its abstract provides general context; it does not validate a tall-box arrangement, a minimum deficit or a universal readiness test for this deep freestanding version.
What Makes This a Deep Deficit?
At the bottom, both the head and the shoulders must be visibly below the horizontal plane through the palm-contact surfaces. Merely dipping the head below that plane while the shoulders stay high is a shallower deficit repetition.
The supports create space; the athlete must actually use the selected depth and return from it. Taller boxes do not make a shallow press a deeper achievement. Establish a consistent endpoint rather than treating the floor beneath the boxes as a target that must be reached.
Keep the body primarily inverted while the head and shoulders move through the press. A deliberate transition into a horizontal bent-arm planche is a different movement. Increasing the back arch or craning the neck also does not establish deeper shoulder travel.
Check Strength, Balance and Apparatus Control Separately
You need more than a long handstand hold. Before combining the tasks, establish controlled flat-palm pressing at lesser depths, a repeatable freestanding handstand, and an entry and exit suited to the actual support height.
The freestanding handstand practice drill develops entry and balance skills on the floor. Those skills are a foundation, but a floor step-down or cartwheel cannot simply be assumed to work around tall solid supports. Learn the exact elevated setup with competent gymnastics or handstand supervision before adding a deep press.
The back-to-wall handstand push-up can develop pressing with less balance demand. Keep wall-assisted work separate from unsupported performance. Being strong against a wall does not demonstrate continuous balance through a deep freestanding return.
There is no universal hold time or repetition count that guarantees readiness. The practical requirement is repeatable control of the relevant components, including the ability to stop and leave the actual setup before the arms lose support.
Choose Supports for Inverted Loading and Clearance
- Use two matched supports with broad, firm, non-slip tops and sufficient room for the whole palm and fingers.
- Choose equipment suitable for bodyweight hand support and the shifting forces of the press, with a stable base that resists rocking, sliding and tipping.
- Confirm equal hand-contact heights and secure placement on a level floor.
- Leave an open corridor for the head, shoulders, torso and elbows at the intended bottom.
- Keep the landing and possible exit routes clear of hard edges, nearby equipment and people.
A product's “plyo box” label or vertical load rating alone does not establish suitability for this movement. Check its construction and intended use. A soft top that deforms under the palms, a lightweight box that tips under shifting pressure or an unrestrained stack is unsuitable.
Prefer a purpose-built or appropriately secured arrangement over loose stacked objects. If modular blocks are used, follow their intended assembly and restraint requirements. Check every connection and the relationship between the supports and floor. Do not build extra height from an improvised tower.
The tops and bases must allow the chosen hand spacing without trapping the shoulders between vertical faces. Test the movement corridor before loading the setup. Do not solve insufficient space by putting the palms partly over an edge or forcing a hand width that prevents comfortable pressing.
Use an appropriate landing area and supervision for learning the elevated setup, while keeping the support bases on a firm stable foundation. Padding in the landing area does not compensate for tipping equipment or an unknown exit. Avoid placing the bases on a surface that lets them sink or wobble.
Flat Palms Change the Task
Spread the fingers and keep the full palm securely supported. Use a finger direction and hand width that allow comfortable wrist loading and an unobstructed press. Maintain pressure through the palms and fingers rather than gripping an edge as a substitute for a suitable top surface.
Flat supports retain wrist extension. Parallette handles allow a different wrist position and gripping strategy, so an identical depth and repetition count do not make the two configurations interchangeable. Introduce flat-palm depth gradually even if you can already press deeply on handles.
Prepare for palm loading with the wrist warm-up routine, comfortable shoulder preparation and easy pressing. Warm-up does not establish equipment stability or clear an athlete to press through joint pain.
Record Achieved Depth Rather Than Box Height
Measure the hand-contact height from the floor. From a clear side view, record the lowest point of the head at the bottom and a consistent visible shoulder landmark. “Bottom head height” refers to that lowest point. Use the same camera position and landmark for comparisons.
Achieved head deficit = hand-contact height minus bottom head height. A positive value places the head below the hands. Record shoulder depth separately because head depth alone cannot show that the shoulders entered the deep portion.
Shoulder drop below the hands = hand-contact height minus bottom shoulder-landmark height. Treat video estimates as approximate coaching measurements, not a validated laboratory measure of joint position.
| Bottom position | What it shows | Record as |
|---|---|---|
| Head below hands; shoulders above hand plane | Head clearance has been used, but shoulders remain high | Shallower deficit press |
| Shoulders approximately at hand plane | A transition toward greater shoulder depth | Record the actual endpoint |
| Head and shoulders clearly below hand plane | The selected deep range has been reached | Deep deficit only if the full press is completed |
For arithmetic only, a hand level of 60 cm (23.6 in), a bottom head height of 25 cm (9.8 in) and a shoulder landmark at 45 cm (17.7 in) give a head deficit of 35 cm (13.8 in) and a shoulder drop of 15 cm (5.9 in). These are illustrative measurements, not recommended apparatus dimensions, required depth or readiness criteria.
Leave clearance beneath the head at the chosen bottom. The exercise is not a head-touch drill, and reaching the floor is not the goal. Do not add a rigid obstacle in the descent corridor to enforce a deeper endpoint.
How to Do a Deep-Deficit Freestanding Handstand Push-Up
- Confirm the setup. Check equal support heights, secure tops and bases, body clearance and the practised entry and exit routes. Choose the depth you can control.
- Set the palms. Place the whole hands on the supports at a comfortable symmetrical width. Keep fingers and palms away from unsafe overhangs.
- Use your established elevated entry. Enter through a method already learned for these supports. Avoid an improvised jump or powerful kick that can shift the equipment.
- Settle the handstand. Establish unsupported balance with straight elbows and active shoulder elevation. Pause until entry momentum has stopped before descending.
- Organize the body. Keep the knees straight, legs together and ribs and pelvis controlled. Maintain a consistent gaze without craning the neck.
- Lower smoothly. Bend the elbows and let the head and shoulders move forward and down through the open corridor. Keep the palms planted and distribute pressure as the balance point changes.
- Reach the selected deep endpoint. Bring both head and shoulders clearly below hand level under control, with clearance from the floor and support edges. Do not drop, rest on the head or force an uncomfortable bottom.
- Press and rebalance. Push through both palms to extend the elbows while guiding the body back above the support base. Keep the legs quiet; do not use a kip or sudden scissor to generate the return.
- Finish the repetition. Regain a recognizable stable freestanding handstand with straight elbows and active shoulders. A momentary lockout during a fall does not complete the task.
- End before control deteriorates. Use your trained exit for the actual support height and layout. Do not improvise a floor bailout around tall boxes after losing the ability to press.
The head path and elbow angle depend on your proportions and hand spacing. Allow the necessary shoulder movement rather than forcing the elbows tightly against the torso or holding the forearms to an exact visual angle. Abrupt flaring, hand lift or a change that causes edge contact means the setup or range needs adjustment.
Use a pace that keeps the descent controllable and breathe steadily as practical. Introduce the movement with individual quality attempts rather than a fast repeated sequence.
Completion Standard
- Both palms remain on matched stationary flat supports.
- The repetition begins after unsupported straight-arm balance is established.
- Head and shoulders reach the selected clearly below-hand endpoint.
- The head and body remain clear of the floor, support faces and other objects.
- No wall contact, spotter assistance, foot support, head bearing or rebound assists the press.
- There is no knee-driven kip, forceful leg swing or uncontrolled scissor.
- The upward press returns to straight elbows, active shoulders and stable unsupported balance.
- The athlete retains control to leave the setup after the attempt.
A nearby competent spotter does not change the movement classification unless physical assistance occurs. If support is provided, log an assisted repetition. A controlled straddle is also a different recorded configuration from the legs-together standard used here.
Progress Without Chasing the Tallest Setup
First establish repeatable unsupported pressing at a smaller flat-palm deficit. Increase the achieved depth gradually while keeping hand width, grip surface and leg position consistent. Taller supports are only needed if the current arrangement cannot provide the required clearance.
A small increase in the planned bottom depth can be enough for the next session. Establish a new baseline at that endpoint before adding repetitions. If the supports change, first re-establish their entry, hold and exit rather than assuming those skills transfer immediately.
A systematic review of partial and full range resistance training found evidence of range-specific strength adaptation. It supports comparing results at consistent depths rather than assuming a shallow repetition count proves strength in an untrained bottom range. The review does not define an optimal deficit or show that the deepest available press is best for every athlete.
The negative handstand push-up is a separate wall-assisted descent drill. It can complement pressing practice in an appropriate lower setup, but controlling a negative does not prove you can reverse a deep freestanding bottom. Do not use uncontrolled deep negatives from tall supports as a substitute for a manageable complete press.
Programming for Quality Attempts
Practise after the warm-up, while pressing control and balance are fresh. For an athlete already prepared for this apparatus, a conservative coaching starting point is 3–5 sets of one controlled repetition with around 3 minutes of rest, initially in one session per week alongside easier pressing work. Adjust from actual recovery and performance; this is not a validated dose or a mastery timetable.
Stop each set before balance or pressing support deteriorates. If the bottom cannot be reversed cleanly, return to the last manageable range rather than accumulating failed attempts. Depth, apparatus and repetitions are separate variables; change one at a time.
Record achieved depth, support arrangement, hand width, leg position and whether the lockout was stabilized. A slightly deeper clean single can be progress even when the repetition count stays unchanged.
Common Mistakes and Corrections
- Calling every tall-box repetition deep: check head and shoulder position against the hand plane, not the box label.
- Using loose stacks or flexible tops: choose suitable restrained supports with secure full-hand contact.
- Ignoring solid support faces: verify that the head, shoulders and elbows have space through the entire press.
- Descending directly from entry momentum: establish a stable top before bending the arms.
- Forcing the deepest possible bottom: choose the endpoint you can reverse under balance control.
- Using the floor as a catch: keep head clearance and regress if you cannot control the descent.
- Throwing the legs to escape the bottom: use a smaller recorded range that permits strict pressing.
- Stopping at a falling lockout: regain stable unsupported balance before counting the repetition.
- Assuming a floor exit transfers to tall equipment: learn the support-specific exit under appropriate supervision first.
Stop for sharp pain, numbness, dizziness, unusual visual symptoms or instability in the wrists, elbows, shoulders or neck. Persistent or recurring symptoms need appropriate professional assessment. This demanding version is not a wrist or shoulder rehabilitation exercise.
Questions About Deep Freestanding Pressing
How tall should the blocks or boxes be?
Tall enough for the intended controlled depth and head clearance, with stable full-hand support and a learned exit. There is no universal height, and added height without added achieved range is not stronger pressing.
Does the head need to touch the floor?
No. Reach the selected below-hand endpoint with clearance beneath the head, then reverse the press. Floor contact is not the standard for this version.
Is it harder than the parallette version?
Compare actual depth, grip and balance conditions. Flat palms and handles differ, and an equally deep parallette press can be highly demanding. Do not rank the variations solely by the equipment's height.
Can I practise with a spotter?
Yes, with someone competent for the apparatus and movement. Record any physically supported attempt as assisted, and keep that separate from a completed freestanding repetition.
Tips for the proper execution of Deep-Deficit Freestanding Handstand Push-Up
Use matched tall supports suitable for inverted hand loading, with broad firm tops and bases that resist rocking, sliding and tipping.
Leave clearance for the head, shoulders, torso and elbows below the hand plane without forcing an unsuitable hand width.
Support the whole palm and fingers on each top; avoid overhanging hands, loose stacks and deforming surfaces.
Learn the entry and exit for the actual support height before adding depth; a floor bailout is not automatically transferable.
Settle into unsupported straight-arm balance with active shoulders before starting the descent.
Lower the head and shoulders clearly below hand level through a range you can reverse, maintaining clearance beneath the head.
Keep the knees straight, legs together and body controlled without a kip, forceful leg swing or head-bearing rest.
Press evenly through both palms and regain a stable freestanding lockout rather than finishing while falling.
Record achieved head and shoulder depth separately from support height, using the same side-view reference.
End attempts while you retain control to exit, and increase actual range gradually rather than chasing taller equipment.
Muscles worked when doing Deep-Deficit Freestanding Handstand Push-Up
The Deep-Deficit Freestanding Handstand Push-Up combines shoulder and elbow pressing with unsupported balance through a deep selected range. The shoulders and triceps control lowering and produce the upward return, while the hands, shoulder blades and trunk coordinate the inverted position.
Main Pressing Muscles
- Anterior deltoids: contribute strongly to the shoulder action through the descent and press.
- Triceps brachii: control elbow flexion and extend the elbows to restore straight-arm support.
- Lateral deltoids: assist shoulder movement and upper-arm control.
Assisting and Stabilizing Muscles
- Upper pectoralis major: assists pressing according to the arm and torso position.
- Serratus anterior and trapezius: coordinate shoulder-blade motion and the active overhead finish.
- Rotator-cuff muscles: stabilize the shoulders during the loaded range.
- Forearm and hand muscles: manage flat-palm pressure and fingertip adjustments for balance.
- Abdominals, obliques and spinal stabilizers: maintain trunk control as the balance point changes.
- Glutes, quadriceps and other leg stabilizers: keep the hips organized, knees straight and legs quiet.
Extra clearance does not establish extra muscle activation. Actual depth, body position and control determine the task being performed. Flat supports also retain wrist extension, so handle-based pressing and block-based pressing should remain identifiable configurations.
Primary Muscle(s):

Anterior delt
Secondary Muscle(s):
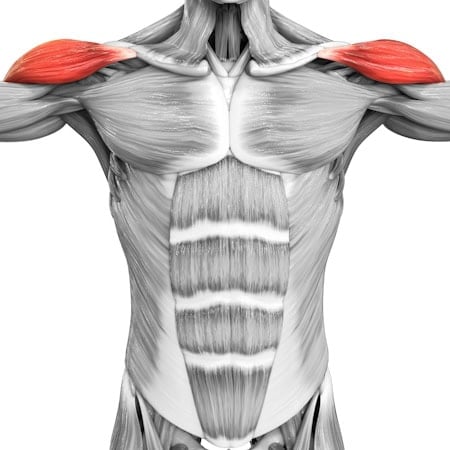
Lateral delt

Trapezius

Triceps
Equipment needed for Deep-Deficit Freestanding Handstand Push-Up

Adjust the difficulty of Deep-Deficit Freestanding Handstand Push-Up
Scale the achieved pressing depth before changing support height. Use the deepest endpoint that permits a controlled descent, complete return and stable freestanding finish. Develop flat-palm pressing, balance and apparatus-specific entry and exit separately as needed. Taller supports provide clearance but do not make a shallow repetition deeper. Wall assistance, handle grips and straddle legs are different recorded configurations.
How to make Deep-Deficit Freestanding Handstand Push-Up harder?
How to make Deep-Deficit Freestanding Handstand Push-Up easier?
How to make Deep-Deficit Freestanding Handstand Push-Up harder?
To make Deep-Deficit Freestanding Handstand Push-Up harder:
-
Increase the achieved below-hand endpoint slightly while preserving flat-palm contact, head clearance and a complete controlled return.
-
Use a three-second descent through the same recorded range without changing the supports or leg position.
-
Pause briefly at the selected bottom under arm support, then press without floor contact, rebound or leg drive.
-
Add one clean repetition at the same depth only after each return reaches a stable freestanding lockout.
How to make Deep-Deficit Freestanding Handstand Push-Up easier?
To make Deep-Deficit Freestanding Handstand Push-Up easier:
-
Reduce the achieved deficit to the last depth you can reverse cleanly, using lower stable flat supports where they provide adequate clearance.
-
Return to floor freestanding handstand push-ups to practise unsupported pressing through the floor-limited range.
-
Separate pressing from balance with appropriate wall-assisted work and freestanding hold practice before recombining them.
