
Feet-Elevated Straddle Press to Handstand
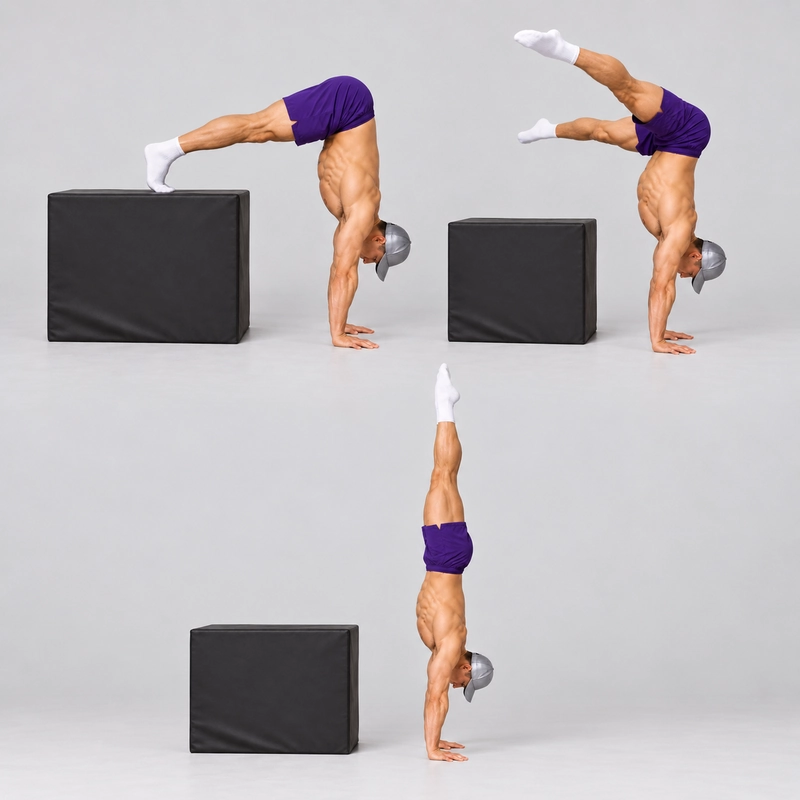
How to do Feet-Elevated Straddle Press to Handstand?
The Feet-Elevated Straddle Press to Handstand is a straight-arm handstand entry that starts with both feet on a stable plyo box and both hands on the floor. Fold at the hips, transfer support to the hands and raise the feet together without a jump. Keep the legs straddled during the ascent, then bring them together as you settle into a freestanding handstand.
The elevated start is a regression of the floor Press to Handstand. Raising the feet lets the hips begin higher relative to the hands and removes part of the lower takeoff range. This can make the initiation more accessible, but the box stops assisting once both feet leave it.
The exercise is useful when you can support and balance a handstand but cannot yet initiate a floor straddle press cleanly. It gives you a way to practise the transition from supported feet to unsupported hand balance, then gradually reduce the starting elevation.
What the Box Changes
With hands and feet on the floor, the press begins from a lower folded position. A plyo box raises the starting feet and can help you organize the hips closer to the hand-support base before takeoff. You still need to coordinate forward weight transfer, active shoulders and leg compression.
This is a setup advantage, not a fixed reduction in bodyweight. Once the feet are clear, the arms support the whole body. A particular box height does not guarantee the same difficulty for people with different proportions, mobility or hand placement.
A systematic review of handstand biomechanics summarizes research on press-handstand motion, shoulder torque and balance control. It provides general context for coordinated pressing and hand balance, rather than a tested box-height prescription for this variation.
Do not confuse this movement with the Pike Hold on a Plyo Box. In that hold, the feet remain supported. Here, both feet release and you finish in an unsupported handstand. It also differs from a feet-elevated pike push-up: the elbows stay straight throughout the press.
Readiness: Support, Balance and an Exit
Before attempting the full movement, be comfortable supporting your body on straight arms with active overhead shoulders. A Chest-to-Wall Handstand can develop that supported position, but wall endurance alone does not establish unsupported balance.
You should also have repeatable Freestanding Handstand control and know how to come down deliberately when a press travels too far or fails to reach balance. No universal hold time guarantees readiness.
Learn your step-down or cartwheel-style exit progressively before combining it with a box press. Handstand Factory's bailout resource describes graded exit practice; its full training session requires email registration.
The box occupies space behind the hands and can interfere with a leg sweep or an attempted return. Rehearse the actual exit route with that obstacle in place. Leave clear floor space to the sides and in front, and use coaching or a competent spotter when you are learning this setup.
If you cannot yet control a free handstand or an exit around the apparatus, stay with supported box holds, small weight shifts and appropriate balance preparation. Raising the feet does not remove the consequences of losing arm support.
Choose a Stable, Sufficiently Wide Plyo Box
Use a solid plyo box on a firm, level, non-slip floor. Check that it will not slide, rock or tip under your intended pressure and that its top is dry and secure. Avoid a compressible surface that makes your foot position unpredictable.
Both feet must fit securely on the same usable top surface in your chosen straddle. Start with a moderate width rather than forcing a full split. A box that is too narrow for your stance is the wrong setup; do not balance the feet precariously on opposite edges or hang them off the sides to imitate a wider position.
Choose a height that lets you reach the floor and organize the starting shape without rushing. There is no compulsory knee-height or hip-height standard for this exercise. For example, a 30 cm (about 12 in) support and a 45 cm (about 18 in) support represent different starting configurations, not interchangeable repetitions.
Use a lower or higher purpose-built setup according to your control and the range you need to practise. More height can shorten the initial lift, but an excessively high box may make mounting, positioning and exits harder. Do not stack loose objects merely to increase elevation.
If the box is adjustable or part of a stacking system, use only its intended, secured configuration. Confirm the top dimensions as well as the height; a platform must accommodate both feet and the planned return if you intend to descend onto it.
Set the Hands and Distance From the Box
Place both palms on the floor in front of the box, approximately shoulder-width apart. Spread the fingers and use a comfortable forward or slightly outward orientation. Keep the full palms available for support and the elbows naturally straight.
Choose a hand-to-box distance that lets you fold at the hips, raise the pelvis and shift weight over the hands. Too much distance can leave the hips trailing behind and turn takeoff into a long forward reach. Too little can crowd the shoulders, obstruct the leg path or make the entry awkward.
There is no single correct distance in centimetres or inches. Test the position with both feet still supported, adjust between attempts and then keep the hands fixed during the working press. A floor mark can help reproduce a useful setup.
Mount deliberately: place the feet securely and organize the hands in a sequence you can control. Temporary knee bending or hand repositioning during setup is acceptable. Settle with straight knees, straight elbows and stationary feet before beginning the measured press.
Check how you will leave a failed takeoff. If the feet only float slightly, you should be able to replace them quietly on the box without catching an edge. For a larger loss of balance, use the practised floor exit rather than reaching blindly backward for the top.
Warm Up for the Actual Loading
Use the Wrist Warm-Up Routine, comfortable overhead movement and easy straight-arm support before full attempts. Gradually introduce forward hand loading instead of moving immediately into the deepest lean.
Add controlled hip folds and active compression practice. Seated Double-Leg Pike Lifts provide legs-together preparation; seated straddle compression lifts are a more specific shape option for this takeoff.
Finish the preparation with a few supported box leans and short, recoverable foot floats if those are already within your control. The warm-up should prepare you without exhausting your arms or hip flexors.
Stop for sharp wrist, shoulder or groin pain, pinching, numbness or dizziness. Do not increase box height or shoulder lean to force an uncomfortable position. If you have been advised to avoid strenuous inversions, follow that individual guidance.
How to Do the Feet-Elevated Straddle Press to Handstand
- Establish the supported start. Set both palms on the floor and both feet securely on the box in a comfortable straddle. Settle before moving.
- Straighten the arms and legs. Maintain natural elbow extension, tighten the quadriceps and fold at the hips. Keep the head in a comfortable position with the eyes on a consistent floor point.
- Push tall through the shoulders. Press the floor away so the shoulders remain active and the upper back does not collapse between the arms.
- Raise and position the hips. Bring the pelvis toward the space above the hand-support base while keeping the thighs close to the torso. Allow a controlled forward shoulder lean as needed.
- Unload both feet. Transfer support smoothly into the hands until the box contact becomes light. Do not bend and spring from the knees, kick one leg upward or launch from the toes.
- Float the feet together. Let both feet leave the top through weight transfer and pressing effort. Keep the knees straight and clear the box without scraping its edge.
- Continue the ascent. Maintain the straddle as the hips rise. Keep pressing through straight arms rather than bending the elbows to push upward.
- Approach the handstand stack. As the pelvis rises above the shoulders, gradually bring the shoulders toward alignment over the wrists. Regulate balance through the hands.
- Close the legs and settle. Bring the straight legs together near vertical and establish a recognizable unsupported handstand with active shoulders.
- Exit deliberately. Hold briefly, then use your practised floor exit or a controlled box return that you have specifically learned.
The movement is a press because the ascent is produced without a jump. Simply keeping the knees straight does not prove that: a strong spring from the ankles can still launch the body. Look for a smooth unloading of the box rather than a sudden push-off.
GMB's press-to-handstand tutorial emphasizes arm drive, hip lift and straddle control while separating lift practice from negatives. Those concepts are useful here, although its broader drill collection also includes jumping entries that do not meet this page's no-jump press standard.
Takeoff and Top-Position Standards
A complete press begins from settled box contact and finishes in a controlled free handstand. For this page, use the following visible standard:
- Both feet start on the declared box and both hands start on the floor.
- The hands stay planted in the same positions.
- The elbows and knees remain straight through the working ascent.
- Both feet leave together without a hop, kick or forceful toe spring.
- The legs stay deliberately straddled until the hips approach the vertical stack.
- After release, no foot, wall or spotter contact replaces hand support.
- The legs close and a recognizable freestanding handstand settles before the exit.
A brief one-to-two-second settled finish is a useful coaching target for showing control, not a universal competition rule. Passing through vertical and immediately falling does not demonstrate the same completed task.
A small bilateral float returned to the box is a useful partial drill. A one-foot release, jump-assisted entry or spotter-supported press can also be preparation, but record it separately from this unassisted full ascent.
The ascent and the negative are separate tasks. A controlled floor exit can follow a completed press even if you are not yet able to lower back to the box. Do not require a difficult return to preserve the repetition count.
Control the Shoulder Lean and Leg Path
Some forward shoulder movement can help position your body over the hands during initiation. Trying to keep the shoulders perfectly stacked from the first instant may leave the feet loaded. Conversely, throwing the shoulders far forward can create an unstable takeoff.
Use the amount of lean needed for the chosen box and body shape, then reduce it as the hips rise. Keep the shoulders actively elevated throughout; straight elbows do not make a collapsed shoulder position adequate.
Keep the straddle while the pelvis rises rather than closing the legs immediately after release. Closing too early can change the balance and make clearance harder. Do not force a wider position than your hips can control.
Use finger pressure responsively as you approach balance. If you travel toward the fingertip side, increased finger pressure can help check the motion; avoid a constant maximal squeeze that sends you back toward the box. Keep the palms grounded and use the corrections you have already practised in handstands.
Common Mistakes and Corrections
- Jumping from the box: return to supported weight shifts or a small bilateral float and practise unloading without a sudden leg drive.
- One leg kicks up first: reset the stance and transfer weight evenly; use a smaller simultaneous release.
- Feet stand on the edges: choose a sufficiently broad box or a more moderate straddle with secure top contact.
- Hands are too far away: adjust between attempts so the hips can rise toward the hand base without a long reach.
- Elbows bend or shoulders sink: reduce the attempt, restore active support and use an appropriate assisted drill.
- Feet scrape or hook the box: review hand distance, foot position and the release path before repeating a full press.
- Legs close too early: retain the straddle until you approach the vertical stack.
- Vertical is reached but balance is lost: practise the free handstand finish separately and use smaller takeoff corrections.
- Blindly reaching back for the box: use the planned floor exit unless you can deliberately control the return.
- Making the setup easier mid-set: record changes in box height, stance or hand position instead of comparing the repetition count as if nothing changed.
These observations suggest what to review; they do not diagnose a single weak muscle or mobility restriction. Video from the side and front can help distinguish setup, timing and balance problems.
Practise the Return Separately
A box return involves reopening the legs, controlling the hips downward and placing both feet on the actual top surface. It is an additional negative, not an automatic part of learning the ascent.
Learn it with a manageable height and appropriate assistance when needed. Know where the box is relative to the hands before the attempt. Aim for light, controlled placement instead of dropping onto the top or searching with one foot while balance deteriorates.
If you cannot control that route, end the successful ascent with a practised floor exit. If balance is already lost, prioritize coming down through the known exit rather than attempting to save a box-return cycle.
Sets, Practice Dose and Progression Toward the Floor
A practical starting option is three to five well-rested single attempts, allowing approximately 90–180 seconds between demanding presses or longer when needed. Use fewer full attempts if quality declines. This is a coaching example, not a validated prescription for every athlete.
Practise after warming up and before tiring the shoulders with high-volume pressing. Two or three sessions per week can be a starting schedule if it fits your other handstand and strength work and you recover comfortably.
Separate full presses from supported leans and partial floats in your log. Use an appropriate version you can repeat, ending the session when jumping, elbow bending or uncontrolled exits become the usual outcome.
When the same setup gives repeatable straight-arm ascents and settled finishes, reduce the box height by a manageable step. Keep the hands on the floor and recheck the distance, straddle and exit. A lower support adds more of the initial press range; it may require additional compression and weight-transfer practice.
Work toward the floor Press to Handstand gradually. You do not need a new canonical exercise for every box height, and completing a high-box press does not guarantee an immediate floor press.
Other progression options include a brief controlled pause after release or a learned negative back to the box. Change one element at a time instead of lowering the box, narrowing the straddle and adding repetitions simultaneously.
Frequently Asked Questions
How high should the plyo box be?
Choose a stable height that gives you a useful starting position and manageable exit. There is no required knee-height or hip-height setting. Record the actual height and recheck the full setup whenever it changes.
Can I use a narrow box?
Only if both feet fit securely in a straddle you can control. Do not force a wide stance onto an inadequate top. Choose a broader purpose-built platform if needed.
Is this a handstand push-up?
No. The elbows remain straight while the hips and legs move into the handstand. A handstand or pike push-up uses elbow bending and extension.
Does a box press count as a floor press?
No. Record it as feet-elevated and include the box height. Raising the starting feet changes the takeoff task even though the finish is a full unsupported handstand.
Must I return both feet to the box?
No. A planned floor exit can follow a completed ascent. A controlled return is an additional negative or full-cycle practice task and should be logged separately.
Can I practise it against a wall?
A wall-assisted learning drill can be useful with an appropriate setup, but wall contact changes the balance task. Do not count that as the freestanding version described here, and make sure the box and wall leave room for your intended exit.
Tips for the proper execution of Feet-Elevated Straddle Press to Handstand
Use a stable plyo box with enough top surface for both feet in a comfortable straddle. Keep the feet secure rather than precariously balanced on the edges.
Choose a box height and hand distance you can control. Record both and adjust between attempts rather than moving the hands during the working press.
Settle with both palms on the floor, straight elbows and straight knees before the press begins. Setup steps are separate from the measured ascent.
Push tall through the shoulders and keep the upper back active. Avoid sinking between the arms as weight transfers from the feet.
Move the hips toward the hand-support base and unload the feet smoothly. Do not spring from the knees or toes to launch the handstand.
Float both feet together while keeping the knees straight. A one-leg kick or hop is assisted entry practice rather than this full press standard.
Maintain the straddle until the hips approach the vertical stack, then close the legs into a controlled handstand.
Regulate pressure through the palms and fingers as you settle. Keep the hands planted and avoid using a large arch or repeated hand steps to chase balance.
Practise an exit that accounts for the box behind the hands. Use a known floor exit instead of blindly reaching back for the top when balance is lost.
Lower the foot support gradually once the current setup is repeatable. Keep full presses, partial floats, assisted attempts and box-return negatives separate in your log.
Muscles worked when doing Feet-Elevated Straddle Press to Handstand
Feet-Elevated Straddle Press to Handstand combines straight-arm shoulder support, active hip compression and hand-balance control. Foot elevation changes the starting position; it does not remove full-body support through the arms after takeoff.
- Anterior deltoids: contribute to controlling the shoulder position during the transition into overhead support.
- Trapezius and serratus anterior: help elevate and control the shoulder blades as you push the floor away.
- Triceps: maintain elbow extension rather than performing repeated bent-arm push-up actions.
- Hip flexors: help maintain active compression and control the legs through the takeoff and ascent.
- Abdominals and obliques: organize the trunk and pelvis and limit excessive arching or twisting.
- Quadriceps: maintain the straight-knee shape.
- Hip-position muscles: coordinate the straddle and bring the legs together near the handstand finish.
- Forearms, wrists and fingers: help manage pressure through the hand-support base and small balance corrections.
These are functional roles, not an activation ranking measured for this exact plyo-box setup. The load and movement demands vary with support height, hand distance, body proportions and technique. No fixed percentage reduction in shoulder loading is assigned.
Primary Muscle(s):

Anterior delt

Trapezius
Secondary Muscle(s):

Triceps

Abdominal

Oblique
Equipment needed for Feet-Elevated Straddle Press to Handstand
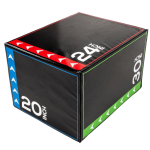
Adjust the difficulty of Feet-Elevated Straddle Press to Handstand
Adjust the starting foot elevation and the amount of movement you practise while keeping the hands on the floor. Begin with supported box leans, small recoverable floats or appropriate spotting. Progress to full straight-arm presses, then reduce the box height or add controlled pauses and negatives. Recheck foot support, hand distance and the exit after every setup change.
How to make Feet-Elevated Straddle Press to Handstand harder?
How to make Feet-Elevated Straddle Press to Handstand easier?
How to make Feet-Elevated Straddle Press to Handstand harder?
To make Feet-Elevated Straddle Press to Handstand harder:
-
Reduce the box height by a manageable step while preserving a no-jump takeoff, straight elbows and a settled handstand finish. Recheck the setup before pressing.
-
Add a brief controlled pause just after both feet clear the box, then continue to handstand without sinking through the shoulders or bending the elbows.
-
Progress to the floor Press to Handstand after gradually reducing the elevation and controlling the added takeoff range. Record the floor version separately.
How to make Feet-Elevated Straddle Press to Handstand easier?
To make Feet-Elevated Straddle Press to Handstand easier:
-
Practise a Pike Hold on a Plyo Box and supported press leans with both feet staying on the top. Learn active straight-arm support before attempting the full release.
-
Use a small simultaneous foot float followed by a quiet return to the box. Choose a recoverable range and record it as partial practice rather than a completed handstand press.
-
Use a competent spotter for the weight transfer and ascent when needed. Agree on the assistance and exit beforehand, and record the attempt as assisted.
