
Band-Assisted Human Flag
How to do Band-Assisted Human Flag?
What is the Band-Assisted Human Flag?
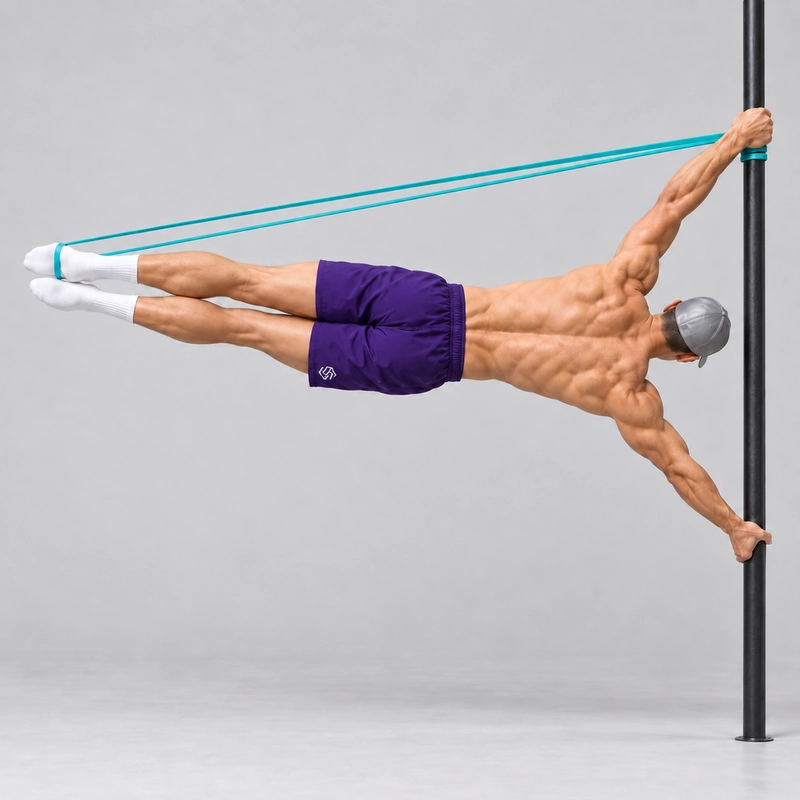
The Band-Assisted Human Flag is a horizontal human flag hold performed with elastic support from a resistance band. Grip a rigid pole with one hand above the other, pull with the top arm and push with the bottom arm while extending the body sideways. Keep both elbows straight and the shoulders, hips and ankles in a long line approximately parallel to the ground.
The main technique below uses band support beneath the pelvis or upper thighs and straight legs together. A foot-supported band is another option. The pole is the main apparatus, but securely mounted stall bars can be used with the same opposing arm actions and horizontal body standard.
This is an assisted version of the Human Flag. The band shares the load while you practise the full body shape; it does not turn the hold into an unassisted flag or remove the need for active shoulders, secure hands and trunk tension.
It differs from the Tuck Human Flag, One-Leg Human Flag and Straddle Human Flag, which reduce the effective lever by changing leg position. Here, you practise a longer legs-together shape while the band supplies external assistance. Those shorter-lever positions remain useful regressions.
The Vertical Human Flag places the body above the hands rather than horizontally beside them. For the wider progression pathway, see our human flag progression guide; band assistance can be used alongside its lever and angle progressions.
What you are practising
The key task is to maintain the flag’s opposing straight-arm actions while the torso and legs stay connected. The top arm pulls against the upper grip, the bottom arm pushes the structure away and the trunk resists sagging and unwanted rotation.
A band-supported horizontal hold lets you practise that body position before you can support it unaided. It is especially useful when a shorter-lever hold is manageable but extending both legs causes the hips to fall. It is also useful for refining a longer body line at a controllable load.
Assistance and leverage are separate variables. A heavily assisted full flag is not automatically harder than an unsupported tuck, and using a lighter band is not progress if the elbows bend or the body stops being horizontal. Compare attempts only when the setup and technique are consistent.
FitPro’s human flag coaching article with Stephen Hughes Landers describes the opposing arm actions and how grip depends on the apparatus. It is general technique context, not a tested prescription for this exact band setup.
Equipment and band anchoring
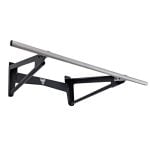
- Main apparatus: use a rigid, non-rotating pole or a purpose-built flag station that tolerates sideways loading. You need enough open space to extend the entire body without contacting another upright or obstacle.
- Alternative apparatus: use securely mounted stall bars with sound rungs and appropriate clearance from the wall and surrounding equipment. Check that the structure is intended for the loads you will apply.
- Band: use a long closed-loop resistance band appropriate for assisted bodyweight work. Check for cuts, splitting, worn areas and damage near the contact points. Follow the manufacturer’s attachment and stretch limits.
- Anchor: use a suitable fixed attachment above the upper hand, such as an appropriate crossbar or stall-bar rung. Place it close to the hand line so the band can provide upward support without dragging the body forward or behind the flag plane.
- Vertical-pole limitation: a smooth pole may provide hand grips without providing a secure band anchor. Do not assume a loop around a bare vertical surface will stay at the same height. Use a suitable fixed anchor or another appropriate station if the band can slide.
- Working area: allow space for the band, legs and exit path. A suitable stable mat can help define the landing area, but it does not replace a controlled dismount.
The anchor must remain fixed as the band is loaded sideways and downwards. Keep the band clear of sharp edges, buckles and abrasive surfaces, and away from the face, neck and hands. Do not invent a knot, clamp or attachment fitting to compensate for an unsuitable pole.
Test the arrangement gradually with the feet supported before attempting a horizontal hold. Check that the anchor stays put, the band supports you in the intended direction and the body-contact point remains stable. Unload before moving the anchor or adjusting the band.
Band placement: hips or foot
Hip or upper-thigh support — main technique
Position the free loop so it cradles the pelvis or upper thighs from below when the body extends sideways. Keep the support broad and stable rather than twisting it into a narrow strand or allowing it to ride onto the abdomen. It must not cross the neck or interfere with either arm.
Arrange the loop while you are supported on the ground, then take up tension gradually. As you enter the flag, the band should continue supporting the same area without pulling the hips into a folded or rotated position. If it slips or tightens uncomfortably, return to support and reset.
A band supporting the hips still leaves the legs as a lever that you must hold straight. Squeeze the glutes and quadriceps and brace the trunk; do not let the band lift the pelvis while the feet hang below the body line.
Foot-supported band — attachment alternative
A band anchored above the grips can instead support a foot in its lower loop. Pullup & Dip’s band exercise guide documents this human flag arrangement with a pole or wall rungs beside the overhead anchor.
Keep the supported foot securely seated and the body aligned; do not allow the other leg to hang or the pelvis to twist towards the band. Choose an entry and exit that let you unload the loop before removing the foot. This arrangement must not route the band through the face or around the neck.
Foot support applies assistance farther from the hands than hip support, and often uses a different amount of band stretch. The same band can therefore feel substantially different in the two arrangements. Record the contact point and anchor position rather than treating them as equivalent loads.
Grip on a pole and on stall bars
Place the hands one above the other on a consistent vertical line. Use enough separation to maintain both straight elbows and active shoulders without forcing an uncomfortable wrist or shoulder position. There is no universal centimetre measurement that suits every athlete and apparatus.
On a round pole, wrap each hand securely and establish the grip orientation you can control in an easier supported drill. Keep the heel of the bottom hand engaged as you push, and avoid letting either hand drift around the pole so the body spirals away from the intended plane.
On stall bars, grip two rungs at different heights with the hands vertically aligned. A pronated top hand and supinated bottom hand is a common starting arrangement, but use a comfortable secure grip suited to the rungs and your practised technique. Do not force pole-specific hand angles onto horizontal rungs.
Choose a position with enough clearance for the shoulders and torso to extend beside the structure. Check that neither hand is blocked by a wall, upright, bracket or the band attachment. Note the rung numbers or hand positions so you can reproduce them.
Readiness and preparation
Band assistance does not make this a zero-experience exercise. First learn to grip the apparatus and maintain a top-arm pull and bottom-arm push with the feet supported. The Human Flag Plank is a useful related drill for finding those actions at a manageable load.
Before combining the full horizontal shape with the band, check that you can straighten both elbows, keep the bottom shoulder active and return to support without the hands slipping. Prepare the wrists, elbows and shoulders gradually, then perform a few easy supported flag positions before harder holds.
An unsupported tuck or vertical flag can be useful preparation, but a fixed hold time or pull-up count does not establish readiness for every assisted setup. Select assistance that allows a secure entry, a recognisable horizontal hold and a controlled exit.
Stop if you experience sharp joint pain, instability, tingling or numbness, or if the band or anchor moves unexpectedly. Use an easier supported drill and get appropriate assessment for persistent symptoms rather than continuing through them.
How to do the Band-Assisted Human Flag
- Set up the support. Check the pole or stall bars, secure the band at a suitable fixed point above the upper grip and position the free loop beneath the pelvis or upper thighs. Test it while the feet still support you.
- Set the hands. Stand side-on to the structure. Place the top and bottom hands in a vertical line with enough separation to control the shoulders and straighten both elbows. Grip firmly without trapping the band beneath either hand.
- Create the push and pull. Pull against the upper grip with the top arm while pushing the structure away with the bottom arm. Keep both elbows extended and the bottom shoulder actively supported.
- Enter with assistance. Take up band tension gradually and lift the hips away from the structure. Use a compact leg position or a planned supported entry if needed, then extend the legs once the shoulders and band position are stable. Avoid a large jump or forceful kick.
- Find horizontal. Bring the shoulders, hips and ankles into a long sideways line approximately parallel to the floor. Straighten both knees and bring the legs together. Keep the torso side-facing rather than rolling the chest towards the ceiling.
- Hold actively. Continue the top-arm pull and bottom-arm push, brace the trunk and squeeze the glutes and quadriceps. Keep the head aligned with the spine and breathe without letting the body line relax.
- End before control fails. Finish the hold if an elbow bends, the bottom shoulder collapses, the hips sag, the body rotates or the band shifts. Do not extend the time by hanging passively from the band.
- Return to support. Shorten the lever if useful and lower the feet to the planned stable surface while keeping both hands secure. Let the band unload before stepping out of the loop or changing its position.
- Repeat on the other side. Reset the anchor and contact point as needed. Use appropriate assistance for that orientation instead of forcing the weaker side to match a setup it cannot control.
For foot support, use the same hand actions, horizontal body standard and controlled hold, but replace the hip-loop setup with the tested foot-loop arrangement. Log the support point separately. If you cannot perform a controlled entry and exit alone, use qualified assistance or an easier drill rather than relying on the band to catch a fall.
What counts as a successful hold?
- Hands stay secure and vertically aligned on the fixed structure.
- Both elbows remain naturally straight, with active shoulders.
- The torso and legs form an approximately horizontal line, with knees straight and legs together.
- The hips do not sag or fold, and the chest and pelvis do not rotate substantially away from the side-facing position.
- The body does not rest against the pole, wall or rungs. The resistance band is the intended external support.
- The feet do not push against the ground or structure during the timed hold.
- The band anchor and contact point remain stable, and the entry and exit stay controlled.
Start timing only after you settle into the correct position; stop at the first loss of that standard. A brief settled hold of around two seconds can be used as an editorial demonstration minimum, but it is not a validated strength test or an unassisted Human Flag achievement. Build useful hold time gradually.
A band-assisted tuck, straddle or angled hold is valid practice, but record the actual leg position and angle. Passing briefly through horizontal during a kick or lowering is not the stationary full-body hold described here.
Common mistakes and corrections
The band lifts the hips but the legs drop
Support at the pelvis does not automatically hold the lower body straight. Contract the legs and glutes and keep the ankles in line with the hips. Use more suitable assistance or a shorter-lever regression if you cannot maintain that shape.
The band pulls the body out of the flag plane
A badly placed anchor can drag the hips forward or backwards. Return to the ground and adjust the setup while unloaded. Do not twist the torso to accommodate a support direction that conflicts with your hand positions.
The bottom shoulder collapses
Keep pushing the structure away throughout the hold. If the elbow bends or the shoulder sinks towards the hand, end the attempt and use an easier load. The band is assistance, not a reason to switch off the pressing arm.
The top arm turns into a bent-arm pull
Keep the pulling action while the elbow remains straight. If you can reach horizontal only by bending that elbow, reduce the demand rather than counting the bent-arm position as this exercise.
The hands rotate around the pole
Recheck the vertical hand line, grip security and pole suitability. Test those positions with foot support before another attempt. On stall bars, choose compatible rung positions without placing the hands at different lateral offsets.
The body is angled instead of horizontal
A high flag can be easier to control, but it is a different training position. Film from a suitable angle and compare the shoulder-to-ankle line with the floor. Use enough assistance for a level hold rather than recording an angled position as horizontal.
The entry is a large kick
Momentum can carry you through the target angle without a stable hold and can make the exit unpredictable. Use gradual band loading and a controlled supported entry. If you need a large launch, regress or get qualified help with the setup.
The band is adjusted while loaded
Do not reach away from the structure or release a grip to move the band during the hold. Lower to support, unload and reset. Follow the same sequence before removing a foot or stepping out of a hip loop.
Choosing assistance and progressing
Choose enough assistance for the same horizontal shape on every attempt. More help is useful when it improves shoulder control and alignment; too much is unhelpful if it pulls you above the target or prevents a stable position.
Band support depends on the model, working length, stretch, anchor direction and contact point. It is not a fixed percentage of bodyweight. Colour codes differ between products, and a printed resistance range does not measure the support supplied in your flag.
Progress first by making the setup and hold repeatable. Then increase clean hold time modestly or use less assistance while preserving the same hand spacing and body line. Change one variable at a time so you can tell what improved.
Do not assume that moving support from the hips to a foot is automatically easier or harder. It changes both stretch and the leverage of the assisting force. Likewise, stall bars may make the grip easier to manage without making the total hold comparable to a pole attempt.
For the unassisted goal, continue appropriate shorter-lever holds and gradually attempt the full shape without the band when you can control it. Remove the band while supported before changing versions. Never detach assistance in mid-hold.
Programming and tracking
Practise after preparation while coordination is fresh. An example starting dose is three sets of three- to eight-second clean holds per side, resting about two to three minutes between demanding attempts. Use shorter holds or fewer sets if the setup is new or the entry and exit are tiring.
This is a coaching example, not a validated protocol. Count the entire entry and exit as workload, even though hold timing begins only at horizontal. End attempts before grip or shoulder control deteriorates.
Train both orientations, choosing assistance separately where needed. Note which arm is on top so left and right results cannot be confused. Give demanding flag practice enough recovery rather than repeating failed holds every day.
Record apparatus, hand positions, band model, anchor position, body contact point, leg shape and clean hold time. A short video helps distinguish a longer true horizontal hold from more time at an easier angle. Recheck the same setup when assessing progress.
Frequently asked questions
Can I use stall bars instead of a pole?
Yes. Use securely mounted bars, two compatible grip heights and a suitable higher band anchor. Allow enough room beside the structure. The grip changes, but the top-arm pull, bottom-arm push and horizontal hold remain the same.
Where should the band go?
The main technique uses support beneath the pelvis or upper thighs. Foot support is an alternative. Choose a stable arrangement that stays clear of the face, neck and grips, and record the contact point because it changes the assistance.
Can I attach the band anywhere on a smooth pole?
No. The attachment must remain fixed when loaded. A pole that works for hand grips may not provide a suitable band anchor; use a compatible fixed crossbar, purpose-built point or another station if the loop can slide.
Should my legs be together?
Yes for the main full-shape hold on this page. Tuck, one-leg and straddle positions are regressions and should be logged separately.
Does this count as a full Human Flag?
It counts as a band-assisted horizontal hold. The unassisted skill requires the same body control without help from a band, feet or partner.
Is it mainly a core exercise?
The trunk maintains alignment, but both shoulders, the upper-body push and pull, and grip are also essential. A band can reduce the demand without removing any of those tasks.
What if I cannot get horizontal with the band?
Check the support direction and choose more suitable assistance, or use a foot-supported or shorter-lever drill. Do not compensate with a bent elbow, collapsed shoulder or large kick.
Tips for the proper execution of Band-Assisted Human Flag
Use a rigid pole or securely mounted stall bars that tolerate sideways loading. Confirm that the band has a suitable fixed anchor; a smooth vertical pole alone may not provide one.
Inspect the band and test its attachment gradually with the feet supported. Follow its attachment and stretch limits, and keep it clear of sharp edges, your face and neck.
Align the hands vertically and choose spacing that permits straight elbows and active shoulders. Keep the grip positions consistent when comparing sessions.
Pull with the top arm and push the structure away with the bottom arm throughout the hold. Do not let band assistance turn either arm into passive support.
Keep both elbows naturally straight without forcing painful hyperextension. End the hold if an elbow bends or the bottom shoulder collapses.
Keep the hip-support loop stable beneath the pelvis or upper thighs. If using a foot loop instead, record that setup and check that it does not twist the hips.
For the main version, keep the knees straight and legs together, with shoulders, hips and ankles in one approximately horizontal line. Tuck and straddle holds are separate practice results.
Enter with gradual band loading and controlled arm actions. Avoid a large kick or bounce that carries you through horizontal without a stable hold.
Time only the settled hold and stop at the first loss of alignment. Use a short video to check the body angle, elbows and rotation instead of chasing seconds.
Lower the feet to stable support and unload the band before stepping out or adjusting it. Train both orientations with assistance appropriate to each side.
Muscles worked when doing Band-Assisted Human Flag
The Band-Assisted Human Flag is an isometric skill with different jobs for the two arms. The band shares the load, but the athlete must still maintain the opposing arm actions and a connected body line.
- Latissimus dorsi and upper-back muscles: contribute to the top arm’s pulling action and control of the upper shoulder.
- Deltoids, serratus anterior and other shoulder stabilisers: help maintain the straight-arm support positions, particularly the bottom arm’s active push.
- Obliques and other trunk muscles: resist side bending and unwanted rotation so the hips remain aligned with the shoulders.
- Triceps: help maintain extended elbows while the arms support the hold.
- Forearms and hand muscles: retain the grips against the opposing forces at the structure.
- Glutes, quadriceps and hip adductors: help keep the pelvis controlled, knees straight and legs together in the main full-shape version.
The main target is the stationary horizontal hold. Entry and exit also involve movement, but they do not change its primary isometric classification. Band placement and assistance affect the loading; these are qualitative movement roles, not measured activation rankings for this exact setup.
Primary Muscle(s):

Anterior delt

Lats

Oblique
Secondary Muscle(s):

Trapezius

Abdominal
Equipment needed for Band-Assisted Human Flag
Adjust the difficulty of Band-Assisted Human Flag
Adjust assistance while keeping the horizontal body line, straight elbows and controlled exit consistent. Record the band, anchor and contact point because hip and foot support are not equivalent loads. More assistance, foot-supported drills or shorter leg positions can make practice manageable; less assistance and longer clean holds can progress it. An angled or tucked hold should be logged as a different variation.
How to make Band-Assisted Human Flag harder?
How to make Band-Assisted Human Flag easier?
How to make Band-Assisted Human Flag harder?
To make Band-Assisted Human Flag harder:
-
Use a less assistive band while keeping apparatus, hand spacing, anchor and body contact point consistent. Restore the previous support if an elbow bends or the body loses its horizontal line.
-
Increase the clean horizontal hold modestly at the same setup. Stop timing when alignment or shoulder control changes; extra time in a sagging or angled position does not improve the result.
-
Make the assisted entry and exit slower and more controlled, keeping the band stable and both hands secure. This adds movement practice; record it separately from the stationary hold duration.
-
Progress towards an unassisted full Human Flag when the same body shape, arm actions and exit are manageable without support. Remove the band while grounded before attempting the unassisted version.
How to make Band-Assisted Human Flag easier?
To make Band-Assisted Human Flag easier:
-
Use more suitable band assistance within the same anchor and support-point arrangement. Test it gradually and select enough help for a level body line without pulling you above horizontal or out of the flag plane.
-
Shorten the lever with a band-assisted tuck, one-leg or straddle position while retaining the same straight-arm push and pull. Log the actual leg shape; these are regressions rather than main full-shape completions.
-
Return to the Human Flag Plank or another controlled feet-supported flag drill to learn the grip and shoulder actions. Unload and remove the band before changing setups, and keep foot-assisted results separate.
