
Kipping Handstand Push-Up
How to do Kipping Handstand Push-Up?
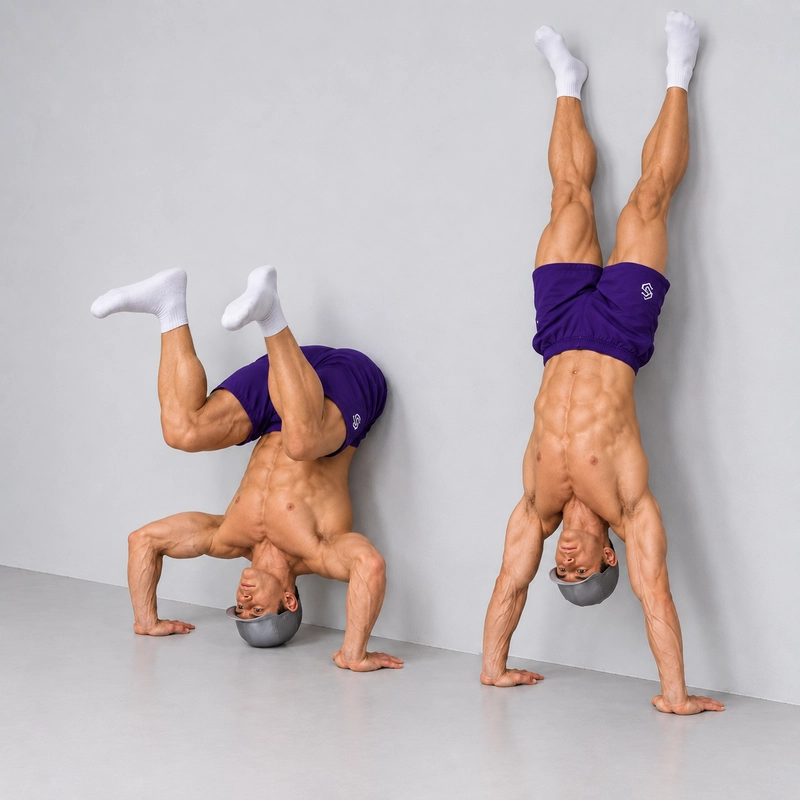
The Kipping Handstand Push-Up is a back-to-wall inverted press that uses a knee tuck followed by coordinated hip and leg extension to assist the upward movement. Start in a controlled handstand with the heels lightly against the wall, lower by bending the elbows, tuck the knees and drive the feet toward the ceiling while pressing through the hands.
Finish with the elbows straight, shoulders active and hips and knees extended. The wall helps organise the inverted position; the hands and arms remain active throughout the descent and press. A successful repetition combines pressing ability with timing rather than simply making the biggest possible kick.
This variation differs from the strict Back-to-Wall Handstand Push-Up, where the legs remain extended and do not provide a deliberate kip. Keep the two exercises separate in your training log. More kipping repetitions do not mean you have gained the same number of strict repetitions.
The main version here uses hands on the floor and a floor-level head endpoint. It is not a deficit press. The Deficit Back-to-Wall Handstand Push-Up uses hand elevation to create extra depth and is taught as a strict variation.
Why practise this variation?
The exercise develops the ability to coordinate a compact lower-body movement with an inverted press. You learn to organise the bottom position, direct the leg drive upward and finish over stable hands rather than kicking away from the wall.
It can be useful for athletes whose sport or training includes kipping handstand push-ups. Strict pressing still has a separate role in building and maintaining the strength needed to control the movement. Do not use the kip to rescue a strict repetition after the arms have already lost control.
CrossFit’s HSPU technique guide recommends developing strict control before adding the kip and keeping the bottom position active. That is the approach used here: a deliberate leg drive follows a controlled descent, with no bounce from the head.
Equipment and back-to-wall setup
- Wall: use a solid, clear wall with enough space for the feet to travel upward and the knees to tuck. Keep furniture, shelves and obstacles away from the entry and exit.
- Floor: use a stable, level surface that provides secure hand contact. Hands must not slide as the kip changes the body position.
- Hands: start around shoulder width or slightly wider, with fingers spread and wrists in a comfortable pressing position.
- Wall distance: around 15–30 cm (6–12 in) between the hands and wall is a starting example, not a fixed rule. Adjust for your proportions and enough room to form the tuck without being forced away from the wall.
- Head endpoint: the main version lowers the head to the same surface level as the hands. Keep the neck neutral and make gentle contact rather than dropping onto the head.
- Padding: if a head pad raises the endpoint above the hands, it reduces the range of motion. Record that setup as reduced-ROM, even if the upward movement still uses a kip.
- Exit: establish a practised, controlled way to step down from the top before beginning repetitions. Keep that landing space clear.
When viewed from the side, the head contact sits slightly in front of the line between the hands, away from the wall, creating a three-point base. Do not force the head to land directly between the palms or use the forehead as the contact point.
WODprep’s handstand push-up guide discusses how hand-to-wall spacing affects room for the tuck and the direction of the drive. Use a position you can control through the whole repetition; a copied measurement cannot replace that check.
A head pad is not permission to rebound or rest your bodyweight on the neck. Use appropriate stable training surfaces and qualified coaching if you cannot control the bottom position. Do not improvise unstable hand supports to compensate for a raised head target.
Readiness before adding the kip
First establish a controlled Back-to-Wall Handstand and a reliable exit. A long hold by itself does not show that you can control a bent-arm descent or press from the bottom.
For this main full-range version, build controlled strict handstand push-ups through the intended range before adding leg drive. You should be able to lower without dropping, maintain active hands at the bottom and finish a press without losing the handstand position. No single universal repetition count guarantees readiness.
If that control is missing, build strength with the Floor Pike Push-Up and, when suitable, the Knee-Height Feet-Elevated Pike Push-Up. These keep the feet supported while you practise a more vertical pressing pattern.
The Negative Handstand Push-Up can develop lowering control when its planned reset is manageable. The Reduced-ROM Back-to-Wall Handstand Push-Up is a separate strict exercise for an intentionally shorter range. Neither drill automatically establishes readiness for a complete floor-level kip.
Prepare the wrists, shoulders and pressing pattern with easier movements, then rehearse the wall entry and exit. Begin kipping practice while fresh. Stop for sharp pain, an uncontrolled head impact, neck symptoms or loss of hand stability; do not continue by making the kip larger.
How to do the Kipping Handstand Push-Up
- Enter the top position. Place both hands securely and use your practised entry into a back-to-wall handstand. Settle with straight elbows, active shoulders and extended legs. Let the heels touch the wall lightly.
- Lower under control. Bend the elbows and guide the head slightly forward and down, away from the wall. Keep pressing through the hands throughout the descent rather than falling onto the head.
- Establish the bottom position. Bring the top of the head into gentle contact with the floor-level endpoint, with a neutral neck and the hands carrying most of the load. The head and hands form a tripod; do not settle into a passive headstand.
- Form a compact tuck. Bend the knees and draw them toward the torso while keeping the hands active. The hips may briefly contact the wall to organise the position. Use a tuck you can control; maximal knee-to-chest compression is not required.
- Coordinate the kip and press. Organise the pelvis, then extend the hips and knees so the feet travel upward toward the ceiling. Begin pressing through both hands as the leg drive starts. Do not kick sideways away from the wall or wait until the legs have finished extending before pressing.
- Finish the handstand. Continue the press to straight elbows with active shoulders. Extend the hips and knees and bring the heels back to light wall contact under control. Avoid finishing in a crouch or a large lower-back arch.
- Reset before the next repetition. Show a stable top position. Either begin another controlled descent or step down through the practised exit. End the set before the lowering, lockout or exit becomes uncertain.
A useful cue is “tuck, drive up, press together”. The tuck sets up the leg drive; the drive and hand pressure work together. The upward phase should look coordinated, not like a kick followed by an unrelated arm press.
The feet can move away from the wall during the tuck and the hips can make brief wall contact. Unlike a strict straight-body repetition, this exercise does not require heel contact throughout. That freedom is not an invitation to climb the wall, forcefully push off it with the feet or use it as a substitute for the press.
What counts as one main repetition?
- A controlled back-to-wall top position with straight elbows and extended hips and knees.
- A controlled descent to a floor-level head endpoint, with active hands and no rebound from the head.
- A deliberate knee tuck followed by upward hip/leg drive coordinated with the press.
- A complete finish with straight elbows, active shoulders and extended hips and knees.
- A stable top position that allows a controlled next repetition or exit.
Keep raised-head-target repetitions, partial lockouts and strict repetitions separate in your records. This is a training standard for the version described here. If you are preparing for a competition, check that event’s own current movement standards separately.
Body position and timing cues
Stay active at the bottom
Head contact marks the depth; it does not provide a spring. Maintain pressure through the palms, keep the arms engaged and avoid a prolonged loaded pause on the head. If you cannot organise the tuck without collapsing, step back to a suitable earlier exercise.
Direct the legs upward
Think about sending the feet toward the ceiling, with the hips and knees extending together. A forceful kick toward the wall can create a large arch; a kick away from it can pull you out of the position. Review the direction before trying to add more speed.
Press as the drive begins
Apply hand pressure as you initiate the upward drive so the leg movement assists the arm extension. If you wait for the feet to stop before pressing, much of the useful timing is lost. Practise a single clean repetition and reset instead of chasing linked repetitions immediately.
Use enough tuck, not the biggest tuck
A manageable knee bend gives you room to produce a controlled upward drive. Increasing the tuck is not a reliable correction for poor timing, insufficient pressing control or fatigue. Stronger athletes may use a smaller kip, but it remains a kipping repetition while deliberate leg drive is present.
Finish tall over the hands
Complete the elbow extension and bring the pelvis back into a controlled position. Straight arms with bent knees, a closed hip angle or a deeply arched trunk do not establish the full finish described here. Settle briefly enough to show that you control the top.
Common mistakes and corrections
Dropping onto the head or bouncing from it
Keep the lowering under muscular control and maintain active hands at contact. If you need an impact to start the upward phase, reduce the task and rebuild control. More padding does not make head rebound part of the technique.
Resting in a passive headstand
Keep most of the load through the hands while organising the tuck. Avoid lingering at the bottom while the arms relax. Stop the attempt if the neck becomes the main support.
Kicking away from the wall
Review the hand-to-wall spacing, the tuck and the direction of extension. Drive upward with the press rather than flinging the feet horizontally. Use qualified coaching if you cannot keep a controlled finish over the hands.
Starting the arm press too late
Time the hand pressure with the beginning of the hip and leg extension. Practise fresh singles so you can review that timing without the next repetition arriving immediately.
Finishing with bent elbows or tucked legs
Complete the press and extend the hips and knees before counting the repetition. A big leg movement does not replace the final lockout. End the set if you cannot produce a clear finish.
Making the kip larger as fatigue increases
Use the same controlled setup and repetition standard throughout the set. Stop when the descent or finish deteriorates. A larger, less predictable kick is not the intended progression.
Mixing different ranges in the same score
Record whether the head endpoint is at hand level or raised above it. A higher pad can make the press shorter; those repetitions should not silently replace the floor-level version in your log.
How to practise and progress
Begin with technique-focused singles while fresh. For example, use three or four sets of one to three controlled repetitions with about two to three minutes of rest. This is a coaching starting example, not a universal prescription or a target to complete despite declining control.
Only link repetitions when you can repeatedly lower, organise the tuck and finish with the same standard. A pause at the top or a complete reset between singles is useful for learning. Do not introduce a loaded head pause to make the drill harder.
Keep strict pressing in your wider programme. Develop the kip for its own task while using strict variations to assess strict strength. If the main movement is unavailable, use an appropriate strict or foot-supported regression rather than using momentum to bypass missing descent control.
Progress can mean cleaner timing, a smaller controlled kip, a more consistent finish or a few additional high-quality repetitions. It does not have to mean longer exhausted sets. This page does not prescribe weighted or deficit kipping as the next step.
Frequently asked questions
Is this the same as a strict handstand push-up?
No. A strict repetition deliberately avoids leg drive. Here, the knee tuck and hip/leg extension assist the press. Both can have a role, but they demonstrate different performance and should be logged separately.
Should my heels stay against the wall throughout?
They touch lightly at the settled top position but may move away during the tuck and drive. The hips may briefly contact the wall at the bottom. Do not force heel contact if it prevents a controlled tuck.
Does a head pad change the exercise?
If it places the head endpoint above hand level, it shortens the range. Record the actual setup as reduced-ROM. The defined main version on this page reaches a floor-level head endpoint without head rebound.
Can I learn the kip before I have strict pressing control?
This page recommends building controlled strict repetitions through the intended range first. Use pike pressing and suitable strict regressions to develop that control. Being able to hold a wall handstand alone does not establish readiness.
How does this differ from a chest-to-wall handstand push-up?
The main kip here is performed with the back facing the wall and room to tuck the knees. The Wall-Facing Handstand Push-Up is a different strict variation with the chest toward the wall. Do not transfer this tuck-and-drive sequence to it automatically.
How should I leave the wall?
From a controlled top position, use your practised split-leg step-down while keeping both hands stable until the feet take your weight. If you cannot control the press, lowering or exit, use a suitable earlier drill and qualified assistance rather than improvising an escape under fatigue.
Tips for the proper execution of Kipping Handstand Push-Up
Start from a settled back-to-wall handstand with straight elbows and lightly supported heels before beginning the descent.
Lower through the arms under control. Gentle head contact marks the depth; never use a drop or head rebound to start the press.
Keep the neck neutral and place the head slightly in front of the hand line, away from the wall, to form a tripod.
Keep most of the load through the hands at the bottom. Stay active instead of resting in a passive headstand.
Use a compact knee tuck you can control. The hips may briefly touch the wall and the heels do not have to stay against it throughout.
Drive the feet toward the ceiling as you extend the hips and knees. Avoid kicking horizontally into or away from the wall.
Begin pressing as the leg drive starts. A kick followed by a delayed arm press loses the intended coordination.
Record raised head targets as reduced-ROM and keep kipping repetitions separate from strict repetitions in your training log.
Practise while fresh and stop before the descent, lockout or exit becomes unreliable. Do not compensate for fatigue with a larger kip.
Muscles worked when doing Kipping Handstand Push-Up
The Kipping Handstand Push-Up combines an inverted upper-body press with deliberate lower-body assistance. The shoulders and triceps still produce the press, while the knee tuck and hip/leg extension help initiate and coordinate the upward movement.
- Anterior deltoids: contribute to the overhead pressing action and help control the lowering phase.
- Lateral deltoids: assist shoulder action and control as the body moves between the bottom position and handstand.
- Triceps: extend the elbows during the press and help control elbow bending during the descent.
- Upper chest: contributes to pressing according to the athlete’s body position and movement path.
- Scapular stabilisers, including the serratus anterior and trapezius: help control the shoulder blades and maintain active overhead support at the finish.
- Abdominals and other trunk stabilisers: organise the pelvis and coordinate the transition from tucked hips to the extended top position.
- Hip flexors: help draw the knees toward the torso during the tuck.
- Glutes and quadriceps: contribute to hip and knee extension during the upward leg drive.
Because deliberate leg drive assists the press, a kipping repetition does not measure isolated shoulder or triceps strength. Use strict handstand push-ups separately when assessing strict pressing performance.
Primary Muscle(s):

Anterior delt
Secondary Muscle(s):

Upper chest
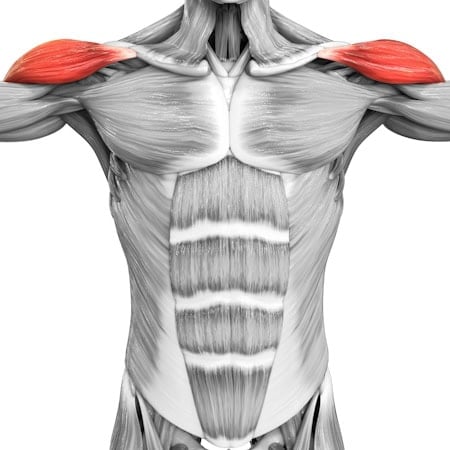
Lateral delt

Triceps
Equipment needed for Kipping Handstand Push-Up
No equipment needed for this exercise.
Adjust the difficulty of Kipping Handstand Push-Up
Choose a version you can lower, press and exit under control. Build strict pressing through the intended range before adding a kip, then practise fresh singles and progress through more consistent timing and complete finishes. Record any raised head target as reduced-ROM. Keep strict and kipping work separate rather than treating a larger kick as the default answer to difficulty.
How to make Kipping Handstand Push-Up harder?
How to make Kipping Handstand Push-Up easier?
How to make Kipping Handstand Push-Up harder?
To make Kipping Handstand Push-Up harder:
-
Use a smaller deliberate kip while keeping the same full depth and complete lockout. Increase the contribution from the arms without losing the timing of the upward drive. If intentional leg assistance remains, it is still a kipping repetition.
-
Link two or three clean repetitions once singles are consistent. Settle at every lockout, control each descent and stop before the finish deteriorates. Progress the number of high-quality repetitions rather than chasing a maximum unbroken set.
-
Make the descent more deliberate, for example around two to three seconds, while keeping the same range and coordinated kip. Do not add a loaded pause on the head or let the slower lowering turn into an uncontrolled final drop.
-
Train the strict Back-to-Wall Handstand Push-Up as a separate strength branch. Remove the intentional knee tuck and leg drive while preserving controlled depth and lockout. Log strict repetitions under the strict exercise rather than combining them with your kipping result.
How to make Kipping Handstand Push-Up easier?
To make Kipping Handstand Push-Up easier:
-
Build the strict pressing base with foot-supported pike push-ups, then suitable strict wall variations. Use the Floor Pike Push-Up or Knee-Height Feet-Elevated Pike Push-Up when a controlled full-range wall press is not yet available. These are preparation exercises, not kipping repetitions.
-
Use one fresh kipping repetition at a time, with a controlled top position and a full reset between attempts. Ask a qualified coach to review the tuck and upward drive if the timing is unclear. Fewer repetitions reduce coordination under fatigue but do not replace the strength and descent-control requirements.
-
Use a deliberately shorter range only if you already control the strict press and descent through that range. A stable raised head target limits depth; keep the hands active and avoid resting or bouncing on it. Record the target height and log this as reduced-ROM kipping, not the main floor-level exercise.
