
Knee-Height Feet-Elevated Pike Push-Up
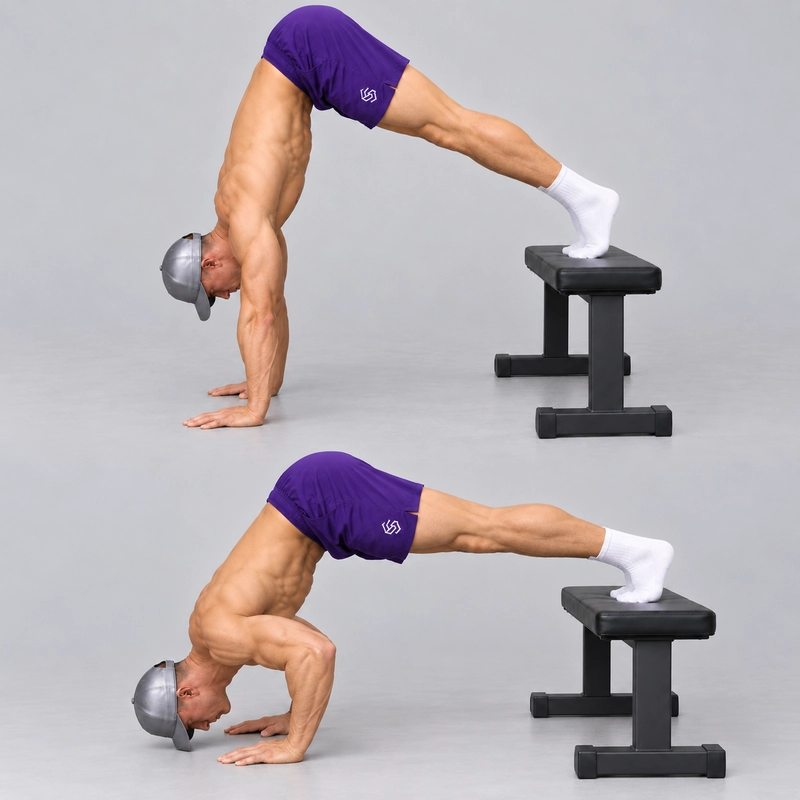
How to do Knee-Height Feet-Elevated Pike Push-Up?
The Knee-Height Feet-Elevated Pike Push-Up is a shoulder-focused press with both palms on the floor and both feet supported on a stable workout bench, plyo box or suitable chair around knee height. Raise the hips, lower the head forward and down toward the floor, then press back to straight arms while the feet remain on the support.
This variation adds foot elevation to the floor pike push-up while retaining the same flat-palm contact and floor-level head target. It is useful when the floor-footed version is controllable and you want to practise a more demanding pressing position without introducing handles or extra depth below the hands.
A foot-contact height of approximately 40–50 cm (15.7–19.7 in) is a practical knee-height guide. Measure the surface you actually use. Higher feet can help bring the hips closer above the shoulders, but hand distance and your ability to fold at the hips still determine the position.
A study measuring forces in push-up variations found higher peak hand-supported forces in its feet-elevated conditions than in regular push-ups. The participants performed conventional push-ups, not this pike variation. That gives general context for using elevation to change loading, rather than a measured bodyweight percentage or an exact difficulty ranking for this exercise.
Why Keep the Hands on the Floor?
The floor provides a fixed hand level and a clear bottom endpoint. You can work on increased foot elevation without also changing the grip or adding a deficit. Flat palms require wrist extension, so the setup also differs from pressing on neutral-grip handles.
The existing knee-height feet-elevated parallette pike push-up uses handles and allows additional head travel below hand level. It is a related option with different contact and depth conditions. Do not compare repetition counts as though the two setups were interchangeable, or assume that the floor version is easier for every athlete.
Foot elevation alone does not make a repetition a pike push-up. Keep the hips folded and raised. If the body becomes a straight sloping line and the chest leads the descent, you are performing a decline push-up instead of this shoulder-pressing pattern.
Select a Foot Support That Stays Still
Workout Bench
Use a stationary flat bench with locked adjustments and a firm surface under the feet. Check that its feet grip the floor and that it cannot roll, rock or slide as you transfer weight forward. Deep upholstery or loose coverings can make foot contact inconsistent.
Place the toes and forefeet securely on the top rather than balancing on a narrow corner. Leave enough room for both feet at a comfortable width. You do not need flat heels; the contact should let you hold the pike without slipping.
Plyo Box
Use a rigid or appropriately stable box in its intended orientation. Measure the top surface and check that it remains planted when pressure is applied toward the hands. A broad box top can make entry and consistent foot placement easier.
Choose a genuinely lower box when you need less elevation. Do not build an intermediate height with loose plates, cushions or unsecured stacks.
Chair
A chair is suitable only if it is rigid, stationary and stable under this direction of loading. Avoid wheeled, swivelling, folding or visibly flexible chairs. Check the seat size and traction, not just its height.
Place it against a solid wall if that helps resist sliding, then still check for tipping and rocking. A wall does not fix an unsuitable chair. The backrest and surrounding furniture must stay clear of the legs, hips and exit route. If you cannot establish secure contact, use a bench or box.
Check Readiness Before Raising Both Feet
Begin with comfortable wrist and shoulder preparation from the joint warm-up routine. Include a few floor-footed pike presses through your intended depth rather than starting with the most demanding configuration.
You should be able to support yourself on flat palms, keep the hips raised and control both the descent and return in the floor-footed version. There is no single repetition threshold that proves readiness. A stable straight-arm position with raised feet is a useful second check, but it does not establish that you can press from the bottom.
If you are still learning active straight-arm shoulder support, the incline pike hold on handles is a related earlier drill. Its feet stay on the floor; test this page's actual flat-palm, feet-raised position separately before pressing.
If the wrists limit flat-palm support, use comfortable preparation from the wrist warm-up routine and reduce the demand. Do not push through pain simply to retain this variation. The floor-footed pike push-up on parallettes offers a different contact option when handles are appropriate, with its own loading and depth to control.
Set the Distance Between Your Hands and the Support
Begin with enough space to place the feet on the support without having to jump or force the hips into position. Once supported, fold at the hips and make small hand-position adjustments between practice attempts until you find a pike you can control.
At the top, aim for a more upright torso with the hips approaching a position above the shoulders, within your current strength and mobility. Do not force a perfect vertical stack at the expense of secure palms, comfortable shoulders or a controlled descent.
Mark the hand line and foot-contact area. Moving the hands much farther from the support usually opens the position and can turn it toward a decline push-up. Moving closer can increase shoulder loading, but may also make the hip fold and press too demanding. Keep the selected distance fixed during each working set.
Straight knees are the reference version. If the back of the legs prevents a useful hip fold, try a small, consistent knee bend as a recorded adjustment. This can improve positioning without necessarily reducing the load on the arms. Keep the knees still instead of dipping and straightening them to launch the press.
How to Do a Knee-Height Feet-Elevated Pike Push-Up
- Prepare the floor and support. Confirm the foot-contact height and apparatus stability. Clear enough floor beyond the hand line for the head target and enough space to step down.
- Enter from supported hands. Face away from the foot support, plant both palms on the floor and place one foot at a time onto its top. Use a manageable initial distance; do not jump both feet up.
- Establish the pike. Fold at the hips, secure both forefeet and set the knees straight when comfortable. Position the hands approximately shoulder width apart with fingers spread.
- Own the start. Straighten the elbows and press the floor away so the shoulders remain active. Keep the neck comfortable between the upper arms and hold the chosen distance.
- Descend toward the floor target. Bend the elbows as the head and shoulders move forward and down. The target is slightly beyond the hand line, away from the foot support, so the two palms and head form a triangle.
- Retain the hip fold. Keep the pelvis raised and the feet fixed. Let the elbows follow a comfortable backward-diagonal path rather than flaring directly sideways.
- Control floor-level depth. Lightly brush the defined target with the top of the head without transferring weight onto it. The arms continue supporting you; do not pause in a headstand or rebound from the floor.
- Complete the press. Drive through both palms and extend the elbows together. Guide the head back between the upper arms as you return to the original pike.
- Finish and reset. Reach straight elbows with active shoulder elevation, keeping the same foot contact, hand placement and knee position.
- Step down while you still have control. At the top, reduce the pike enough to bring one foot and then the other to the floor while keeping both hands planted. Finish the set before fatigue prevents that exit.
Use a deliberate lowering phase of roughly two seconds and a smooth return. Inhale during the descent and exhale during the press if comfortable. Neither a rigid elbow-angle number nor a forced head position is needed; the path should remain controlled and repeatable.
Keep the Bottom at Floor Level
For this page's reference repetition, the palms and the head-depth target are at the same floor level. A thin firm mat is acceptable if it supports the hands and target evenly. A pad placed only beneath the head raises the endpoint and changes the range.
Do not reach for the floor with the chin or forehead to disguise an incomplete descent. Keep the neck following the torso and reach the target through elbow bending and shoulder movement. Light head contact marks depth; it does not provide support for the return.
A systematic review of range of motion in resistance training found that strength gains partly reflect the range trained and tested. Keep the target consistent so you can tell whether your pressing improved or the descent became shorter. The review did not establish a bench-height pike protocol or show that this variation outperforms the parallette version.
- Both palms remain on the floor and both feet stay on the measured support.
- The hips stay folded and raised, rather than unfolding into a decline push-up.
- The elbows move from straight-arm support to the defined bottom and back to straight-arm support.
- The head reaches floor-level depth under arm control, without resting or bouncing.
- The knees stay straight for the reference version, with no leg drive.
- The hand distance, foot placement and equipment position do not change during the set.
Log raised-target partial repetitions and bent-knee work separately. Useful training adjustments do not need to be disguised as the reference movement.
Identify What Is Limiting the Set
- The first descent cannot be stopped. Reduce foot height or return to floor-footed pike presses. Keep the descent within a range you can control.
- The top hold is steady, but the press stalls low down. Use a lower foot support or a clearly recorded raised head target. Holding and pressing are different tasks.
- The hips drop and the chest moves toward the floor. Re-establish the fold between attempts. If it keeps disappearing under load, choose a less demanding elevation instead of counting decline push-ups.
- Straight knees pull the pelvis out of position. Test a fixed modest knee bend or more manageable hand distance. Address positioning before deciding that shoulder strength alone is the problem.
- Later repetitions lose depth or lockout. Stop earlier and rest longer. Do not move the hands away from the support to rescue the rep count.
- The feet or support shift. End the attempt and correct the contact or apparatus. More strength will not solve an unstable seat or sliding bench.
Train the Knee-Height Stage Before Raising the Feet Again
Start with three sets of three to six controlled repetitions, resting about two to three minutes. Select a configuration that leaves one or two complete repetitions available. If even the first full rep is uncontrolled, lower the feet rather than forcing a series of negatives toward the head target.
One or two sessions a week can be a practical starting point when balanced with your other pressing. Treat these sets as part of that workload. These numbers are coaching suggestions, not a validated prescription for this exact exercise.
Keep a short log: foot-support height, apparatus, hand distance, head-target height, knee position, tempo and clean repetitions. Film a side-view set occasionally to check whether the improved count came from a more open body position or less depth.
When three sets of six are repeatable over two sessions with the same depth and controlled exit, choose one next challenge. You might move the hands slightly closer between sets, add a brief unsupported bottom pause, or test a higher stable foot support. Rebuild a smaller repetition count after the change. This checkpoint is a practical decision aid, not a mandatory qualifying score.
Changing to parallettes is a separate grip-and-range decision, while moving toward a wall-facing handstand push-up also requires inverted support and entry and exit skills. Pike pressing develops part of that pathway; it does not teach handstand balance by itself.
Common Setup Questions
Are my hands or feet on the bench?
Both feet are on the knee-height support and both hands are on the floor. The hands-raised bench variation is an incline pike push-up with a different bottom target.
Can I use a chair instead of a bench?
Yes, if the chair is rigid, stationary, roomy enough for both feet and stable when you lean forward. A suitable bench or box is the better choice when a chair rocks, slides or leaves the feet insecure.
Should my hips be directly over my hands?
Work toward a more upright torso while keeping control. The best distance depends on limb proportions, mobility and strength; there is no universal centimetre measurement that puts every athlete in the same position.
Is this harder than pressing on parallettes?
Grip, hand height, depth and body position all affect the comparison. Parallettes can permit a deeper descent, while flat palms demand a different wrist position. Compare the actual configurations rather than assigning difficulty from the equipment name.
Should my heels touch the bench?
No. Secure toe and forefoot contact is sufficient for the reference setup. Do not force the ankles into a position that makes the feet slip or prevents a controlled pike.
End the Set Before the Exit Becomes Uncontrolled
Stop for missed depth, bent-arm finishes, leg drive, lost pike shape or changing contact points. Step down while the arms can still support you. Pain, dizziness or equipment movement also calls for ending the attempt; persistent symptoms need individual assessment before repeating the load.
Tips for the proper execution of Knee-Height Feet-Elevated Pike Push-Up
Measure the surface under the feet: approximately 40–50 cm (15.7–19.7 in) is a practical knee-height reference.
Use a bench, box or suitable chair that stays stationary under forward weight transfer, with secure room for both feet.
Plant both palms on the floor before placing one foot at a time onto the support.
Mark the hand line and foot contact so distance stays consistent instead of changing to rescue later repetitions.
Maintain a clear hip fold and raised pelvis; a straight sloping body with a chest-first descent changes the movement to a decline push-up.
Use secure toes and forefeet on the support without forcing flat heels or balancing on an edge.
Guide the head to a floor-level point beyond the hand line, away from the support, while the elbows bend along a comfortable diagonal.
Brush the head target lightly under arm support and press back without resting, bouncing or pushing with the legs.
Finish with both elbows straight and active shoulders; record a fixed knee bend or raised head target as a separate adjustment.
End the set with enough strength to step both feet back to the floor while the hands remain planted.
Muscles worked when doing Knee-Height Feet-Elevated Pike Push-Up
The Knee-Height Feet-Elevated Pike Push-Up combines shoulder pressing with elbow extension while the floor supports the palms and an elevated surface supports the feet. The hip fold helps orient the torso toward an overhead press; maintaining it is part of the movement, rather than a cue to squeeze every muscle as hard as possible.
Primary Pressing Muscles
- Anterior deltoids: contribute strongly to lifting the upper body out of the bottom and controlling shoulder movement during the descent.
- Triceps brachii: control elbow flexion on the way down and extend the elbows to complete the press.
Assisting and Stabilizing Muscles
- Lateral deltoids: assist shoulder action and upper-arm control as the pressing angle changes.
- Upper pectoralis major: can assist the press, with its contribution affected by the torso position.
- Serratus anterior and trapezius: coordinate shoulder-blade movement, including upward rotation and active elevation at the straight-arm finish.
- Rotator-cuff muscles: stabilize the shoulder joints while the arms bear load.
- Abdominals, obliques and spinal stabilizers: help preserve a controlled trunk as the shoulders move forward and back.
- Forearm and hand muscles: maintain flat-palm pressure and stabilize the wrists against the floor.
- Hip and leg muscles: help maintain the hip fold, chosen knee position and stable foot contact.
The feet continue to support part of the bodyweight. Foot height does not provide an exact arm-load percentage, and no exercise-specific activation measurements are claimed here. A strong hamstring stretch signals a positioning demand, not that this is primarily a hamstring-strength exercise.
Primary Muscle(s):

Anterior delt
Secondary Muscle(s):
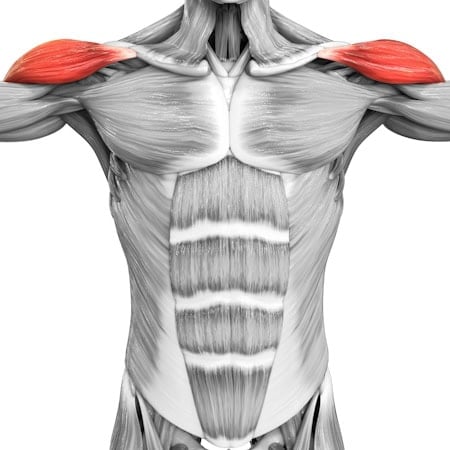
Lateral delt

Trapezius

Triceps
Equipment needed for Knee-Height Feet-Elevated Pike Push-Up
Adjust the difficulty of Knee-Height Feet-Elevated Pike Push-Up
Keep the palms on the floor and scale the feet-elevated pike using foot height, hand distance, the head-depth target or tempo. Change one factor at a time and preserve the hip fold. A lower foot support or a recorded raised head target can make the task more manageable. Closer hand placement or higher feet can increase the challenge when the position remains controllable. Parallettes introduce a separate grip and possible deficit range; they are not an interchangeable way to record this floor-hand version.
How to make Knee-Height Feet-Elevated Pike Push-Up harder?
How to make Knee-Height Feet-Elevated Pike Push-Up easier?
How to make Knee-Height Feet-Elevated Pike Push-Up harder?
To make Knee-Height Feet-Elevated Pike Push-Up harder:
-
Between sets, test a slightly closer hand position that makes the torso more upright. Retain secure feet, the hip fold, floor-level depth and a complete straight-arm finish.
-
Use a three-second descent through the same range at the same foot height and hand distance.
-
Pause briefly just above the floor target without head support, then press to straight elbows without knee movement or a leg push.
-
Progress to a higher stable foot support as a separate measured variation, rebuilding controlled repetitions before considering further elevation.
How to make Knee-Height Feet-Elevated Pike Push-Up easier?
To make Knee-Height Feet-Elevated Pike Push-Up easier:
-
Lower the feet to a stable shorter support, or return them to the floor, while retaining flat palms and a controlled pike press through the defined depth.
-
Use a firm secured raised head target to shorten the descent. Record its height and maintain arm support instead of resting on the head.
-
Set the hands slightly farther from the foot support if that reduces shoulder loading while still allowing a clear raised-hip pike. Record the new distance and avoid turning the movement into a decline push-up.
