
Tuck Press to Handstand
How to do Tuck Press to Handstand?
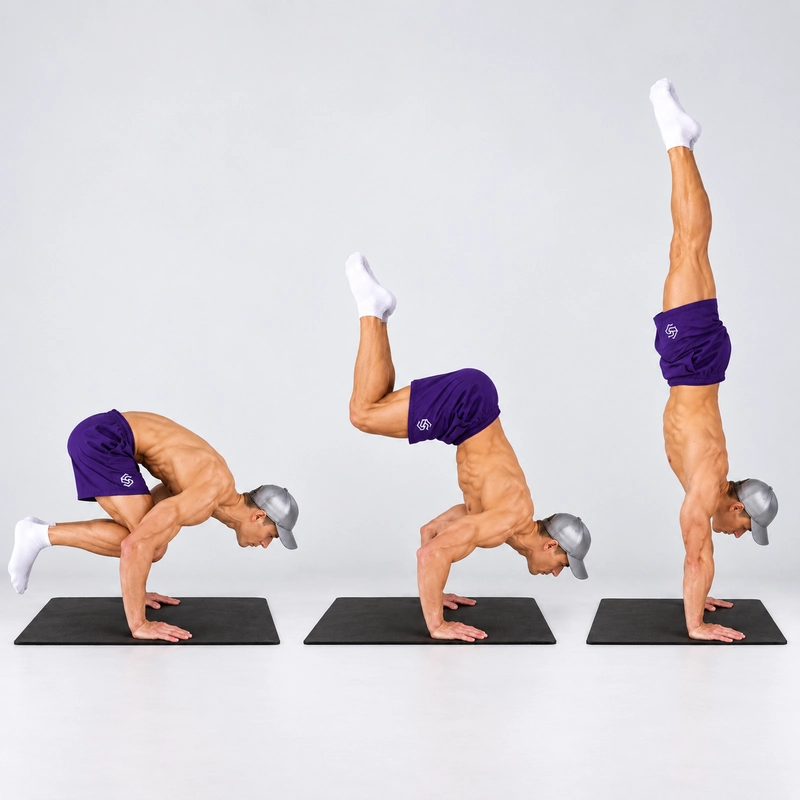
The Tuck Press to Handstand is a freestanding handstand entry performed with straight arms and bent knees during the ascent. Begin with both hands and feet on the floor, gradually transfer weight onto the hands and float both feet without jumping. Keep the legs compact as the pelvis rises, then extend the hips and knees into a controlled straight-body handstand.
The knees do not rest on the arms, the head does not touch the floor and no wall or spotter supports the main repetition. The elbows remain naturally straight from the first weight shift through the finished handstand. A controlled return through the tuck is an optional additional negative, not required to complete the upward press.
How does it differ from other handstand presses?
The Press to Handstand page teaches a straight-leg straddle ascent from the floor. This variation uses bent knees and a compact leg shape instead. The difference matters most around takeoff and during the rise: you organise the tuck rather than keeping both legs straight and wide.
Handstand Factory’s public press-preparation explanation notes that a tuck press does not require the pancake range often associated with straddle pressing. That gives it a useful role for athletes exploring a bent-knee pathway, but it still requires active straight-arm support and control of the overhead finish.
| Movement | What defines it? | What changes here? |
|---|---|---|
| Straddle press | Straight knees and legs spread during the ascent | The knees bend and the legs stay compact |
| Crow or Frog Stand | Knees supported on bent arms | The arms stay straight and the knees remain unsupported |
| Tuck Planche | Unsupported compact straight-arm hold | The pelvis continues rising to an overhead handstand |
| Tuck handstand hold | Maintain an already inverted bent-knee position | The full movement begins with the feet on the floor |
| Bent-arm tuck press | Elbows deliberately bend during the entry | Both elbows remain straight throughout |
| Jump to tuck handstand | Foot push-off launches the body | Takeoff comes from gradual weight transfer and pressing |
Some tutorials use “tuck press” for a seated or bent-arm entry. This page specifies a floor-footed, straight-arm press so the setup and repetition standard stay consistent. You do not have to demonstrate a separate Tuck Planche hold before beginning the ascent.
Why practise the tuck version?
It lets you practise a controlled handstand entry while keeping the lower body compact. The movement asks you to coordinate straight-arm shoulder support, hip positioning and hand balance, then manage the change from tucked legs to the extended finish.
The tuck changes the shape of the press; it is not an escape from its strength demands. If the hips remain low or behind the hands, bending the knees alone will not make the feet float. You still need to organise the body over the hand support and continue lifting the pelvis.
A good finish is the same overhead balance used in a Freestanding Handstand. Reaching vertical and immediately falling through it is different from pressing into a position you control.
Equipment and floor setup
- Surface: use a firm, level, non-slip floor or suitable stable mat. Thick, soft padding under the hands makes the support less predictable.
- Space: leave enough clear room around the hands for the ascent and an already practised exit. Keep furniture, boxes and walls out of that route.
- Hands: start roughly shoulder-width apart with fingers spread and pointing forward or slightly outward according to wrist comfort.
- Feet: place both feet on the same floor, close enough to the hands to form a compact folded position. Use a narrow, comfortable stance rather than a wide straddle.
- Knees and hips: bend the knees enough to organise the tuck while lifting the hips. Avoid sinking into the deepest possible squat if that leaves the pelvis too low to transfer weight smoothly.
- Arms: keep the elbows straight within their natural range. Do not force hyperextension or use the upper arms as a shelf for the knees.
- Head: keep the neck comfortable, looking at the floor between or slightly ahead of the hands. The head is never a support point.
Choose hand and foot spacing that allows a controlled lean, toe float and return. Body proportions and available shoulder and hip movement differ, so no single distance fits everyone. Adjust between attempts rather than walking the hands during the press.
The main version begins and finishes with the hands on the floor. Low, stable parallettes are an equipment variation if you can control their grip and exit. Their hand elevation changes clearance and balance feedback; record that setup separately rather than treating it as identical to the floor version.
Readiness and preparation
Before full freestanding attempts, establish repeatable unsupported handstand balance and an appropriate exit. You do not need a perfect line or one universal hold-time benchmark, but you need enough control to catch the position after the press. Preparation drills can be practised earlier with suitable support.
Use comfortable movements from the Wrist Warm-Up Routine, followed by light straight-arm weight shifts and overhead support practice. Keep loading gradual and avoid forcing painful wrist or shoulder positions.
Planche Leans can contribute to a separate straight-arm loading branch. They do not reproduce the complete press or prove handstand readiness. Likewise, a long Crow hold does not show that you can lift unsupported knees through a straight-arm press.
For the broader press family, the Wall-Assisted Straddle Handstand Press Negative practises a controlled lowering with straight arms. Its leg shape and wall assistance differ from the main tuck press here, and being able to lower does not guarantee that you can press upward.
GMB’s press-to-handstand tutorial treats lifting drills and negatives as complementary practice and emphasises choosing manageable variations. Use it for broader coaching context; the tucked, unsupported ascent and straight-body finish below define this particular exercise.
Stop for sharp pain, numbness, dizziness or loss of reliable arm support. Use a suitable earlier drill and appropriate guidance if symptoms persist or the exit is not yet controlled. Do not continue full attempts by bending the elbows, adding a hop or dropping onto the head.
How to do the Tuck Press to Handstand
- Settle the floor start. Place both palms securely and bring the feet into a compact bent-knee fold behind the hands. Begin with both feet grounded and no bounce. Keep the knees clear of the arms.
- Create straight-arm support. Straighten the elbows and actively push the floor away. Keep the upper back broad and the shoulders supportive instead of letting the torso sink between the arms.
- Raise the hips and transfer weight. Move the pelvis upward while gradually bringing more weight onto the hands. Allow a controlled forward shoulder shift as needed; do not insist on perfectly vertical arms and torso from the first moment.
- Float both feet. Let both feet leave the floor at approximately the same time once the weight transfer is sufficient. Keep the knees bent and legs compact. Do not jump, kick one leg up first or rest the knees on the arms.
- Continue lifting in the tuck. Press continuously through straight arms as the pelvis rises toward the space above the shoulders. Keep the legs folded rather than extending them early to throw the feet upward.
- Organise the overhead stack. As the hips rise, bring the shoulders toward their overhead position over the hands. Keep the neck comfortable and use small hand-pressure corrections. Do not keep lunging forward after the pelvis has reached the stack.
- Extend the legs under control. Once the tucked overhead position is manageable, open the hips and knees smoothly and bring the legs together above you. Keep pushing tall through the shoulders rather than snapping the legs open.
- Show a balanced finish. Establish a recognisable freestanding handstand with straight elbows, extended hips and knees and no wall contact. Settle briefly, then use your practised exit or a separately planned controlled tuck negative.
Think “hips rise, feet float, tuck rises, legs extend”. These actions overlap in a continuous press; they do not need to become four long pauses. A pause immediately after takeoff is an optional harder drill once the basic ascent is consistent.
The shoulders can move forward during initiation and return toward the stack as the hips rise. Do not exaggerate the lean or try to freeze the shoulders in one place through the whole movement. The aim is coordinated support, not the largest possible forward shift.
What counts as one main repetition?
- Both feet begin settled on the same floor as the hands.
- Both hands stay planted and the elbows remain naturally straight.
- Both feet leave at approximately the same time without a jump or kick.
- The knees remain bent through the main rise and never rest on the arms.
- The pelvis reaches the overhead position before the legs open into the finish.
- The final handstand has straight elbows and extended hips and knees, with no wall, head or spotter support.
- The athlete demonstrates a brief settled balance before a controlled exit.
About one to two seconds of settled balance is a useful completion cue for this press, not a universal competition rule. It demonstrates the finish of an entry; it is not a claim that you completed the separate timed-handstand exercise’s longer hold standard.
A toe float, partial rise, spotted press or jump into a tuck handstand can be useful practice, but it is not the main unassisted floor press. A controlled ascent that stops in a tuck handstand is an intermediate endpoint; extend the hips and knees for the complete repetition defined here.
You do not have to lower through the tuck for the ascent to count. A planned step-down can follow a completed press. A tuck negative or full up-and-down cycle adds another task and should be recorded separately.
Timing and body-position cues
Keep the tuck compact without knee support
Fold the legs close enough to the torso to organise the ascent, with the heels drawn in comfortably. Do not squeeze into a painful maximum tuck or catch the knees on the upper arms. Knee support changes the movement into a different balance or transition.
Lift the pelvis instead of flinging the feet
The feet follow a controlled rise of the tucked lower body. Opening the legs sharply while the pelvis is still low tends to change the entry into a kick or a swing. Keep the folded shape until you can open it without disrupting support.
Maintain the elbows and active shoulders
A press can involve substantial shoulder movement while the elbows remain straight. Straight arms do not mean the whole movement is static. Keep pressure through the hands as the torso changes angle, then finish with active overhead shoulder support.
Use responsive hand pressure
Keep the palms planted and fingers active. Small pressure changes help you regulate the balance as the legs extend. Do not grip maximally throughout or assume the fingers can rescue a large uncontrolled throw past vertical.
Extend after organising the top
You do not need a long tuck hold overhead, but you should be able to regulate the position before opening the legs. Extend deliberately and keep the ribs and pelvis organised rather than using a large back arch to manufacture the finish.
Common mistakes and corrections
Starting so low that the feet stay heavy
Use a folded bent-knee setup that allows the pelvis to rise. Keep the feet supported while exploring the position rather than pulling them off by force from a deep seated squat.
Adding a small unnoticed hop
Pause the starting feet and review takeoff from the side. Practise a smaller straight-arm toe float or use planned assistance if you need a bounce. A jump to handstand is a separate entry.
Bending the elbows as the feet leave
Reduce the task and rebuild the takeoff through straight arms. Do not count a bent-arm ascent under this page’s standard or use a deeper bend to recover a failing repetition.
Resting the knees on the arms
Keep the knees unsupported. Crow and Frog Stand use knee contact and bent arms; their support arrangement does not carry over into the main press.
Opening the legs too early
Keep the compact tuck while the pelvis rises, then extend near the controlled overhead position. Do not turn the leg opening into a kick that pulls you through vertical.
Reaching vertical but immediately falling
Train catching and extending from a tucked handstand separately with an appropriate entry. A recognisable settled finish matters more than briefly passing through a vertical shape.
Assuming a negative guarantees the upward press
The descent, initiation and upward rise are different training tasks. Keep practising manageable takeoff and ascent work rather than testing a full press repeatedly just because you can lower.
Practice and progression
Practise near the start of a skill session, after gradual preparation. For example, use three to five sets of one controlled attempt with about two to three minutes of rest. Choose partial, assisted or full repetitions according to the range you can reproduce. These are coaching examples, not mandatory doses.
Judge progress by where control improves: lighter simultaneous takeoff, a steadier tucked rise, less unnecessary shoulder travel or a cleaner leg extension at the top. Repeating a full attempt while hopping or bending the arms reinforces a different entry.
A few brief sessions per week can be a starting structure if the wrists and shoulders recover comfortably. Account for your other handstand, planche and pressing work rather than adding maximum attempts every day.
First make a complete ascent repeatable. Then add a short pause, a slower rise or a controlled tuck negative. Moving to the straight-leg straddle press is a related branch with different mobility demands, not an obligatory harder step for everyone.
Frequently asked questions
Is this freestanding?
Yes. The main repetition uses no wall or spotter contact during the takeoff, ascent or finish. Assisted versions are preparation drills and should be labelled separately.
Do I start in a Tuck Planche?
No. This version begins with the feet on the floor. Pressing from a separately held Tuck Planche is another starting configuration and should not be silently combined with floor-footed repetitions.
Do the legs stay bent at the top?
They stay bent through the main rise, then extend into the straight-body handstand finish. Stopping in a tuck handstand is useful partial practice but does not complete the final shape defined here.
Is a tuck press always easier than a straddle press?
No. Bent knees reduce the need for a deep straight-leg fold or wide straddle, but strength, shoulder control, body proportions and familiarity affect which version feels more manageable.
Can I bend the elbows?
This page defines a straight-arm press. A deliberately bent-arm tuck press is a different variation, with its own execution and performance standard.
Must I lower back through the same tuck?
No. Demonstrate control at the top, then use a familiar exit. A slow tuck descent is an optional negative and makes the practice a longer up-and-down cycle.
Tips for the proper execution of Tuck Press to Handstand
Begin with both hands and feet settled on the floor. Keep the starting feet quiet so takeoff comes from weight transfer rather than a bounce.
Use a compact bent-knee fold that allows the hips to rise. Do not sink so low that you must jump to leave the floor.
Keep both elbows naturally straight and actively push through the shoulders as the torso changes angle.
Keep the knees clear of the arms. Crow-style knee support changes the movement and does not count as this press.
Raise the pelvis and gradually load the hands until both feet float at approximately the same time without a hop or kick.
Allow a controlled forward shoulder shift during initiation, then return toward the overhead stack as the hips rise.
Keep the legs tucked through the main rise. Do not snap them open while the pelvis is still low.
Extend the hips and knees deliberately near the controlled overhead position, finishing with the legs together.
Keep the head clear of the floor and the neck comfortable. Use responsive finger pressure without lifting the palms or walking the hands.
Show a brief settled freestanding finish and use your practised exit. A tuck negative is optional and is logged as additional work.
Muscles worked when doing Tuck Press to Handstand
The Tuck Press to Handstand combines dynamic straight-arm shoulder support with active control of a compact lower-body shape and the final handstand balance. The elbows remain extended while the shoulders, trunk, hips and legs change position.
- Anterior deltoids: contribute to supporting and controlling the shoulder position as the body rises from the forward-leaning start to overhead.
- Trapezius and serratus anterior: help coordinate the shoulder blades and maintain active support, including the elevated overhead finish.
- Triceps: help maintain elbow extension rather than producing a deliberate elbow-bending repetition.
- Abdominals and obliques: help organise the ribs, pelvis and compact body shape through the ascent and leg extension.
- Hip flexors and other hip muscles: coordinate the folded thigh position during the tuck and its controlled change near the top.
- Quadriceps and glutes: contribute to knee extension and the extended lower-body finish.
- Forearm and hand muscles: maintain wrist support and regulate pressure for balance.
Muscle actions vary through the movement: straight elbows do not make the entire press isometric, and not every muscle shortens throughout the ascent. Knee bend changes the leg configuration compared with a straddle press, but no precise activation advantage or loading percentage is claimed.
Primary Muscle(s):

Anterior delt

Trapezius
Secondary Muscle(s):

Triceps

Abdominal

Oblique
Equipment needed for Tuck Press to Handstand
No equipment needed for this exercise.
Adjust the difficulty of Tuck Press to Handstand
Build controlled straight-arm takeoff, a compact rise and a balanced finish separately before combining them. Use partial toe floats, planned spotting or a suitable elevated-foot setup when needed, recording the assistance and starting height. Once a full floor press is repeatable, add a short pause, slower ascent or controlled tuck negative. Keep jumps, bent-arm presses and knee-supported entries separate.
How to make Tuck Press to Handstand harder?
How to make Tuck Press to Handstand easier?
How to make Tuck Press to Handstand harder?
To make Tuck Press to Handstand harder:
-
Add a short settled pause just after both feet leave the floor, then continue rising in the tuck without a rebound. Begin with about one second only where you can maintain straight-arm support and still reverse or complete the movement.
-
Slow the complete ascent modestly while keeping the same range and straight elbows. Do not create most of the apparent duration by waiting on the feet and then throwing the legs upward. Keep the moving phase controlled from takeoff to finish.
-
Maintain a longer settled handstand after extending the legs, such as five to ten controlled seconds when your balance allows it. Record this added hold separately from the press count and exit before overhead support deteriorates.
-
Add a controlled freestanding tuck negative after the completed handstand. Fold the hips and bend the knees, lower the pelvis while maintaining straight arms and place both feet on the floor deliberately. Use only a range you can control; this adds a descent and makes the task an up-and-down cycle rather than the main ascent alone.
How to make Tuck Press to Handstand easier?
To make Tuck Press to Handstand easier:
-
Practise a bent-knee straight-arm toe float close to the floor. Transfer weight gradually, lift both feet briefly without knee contact on the arms and return under control. Keep the range small enough to reverse; this is takeoff practice rather than a complete press.
-
Use a qualified spotter for agreed assistance at the pelvis through the difficult part of the ascent. Keep the arms straight and the tuck organised, and plan the exit before starting. The spotter should not unexpectedly pull the feet over your balance point. Record the repetition as spotted.
-
Start with both feet on a low, stable platform and the hands on the floor if that setup is manageable. The raised start changes the takeoff range; keep a controlled tuck and leave room for your exit. Record the platform height and avoid assuming that a taller box is automatically easier. This is an elevated-foot variation, not the main floor start.
