
Deficit Push-Up
How to do Deficit Push-Up?
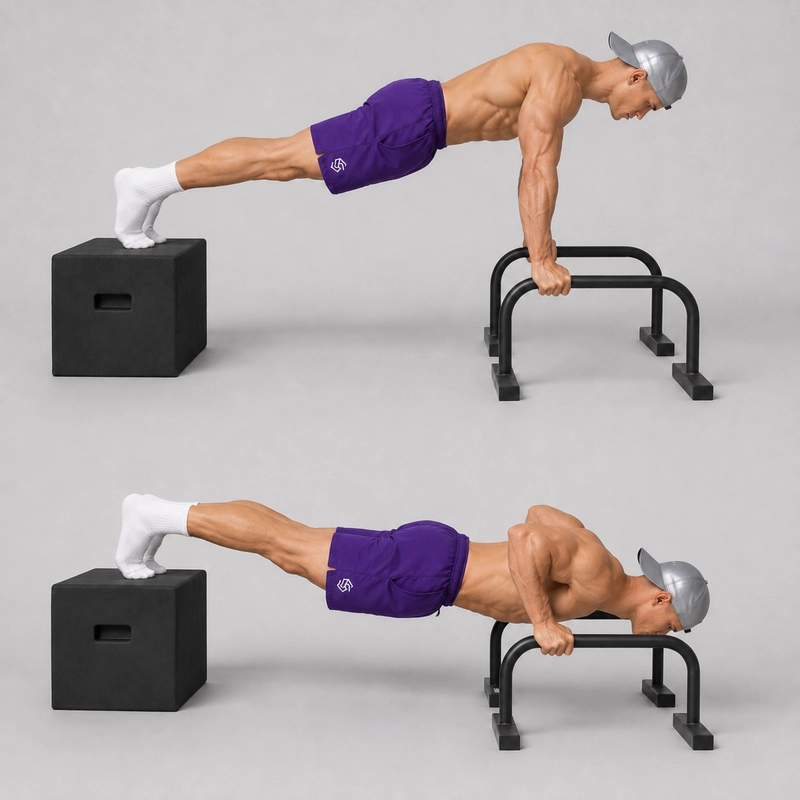
The Deficit Push-Up is a horizontal pressing exercise performed with the hands gripping two stable parallettes. Elevating the hands creates space for the chest to descend below hand level, giving the exercise a larger available range of motion than a standard floor push-up. The feet remain on the floor in the standard version described on this page.
The defining feature is not simply using parallettes: your chest must travel below the height of your hands while the movement remains controlled. If you stop at hand level, you are performing a regular push-up with a neutral grip rather than a true deficit push-up.
Build consistent Regular Push-Ups before adding depth. The Deficit Push-Up maintains a stable base while increasing the available movement range, whereas the Ring Push-Up adds independently moving handles and a separate stabilization challenge. These are related exercises, but they should remain separate canonical entries.
A larger range can help you train strength through a deeper bottom position, but it is not automatically better for every person or every goal. A systematic review of range of motion in resistance training found generally trivial-to-small advantages for full or longer ranges over partial ranges across the included outcomes. The review was not specific to Deficit Push-Ups, so the practical goal is to develop a repeatable range that your shoulders can actively control rather than chasing maximum depth.
Equipment and setup
Use two matching parallettes that are stable enough not to slide, rock, rotate or tip when you apply pressure in different directions. Place them on a level, nonslip floor and test each one before beginning. If you are choosing equipment specifically for this movement, medium-height models usually provide more usable clearance than very low handles; see the guide to the best parallettes for the differences between available designs.
Position the parallettes parallel to one another, with their handles pointing forward and backward. Begin approximately shoulder-width apart and adjust them slightly wider if necessary to create a comfortable path for your elbows and shoulders. Grip each handle with your palms facing inward and your thumbs wrapped around the bars.
Place your feet on the floor behind you. A shoulder-width or slightly wider foot position offers more stability, while feet placed close together require more trunk control. Make sure there is enough space between and beneath the parallettes for your chest to pass below the handles without touching the floor.
Readiness
You should be able to perform controlled Regular Push-Ups through a consistent floor-based range without shoulder discomfort, lower-back sagging or incomplete lockout. Start with only a small deficit even if your parallettes permit a much deeper position. The available clearance is not a target you must use immediately.
The neutral grip keeps the wrists closer to a straight position than a palm-flat floor push-up, but this does not guarantee that the exercise will resolve wrist, elbow or shoulder pain. Stop if you experience sharp pain, instability, numbness or worsening discomfort, and seek qualified assessment when symptoms persist.
Step-by-step Deficit Push-Up technique
- Establish your grip: Hold the centre of each parallette with a wrapped neutral grip and press down firmly to confirm that both bars remain stable.
- Form the starting plank: Extend your legs behind you and align your head, shoulders, hips and heels while bracing your abdominals, glutes and quadriceps.
- Set the shoulders: Begin with your arms straight and the handles beneath or slightly outside your shoulders without shrugging toward your ears.
- Lower between the bars: Inhale as you bend your elbows and guide them diagonally backward while lowering your chest—not your head—between the parallettes.
- Enter the deficit gradually: Continue below hand level only as far as you can keep the shoulders controlled, the forearms stable and the body moving as one unit.
- Reverse the movement: Press the parallettes away from you and exhale as your chest rises back through the same path.
- Finish the repetition: Reach controlled elbow extension and allow your shoulder blades to move naturally around your rib cage without forcing your upper back into an exaggerated position.
How deep should you go?
There is no universal depth measured in centimetres or inches. Your appropriate bottom position is the deepest point at which you can pause or reverse direction without bouncing, losing your body line, shrugging the shoulders or experiencing pain.
Increase the deficit over time rather than dropping immediately into the deepest position your parallettes allow. If the front of the shoulder feels compressed, the shoulders glide uncontrollably forward or you cannot press out without changing position, reduce the depth.
Parallette height alone does not determine the range of motion. Taller parallettes create more potential clearance, but they also raise your hands farther above your feet and produce a more inclined body angle when your feet remain on the floor. The actual deficit is determined by how far your chest travels below the handles.
What counts as a complete repetition?
Begin with straight elbows and a stable plank position, lower until your chest travels visibly below hand level, and press back to controlled elbow extension. Your head, torso, hips and legs should rise and fall together, both parallettes should remain planted, and every repetition in the set should use approximately the same bottom depth.
If your hips remain high while only your head moves between the bars, the repetition does not meet the standard. Likewise, a deeper repetition should not be counted when it requires bouncing, twisting, collapsing through one shoulder or shortening the lockout.
Breathing and tempo
Inhale during the controlled descent and exhale as you press upward. Maintain enough abdominal tension to keep your ribs, pelvis and legs connected, but continue breathing rather than holding your breath throughout an entire set.
A useful learning tempo is a two-to-three-second descent, a controlled change of direction and a smooth press to the top. A pause in the bottom position can help verify control, but it is an optional progression rather than a requirement for every repetition.
Benefits of Deficit Push-Ups
- Train a larger available range: The elevated handles allow the chest to travel below the position possible on a flat floor.
- Strengthen the deeper position: Progressive depth develops control where the shoulders and elbows are more flexed.
- Use a neutral grip: Gripping the parallettes keeps the wrists closer to neutral instead of requiring substantial wrist extension.
- Maintain a stable pressing surface: The fixed parallettes let you focus on range and force production without the independent movement created by rings.
- Scale the challenge: Depth, tempo, pauses, foot height and external resistance can all be progressed separately.
Common mistakes and corrections
- Using unstable parallettes: Stop and reposition the equipment if either base slides, rocks or begins to lift from the floor.
- Going too deep too soon: Reduce the deficit and develop control before increasing the bottom range.
- Dropping into the bottom: Control the descent instead of relying on a bounce from the deepest position.
- Leading with the head: Keep your neck approximately neutral and move your chest between the handles.
- Flaring the elbows directly sideways: Let the elbows travel diagonally backward along a path that feels strong and controlled.
- Letting the hips sag or rise first: Brace your trunk and move your shoulders, hips and heels together.
- Pinning the shoulder blades together: Allow them to move naturally during the descent and press rather than holding them rigidly retracted.
- Confusing an incline with a deficit: Remember that tall handles raise the hands, while the deficit is created only by descending below hand level.
How to program Deficit Push-Ups
For general strength or muscle development, start with 2–4 sets of 5–12 controlled repetitions and rest approximately 90 seconds to three minutes between challenging sets. Choose a depth and repetition target that allows you to stop before body alignment or shoulder control breaks down.
Progress one variable at a time. First make the chosen depth consistent, then add repetitions, increase the deficit slightly, introduce a pause or add external resistance. Comparing sets becomes difficult when depth, foot height, tempo and load all change simultaneously.
Frequently asked questions
Are Deficit Push-Ups harder than Regular Push-Ups?
They usually make the bottom portion more demanding because you move through additional range, but the answer depends on setup. Tall parallettes with the feet on the floor also create a slight incline, which can reduce how much bodyweight is supported by the upper body.
Should your feet be elevated?
The standard version on this page keeps the feet on the floor. Elevating the feet approximately to handle height creates a more horizontal body position and usually increases the upper-body demand, while placing the feet higher than the handles creates a decline Deficit Push-Up.
Is every push-up on parallettes a Deficit Push-Up?
No. It becomes a Deficit Push-Up only when the chest travels below the height of the hands; otherwise, it is a regular parallette push-up performed with a neutral grip.
Are Deficit Push-Ups and Ring Push-Ups the same exercise?
No. Both can permit additional depth, but parallettes provide a fixed base while rings can swing, separate and rotate independently. Use the Ring Push-Up page for the suspended version and its specific setup.
When should you add weight?
Add resistance only after you can reproduce the intended deficit without bouncing or losing alignment. A weighted vest is generally easier to manage independently than a loose plate; see the Weighted Push-Up page for loading methods.
Tips for the proper execution of Deficit Push-Up
Place both parallettes on a level, nonslip surface and test them in every direction before loading them.
Keep the parallettes parallel and use a secure wrapped neutral grip.
Position the handles beneath or slightly outside your shoulders at the top.
Brace your abdominals, glutes and legs so your body moves as one unit.
Guide your elbows diagonally backward instead of flaring them directly sideways.
Lower your chest between the handles rather than reaching forward with your head.
Use the deepest position you can control without pain, bouncing or shoulder collapse.
Allow your shoulder blades to move naturally as you lower and press.
Reach controlled elbow extension without snapping or forcing the joints backward.
End the set when your depth or body alignment becomes inconsistent.
Muscles worked when doing Deficit Push-Up
The Deficit Push-Up trains the same fundamental horizontal pressing muscles as a Regular Push-Up, but the parallettes allow these muscles to work through a deeper bottom position when sufficient mobility and control are available.
Primary muscles
- Pectoralis major: The chest controls the descent and produces much of the force required to press the body away from the parallettes.
- Triceps brachii: The triceps extend the elbows as you press toward the top position.
Secondary muscles
- Anterior deltoids: The front shoulders assist the chest and control the upper arms, particularly in the deeper bottom range.
- Serratus anterior: The serratus helps the shoulder blades move and remain controlled against the rib cage.
- Abdominal muscles: The abdominals resist lower-back extension and help maintain the plank position.
- Glutes and quadriceps: The lower body remains contracted so the torso and legs move as one connected unit.
- Forearms and hand muscles: These muscles maintain the neutral grip and keep pressure centred on the handles.
Primary Muscle(s):

Middle chest

Triceps
Secondary Muscle(s):

Anterior delt

Abdominal
Equipment needed for Deficit Push-Up
Adjust the difficulty of Deficit Push-Up
How to make Deficit Push-Up harder?
How to make Deficit Push-Up easier?
How to make Deficit Push-Up harder?
To make Deficit Push-Up harder:
-
Increase the deficit gradually while preserving the same shoulder and body control.
-
Pause for two to three seconds in the bottom position before pressing upward.
-
Use a four-to-six-second lowering phase on every repetition.
-
Elevate your feet approximately to parallette-handle height to create a more horizontal body position.
-
Raise your feet above the handles to perform a decline Deficit Push-Up.
-
Wear a securely fitted weighted vest while maintaining the same range of motion.
How to make Deficit Push-Up easier?
To make Deficit Push-Up easier:
-
Return to Regular Push-Ups on the floor until you can maintain a controlled body line.
-
Limit the deficit to a small distance below hand level and increase it gradually.
-
Use lower parallettes so less additional depth is available.
-
Perform the exercise from your knees while maintaining a straight line from your knees to your shoulders.
-
Perform controlled Deficit Push-Up negatives and place your knees down before returning to the top.
-
Use Incline Push-Ups on a stable elevated surface when a full bodyweight push-up is not yet manageable.
