
Freestanding Handstand Toe Float Drill
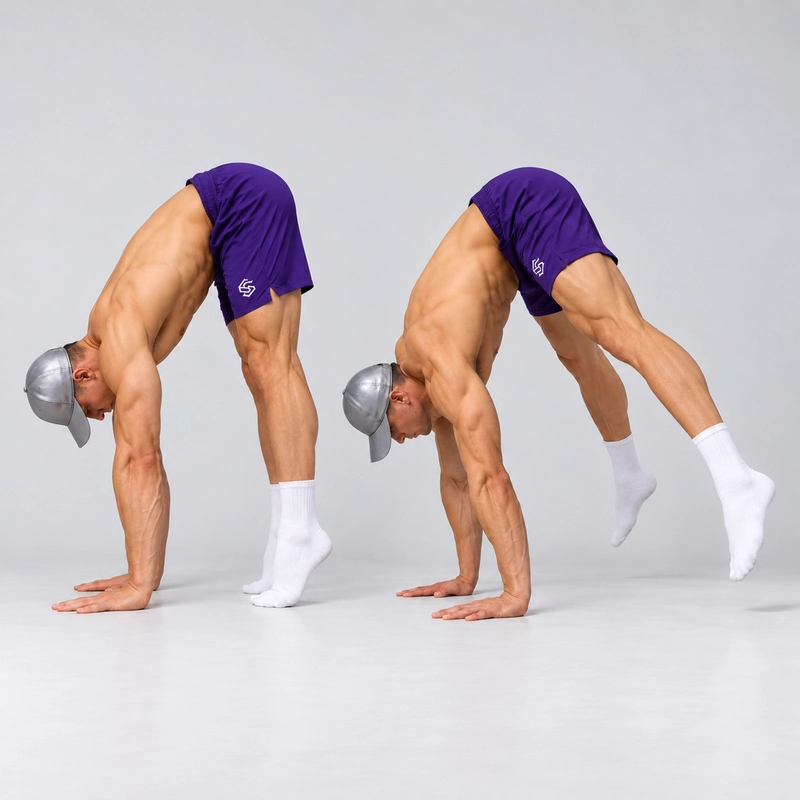
How to do Freestanding Handstand Toe Float Drill?
What is the Freestanding Handstand Toe Float Drill?
The Freestanding Handstand Toe Float Drill practises a small but important part of a floor straddle press: transferring your support from hands and feet to hands alone. Start folded forward in a comfortable straddle, with both palms and both feet on the floor. Keep your elbows and knees straight, push actively through your shoulders and shift your body until both feet become light enough to float. Pause briefly, then place both feet back on the floor under control.
In this variation, “toe float” means both entire feet leave the floor. Simply raising your heels while your toes stay down does not complete the drill. “Freestanding” means the hover has no wall or other support; you do not need to start in a vertical handstand or press all the way to one.
This is a partial entry drill for the Press to Handstand. That exercise continues from the folded start to a full overhead balance. Here, the useful result is a smooth takeoff and a quiet return. Keep the range small enough that you can control both. A higher leg lift is not automatically a better repetition.
It also differs from the Freestanding Handstand, which focuses on balancing in the vertical position, and from toe pulls performed in a Chest-to-Wall Handstand, where the athlete starts upright against a wall. A toe float from a standing straddle works on the start of a press, rather than the release of wall contact.
Seated Straddle Compression Lifts have a different task: the hips stay on the floor while the legs lift. In a toe float, the hips are already raised and the hands briefly support the whole body. The related Seated Double-Leg Pike Lifts can give you separate practice keeping the legs straight while lifting them, but they do not reproduce the balance and hand loading of this drill. Feet-Elevated Straddle Press to Handstand changes the starting height and aims for a complete press; this page uses a floor start and a short hover.
For a broader coaching explanation of arm drive, hip lift and controlled lift practice, see GMB’s press handstand guide. Its progressions cover several entry methods. For the toe float described here, keep the takeoff slow and exclude jumping.
What this drill develops
The drill gives you repeated practice making your feet light while keeping active, straight-arm support. You coordinate the forward transfer of your body, a high folded hip position and control through the palms. At the hover, the hands become your only contact with the floor. On the return, you reverse that transfer without dropping your feet or letting your shoulders collapse.
The body shape matters. If your hips remain low and far behind the hands, pushing harder may only increase effort without producing a controlled lift. A comfortable fold helps you bring more of your body towards the hand support. Use the straddle width and hand placement you can control; there is no universal width or shoulder-over-wrist position that guarantees a float.
A study of straight-arm presses in male gymnasts reported differences in toe-off body shape and joint moments between skill groups. It concerns complete presses, not this partial drill, so it provides context for coordinating shape and support rather than a tested toe-float training prescription.
A small float is useful feedback about takeoff control. It does not establish that you can balance a full handstand or complete a press. Treat those as later skills with their own entry, balance and exit requirements.
Setup and readiness
- Surface: use a firm, level, non-slip floor with enough clear space around your hands. Avoid a loose mat that moves beneath the palms.
- Hands: place your palms approximately shoulder-width apart between or slightly ahead of the feet. Spread the fingers and use an orientation that lets you load the wrists comfortably.
- Feet: choose a comfortable straddle with the knees straight. Keep both feet on the floor for the start. A full split is unnecessary.
- Hips: fold from the hips and raise the pelvis. Start from a position in which you can plant both palms and gradually add hand load without forcing the fold.
- Shoulders: push the floor away and maintain active support. Keep the elbows naturally straight without forcing them past your available range.
- Space: clear the area in front and to the sides so you can return the feet or use a practised exit if you move beyond the planned hover.
Prepare the wrists with gradually loaded palm positions, such as those in the Wrist Warm-Up Routine. Warm-up work does not make an uncomfortable loading position acceptable: reduce the lean or stop if you cannot support it comfortably.
You should first be able to hold a folded straddle with planted palms, keep active straight arms during a small weight transfer and return the feet deliberately. You do not need a complete press or a long freestanding handstand before practising a tiny float. However, you do need a plan for returning to the floor. Stay with feet-grounded leans if you cannot control the return, and learn an appropriate exit before increasing the lift.
Handstand Factory’s public bail-training overview describes graded practice for a cartwheel exit. Learn exits progressively and with suitable instruction; do not first attempt an unfamiliar exit when a float unexpectedly rises too far.
If overhead support is a separate limitation, the Pike Hold on a Plyo Box offers straight-arm practice while the feet remain supported. It is a preparation with different geometry, not a completed toe float. The main version on this page needs no box or other equipment.
How to do the Freestanding Handstand Toe Float Drill
- Establish the floor start. Stand in a comfortable straddle, fold forward and plant both palms. Keep the knees straight and the hips high. Settle your weight with both feet still touching the floor; do not use a bouncing start.
- Create active hand support. Spread your fingers, press through the palms and push the floor away. Keep the elbows straight. Let the shoulder position adjust as you fold and load the hands, without shrugging into a collapsed or uncomfortable position.
- Transfer support smoothly. Move your body towards the hand support in a small, controlled lean while keeping the hips raised. Your heels may rise as the feet become lighter, but avoid an ankle spring, knee bend or push-off. The change should feel like progressively unloading the feet.
- Float both feet together. Continue only far enough for both toes and heels to clear the floor. Keep the legs in the straddle and the knees straight. Aim for a visible small gap, not a dramatic lift. If one foot kicks up while the other pushes off, reset and reduce the attempt.
- Briefly control the hover. Keep your hands fixed, elbows straight and shoulders active. A brief pause is enough to distinguish a controlled float from a hop. Around one to two seconds can be a practice target when you can maintain control, but it is not a compulsory beginner benchmark.
- Return quietly. Reverse the transfer just enough to bring both feet back to the floor. Keep pressing through the hands while the toes settle. Avoid dropping the pelvis, bending the elbows or landing heavily.
- Reset before the next attempt. Re-establish stable foot contact, breathing and hand support. End the set when you need momentum, extra hand steps or a rushed landing to continue.
What counts as a repetition?
Count one cycle when you start with both feet settled on the floor, lift both entire feet clear without jumping, show a recognisable brief hover and return both feet under control. Keep the hands in the same place and the elbows and knees straight throughout. You do not need to bring the legs together or finish vertically.
Do not count heel raises with grounded toes, one-foot kick-ups, bent-arm attempts, hand walking or hops as the main version. Those change the task. A bent-knee regression can be useful, but label it separately rather than recording it as the straight-leg floor drill.
Technique cues and common mistakes
“Make the feet light before lifting them”
If you try to yank the feet up before establishing hand support, you may jump or lose the fold. Start with a slow transfer and notice when toe pressure reduces. A small, controlled release is more useful than a larger lift produced by momentum.
Keep the hips high without forcing the fold
Low hips can turn the attempt into a long forward lean with the feet still heavy. Recheck your starting fold and straddle before adding more lean. If you cannot place the palms comfortably with straight knees, use a labelled regression rather than forcing a deeper stretch under load.
Do not chase one exact shoulder position
Some forward shoulder travel may be needed as the body transfers towards the hands. Keep it gradual and within your ability to return. Avoid both extremes: refusing any useful lean, or throwing the shoulders forward and relying on a hurried landing to recover.
Use the hands without gripping rigidly
Maintain contact through the palms and fingers so you can make small pressure adjustments. Do not let the base of the hand peel up as you shift. Finger pressure contributes to control, but it does not replace active shoulders or a workable starting shape.
Own the descent
A loud landing often means the hover exceeded your available control. Reduce the height or duration and keep supporting yourself as the feet return. If the elbows bend or the shoulders sink on the way down, return to a feet-grounded transfer and rebuild the movement there.
Separate wrist comfort from effort
The drill places substantial support through the hands. A difficult effort is not a reason to ignore wrist discomfort, tingling or loss of stable palm contact. Adjust the setup, shorten the lean or stop the attempt when loading is not comfortable.
How to practise and progress
Use this as focused skill practice while you are fresh. A conservative starting example is three to five sets of one to three deliberate float-and-return cycles, with roughly 90–120 seconds between sets or longer if needed to restore control. These are coaching suggestions, not research-tested requirements for this drill. Start with fewer attempts if your hand loading is new.
Track the quality of the start, whether both feet clear together and how quietly you can land. A side or front-oblique video can reveal heel-only attempts and unnoticed knee bends. Keep the surface, hand placement and straddle reasonably consistent when comparing sessions.
If you cannot yet float, practise the same folded start with the feet staying grounded. Transfer a little more support to the hands and return before control deteriorates. A deliberately bent-knee version or a qualified spotter can make the task accessible, but keep those results separate from the main drill.
Once the small hover and return are repeatable, add a little pause time or a slightly higher partial lift while preserving the same controlled landing. Progress to a complete floor press only when you can manage the larger range and the unsupported finish. Changing hand placement or straddle width is a setup experiment, not an automatic difficulty upgrade.
Stop a set when takeoffs become jumps, one foot repeatedly leads, elbows bend, the hands move or landings become uncontrolled. Practising more tired attempts can make it harder to judge whether the technique is improving.
Frequently asked questions
Do I have to reach a full handstand?
No. The intended finish is a brief low hover followed by a controlled return to the folded floor start. A full press is a separate progression.
Do my heels need to stay down until takeoff?
No. The heels may lift as support transfers to the hands. Avoid springing off the toes. The repetition only reaches its float phase when both complete feet are clear of the floor.
Can I bend my knees?
You can use a bent-knee regression, but the main version keeps the knees straight in a comfortable straddle. Record which version you practise so that progress remains meaningful.
Is this the same as a tuck planche?
No. This drill starts in a high, folded straddle with straight knees and aims to practise a press takeoff. A tuck planche uses a different body shape and support task.
Why can I lift only one foot?
You may be shifting asymmetrically, using one foot to push or approaching the limits of your available fold and support. Check the start, reduce the lean and look for equally light toe contact before trying a bilateral lift. One-foot clearance does not count as the main repetition.
Will a toe float guarantee a press to handstand?
No. It practises the initial unsupported moment. A complete press also requires control through the ascent, overhead support, balance and a reliable exit.
Tips for the proper execution of Freestanding Handstand Toe Float Drill
Start with both feet settled on the floor. A bouncing start can hide a jump behind an apparently smooth float.
Use a comfortable straddle that lets you plant the palms and keep the knees straight. You do not need a full split.
Keep the hips raised and fold from the hips. Check your starting shape before compensating with a larger forward lean.
Push actively through straight arms before making the feet light. Maintain that support throughout the return.
Let toe pressure reduce gradually. Avoid an ankle spring, bent-knee push-off or a kick from one leg.
Both toes and heels must clear the floor. Heel lifting with grounded toes is a preparation, not a completed float.
Choose a small hover you can reverse. Extra height is useful only when the landing stays controlled.
Keep the palms planted and use small finger-pressure adjustments. Moving the hands changes the repetition standard.
Set both feet down quietly with the knees still straight. Reset fully before the next attempt.
Practise a reliable return and appropriate exit before increasing the lift. Stay with grounded leans if you cannot recover deliberately.
Muscles worked when doing Freestanding Handstand Toe Float Drill
The Freestanding Handstand Toe Float Drill combines straight-arm shoulder support with control of a folded straddle. This muscle description explains the movement; it is not an exercise-specific measurement of muscle activation.
- Shoulder support: the deltoids and muscles controlling the shoulder blades, including the trapezius and serratus anterior, help maintain active support as body weight transfers onto the hands. The exact demand changes with the body shape and lean.
- Elbow stability: the triceps help maintain straight elbows while the body briefly becomes supported by the hands alone. There is no deliberate elbow-bending repetition.
- Trunk control: the abdominal and oblique muscles help coordinate the torso and pelvis so the fold and return remain controlled.
- Leg position and compression: the hip flexors contribute to controlling the legs relative to the pelvis, while the quadriceps help maintain straight knees. The straddle is maintained within the athlete’s available hip range.
- Hand and wrist control: the forearm and hand muscles help maintain contact and regulate pressure through the palms and fingers.
The shoulders and arms support the body while the legs move through a small range. Avoid treating this drill as a substitute for a full press, a handstand hold or a seated compression exercise; each asks for a different combination of position, support and control.
Primary Muscle(s):

Anterior delt

Trapezius
Secondary Muscle(s):

Triceps

Abdominal

Oblique
Equipment needed for Freestanding Handstand Toe Float Drill
No equipment needed for this exercise.
Adjust the difficulty of Freestanding Handstand Toe Float Drill
Adjust how much support transfers to the hands and how far the feet leave the floor. Keep changes small enough to preserve a no-jump takeoff and a deliberate return. Bent-knee or assisted versions are regressions with their own standards; record them separately from the straight-leg bilateral floor float. Longer or higher floats are progressions only when the landing remains controlled.
How to make Freestanding Handstand Toe Float Drill harder?
How to make Freestanding Handstand Toe Float Drill easier?
How to make Freestanding Handstand Toe Float Drill harder?
To make Freestanding Handstand Toe Float Drill harder:
-
Extend the brief hover slightly while keeping both feet clear, the elbows and knees straight and the hands fixed. Increase duration only when you can still return quietly.
-
Raise the feet a little higher during a partial press, then reverse the movement deliberately. Keep the lift within a range from which you can return or use your practised exit.
-
Slow the lift and return while keeping the same small range. Show gradual unloading and reloading of the feet rather than adding momentum or repeating rapid taps.
-
Progress to a full floor Straddle Press to Handstand when you can control the ascent, unsupported overhead finish and exit. Treat this as a separate exercise rather than counting it against the toe-float standard.
How to make Freestanding Handstand Toe Float Drill easier?
To make Freestanding Handstand Toe Float Drill easier:
-
Keep both feet on the floor and practise small weight transfers from the folded straddle. Reduce toe pressure, then return before either foot lifts. Maintain active straight arms without using a jump.
-
Use a deliberately bent-knee regression if straight-leg folding prevents a comfortable setup. Keep the elbows straight and float only through a controllable range. Label and record this as the bent-knee version.
-
Practise with a qualified spotter who can provide light, planned assistance at the pelvis and help control the return. Agree on the assistance and exit before starting; do not rely on someone grabbing the feet after balance is lost.
